Description
About This Video
Transcript
Read Full Transcript
Hi, today we're going to explore some fundamental work on the reformer. Um, I think that it's important for all of us as movers, teachers, students of [inaudible] to remember that however advanced you get in your practice, it's always beneficial and also wise to return from time to time to the basics. So we'll start lying on our backs. I've got my spring setup for foot work with three red springs, so lying on our backs, arms stretched long along sides, our bodies. Let's just take a moment to close. As our eyes, feet are resting on the foot bar.
The pelvis is dropped into a neutral position with the pubic bone and the two hip bones on a horizontal plane. Feel above that, that the back of the ribs are heavy on the mat. The shoulders lie flat as the arm stretch forward and the neck is long and free of tension. Place the hands on the ribs just on either sides of the ribs and take a deep breath in. As you inhale, feel the ribs expand outwards into your hands. The abdominals are able then to drug downwards towards the bed of the reformer.
And as you exhale, feel the rib slide down the front of the body and towards one another, effectively engaging through the front of the waist. Just take a few more breasts like that. Inhale, filling up the lungs, ribs, expand to the outsides, dominoes drop heavily, and then we're ready to deepen that abdominal contraction or that abdominal area. As we exhale, letting all the air out of the body and feel the backsides of the rib cage. Settle just a little heavier into the mat. One more time like that. Inhale, filling up the lungs. Using this moment also to just bring your awareness into your body.
Exhaling to feel the ribs slide together. Bring your awareness to your mind and connect your mind and your body together. Allow now for the arms once again to rest alongside the body. Inhale to prepare. As we exhale, we're going to tilt the tailbone under, flattening the lower spine into the reformer, so feel there that that action is pure abdominals. The legs don't have to work at all.
Inhale as we allow the tailbone to drop down in back, creating just a small space in the lower spine. Exhale. We'll do that twice more. Using the breath, drawing energy inwards and allowing the lower spine just to respond and flatten. Inhale, allow the pelvis to reach backwards. XO. Once again, we flatten the spine from here. Let's take another inhale and then exhale. Continue.
But this time starting to lift the pelvis off the, so now we have to use the legs just a little bit. We roll the spine upwards, keeping the ribs just below the hip. Pubic bone in healing at the top. Exhale, starting from the breastbone. Let the body just ripple back down into the reformer, creating space between the bony landmarks of the Vertebras, rounding through the lower spine and finally drawing the pelvis all the way down. But the feet this far away from us, we're not going to get a lot of height in our pelvic crow, which is just fine. XL flattening through this spine, tilting the pelvis under. Feel the pelvis lift. As the pelvis begins to lift the ribs, starts to drop backwards towards the reformer and don't really lift very high off the reformer at all in Hilton poss and exa breastbone first ribs, the bones of the lower spine, and finally the pelvis coming down, bringing our awareness to our breath.
Inhale, exhale, flattening through the spine, allowing the pelvis starts to travel up. Words keep leading them movement with the pubic bone as the front of the rib bones stay fairly close to the mat in healing. To pause here and exhale, breastbone ribbons feel as you pass through your middle back that the shoulders are still heavy and flat on the Mat. Release the spine all the way down. Set the feet together on the bar. We're going to head into some spine twist. Just take the arms a little wider and turn the palms to face up.
On the inhale, we'll tilt the knees in my direction, keeping the knees stacked, so the one foot we'll have to leave the foot bar as we exhale, feel the rib bone that has lifted off the mat. Slide back towards the center of the spine. Starting the movement back to center. Inhale, as we rotate in the opposite direction, knees line up. Opposite shoulder is our anchor. Exhale, the ribs slide in towards the center of the spine. We feel the obliques connect and the pelvis drops back into the mat.
Inhale as we reach over and exhale, drawing back against the spine with the abdomen, bringing the knees back up. Riding inhales. We reach over. Exhale as we slide the ribs back. Feel that the waist is what's doing the work. You're doing the movement. Maybe do that one more time to eat side. Just a gentle rocking backwards, a gentle rotational movement of the spine. Exhale to come back. Inhale to reach across and XL to come back.
Slides yourself just slightly away from the shoulder blocks, giving yourself
Uh, we exhale to lower the body down again. Inhale, exhale. We reach up, ringing out the breath, placing the ribs down. Trying to maintain a neutral position in the spine. Release down in the pelvis is a better way to say that. So as I left, my spine is no longer in neutral, but my pelvis is endeavoring to be. If however, you're not able to flatten your lower spy, then it's possible that you'll want to buy us towards a little bit of a Tuck in the pelvis just to get that lower spine to flatten into the mat, lifting the arms and lowering the body. One more time. We're going to hold it at the top. So we exhale and lift in kneeling to pause. Exhale, just float the left thigh, keeping everything else still inhale. Allow that leg to come back to the bar.
Exhale, float the right leg up here. If you feel like you're experiencing challenge in your neck, you could always reach back in. Great. Place your hands behind your head. Exhale to lift. Makes the work in the abdominals just a little bit harder because the gravity is a little bit heavier here. Exhale, right, like lifts. So as we're moving through this exercise, gaze down at the center of your body without jamming the CIM into the chest and see the abdominal muscles sink.
Imagine that you have a pulley system that initially originates right underneath the ribs and that ribs dropping down lifts the leg and space. The leg itself is very, very light. One more please. Xcel to lift as you've changed legs, notice that you're keeping your pelvis as still as you possibly can. Exhale to lift the right way in here. The right leg comes down. Reach the arms forward, lift the arms to the ceiling and place the head and chest down.
Any help. Prepare. Exhale to lift. This time we're going to take the hands and wrap them around the back sides of the thighs. Come up just a little higher still and then take one hand right on top of the other hand, making a pointer with the hands. Inhale as you reach across one thighbone. Excellent. As you come back, try not to allow the arms to go down in orientation to the legs, so it's as though there's a line across the thighs just over the knees and we're tracing that line in. He as we reach across and exhale as we come back again, noticing the stillness and stability of the pelvis. Exhale to come back.
Inhale to reach over. Xcel to come back. One more. Reaching over. Exhale to come back last time. Reaching over. Exhale to come back. Separating the arms, lifting the arms and lowering the body. Yeah, bringing the arms down, lifting ourselves up. We're going to put the foot bar up in. Prepare for foot work.
Everything else in the body is calm and easy. Last one coming all the way in. I'm going to move to the toes. Toes or separate about as wide as your sitting bones. Press the carriage. Yeah, holding there. The heels here are lifted up. We have good, strong, solid ankle alignment. We're going to keep the feet still as we bend the knees to come in, so as we stretch out, we have a nice pointed foot and then that foot stays nice and still as the carriage comes back to the stopper and reach out and bend.
So using the breath, exhaling and inhaling to come back to create a rhythm for the movement. Every so often reinvestigate your pelvic position. Re-Investigate if there's tension being held in the fingers and the neck in the jaw perhaps, and try to let go of any unnecessary tension in your body. We'll do just a few more here. So as a leg straight and keep the knees just in front of the ankles instead of allowing them to bow behind the very common practice, the hypercare very common thing.
So I guess it's not something you want to practice, but the hyper extending of the knees. So it's important to just notice that the ankle stay right in front of the knees. The knees stay right in front of the ankles last time here and we bend and come all the way back in. From there, bringing the heels together, Small v position, tailbone anchored, wrapping through the hips and bending. Feel that there's a energy through the heels all the way through the hidden seams of the legs to the groin. As the legs are being straightened, that energy continues as the knees separated and bent. So it's as though even as they come apart, they're still trying to draw together.
The heels are squeezing together firmly all the time to help you remind yourself of that. In our leg connection, the hips are rotating in the hip joints in an outward direction. We'll do three more here. The ribs are settling down with every exhale and the pelvis is still and we bend and come all the way back. Taking the heels now to the outsides of the bar, flexing the feats. We have that nice flat foot. Again, draw inwards as though you're trying to slide the legs together on the bar and then stretch the legs out from there and bet stretcher as the knees been creating more length through the spine, out through the top of the head.
Reach out
And Ben Moving
It says though the legs are trying to draw together without actually moving at all. So they're very separate. There's just energy. They're like they're powerful. Magnets on the insides of both legs reaching for one another. We'll do about three more here. Again, looking for tension, getting rid of excess
So it's like you're pulling taffy from the two long ends of your legs through the heels all the way up to the trush and the lift and down, looking for a full range of motion in that foot. Full range of movement, ease of practice, backsides of ribs settling down.
So the leg that's been knee, that foot pushes into the bar right in the center of the big toe. Let we find center and Change, creating a rhythmic movement. So up and then down, up and then down in here and in here and exhale. So we breathe. Long breaths feeling that nice stretch to the calf. As the heel drops under, do about two more on each side. I think we have one more to go to be even.
So let's finish off on that other side. Lift the heels up, then the knees in. Roll to your side. Place your hand on your shoulder block. Help yourself up to city. I'm gonna take my springs down just to two reds and come back down for some single leg work. So starting on the left heel, take the right leg, just lift it up. So it's just over the top of the pelvis on that side. Check that the pelvis is level and still, and then we just stretch out with that left leg and bend as the left leg moves the right legs. Very still just being held in space, not letting it drift forward or back there.
Just the awareness of that position. So we stretcher and we drag in one more time. Stretcher and drag in. Place the right heel on the bar. Lift the left foot. Exhale as we press through that right lay all the way to straight and bend.
I get noticed. The straight position is where the knee is supported by the quadriceps and the hamstrings and isn't bowing behind the ankle joint. Notice it as that leg is pressing that the back sides of the pelvis have equal weight on both sides. We'll take this four more times, reach and then there's plenty of time bringing awareness to the breath. Bringing awareness to the ease of movement, awareness to the ease and the arms, the heaviness of the shoulders coming all the way back.
Now place the left toes on the bar, lift the right leg back up. And from here pressing out. Same as the double leg position where the leg is straight, the foot is lifted, and then we bend and hold that heel nice and still feel that the inner thighs, even though they're separate from one another, always consciously drawing towards one another. The abdominals are working,
Here's two and bat. Here's one and band.
I know I have definitely differences from side to side. I think it's an interesting inquiry. Just you know, bodies and our own practice to notice last two and the last one. Once again, placing both feet on the bar, turning to the side, hand on the shoulder block, helping ourselves up. So I'm gonna go to a red spring and a blue spring and we're going to go into some arm work slash abdominal work. We're going to do the arms supine series, so we lie all the way down.
Taking a hold of the straps in our hands. I forgot to check my straps before I lay down. That was not a good idea. So I've just checked them. Now we're ready to go. So keeping the feet on the foot bar, bring the arms so that they're just over the shoulders and slide the shoulder blades downwards towards the pelvis. Once you're certain that you have a nice strong shoulder position, then lift one leg followed by the other legs are just going to stay in table top. So from here that spine stays down.
We're going to press from the breastbone, the breast one's going to drop, and with that the arms move down towards the Mat. This can also be done on a lighter spring. It's quite nice on a lighter spray resist from the same place. So I'm not thinking about pushing with my hands. I'm thinking about sliding my chest and my ribs down and allowing my arms to follow through. With that action inhale up.
That personally allows me to get a great deal of abdominal work. In addition to that, one could focus on generating a little inward energy with the thigh bones as though they're pressing up against a wall or coming towards you using the breath. Exhale, and to take the arms down and in healing to lift the arms up, we're going to segue into the second movement at the bottom. Turn the palms to face the hips in your feel the breath expanding as the arms expand. Exhale, slide the arms back down in here. We expand out as the arms reach out and we XL to press the air out of the body. Inhale to reach out and exhale to press down.
Feel that all the time, the backsides of the ribs are very heavy and they, that's where we put our focus. When we move our arms to our sides. We'll do about four more here in healing, reaching out and exhale, sliding back. Inhale, reaching a and so sliding back. Last two, continue to put your awareness in your focus, not just in your arms but all the way through the center of the body. Now turn the palms down, lift the arms over the shoulders.
Keep the carriage very still hair. As we reach out to the sides and we pull down, rotate the palms down. Inhale, the arms come over the shoulders, the carriage stays, stills. We reach out and we exhale to bring the arms down. We'll do about six lift, open and press lift. Keeping the shoulder blade still is a big part of keeping the carriage. Sta you feel your carriage move. You may have gone too far back with your arms.
So you one spring tension against the straps all the time. Last one here and now we take the m's of why keeping the carriage so it's a little trickier in this direction. And then you press down to our sides, rotating the palms in the arms, reach out the shoulder blade, stay flat and still as we bring the arms over the top and down, if you feel that your low back is starting to get tired or your legs are getting tired, you could just drop the lower legs from the knees so you're not having to hold the weight of your shins up. That may enable you to feel even more. Work in the center of your body. Last two and press one more and press holding here. Bending the arms next to the body.
The upper arms here are quite close to the ribs. Shoulder blades are down and the elbows are hovering off the mat. From there. We're just going to stretch the and bend all the while keeping those elbows nice and tight towards the body, keeping the upper arm still so they just hover off the reformer. And as you're straightening your arms, generating work through the back of the body, through the shoulder stabilizers and also through the front of the body around the sternum and the ribs. And what I mean by that is we just said conscious effort of relaxing the sternum and the ribs down. We'll do four more here.
Feel the neck length and backwards as the arms reach forwards. Last two and one more. Lift the arm straight up over the shoulders. Place the feet down on the foot bar and come all the way in. We're going to scoot away from the shoulder blocks just a little bit and do the a hundred prep. So we start once again with the arms just over the shoulders.
The legs lift up. We're gonna end here. We did this earlier with no spring tension. Now we're going to add a little weight. As we exhale, we're going to press the chest forward, reaching past the hips in heel, starting the lift of the arms and bringing the head down. Exhale, we progress forward. Pausing there, wringing out the breath. Inhale, we lift and return. Exhale, and to lift. Reach forward. Inhale to lift the arms and return the head back.
We'll do three more. Reaching up. Press the arms past the hits. See the spine stable. See the pelvis stable last to lifting up and reaching back. And one more. Lifting up and reaching back. Placing the feet down. We're going to take the feet into the straps now.
So you put your feet on the foot bar, you press out. One leg stays on the foot bar while the other leg comes into the strap. The leg in the strap then gets to push forward so that we can bring the opposite leg into the strap. Starting with the heels together, the toes apart. Bend the knees into a frog position only so far that you're able to maintain that nice, neutral pelvic position. And from there we're gonna stretch the legs up and bend the knees in.
So we feel again, strong connection with the heels. Just watching the legs as they move straight out in front of us. Rapping through the outer of outer portions of the hips and feeling the inner thighs strong.
Feel the thigh bones. The femur is rotated in the hips as the legs come together and touch at the top and then exhale to press the legs away. In here. The legs come around rotating in the femurs. The heels come together at the top and we exhale to press down. Inhale as we rotate in, reach again, bringing your awareness to the smoothness of the movement in both legs.
Does one leg want to travel wider? Does one hip wanna lift off the reformer? All internal dialogue questions that you could be asking yourself. We'll just do two more here. Reaching around and touching right in the center and down.
Make sure that the legs come all the way together and touch before they press down again. And then we're gonna reverse that. We'll lift the legs up, keep the pelvis down open, press the legs down and together they touched together at the bottom and they travel back up through center. Separate reach down and together an inhale as we lift back up, separate down and together. Just mobilizing through the hip joint. Consciously thinking about this spiraling open of the hips. Just do two more here.
I'll do three more here. Just bringing awareness to the center of the body all the time. Inhale to open x out. Suppress. One more time. Inhaling to open
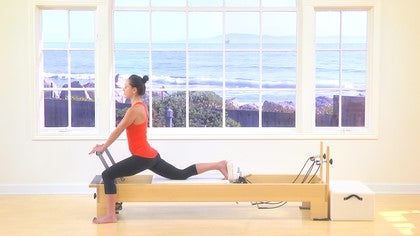
The straps can come back onto the hooks and we'll turn and help ourselves up and gestures spring. So you have one red spring connected standing up, stepping to the outside of the reformer. Place the foot, one of your feet on against the shoulder block and your knee on the reformer bed. Hands on the foot bar. We're going to bend the front knee and take that back like back. So in this position, notice that the shoulders are over the pelvis so we don't want to let the leg get behind the body. That's not true. The leg is slightly behind the body. What do I want to say? We don't want the pelvis to get behind the shoulders.
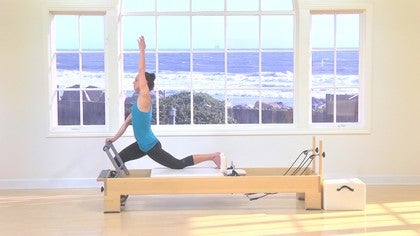
Let me just drop down into that stretch in opposition to the backward motion of the leg. Lift up through the abdominals and through the chest, which will increase your stretch. We're going to tilt the tailbone up and start to stretch the front leg long. Now we're just moving into the hamstring stretch here. Breathing in and out, holding each position for a few breaths. Then as we bend the front knee, now the pelvis biases towards that, a tucked position or the pubic bone reaches up the front of the body. Chest is lifted and proud. Pausing here, breathing into the stretch and as we go into the hamstring stretch, the spine is reaching towards an arched position as we reach out through the spine, squaring the hips, keeping the head in line with this spine, taking a few nice deep breaths. And then once again, Ben, that front knee, bring yourself upright as your carriage comes all the way back and step off to walk to the other side.
So now we have the opposite foot against the shoulder. Block, the opposite leg on the ground. They press the carriage back and lift the spy again, just feeling the alignment, the pelvis, the ribs, the shoulders, all fairly upright pubic bone. Drawing forward as the five on bone draws back holding with our breath and I tilt the tailbone back or it's to start to stretch that front leg towards straight holding the stability of the pelvis breathing. When I bend the knee again, draw the pubic bone up the front of the body. Come back into that upright standing position and gree.
Good idea to sit with your stretches for a little bit. Give the body a chance to respond to what you're asking of it. Yeah, and again, tailbone tilts up in back. The leg starts to straighten spine as long you breathe in and out. And then we bend that outside knee and we bring the carriage all the way back in. Let me step down.
I'm going to change my spring too, a blue or a light spring and turn around for a single leg reverse knee stretch. So bringing awareness to the shoulder girdle, to the spine, into the abdominals. One knee on the reformer, both hands on the carriage looking down, leveling the pelvis, round the spine. Stay connected to both legs, so we don't want to just rest on the reformer one to stay standing on the leg that's on the floor as well and from there we draw in on the abdominals and the carriage comes underneath us, underneath us and we reach back and XL draw in on the abdominals and float the carriage underneath us. Feel as the carriage is coming under as though you're not pushing down in your knee, but instead trying to float the knee up towards the top of the shoulder block and giving us just a moment each time to hold and deepen.
Notice that once we set the spine in position, nothing else changes. We stay very still. We'll just do one more. Exhaling under and coming all the way back. Step down, walk around to the other side. I'm bringing the knee onto her up against the shoulder block. Well, essentially the legs are lined up with one another.
My outside hand in front of my inside hand drawing and creating that nice rounded spine, watching the line of the pelvis and inhale. Exhale. It's not about pushing the leg, it's about feeling that the spine is curling even more so than the leg just responds. It floats. Yeah. And he'll release excellent draw in enough to like floats in and inhale, release. So we generate awareness through the center of the body to create the movement in the carriage and he'll release. Exhale to pour in here.
I really want to do three more. Giving yourself just a moment each time to look for a little depth in that and to
Ilan getting the back into a long straight position and drawing the rib bones in and out. Take the legs back as we inhale and then exhale, resist the pull of the springs. And draw on with the abdominal. So we're reaching in a long flat spine here. Any other weight is heavy on the heel. Let the toes be very light. As the legs come underneath you, feel the head reach towards the bar on the shoulder blades. Reach back away from the bar.
There's almost a sense of opposition in the shoulder girdle in the neck, pulling the carriage underneath. Draw deeply in through the waist in Hilti. Reach back and then exhale to pull forward
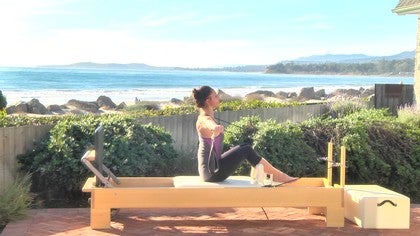
I'm using the box because I'm going to segue into it in a minute. Be careful as you get up onto the box, it's a fairly light spring. You just want to make sure that you're safe. You can just going to sit up on the box, feet resting on the better. If the reformer hands coming back behind the head.
From here as we inhale, we're going to stretch the out and over in one direction, feeling that one side of the body elongate. Exhale, drawing that side, the elongated side back to center in. We reach over, stretching out through that side body and exhale we dry and connecting into those muscles that we felt stretching. So as we stretch over we get a nice side body bleak stretch and as we come back and see obliques on that side, that bring us back to home all the while, not just thinking about this side of the body working, but the body front to back, right? The back extensors are long. They assist in this movement. The abdominals are drawn in and back to support and protect the spine. Let's do that a couple more times.
Reaching over and coming back and reaching over and coming back. Just one more like that. Inhaling over and exhaling back. Continuing to keep the hands where they are, pressing the head against the hands and feeling that the elbows are in your periphery so that there's no tension in the shoulders. We're going to rotate this by now. Paying close attention to the weight that's on each of the sitting bones. Inhale. As we come back, exhale, we feel the weight consistent on the hips as we announced.
Lift and stretch to the other side and inhale to come back rising through the spine. Exhale, drawing and in back through the waist. Inhale to center. Exhale, feel. I like to lift up with my arms on my head. Creating a sense of axial elongation through my whole spine. We rotate in lift.
It's noticing that the front of the body is where that movement in the back of the body to spinal extensors certainly have a lot to do with rotation of the spine as do the obelisks. They work together. We're going to do one more to each side. Rotate, lifting tall and center, and last one rotating and center. And then let's take the right hand to the outside of the left thigh. Bring the left hand behind you on the box. Use your left hand or your backhand to help you.
Guide yourself more upright and then use both arms to just guide your spine into a gentle twist. Bring the body back to center. Opposite hand comes down the left hand today. Outside of the Rifa, the right arm reaches back on the box. [inaudible] back arm helps us lift both arms. Help us lift and rotate. It's getting a little stretch here.
Come back to center. Step down onto the floor, turn around and get onto the box on your stomach. So I'm positioning my body so that my breastbone is just over the edge of the box. My ribs are on the box and resting. Sliding the hands fairly high up the outside edges of the reformer. Allow the head to just reach down, draw in on the abdominals and just hovering the leg so that the backs of the legs are active. I'm not asking you to lift them off the box, just asking you to feel that they're not resting on the box. From there, we're going to slide the scapula down the shoulder blades down, keeping the arms straight. As that happens, the head lifts and we pull the chest through the arms. The shoulders blades stay reaching downward.
So there's a resistance pattern as the body now reaches all the way down. So let's inhale. Slide the shoulder blades down the back. Allow the head to come above the chest, reach the chest up in through the arms.
Looking for the deepest connection that you can find in your upper back here. And then just reaching back down, putting your hands on the box, stepping off the box.
Then the knees roll down through the spine, keeping the knees bent. Notice if the weight shifts from side to side. Try to stay nice and level on your feet. Has An in here [inaudible] so we pull back up through the waist, keeping the knees soft all the time, allowing the slugs to straight as the spine becomes up right. Reaching the arms up. Oh Wow. In the arms.
Just effortlessly to fall next to the body. Allow the knees to bend. Roll this. Find Down, creating an upward awareness through the center of the body, a supportive energy reaching all the way down in healing to pause and exhaling to lift. That's taking a moment to feel energy that you've created in your body. Thank you for taking class.
Slow Burn: Reformer Workouts
Mention
 |
Meredith Rogers (Teacher) |
 |
Frances K |
 |
Lacey |
 |
Malgorzata S |
|
|
KERRIE |
 |
Susan P |
 |
Laurine F |
 |
Leah M |
 |
Jess Perkins |
|
|
Bev V |
|
|
Suzanne H |
 |
Stacey S |
 |
Sharon Spaziani, Lmt, NCPT |
|
|
Paula S |
|
|
Susan S |
 |
Mary Liz Oliva |
|
|
Marie-Josée Packwood |
 |
Connie M |
 |
Anna L |
|
|
Jeannine B |
Comments


You need to be a subscriber to post a comment.
Please Log In or Create an Account to start your free trial.
