Description
About This Video
Transcript
Read Full Transcript
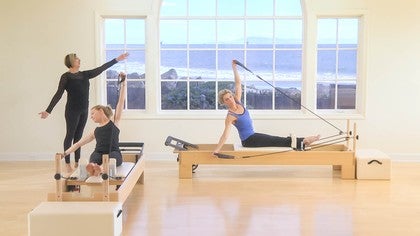
Hello, I'm Rebecca Rotstein and I'm happy to be back here at Palladio's anytime. Today we are going to be doing a reformer class. This is Karen who is one of my buff phone's instructors and I'm excited to work with and we're going to be predominantly using the long box, although we're also going to be integrating some spirals. So Karen, we're going to start off with footwork, but I'm going to have you start on top of the cuboid bone. So I'm going to reposition your feet and the cuboid bone is really in that little pocket of a in front of the heel. So we're going to restore a little lateral arch to begin with them readjusting your feet. But I don't, there'll be a tendency to roll the arches in, which I don't want to do and we're gonna find a little lift through the inner arch or the medial arch as you push out so we can push and return.
So my focus here is not on abdominals. My focus is really just on integrating the legs and the hips and pushing and returning so you can breathe as you like. Typically I like to have people inhale as they push and exhale as they return. Now pause for a second. Wherever you are, see if you could relax your chest a little bit. There we go. So we can deflate the test, take some of the tension out and return back in and push. And let's do a few more here.
So see if you can experience the pressure underneath that outer part of your arch and that's going to help restore and reposition some of the bones of your feet. I have found this to be very, very useful for my feet that have arched challenges and relax. Now let's go onto the balls of the feet and I'd like you to do it with your heels. Just drops today. So see what happens and notice what that experience is after you've just positioned it under the cuboid bone and returning back in and pushing and returning and really focusing on how your thighbone is moving within the socket. Well, let's just do two more here.
And she's doing a really nice job of avoiding tilting her pelvis or moving through her pelvis and just allowing the thigh bones to excursion. Do One more here and return back. And now let's go directly onto the heels and push out and return back in. So I find that when you're on the heels, there's keep going here that there's a really nice connection that is offered into the thigh bones so that it has to do with the relationship of the heel to the hip. But it also has to do with the feedback that you get from the heels. Contact with the bar as well.
And especially watch this as you come back in on the next one. Do it half speed. So five, four, yes, three, two, one. So in that slow ecentric return, so when it's, it's an East centric contraction of your quadriceps, that slow return really allows you to sense the thighbone dropping in the socket and again, push out and once more slowly returning back in. Nice. Now let's remove one foot from the bar. So lift one foot and push away and return back in. And again. So again, you're removing some of the support base here, but also some of the pressure and concentrating it all on the left side for instance. And this time as you come back in and let's extend the opposite knee.
Good and push and return. Good. So it's sort of a piston like action and one knees always straightening while the other knee's always bending. And let's just do one more and return switch feet. Pause for a second, relax your chest. Here we go. So we're getting rid of all the excess, unnecessary tension and push away and return and push and return.
Let's just do two more like that. And you'll notice that when you release the excess tension from the ribs, you're able to also relax the shoulders a little bit. And now we do the piston good and return and push and return. And there is a little connection through the pelvis for sure and too, and one and I will mention that you want to make sure you always straighten that knee fully do one more. You are doing a pretty good job, but I see this with clients and over and over again that they don't fully extend that knee. Let's now go into [inaudible] first position and I want you to lift your heels a little higher at this point, and I'm going to move this foot over just a little bit so that you're actually directly in with the mid line.
Now this for me is a direct connection into the ankles, so I'd like you to push out and return back and it's a really good opportunity. Continue to notice whether you're swerving inward or outward at your ankles and to get a very direct connection in through the inner thighs as well and through your rotators of your hips and [inaudible] and two more here. So it's almost like an elastic band that pulls and slowly returns and once more poles and slowly returns and relax there. Let's go directly into a point and flex position. So we're going to go onto the balls of the feet once more and we're going to work the ankles continuing with some of the theme that we've been doing.
Push away and directly lower your heels here and now lift your heels and lower your heels. So I with you here, I'm watching the tracking of your ankles, of how your knees relate to your hips and as well as relate to the center of your ankles. Now pause here. You're going to take five slow counts to lower down five for your too fast to one. So it's an East centric contraction of those calf muscles and rise up again and slowly lower for five, four, three, two, one and push rise up and slowly lower. So I'm trying to make sure as she's doing this, that her ankles are tracking directly over her second toes between her first and second toes. And last one, five slow four three, two, one. Stay here for a moment. I'm going to show you one of my very favorite stretches.
You're going to bend your knees and I call this the zero gravity point. It's the point where you're almost effortless. You're not using too much effort to push yourself out, but you're basically hanging out through the end range of the joints, but in a safe way. And just stay here, breathe in and out into really great way to get some of the deep muscles through the calves higher up that you don't usually typically access. Can you feel that? It's a really nice one, especially if you've ever had any ankle issues or knee issues and come all the way back home. All right, I'm going to change the springs for you only today and I'm going to have you on your two springs. I'd like you to grab your straps and we're going to do some leg springs, but we're going to do it with a magic circle.
I'm going to place the circle between your ankles, so I can tell right now based on how Karen has been, uh, preempting some of my actions that she likes to turn out, which is fine, but because that's her tendency, I'm going to try and make her work in the opposite direction. So I'm going to make her work a little bit more with her internal rotators and in a parallel position for her abductors because I like to work people in where their area of weaknesses. So let's have you just lower your feet first and let your feet rise back up. [inaudible] so let's see where her end ranges. There we go. And lower your feet down and rides back up. Let's do one more like that, lowering down and see how low you could go.
Pause right there. If you were to go any lower than that, suddenly your feet would be typically you could say behind the in relationship to your head if you were standing, it would be as if your feet were behind you. That's going to put too much load on your back. But I want you to go just to the point where your feet are in line with your head and now let your feet rise back up because in doing so, then we can get a real recruitment your so there and you get the 10 Segretti connection and lowering down and rising back up. We're going to do a couple things that activate the PSOAS and maybe a different way today. Last one, and you're going to see how so as is not the devil that it can actually be your friend if you, if you work with it appropriately. Now this time, let's bring in a little bit of some variation. Let's have you squeeze and release. Lower down, pause, squeeze, release, lower, a little bit more. Squeeze, release and lower. That's our pattern. Squeeze, release and lower squeeze. Release and lower squeeze.
Release. Lower pause right there. No more and reverse. Coming up. Squeeze. Rise up. Squeeze, release, rise, squeeze, release, rise, squeeze, release, rise, squeeze, release, rise. How'd that feel? Good. Good. You're going to do it again. Squeeze. Release. Lower squeeze. Release. Lower. Squeeze. Release. Lower.
You may notice that Karen's actually doing bigger movements now to avoid the repetitions. Squeeze, release, lower last time. Squeeze, release, lower pause. Now, squeeze, release, rise, squeeze, release, rise. Good. Squeeze, release, rise. She's doing a very good job of having that lower abdominal connection so that she doesn't start to move through her pelvis. Two more and last time. Squeeze. Release and rise. Good. Just try this. This always feels really nice. Bend your knees and push straight out in front of you.
Let's just do three of them. Reach and back in so that you really get that full flection at the hip joint. And last time. Okay, lift your feet back up to the ceiling. Now we're going to do what would be like walking, but you have the circle here, so you're going to try walking down.
Lower one foot. Lower the other foot. Good. Lower one foot. Lower the other foot. Now rise up. Whoops. Hold on. We almost lost it. There you go. And lift. And then the other one lifts and she's trying to avoid too much trunk rotation, but getting just a little bit of excursion within the sockets and back up and we're going to remove the circle. That's enough. You can stand up because now we're going to do the long box. Oh, you know what? I'd like you to stay there. I lied. I want you to get a stretch.
Place your feet back in. Yes, it changed my mind. There's one other thing that I wanted to do to release all that. We just worked a, because it can get a little grippy in those inner thighs. So just do a set of say five frogs, bending and straightening. So it should feel rather liberating now that you don't have that annoying circle to hold. And then the last one, I'm going to give you a nice stretch that that has been very helpful for my own hips. And one more. I'm a terrible counters.
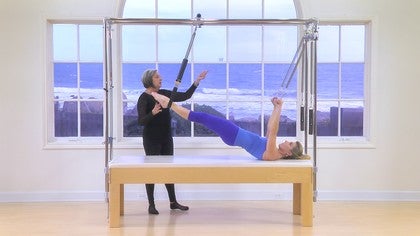
So let's say this last one is five and grab your ropes. So I want you to lift your feet a little bit higher, but you're going to pull your ropes in toward you. So by default, because your feet are glued together, you're pulling the ropes into you, your knees are gonna move away from you, so the knees are moving away from your head while your feet are moving in towards your head. And it gives you a really great bit of feedback here through these external rotators. And you might even feel it through the front of the hips, right through here. So it's also a way to get a little release through that Pectineus, which can be really gnarly on a lot of people right here through the front of the hips. And now you can remove your straps, I promise. And I'm going to set you up here for some long box.
But now I want to start coming into some spine articulation. So in this position I'd like you to do a little pelvic tilt. So start rolling back and rolling forward. Just small. We're going to keep this the range really tiny to begin with and start lowering back and returning up.
She's doing a really nice job at maintaining the distance between her hands in her heart. So it tells me that she's not overworking her biceps to achieve this movement, which I like. And this time I'm going to give you a different cue rather than beginning with the tail. I want you to think of unlocking the lower ribs. So free, yes, free them behind you. If you'd had my hand on Karen's back like I did, you would have felt this sense of breath and expansion in life. Come into your hand. It's really nice. And again, inhale.
So those kidneys are freed and unleashed to go back and returning forward and up. And once more. Good. This last one, stay. Now, open your arms out to the sides. Flip your palms to face the other direction and push and returning back in and rising up. Yes. So that's your sequence. You're going to roll back again. Good. Open your arms out to the sides, flip the palms, push back, and maintain that sense of release. Yes. And returning back in and rising back up. Great. Continue. Yes. And opening your arms out to the sides.
Push straight behind you and returning. So you get a nice bit of rotation through the Scapula as well as through the arm itself. And last time and push. Good. And returning back in and rising up. Nice. So take one more breath in for me right here. Inhale and exhale. That's it. We're going to go straight into polling straps now.
So now that we've warmed up some more of the abdominals, we're ready to go for the back. Again. I'm a big believer in, I'm going to lower this down for you. Sorry. I'm a big believer in uh, quite a bit amount of work for the back and I like to bring it in earlier after the front of the abdomen has been warmed up. Cause really this is, this is the back is the back of the abdomen. This is all technically in anatomy talk. This is the abdomen, even though it's the back part of the body. So I'm going to have you do it a little differently than you might be used to. Karen, I want what I call the boobs on the box. So I want your chest to be actually on the box.
Now obviously if this is a very uncomfortable for you or if if you were very large, I wouldn't have you do that. But I want you to pull back from your elbows. The reason I like this positioning is such that it inhibits the person from going into too much extension in the lower back and in the lower spine. So we're going to start working you out quite a bit from your upper back as you pull back straight from your elbows, grounding through your pubic bones. Stay right there. Now I'm going to get your rotator cuff involved.
I want you to think of the seam of, of what would be a t shirt seam. I want you to squeeze that just a little bit or lift up into that. Yes. Rather than squeeze, let's say lift up into the tee shirt scene. Now keep your elbows at the same height they are and simply extend them behind you. So reach back behind you. Reach, reach, reach. Now pause. Stay right there. Extend those elbows more. Reached through the knuckles. Yes, everybody hold this now lift up just a little bit up. Pause.
So what happened is you went into your lower back, drop your chest just a little bit. And I want yes, the seam of that t-shirt to work. That's your rotator cuff that I'm trying to activate. Now, keep those elbows where they are and let the elbows bend. Yes. And push or I guess it's really a pull and then and pole. And then, and I can see that this is your area of weakness, which is good. I like to work into that. But drop your chest just a little bit. Yes.
So I'm really targeting this and not allowing you to rely on those erector muscles last time. Good. Now straight elbows, lower your hands all the way down by your sides and drop your trunk. Good pull from the side of the wrist as you rise. So straight elbows now to traditional pulling straps. Now drop your chin slightly. Unwrinkled just a little bit of the back of the neck. That's it.
And I'm going to help you out to come just a little bit higher. And that's the rotator cuff of your right shoulder. Lower yourself all the way back down. Yes. And get into a full stretch and palms facing inward and start to pull back [inaudible] so we get a nice organization through that upper back. Look down where just a little bit on wrinkling through the back of the throat and down again.
Last time pulling [inaudible] and I'm going to have you think of your heart just a little bit, but your heart is not down by your ribs. And I want you to think of your heart, the bottom ribs, the heart being a little bit higher up rolling through that area. Yes, and lowering your hands all the way down by your sides. Let's do polling straps to open your arms out to the sides for the tee position and pull in and rise just a little bit, just a little bit. Yes. So you feel the rotation happen within the socket and open your arms out to the sides. And again, I'm going to come onto this side just to give you a little bit of assistance. Straighten that elbow a little bit more there and out to the sides.
And last time. Now pause for a second. Straighten the elbow. I'm going to give you just a little bit of assistance. Let your heart rise just a little bit. There you go. And Open your arms out to the side so you really feel that connection into your shoulder blade and relax your hands all the way down. Nice. So you can return your straps into their holders.
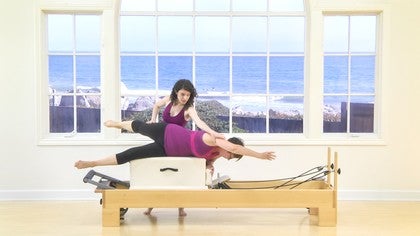
You're going to lie on your left side. Now we're going to do a little sideline work and we're going to take advantage of the long box today using not any resistance from springs or from police. But by the fact that it's a narrow send base of support and it's also elevated. So it's a higher center of gravity. We're going to start off. Yep. Let's have your elbow on the elevated head rest and you might want to come slightly forward because if you do start to tilt back, you might fall and that wouldn't be pretty.
We're going to give you two options if you want. If you want the harder option, you're going to keep your hand here or maybe even up in the air. If you need some support, you can always place your hand on the front of the box. So we're going to do front, back leg kicks butt with this ridiculously narrow base of support because her feet are in line with her head. So let's have you flex your feet. [inaudible] lift that top foot to hip height and now kick it forward twice. Kick kick. You're going to have to do exactly. He says, I hear what you mean. Okay, now pause. You're cheating.
What you're not allowed to do yet is move this foot forward. You're going to keep it right here. So if you want, you can push into me. But that means you're going to have to minimize the range of motion. So you're going to go forward and back. Now I want you to try it first with your hand up in the air.
So I want you to see how little the movement would be in order to stay stable. Yes. It's very hard. Lift up through that bottom waistline and notice how that will stabilize you. Yes. Doing a very good job actually. Yes. So the breathing will help you. And last one, good.
Now you get to do what you wanted to do before, which is big scissor legs. So that will even you out because it, Yup. And if you want, you can place your hand down in front of you. It will even you out because it allows you to have the force and the support in the opposite direction. And let's keep going. Kick, kick, kick, kick. And now single leg kick just as you're doing, excuse me, kick. Yes. And kick and kick once more. Each side. Kick and kick. Let's go into beat. So line your feet up in line with your head.
The key is you don't want to be too far forward. You don't want to be too far back. You may sense a little bit of discomfort perhaps underneath the bottom hip. If so, you could put a little pat on, but I think you're okay for right now. And let's do a set of beats. Don't hold on. You can do it without that. And 10, nine, eight, seven, six, five, four, three, two, one and turn out now. Ten nine, eight, seven, six, five, four, three, two, one. Relax. Go back into parallel. If you'd like.
You can place your hand back down. You're going to bend your knees in toward your face. You're going to straighten them out away from your face. Yes, there's a lot of abdominals here and pull and push and pull and push and pull and push. Ah, the sound of a train. I know I'm back at boys anytime. Fall and push. And last time, pull and push. Relax. Now we're going to do a teaser variation. In order to do this, you're gonna end up rolling backward a little bit.
So you're going to want to make sure you're as close to the front of edge as you can safely be. For this variation of Teaser, you're going to have your hand on the shoulder rest and you're going to end up probably pushing down a little bit through the bottom leg. So you're going to start off exactly as you're doing, reaching that top arm forward. And this is bringing in a PNF pattern as well. So as you start to rise, you're going to sweep your arm down and bring your foot up so it externally rotates and flex it. So you get that nice deep rotation in the socket and then you're gonna slowly lower yourself down. Sweep your arm if you can, and return to that position. Now pause for a second. The more that you activate that glued here, the more it's going to protect your back cause it's going to distract from that crunchiness that happens in the lower back. So push your foot up, stay, stay, stay, go back to the position again, push your foot up a little higher.
There you go. So make sure you got that connection first. And now you're going to swing your foot forward and rise up and lower. Returning to that diagonal stretch I call it. And again, sweep down and rise up. And the more you push down through this foot, the more it'll help create a sense of stability and lower back down.
Let's do one last time and sweeping. Flex the foot, flex foot, zip up here. There you go. And relax. Go into a stretch to end. So continue that last bit of movement to the starting position. Really reaching in opposite directions from your hand and through your foot. Let's go on to side too. You're doing all right.
So we'll go onto the second side here and propping yourself up on your elbow to protect your head. Feed her in line with the head and you're going to first yes, have that hand either your hip, you're in the air. Try and do your front back leg kicks with as minimal amount of basal support. So you're going to swing that top foot forward, lifted the hip height a little bit. Yeah, so you want that glutamate supporting you and then point the toes back. This is an easier side for you, far easier.
The interesting thing about this exercise is that it can really aluminate where your discrepancy lies in strength or stability and it shows you the side that you may need to spend a little more time working on. And two more. Good. And we did it on the other side. We did a little pulse. So if you want to do the little pulse pulse, there you go. And relax. Now let's do the full scissors. So the bottom leg actually moves in response to the top leg and swap. Yes. And swap and swap. Nice. Swap. Swap.
If I could ask to challenge you by bringing your hands slightly forward. Yes. That's going to kick in more of that whole trunk stabilization sling. Yes. And it's hard. It's just challenging or more. And relax. Let's go into your beats. So you're gonna beat your feet. See if you could find a little bit more of a lift here. Yes.
And now turn out and beat again. Reach your hand slightly forward so that yes, we can get a little bit more of the entire trunk connection, stabilization and return into parallel. He can place your hand down on the top of the box here, bend your knees in and reach your feet back and bend your knees in and reach your feet back. Now as you're doing this, be careful that you don't start to roll back to the top hip. Yes. So if you keep that top hip forward while you're bending your knees in, you're going to find that it forces you much more into your abdominal connection and once more after this, great. All right, we're ready for the teaser part again, you're going to end up falling off if you don't scoot all the way forward toward me. And that bottom hand is against the shoulder, wrist. So we start with a little stretch.
So you really lengthen out and you get that glute connection. So you're going to sweep the hand and the foot down to rise up. Now get the maximum external rotation here. Zip up for the low belly. Yes. And returned sweeping the hand down, lowering the foot. So it's almost like an arcane going up and down. And again, our king up, see how much you could push down through this bottom foot.
Drop this hip, the hip that's in the air tends to hike up. Yes. And then we can really get it to sink in the socket and get the full extension up through the knee. And again, one more time, try and straighten that bottom knee. So the cheating mechanism is to bend it and the challenge is to keep it straight. Rise up, rise up, rise up. And if you wanted even more challenge, I would tell you to minimize the assistance of your hand that's pushing downward. There you go. Beautiful Line. And let's return to that starting position and get yourself a stretch. So reach out through that top foot.
I'm giving you a little bit of pull or I could actually give you resistance to push into while you reach with the opposite arm. Very nice. Let's go into a set of lap polls. So I'd like to go onto your stomach here. The foot part is still dark. And if you have ropes at home, this is, it's much easier if you have a leather straps that you could still possible, it might be a little more challenging to pull, but you're going to pull yourself all the way to the risers. And if you don't have risers, then you can always just be holding on to the sides of the frame.
I'd like you Karen, to do a set of lot pole, so you're just gonna pull yourself in. Yes, and I want you to lift a little bit through the back of the throat. Let it rise slightly, yes. And pull. Now pause five counts to lower five that east centric theme that we've been working on or we're repeating to one and again, pull nice and slow Li releasing, slowly elongating. And it can also release any kind of tension or stickiness that might be there in some of the Fascia around the shoulder girdle and last time. Now, the other thing I like about these lat poses that are so functional, because you're getting everything in the complex to work together synergistically and relaxed, slowly start lowering yourself back down.
[inaudible] now we're going to do a crazy variation on horseback. So from here you're going to open your earth, your legs out to the side straddle and swing your heels forward. Exactly. So I want you to stay right there. Good. Now tuck your tail under. I want you to see curve as much as you can. Yes. And slowly release. Open your arms out to the sides.
I should do it in front of you so you can see me and swing and bring your feet forward. Yes. So it's a good tricep exercise too. Nice. Lower abdominal tucking under through the television, through the pelvis, not the telus. And lowering yourself down. Open your arms out to the sides on curling. And last time push your hands down and a little lower body. Horseback. Good. And relax.
Now we're going to go into swimming, but you're going to swim into the swimming exercise by opening your legs out to the sides. Yes. And Scoot yourself back just a little bit. Bring your arms out in front of you and inhale and exhale. Pulse, 10, nine, eight, seven, six, five, four, three, two, one and pause. Now I want you to envision that your hips are hugging one another and continue 10, nine, eight, seven, six, five, four, three, two, one, and relax. Swim yourself over to the other side so that you're facing the other direction.
That's right. I wasn't very clear on that, so that's fine. You're going to come and face me over here. We're going to do a set of pushups, so we're still on one spring and I should state that we'd been on one spring, I think ever since we started on the long box. So for your pushups, we're going to do a variation on this where you'll have your hands on the foot bar and I want your legs. Ideally I want your knees to be in a straight line or your, I should say your thighs to be in a straight line with your trunk. So it's like a half plank position. If you needed more assistance, I would tell you to have your feet a little closer in your knees closer in. So let's do a set of three piles.
Pushups where your elbows bends straight by your sides. Yes, this is a really good job. I feel and sense that tricep kicking in. I'm not trying to work her pex at this moment on this next one. Lower yourself down. Now push yourself out. Extending the elbows and rising up with straight elbows. Then elbows for little tricep dip.
Push out and rising up and see if you could bend the elbows and stay. Then the elbows in stay. Now don't rise. Push out from there. Yes. And rising all the way up. We're going to reverse that and push. Bend the elbows in. Keeping the chest low. Yes. And rising up. Pinup. Push and bending the elbows. Keep your trunk low.
Don't let your head dip and rise up last time. Stay there. Stay, stay, stay. Lift through your throat. Yes. And push out Ben through the elbows. Yes. East central control and rising up. Look down. We're just a little bit and find the connection right here.
Notice how he could unwrinkled the back of the throat. Pause, breathe in, and exhale and relax. So it's like a reverse long back stretch with that circular. Now we're going to go into thread the needle. So keep your hands right here on the bar. Let's start with your right arm.
So bring your right arm out to the sides and ideally, you know, maybe come forward. No, we actually think you're okay. So your, your shoulders can be just in front of the edge of the box. So you're going to thread the needle by pulling underneath and pause here. After all that hard work, you deserve a nice stretch. So you're going to leverage or take advantage of the corner of the box so that you get a little traction here as you start to pull away. Even. So it's like you're uncurling. And the benefit of, again, the long box is that you wouldn't be able to get that kind of traction on the ground. Now uncurl and rise up toward the ceiling.
Now stay here. I want you to push into this hand, not so much that you move the carriage, but so much that you get additional rotation and stretch through the chest. And again, repeat that. We're going to add on. Nice. So we're now integrating some of the spirals here and coming back up. At this point, let's take the opposite leg so that you have your right knee down, your left hand down, and the opposite one is going to go into extension. So pause. We get a nice spiral and twists. Breathe into your back though.
Inflate into the kidneys. Yes. And let everything come into flection. So bend the elbow, bend the knee curl, and let's go into extension. Repeating what we just did. Now push through the supporting foot and knee. Push the supporting hand and see how you could expand through all your limbs. Last time.
So we go into the full flection [inaudible] and then we come up, you know, reach and rise. Now stay a little bit more lifted in this hip here. That's going to support you. There you go. Good. And last time, flex. Everything curls in onto itself. And then we reach and rise. Let's bring this foot in. We're just a little bit. If you give that inner thigh connection, you're gonna see how it all comes together. Extend that right elbow, reach, push, push your lens in all directions and relax. Very nice.
I want you to do one other thing we just did a little bit with the hips. I want to go back into another PNF pattern for the hips where you lift one foot up behind you [inaudible] now you're going to lead with the heel. You're creating a diagonal line, but there's a spiral within that diagonal. So you're going to lower that heel down and then you're going to lead from it back up. Now try to lead from the foot not from your ribs and lead out and down with the heel in, back up with the heel.
So you go down and out with the heel and in and back up with the heel one last time down and out with the heel. So you maximize the internal rotation like a pigeon toe, and then you come back and up. Let's try the other foot I had, I did not actually bring into the ankle part, but that's okay. I just want you to experience the hip here and you're going to leave down and out and back. In and up and down and out. Yes, in an up, two more, down and out, in and back up last time. Oh, careful down, straight out and back in and up and running.
Lax. Now you can stand up. So come over to the front of your box. We're going to do a backbend with bicycle. So I'd like you to set up, actually just turn one moment here. The position is where your sacred ILIAC joint is. Just a little bit, a little bit below that I want you to have against the edge of the box so that you have a nice bit of stability and don't throw out your back. Now start to lean backward and just get a nice back. Then feel okay. So have your hands face one another first.
Actually [inaudible] start to lift them up to the ceiling and then let them lower a little bit further. So straight down. So you're going to work against gravity. You're going to lift them just to an inch or two. Hold it, hold it. Hold it and then let them release. So notice how you get just a little bit more length each time you do this and last time and slowly release.
So we increased the, the ability of the back to bend. Now place your hands behind your head, little cervical, nod and curl here, softening through your ribs. You're going to do a bicycle. So you're going to pull one knee in toward you. Ah, and go down. Yep. And up and lower down and oh, and down and up and lower down.
Yes. And try the other side. Pull the knee in. Reach the heel to the ceiling and lower it down and pull it in and lower it down. So this is a really wonderful way to integrate the, so as in a way that's going to support your back and help you rather than hinder you and down. Now let's do an alternate. So we go one with the right leg and lowering down and one with the left leg. So you can feel like you have tentacles like an octopus moving through water and, and once more reach and swim with that foot. And, uh, and, and last time up and down and help yourself rise up here.
So let's do a little it, a little bit of standing work to end. Let's stand with our feet wider than hip distance apart. So reach your arms out to the sides and then toward the right. And now let's do a little sweeping action with that left arm. Good and come up. And now we're going to do that to the other side.
We're going to sweep and you might notice that with all this hip work and with some of the natural spirals that we've integrated, that the Femur, the thighbone seems to sink a little bit better into the socket reach. And now let's make it a little bit more fluid and reach. So I guess I have a water theme today, but it wasn't planned out. But you know, I think this setting overlooking the beach inspires me a little bit and last one and allow, yes, notice how the trunk just naturally spirals. You don't have to think too much about it and let your feet come together and lift your arms up overhead. Lift your arms as high as you can, and now just allow your trunk to relax and open your arms.
Thank you. Thank you all for joining today.
Anything Goes: Exploring Spirals
Mention
 |
Rebekah Rotstein (Teacher) |
|
|
Kristine L |
 |
Giglia M |
 |
Anna N |
|
|
Abigail H |
|
|
Judy J |
 |
Cathy H |
|
|
Charlie T |
 |
Sarah D. Carrasco |
 |
Stacey S |
 |
Pam H |
|
|
Denee D |
 |
Piera B |
 |
Michele M |
|
|
Giuseppe S |
 |
Jennifer S |
 |
Elena F |
|
|
Mindi K |
 |
Heidi VDB |
 |
Jodie |
 |
Dorit T |
 |
Helen H |
|
|
Sally M |
 |
Anat S |
 |
Ayse B |
|
|
Veronica M |
 |
Holly Holland |
|
|
Michelle E |
 |
Z A |
 |
Yugonda D |
 |
Daniel T |
Comments


Such a joy to watch this nice class and listen to rebeca's cueing and knowledgeable way of explaining each move...
The student was lovely as well :)


You need to be a subscriber to post a comment.
Please Log In or Create an Account to start your free trial.
