Description
About This Video
Transcript
Read Full Transcript
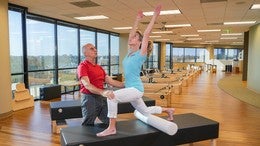
I'm so excited to be back at one of my favorite places, Pilates Anytime, with one of my favorite people, Christy. Christy thank you for coming. And this is an opportunity to do a second installment of our foam roller workout. It was so great the first time and we're gonna just up it a notch. I think you're gonna love it.
So let's begin just putting your feet on the foam roller. We're gonna start out by opening the body. It's so important just to open out before we begin. So as you roll the legs out you'll take the arms overhead. And that's perfect.
I want the foam roller just to reach that little notch, it sits so perfectly inside that notch. Just behind the achilles. And then as you exhale draw it into center. And inhale. And exhale as you draw into center.
And inhale, I just wanna check that you're straight. And exhale, as you draw it in. And inhale, I'm just gonna straighten you a little here.. That's perfect. And exhale, as you draw in.
And inhale, feel that elongation. And exhale as you draw in. One last time inhale, stay there for a moment, rotate the arms so the palms face upward. And you're controlling the ribs so beautifully, you're keeping this connection between the pubic symphysis and the lower rib cage. Now leave the arms where they are but draw the legs in.
And we are not preparing for a pelvic curl. So we inhale as you roll up the arms come down to the sides to support you. And inhale, and exhale as we roll down taking those arms over and you feel again that opposition energy. And inhale, and exhale, rolling up. I'm sure you feel those hip extensors working oh yes.
And exhale. Just be aware that the abdominals are dominant in the beginning but soon after it's so important to recruit these hip extensors. Inhale and because of this mobile surface they work as flexors of the knee and extensors of the hip. And exhale. And inhale.
And exhale taking it back. I'm gonna bring this roller just a little closer. And inhale. And exhale as we roll up. Now we have that stability there.
Now you're floating. And Christy I want you to just reach with the feet and pull back. And reach so we're rolling the feet back and forth and she is floating. This is all floating in space as she rolls back and forth. And rolls once more.
And rolls and hold it there. Feel that last little stretch, and slowly taking the arms overhead. Glide the arms around to a T position and squeeze the legs together. We're going to do a spine twist supine. Now I want you to feel the energy reaching out of the arms so there's that openness and taking the legs to the right and because we've got the roller here you can actually roll onto the top of the foot.
And exhale as she pulls back. And inhale. And exhale. Feel this openness across the chest. Inhale.
And exhale. And inhale. She feels that beautiful stretch right through the obliques. And exhale. Inhale, and exhale.
And inhale over. And exhale. Couldn't be better. So now we take one leg off and put it down on the ground and the other. I'm going to move the foam roller to the other side.
Of course you could simply turn around. We are now moving into the chest lift Christy. Putting the hands behind the head. Why I love this chest lift is that it's an opportunity to open the chest out. So we inhale as you reach back.
The abdominals are stretching a unique position for the abdominals. And exhale as you lift up. And then inhale. Getting that wonderful extension of the spine and then exhaling pulling deep into those abdominals. And inhale.
And exhale as you lift up. And inhale. And exhale. Notice how Christy keeps the long natural curve of the spine. She doesn't drop the chin too close to the chest.
And exhale. And inhale. And exhale. And one more. And if you have a friend around to simply open you out that is absolutely wonderful.
And Christy now we are going to add a rotation to it. So as you lift up and rotate to the right you will lift up the opposite leg. And then go down. And exhale as you lift into it. And look at, directly at me.
Right here, right there, right there. That's exactly where I want you to come up to. And inhale as you go back. And exhale on here. Right there.
Yes, that is the exact angle. There's sometimes a tendency to over rotate at the expense of the wonderful flexion and Christy's in that perfect position. I'm gonna even say pull that leg in just a little closer. And inhale. And exhale.
And inhale. And exhale. You're right there. And inhale. And exhale.
Yes, keep that leg right on the center line. And inhale one last one. And exhale. You're perfect. And put it down and stretching those arms back straighten the legs out.
We're now gonna do a roll up and I love this roll up. Because you inhale it minimizes that difficult point of the hip flexors lifting the body off the ground and yet it amplifies all the benefits of the roller. And exhale as you roll down. Places the back in that extended position. She inhales, now at this point allow the back to sink towards the mat and continue on.
And inhale. And exhale. Reaching back. And inhale. And exhale.
Now, this work is all about shapes. When you look at that shape it inspires. It is so beautiful that shape. And exhale. It's all about shapes.
Look at that shape, inspirational. And draw the arms forward and exhale. And inhale. And exhale. Reaching, and inhale.
And exhale. (deep breath) And inhale. And exhale. And Christy to finish off this little segment put the hands back behind the head. Bend the knees again.
Little more, perfect. You lift the pelvis just off the ground and I want you to roll back, (groans) and roll forward. And as you roll here you can actually lift up just a little. Okay. So you get that sense of being suspended and lifting the pelvis a little but then you roll through the muscles and then rolling forward rocking through the muscles of the back.
This is simply a massage. That's what it is. Rolling and you can actually posteriorly tilt the pelvis. And then allow the pelvis to anteriorly tilt here so it drops and then rolling, rolling perfect. And massaging all the muscles of the spine.
Nice. Right there. And right there, place the pelvis down and give yourself one more little stretch. Fantastic. And reach the arms out and you can roll up.
Good, Christy I am bringing this to here. You are going to kneel. Put one knee on that. The back knee. Back knee.
Perfect, and bring the other leg forward to there. Do you feel secure? Mhm, I think so. I would put the knee, the roller just a little bit, just on the knee. That roller is such a perfect surface for the knee.
And what you want is the front knee to be directly over the ankle. It looks great. I would take this foot half an inch forward. Perfect, perfect. Now you feel the hip flexor and quadricep of the back leg.
Mhm. Very important to still keep those abdominals engaged so the pelvis doesn't just sink forward in an uncontrolled manner. You look awesome. Bring the arms forward and out to the side. Perfect position.
Biasing towards a slight posterior tilt in the pelvis here to maximize the stretch of that hip flexor. Reaching those hands out, beautiful. Now bring the hands to either side of the foot as you dorsiflex that foot and stretch out. And you could relax those hands on the mat. Yes, and elongating, using these back muscles.
Remember by using the back muscles you are activating them plus there's that added benefit of pulling the pelvis into an anterior, toward an anterior tilt. Come back into the hips flexors, stretch. I know Christy loves that hamstring stretch. Taking the arms up this time and reaching, yes. What a beautiful, again going back to those shapes.
Look at that shape. It's the shape that an artist would draw. And then bringing the arms again forward and stretching. Yes, activating these muscles of the back. The extensors of the back.
Beautiful. And take your time in the stretches. Take your time. And back to that hip flexor stretch and we can change legs. Beautiful position, I love the way you finish that off and now we move to the other side.
So we're using our previous workout Christy as the foundation and we're building upon it. So we did this last time but we're building upon it. Taking the arms forward and out to the side you can see that beautiful line running through her trunk, through the thigh. Love your breath, I'm hearing your breath, I'm feeling the energy in your body and I love that. Placing the hands down.
And notice how she immediately she preempts by dorsiflexing the foot. That immediately sets her up for the stretch. I can feel her back muscles working. I can feel how she's reaching. Her tailbone out into the distance, her sacrum, her coccyx out into the distance.
And coming back into position this time the arms will come overhead and feel that beautiful stretch. I'm feeling here to make sure that she's activating her abdominals which of course she is. They're working eccentrically as they elongate. And forward again taking the arms forward and reaching. That tailbone back into the distance.
Biasing towards an anterior tilt of the pelvis. Beautiful work. And come back into the hip flexor stretch to finish it off. And now Christy putting the hands down we'll put both knees on that roller. I love that.
You're in this quadruped position. We're going to do a three part gluteal kneeling exercise. You could actually walk the hands just slightly back so your hip joints are above the knee joint. Shoulders above the wrists. She's perfectly set up.
She is so stable with the bridge here I could simply walk over her, I know nothing would happen. And if you could point this foot, reaching it to the back. So she goes up and tips and up and tip. Notice how she keeps that beautiful 90 degree angle just simply hinging from the hip joint. And you want to do between five and 10 repetitions.
And now we move to the second exercise. So bring the knee down and we go out to the side. So we go one, important that there's no deviation. The pelvis doesn't drift off. She's holding everything absolutely stable.
Only lift the leg as high as you can within the confines of keeping the pelvis, the upper body, the alignment of the spine everything is absolutely stable and we get that hip dissociation. I'm loving it. From here she straightens the leg out. And she goes straight down and up, pure hip extension. Straight down.
And up, and straight down. Get that hinging at the hip joint. And, and. (light breathing) I'm feeling her ribs so that there's no movement in the ribs and we'll give her one more and she's gonna stay up there, stay up there to enjoy that beautiful shape. It's all about the shapes.
And now Christy five pushups of course. And down. And we'll do tricep pushups in this position. Two, and three, and keeping the scapula as still as possible, four and five, and we put the knee down and we're ready for the other side. That's the joys that we have two sides.
So we can enjoy now the other side. And reaching up and tip. Again absolutely still, the movement is coming from that hip joint. The rest of the body stays absolutely still. Eight, nine, and her feet reaching up, she puts it down and then out to the side, one.
The whole structure moves as one piece. Again and think in terms of shape how there's no deviation. She simply lifts that 90 degree angle of the knee up to the side. I'm loving it and she brings it down and stretches it out and this position is all about elongation. And down and reaching up.
And two beautiful, and three, and. (light breathing) Eight, and leave it up this time Christy. So you enjoy that arabesque and we prepare for our five triceps pushups as we go down. Notice how she keeps the leg absolutely still in relationship to the pelvis. And down.
And keeping those scaps, still keeping those elbows close by your side Christy. That's five. Was that five? Do you know how to count are you sure that was five? Let's do one more just to make absolutely sure.
Oh, yes, and we put it down. Now Christy you'll be delighted to know that what we are going to do is stretch one leg back. And the other leg is going back. And do you notice there's a roller just under the thighs. She's going to do five pec pushups.
This time the elbows will go out to the side and there's this beautiful moment of comfort as your thighs touch the roller. Keeping the scapula still and I will provide that little bit of energy support. Nothing but energy support three, and touch four, and touch and that's about the depth that you should go. Keeping the scapula absolutely still and bend the knees and go into a little rest position. Yes, so that's a tough little segment.
I am now going to move the roller. Of course you at home can simply turn around. And Christy you'll be delighted to know we're gonna do a little massage for our glutes. Oh good. So you sit on the roller.
Perfect, and this time we'll differentiate it a little to what we did last time. Making it slightly more intense by crossing this leg over and you tip the pelvis onto the side and simply roll all the way into the gluteal, into that piriformis, and doing a slight posterior tilt of the pelvis allows you to get into that muscle now doesn't that feel good? Yes. Oh yes that feels amazing. Really great. It feels amazing.
And I'm gonna suggest here as Christy's doing is keeping the fingers facing outward. Meaning out to the sides. Not toward the body and not back but out to the side. That's gonna be important in a moment. Now put both legs down Christy.
And here you can just a moment of going into that posterior tilt. And back. And into that posterior tilt and back, feeling the mobility of the spine so much. Joseph Pilate talked about when we are young our age is determined by the mobility of that spine. And here we can feel how we ease out of the restrictions and the elasticity put the other leg up.
And we lean onto the side. How much you lean depends on how tight those muscles are. We don't want to punish ourselves but we want to feel that massage of the muscle. Beautiful. Now sitting back put both legs down and we straighten the legs out.
This time Christy the fingers do face you if possible. What's nice about this is the body is already elevated off the ground. So people who have difficulty with this wrist position and often have to turn the arm so that the fingers face outward here you will probably be able to keep the fingers facing the body. Feeling that beautiful stretch. And from here simply lift up into that back support.
Christy gets that beautiful line. And then hinging at that hip joint. And then lifting up, getting that beautiful line. Hinging, don't go into a flexion of the spine here. It's an extension of the hip joint.
Extension of the shoulder joint. Extension of the back extensors. And lifting up. And down, and lifting, lifting, lifting, lifting, lifting, and slowly down. Thank you Christy.
If you could sit on this side of the roller and face that way we're going into the mermaid. So we did this exercise last time and feel free to adjust the roller as you go through the exercise. Sometimes it slides away from you a little. But it's a beautiful exercise and immediately simulates and very closely simulates how we do it on the reformer. So we reach out, this arm don't bring it too high.
I would say to about there. And then swoop it around and here you feel this stretching and slowly back and what's very difficult and be aware of it is as you go down there's a lot of pressure on that shoulder. So we must use this latissimus dorsi, in fact all the shoulder adductors to keep the support of the shoulder. And then we bring it around. Come around as much as possible but keep the head aligned.
And draw it back and then down. Notice there's not flexion of the spine. In fact we are using the extensors. Getting that long line here. And slowly back, and up.
And reaching out. This is our fifth one I believe. And reaching out and if you want to go a little deeper here that's fine. Feel that strong work and stretching it's not just stretching the muscles are working. Muscles of the shoulder are working greatly, the muscles of the trunk and she rotates again as she comes back.
Now stay there Christy. What you're going to do, we're going to add a section to this exercise, bring it a little closer. As you bend this arm you're going to reach over. And I would look down to that arm it gives you such a beautiful line and then come back to center as you straighten. And then reaching over and you feel the stretch here.
And then coming back as you feel this opposition. So reaching in and then reaching out. And reaching in, creating this beautiful arc, so you arcing over my arm. And then back and the last one and arcing over. And back.
If you could simply change legs and we are going to change sides. How does that feel Christy? You feeling good, you feel a nice rotation? Feel the natural flexors working? Well you have to, you know.
Yeah, beautiful, beautiful. So from there notice the choreography of this mermaid. It doesn't emphasize the flexion of the trunk. Quite the contrary we've got rotation but a lot of extension and inhale as you go out. And then she gets that rotation.
Yes rotation but those extensors of the back are working. Of course the abdominals work as well and bring it back and then up. And reaching out. And exhale and inhale. And down.
And reaching and feel that line. And up and down and reach and around. I'm gonna give you a little stretch here. Keep the head centered, there. So rather than rotating the head too much keep that head looking straight down.
And we take a little stretch here. And then taking the arm out. And back to center. And now we do the lateral flexion. So reaching over as you pull in.
And then back. And reaching over. And you pull back. And, and don't worry if you cannot get this issue of tuberosity, that sit bone down to the ground. You want to keep the pelvis stable but pushing down toward the mat may put too much pressure on that hip joint and in fact the knee joints.
Where Christy is now is just a perfect position. Accentuating that arc and back to center. Christy if you can lay prone so we're putting our arms on that roller. In fact we'll, the position that I'm gonna suggest today Christy is having the roller just below the elbows. And having the thumbs facing upward.
This is a very good position for the shoulder. You're in slight external rotation. And what I want you to emphasize today is the articulation of the spine as you're going into extension, not lifting the whole back as one pice but articulating through the neck, through the upper back, and even if that's as far as you want to go that's fine. So we are gonna build up today and you'll see how we increase the range working through at this point the lower ribs are just on the ground. The sternum is reaching forward and slowly down and lifting a little higher now.
So this time we're gonna go right into that mid back just below the scapula. And reaching forward keep the external rotation. Particularly on that right arm. And lifting up, lifting up, lifting up, lifting up. See you can see the difference in range now.
Now we're going right into that lower back. Not of course forgetting all that we have built from the cervical spine through the thoracic spine and all the way down to that lower back. Let's do one more as we lift, lift, lift, keeping those arms at this point look straight forward, yes. Beautiful, and think of those scapula stabilized, a lot of arm work and shoulder work. Into the rest position from here.
So you can just help yourself up, good. And I would highly recommend using the roller for this rest position. Notice the wonderful stretch that it gives to the shoulder, to the shoulder extensors, we're in shoulder flexion. The extensors of the shoulder are stretched out. We get this beautiful movement here.
In fact what I'm gonna ask you to do just three times is pull into like a cat stretch. Just to stretch out the back and then rolling forward and stretching out. And she draws back, we've just used those extensors. Now we're going into flexion of the spine like a cat. Joseph Pilate spoke about going into the reverse direction.
And reaching out and we'll just spend time here taking three breaths. This is a time to simply feel the space between the vertebrae opening out. To feel the shoulders stretching and to bring the body, mind, and spirit together, together. Uniting the body, the mind, and the spirit. Slowing the breath down.
And slowly Christy if you can roll up just sit on your heels. And take a moment. And let your arms hang by your side. Just focus out. And a big inhale, lifting the arms.
And exhale. Thank you so much.
Mention
 |
Rael Isacowitz (Teacher) |
 |
Barbara L |
 |
Laurence F |
 |
Denise |
 |
Elizabeth D |
 |
Lou M |
 |
Katia B |
|
|
Sharon C |
 |
Annie M |
 |
Julia R |
 |
Belloni Samanta |
 |
Kirsty L |
 |
Cindy K |
 |
Julie M |
 |
Jo |
 |
Lady Luz D |
 |
Andrea F |
|
|
Kristine L |
|
|
Kristin R |
|
|
Nadia W |
|
|
Ronnie S |
|
|
Deana |
 |
Monika P |
 |
Kristi Cooper |
 |
Rachel B |
 |
Marta F |
|
|
Ria V |
 |
Pinar F |
 |
Heather H |
|
|
Lani G |
|
|
Alexandra L |
 |
Lina S |
 |
Judy S |
 |
Mandy P |
 |
Heikki L |
 |
CADM |
|
|
Patricia A |
|
|
Niamh O |
 |
Anne P. |
 |
Ira R |
 |
Rebekah B |
 |
Jamie K |
 |
Lizanne B |
 |
Connie M |
|
|
Monica Bino |
 |
Brenda B |
 |
Chrystelle C |
 |
Louise T |
 |
DJ |
|
|
Yvonne M |
|
|
Viera W |
 |
Diane F. Medeiros |
 |
Pamela F |
 |
Hwanii K |
|
|
Debra H |
Comments


You need to be a subscriber to post a comment.
Please Log In or Create an Account to start your free trial.
