Description
About This Video
Transcript
Read Full Transcript
Hello, I'm Kathy Murakami. And welcome back to fundamental progressions. This is a class number two. So if you missed class number one, you may want to look for that because we are reviewing just a little bit, but we're adding on because it is a progression. Okay. So what we're going to start with is the rubber band. So we take the rubber band, hopefully you have one.
These are theraband. This is a brand called, actually this is the brand called theraband theraband Dyna band. They're about six inches wide and we want to place the band flat. So please use the full width of the band here. So the bottom edge feel is about where the bottom of your ribs are. So you feel that, okay, have it flat and then you cross the ends in the front and the palms are up, the palms are up.
So ladies you can probably turn this way I think. Yes. So the camera can see. And so as you recall, last lesson we had the ball placed here for you to feel the body expanding laterally with the inhalation. Now that we have the band touching the back side of the body here. You know, let's make yours a little wider so you can see how Emma's band was a little smooshed up there. We want to use the full width. Let's see if I could do it. There you go. Okay, so that there's a lot touching the surface of the body.
Yeah, and vineyards. I'm going to widen your loosen, loosen your grip so I can move it and thank you. There you go. Like that. So like I was saying, there was a ball here for the breathing in the previous lesson. Yes. And now you're, you can feel the band here in this part of the body for tactile feedback. Okay. So again, the end is crossed in front. The arms are not crossed. You're pulling just enough to feel the tension of the band touching the body, but not so much like you are strangling yourself and can't breathe.
All right, from here, keeping the arms relaxed. Inhale and open the body sideways and to the back and then exhale and pull the band just slightly to feel the ribs soften together again. Breathing in, look at that lifetime train and exhale in through the nose, out through the mouth, into the nose, out through the mouth. Doesn't matter right now. Just feel your body breathing. And as you continue, feel your body breathing from the inside, from the inside. So that inhalation is making space on the interior.
Intention to feel expansion three-dimensionally.
This can even be done in a seated position. And the uh, your, you can just be resting on your elbows. If sitting on the floor is uncomfortable for you, you can put a pillow in between the torso and the thighs. The idea is the body is relaxed. Yup. Okay. We who are behind are the feelers. The feelers are going to find the lowest ribs like, so feel the bones of the spine here, the spinus processes. You can feel the goalie on either side.
So the hands, maybe we'll turn toward the camera. The hands are placed so that something like this, okay? The pinky finger is about where the bottom rib is. The thumbs are in the gully. The fingers laterally are emulating the ribs. Okay? Now, if you're alone and you don't happen to have a feeler near you, you can just do this on your own with the band because the band, you just, you have to focus your mind a little bit more to feel the band touching the body. And of course you have to have some tension on the band, like so, but it still can be done. Okay? Okay, let's turn sideways. All right, so this, uh, piece, now I'm giving you is about the power of the mind in the police work. I think after Joe's book, the second book I saw was called the [inaudible] method to physical and mental conditioning. So remember that, um, the connections that you are learning to feel will happen on the interior.
They happen in your mind first and then it happens physically. So even if you or you know, you can't do something or that shape, that exercise looks too hard. If you can connect to that place where you can see it and then feel it in your mind, it will happen for you. Okay. So first what we're going to do is feelers are in place. I ask breathers, just breathe.
That's their attention. And can you feel your body breathing into the hands that are on your back? And that would probably be yes. One note here, the feelers hands must be very, very relaxed, very relaxed. So feelers, you feel them breathing, they're alive. Yes. Okay. All right. Very good. So intentionally widen your body into the hands on your [inaudible] that you feel on the back and then exhale.
Sometimes you can just think it in your mind. Sometimes you put a color inside your body, make the color more intense, whatever works. Go ahead and breathe in a little more to the right and then exhale and again a little more to the right. Exhale and feelers. Do you feel that breathers? Do you feel your body moving into the right side?
All without tension. Let's change it up. Left side, same thing to the left and release. Very good and again, left side. And one more time and exhale. Great. Set up. Change positions. How was that? Good. Kind of cool. The first time I did this I thought it was the coolest thing ever. I did. I was like, wow, I can, I can actually, I could really feel it.
Now you might feel the right side of your body. It's a little easier for you to breathe into because you have an extra organ on your left side. You have your heart living on the left side. So it might not be as readily pliable cause there's not as much space for the lungs. But anyway. Okay, we'll do it quickly on our second side. So breathers, you're in position and feelers, you're in position. Yeah. And you can just lighten that. Yep. Just barely touching. So the, your, your hands will be much more sensitive to feeling if you just super relaxed them. But they, but they're, they are definitely there. Okay.
So it's not a creepy touch but it's not a down either. All right, here we go. I'm just gonna breathe normal breathing into the hands.
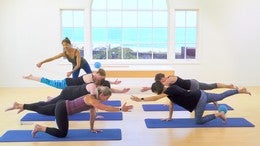
So the breather might feel it but the feeler might not see it or actually even feel it. Yeah. And, and also respiratory musculature needs strengthening and pliability and has to start to get a little more elastic. And if you've been a little bit uptight or you have that stiff back or the myriad of other things that can happen to us humans, then it doesn't happen right away. But it will with practice. Yes. All right. Next thing we're moving on to is the cat cow for shape. So a come to the hands and knees and you all probably know this, this exercise, it's very common.
It's where you're going to go into a flex spinal shape and then an extended spinal shape. But what I'd like you to do here, make push might be a little differently, is one, you'll be changing the foot position. So when you go into the flexed shape, this is when your back is convex. You actually will release and so your feet will have the top side of the foot flat on the floor so you can press press down into them a little bit. That's gonna help you in the curve. Now when you make the flex shape rather than pushing and trying to go into your maximum, I would like you to feel that you are making more of an evenly, an evenly distributed arc. If that makes sense. So you're not pushing, we tend to push a lot more into the upper back.
Can you all make an exempt try that. Just you feel that this is really where most of this is easy to go because the spine is already in this shape. Okay. But what I'd like you to do is see if you can again, make it a little more evenly distributed. And then when you change to this, which is going to be the extension, you can then change from the top of the foot to the toes. So you would stand on your toes, right? And then when you are, you do let the pelvis move forward.
But think more than just dropping into that lumbar spine that you're kind of scooping, pooling the breastbone forward between the frame of the arms. So try to get a little more of that thoracic or upper back extension. And be careful with the neck and the head here. We tried to do it a lot in this area. So again, now that arch shape is a little bit more evenly distributed this way. Okay. So that the, there's actually length that's happening through the spine.
Is that making sense for everybody? Okay. And then we move with the breath. So here we go. We're going to start with flection first. So flatten the top of the foot down and we'll breathe in. And then as you exhale, start to curve as though you're making a circle as though you're making a circle here. Yes. Like this. And then you'll breathe in and then as you exhale, you can go ahead and stand on the toes, get a little with the legs.
And now the circle is here on the back this way. So keep that shape your, your mind is not just going from tailbone to crown ahead. Your mind is continuing to see this, circle this way, and then go ahead and breathe in and then exhale and flex your shoulder blades down a little bit more. Yeah. Great. Remember that the shoulder blade still come down the back. Great. I'm gonna pull you back. Breathe in there ladies.
Exhale and into the extended position. Our King. Yep. Here, you know, it will help you to, if you kind of get a sense of you're pulling your knees just a little bit forward and the chest moves forward between the frame of the arms, which again, go ahead and breathe out. That's nice. Keep pressing the shins and the top to the feet flat. And then notice here, because of the shape you can practice that breath of feeling the back widen multidimensionally the whole back is blooming open here and exhale and, and yeah, be careful with your neck. I'm going to make it a little [inaudible]. Thank you. Yeah. So Amanda was trying to be a turtle going in the shell there. So remember, come out of the little color of the shell. One last set. Exhale on the curl.
You're flexing tail bone gently under. Try not to excessively push in the lumbar spine. You can even press into the hands though and last time into extension. So they feel this and the reason, there's going to be a reason that you want to feel these shapes cause we're going again, remember it's Bisquick. We're going to feel this in a different position. Okay. Very nice.
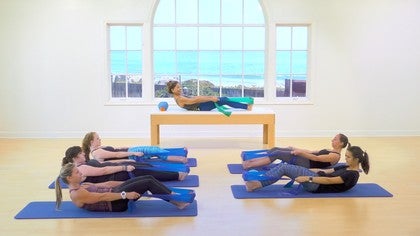
So moving on. We are now going to use this squishy ball. All right? If you happen to have with a squishy ball, the has a little bit of a feel like skin, it won't slip out from underneath you. If you happen to have one that's a little bit smoother, you may need to use a little anti-slip pad and we'll take the ball and you want to swish it down here by your tailbone. Okay? Smush it down by your tailbone. Okay. Something like this.
If you can keep your feet flat on the floor, do so. When we start, we're going to go into that curve to flex shape. If you cannot and you find your feet leaving the floor, I'm going to suggest that you flex them. All right? Now we have not forgotten the other dots. Remember the dots? Shoulder blades. What it remember what else? Inner thighs. The elevator, right? What else?
The pelvic floor and and the deep abdominals travels. She's fancy transverse abdominis. A plus for you, right? So here's what we're going to do. The arms will be forward. We've been there. We anchor the shoulder blades. On the back. We breathe in and when you breathe in, envision this. Woo. Your spine just grew up right. You just grew up and now as you exhale, that curves shape you just did on your hands and knees, curving back, breathing out, breathing out. Not too far. That's it.
So you're working at about a five six. Yes. Okay. Inhale, hear member widen in the back, widen on the sides. Exhale, return and bring that body upright. Inhale, lengthen upward. Exhale and curve it back. Soften. Go to soften the chest. Alright, really soften the chest. Often I'm seeing this. Okay, you do want to be concave in the front, little convex in the back.
Inhale wide back, throat open. Exhale, breathing out and returning up. Great. Inhale again. Excels u, curve back again. Now we're going to do something so that you just notice a little something. Inhale here and now as you breathe out, open your arm. That's towards me, towards me. Slowly exhale, exhale, exhale, exhale, exhale. You feel something different?
What are we feeling ladies? Hmm. A little more work. The tremor of truth. They feel a little more work on the side of the arm. That's to the side. Take it back. Inhale, exhale and return upright. Come all the way up slowly with the breath. Inhale. Exhale, back shoulder blades down, throat, open, little breath. Now the other arm, any amount, it might not be the same distance. Kay. Avoid turning your face or turning your body.
You feel a little more work on that side. Yes. Yes. Inhale, snuck grade. Exhaling, come back. Little inhale here and exhale and come all the way up. So what is this telling you? This is telling you that what? Your arms are a hundred pounds.
No, it's telling you your arm is a weight. Your arm is a weight. Yes. As you exhale, you open, it gets heavier and heavier and heavier is worthy. Work further away from your center. So your center has to anchor a little bit more. All right. And then come all the way back.
So your goal is not to go as far as me or someone next to you and return upright. Your goal is to figure out where should your arm go. Should you take this more challenging variation, how far should it go so that you can still breathe. You're not wondering when is it going to be over and you can maintain that pleasant expression on your face. Okay. Relax. Good. Ah, two reps. See. Okay.
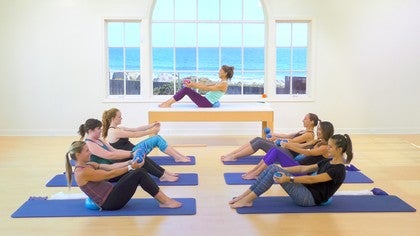
Now take your band again. So this is a couple of ways we were preparing for the original exercise called the [inaudible] roll up. So we're rolling down obviously cause it's a little bit easier. Yeah. So we're going to not have the ball behind us to rest on. Now the band will go back to where you had it when we practiced the breathing.
Yes. Again, make sure it's wide. Don't cross it this time. And um, should you need a little bit more support. You, there are thera-band options out there that are heavier, so the heavier band will give you a little more support. Pull the bands so that your hands are here by your knees. Your shoulder blades are anchored in your, uh, forearm is parallel to the floor. Okay. So we're gonna roll back the same way we breathe in.
As you exhale below that spine, out that is below the band. Keep count countering by pulling the band in the hands forward a little bit and get to about where you were when you had the ball behind you or you about there. But it feels like it's a little more work, doesn't it? Yes. In here is all you. Nearly XL. Maybe you can scooch back a quarter inch all but maybe not in Ale.
Exhale and return. Great. Try that again. Breathing and exhaling. So remember that breath wide into into your band. You curving back, you're curving back, you're curving back. The throat is open. Yes, the eyeballs are staying in your head. Inhale, stay there, hang out. Exhale, Amanda. Little inhale and exhale and curl all the way forward.
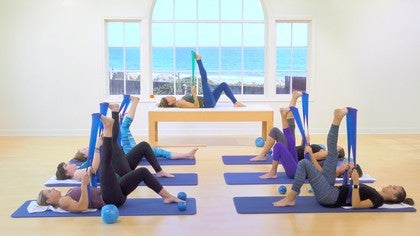
Very good. Did we feel ourselves working? Did you remember your other dots? Oh I forgot to mention them. Well they're still there. Okay. Now your third variation here, cause that was the going to balance is to take the band and it's going to go around your feet. You want it to cover your toes. Yes, my better. Keep my eye on this side of the room. I'm going to face this way. Okay. And uh, covering the ball of the foot and the toes. Grab the, and uh, the band by your ankles and then sit up. Okay. So this time we're going to try to go back in time to probably some of you weren't even born yet to the 70s, but in the 70s the waistband on jeans was way up here.
Okay? Way Up here. So we're going to try to roll back and go back in time to the 1970s waistband. Okay? Not The waistband of the nineties down in here. What was it 10 years ago? I can't remember. But you all know what I'm talking about. You're supposed to laugh. It's a corny joke. All right.
In jail and XL, feel that length into curve. Breathe out. Breathe out, breathe out. Breathe out. Maybe make it back. Maybe only go to the eighties. I don't know. But you touch that lower back and you breathe in there and now when you breathe out, let that band.
Soften your chest. Use that breath to carry you back. Flexing all the way, heels anchored. Touch that way. Span. Breathe in, look at your feet. Exhale. Feel that bend retract. You retract ing and come forward. That's it.
One more so I can see and it's not that serious. Exhale looks great. Soften the chest. Nice touch. Inhale and then breathe in. Return. Okey dokey. Rest. Nice. So often what happens on this one, if you're new with the roll back or the roll up. These girls, they practiced a lot before the filming, um, is often what I usually see.
One of two things on rolling back. The legs straighten and then you get around in here and there's a kind of a clunk like this. All right, so my suggestion, when you're learning, if that is what's happening to you and you notice that you start to push into the legs and straighten, you really keep the knees bent because when you keep the knees bent, it's your body will allow your pelvis to roll back a little bit more readily because this is the one vertebra at a time thing. Okay. Number one. Secondly, if you happen to be someone on your journey back, you get around in here and you're like, oh, there is no way because I can feel my feet starting to come off the floor. Okay for you, I'm going to suggest you really pay attention to the point before, right before you feel that feeling of the heels flying up and you stay there and just breathe. You stay there and just breathe because you're working to get the back body to lengthen and the front body to strengthen.
If you insist on, you know, kind of trying to keep up with everybody and you get there and you just click this and then come here. What will happen on your way up is nothing and you'll and you want to pull like this and breathe as an afterthought. Alrighty. Okay. Very good. Having fun. Yes. Alrighty and now we are going to get some towels to use. Now we are going to do some Palase origami. Not really. I'm actually not. I changed my mind.
We are going to use the towel and the towel is gonna now be new. B, f f best friend forever. So ladies on this side of the mat or of the room, I'm sorry, you will put the towel down on the right side of your mat and you over here. We'll put the towel down on the left side of your mat. Okay. And you can keep the ball nearby.
When you lie on the towel, your head must be in it, so make sure your head is in the towel not too far above, but right at the bat, at the edge, and the bottom must be secured under the shoulder blades. Number one, you can use the ball right now for prop because the legs are not going to move. You feel at the beginning. In progression one we talked about leg bone alignment, so the leg bones are in a straight line from the middle of the hip joint. Hip socket heals in line with your sit bones. Okay? Then make sure you have a as part of your awareness on your inner legs, all the way down to the ball of the foot. So the ball, especially of the big toe is anchored into the surface.
The feet are resting on, and in fact, if you just a little bit press there, you don't have to push really hard. So the toes lift, but press very lightly into the ball of the big toe and feel an imaginary energetic line up the inseam of your tights into the inner thigh elevator door area through the pelvic floor. You will start to feel that connection all the way from the foot to the abdominal area. Yeah, that helps you anchor the lower half. Super important. The pelvis stays in its position where it is when you begin.
Um, it's different, slightly different for, but please avoid overarching or pressing the small of the back down this way, pushing the belly out, trying to press the belly down or over, gripping the buttocks and going into a tuck. Okay. We'd like the lower half to remain fairly undisturbed for now. When you grab the corners of the towel, you grab it very close to the head, not out here. So you have a firm grip? Yeah, the shoulder blades are down, the elbows are off the floor. The position will look like this. We'll do the same. Britt breath preparation. As you start the exhalation, you start to pull the towel full pull, pull, pull, pull.
And immediately you will look at the ball between the legs. Alrighty, the second breath will let the head rest back into the towel. Head rests back into the towel without falling back. So initially this um, preparation exercise is for you to learn how to sustain an abdominal contraction. Uh, ladies, you don't have to do yet, but you can relax to sustain an abdominal contraction, um, and still be able to breathe cause it's not easy to do that. Alright? Okay. You all get extra credit. All right, here we go. Thank you. Thank you for being such a great class. Grab the corners of your towel. Elbows.
There's a little bit off the floor. Shoulder blades are down. Iser open, organize your mind, breathe in like we've been practicing. Start to exhale a bit to connect. Then pull the towel popup, pull, pull, pull. Exhaling, extending like sanely, Dah, Dah, Dah, Dah, Dah, Dah and immediate. Look at the ball between the legs. Stay here and breathe in. And then when you breathe out, let your head get super heavy, but don't fall back. And now you practice that breath. Inhaling into the sides and the back. Exhaling feeling your interior.
Inhaling again. Exhale, a little bit of elevator door and pelvic floor. Feel the inner leg. Inhale again. Exhale. So the idea is not that we have to come higher and higher. The idea is you just sustain that marathon of internal connection. Exhale, and let's do one more.
Breathing in and breathing out. Take one little breath and then exhale and roll back. Take a little break. The traditional hundred a classically is taught five counts in in hell. Two, three, four, five, and then exhale, two, three, four, five, right?
10 Times, 10 times 10 is a hundred. When you're learning, you could make it three and three or you can make it four and four. You know on the inhalation exhalation, or you could make it inhale for three, exhale for five because it's that exhalation that helps you feel the interior a little bit more, right? You don't have to do it a million times. It's part of our Bisquick. Yes. If you don't know what Bisquick is, watch progression one. All right, let's do this one more time and we're preparing. So inhale and then start that exhale.
So you find that connection and then pull the tell forward and up. Forward and up right away. Look at the ball between the legs. Inhale, stay there and breathing out. Two, three, four, breathing into three. Exhaling, two, three, four, five. Inhaling, check the tailbone. Make sure it's not kind of trying to like sneak up. Exhaling, inhaling and exhaling. Great. Last one. Breathe in and breathing out.
Rurally being back. Beautiful work. Let go of the towel. Put your arms down. You can roll your head side to side a little bit.
So what I'm going to challenge you with now is we'll come into the abdominal curl position. Okay. And then while you're there, you still have the support. You're going to think about, remember the mental part. Think about maybe taking your right foot off the floor, but don't do it. You're just gonna Kinda like you're, you're emptying your energy out of that leg. So it sort of feels light, but don't actually pick it up and just notice the connection you feel in the torso. Right? All right, here we go. We're going to breathe in to prepare. Soften the chest. Exhale, curl forward.
Even though you don't have the ball between the legs, pretend you do so you have that whole inner line connected. Take another breath. Exhale. Let the head get heavy, but don't fall back. Yes. Now you feel the work. Take another breath. And then as you exhale, so think about lightening the right foot a little bit. Like if it was on a scale, the needle would stay at zero and then inhale your weight back into it and then levitate a little bit out of the left leg. Oh, I see a tremor of truth happening here. [inaudible] go back into that leg and then again, empty out of the right. Just a little, not so much that I remember you can't breathe. And last time exhale.
Empty a little bit out of the left leg. Inhale yourself back into your body and then exhale and rest. Oh, how was that? It was good. Could you feel that shift? Yeah. Great. Okay. Very good. So mental challenge, really good. Everybody come on up.
We'd been on our backs a lot. So time to do the Arrow. I would like a model for this. Can I eat you? Yeah. So what you'll do now is you'll take this towel and you need to fold it or roll it so that you lie down on your belly and your feet will be off of the edge so that when you, um, have your face down, you have room for your nose, you have room to breathe. So figure out how big your nose is. All right. And we're going to do something called Arrow.
So this is a preparatory exercise or of fundamental exercise for all of the exercises in the Polonius Mat work, which require what we call extension extension. And, um, as we mentioned earlier in our first, uh, class, we have that alignment here, which she's got beautifully and we have to still be able to connect all those dots. The dots of the Scapula, the thoughts of the deep abdominal area, the inner thighs, the pelvic floor. And actually there's also a.here on the back of the sacrum. There is a muscle that lives there that supports the sacrum in its position here as well. So you will activate that. It has a fancy name to call the multifidus. The arms are here next to the body.
So as we practiced in progression one, we had the balls here and we were sliding down. You remember that? And it was like just a little bit ago. So that will be activated. So the back body's very activated. Yeah. And we will breathe in the same way. Feel those magic hands on your back. She will exhale, find all her inner connections and then levitate the chest and forehead just a little bit right here. So again, oops.
The sensation is connection and length. Length. Okay. Length here, length here, length here. And in contrast, breathe in not too deeply, and then exhale, return to the starting position. And what you may find is you grew, so you have to move that towel out a little bit, right? Okay. She nicely is keeping this area open it. There's a big temptation to start out like this. So as best you can remember, your collarbones are very wide and long, especially at the corners. The ladies, you want to get in position this position face down, called prone.
I'll keep you here for this. Okay. All right. So you're very aerodynamic, aerodynamic, like you just got shot out of a cannon. Get the corners of the chest, open collar bones, long palms against your thighs just like you started with in the first class. Breathe in wide in your back. Gently exhale, find your inner connections and then levitate. Barely off the floor. Beautiful. Pause there.
Little inhale, stay there and exhale. Stay there and breathe in. Eyes up just a little bit. Yep. Exhale and return to the starting position. Inhale again. Remember, relax a little bit, no tension. Exhale, slide the scapula. Engage the inner unit, inner thighs, pelvic floor. Good. Hover. Little higher.
Yes. Inhale, sustain. Nice. And exhale. Return back down. Great. Let's do one more am have your legs a little bit apart. There you go. Inhale wide back. Exhale, levitate the chest.
Eyes look forward. Just a hair. Yes. There we go. Hold and breathe. Feel your inner connections, inner body. Getting Long. Exhale and return back. Beautiful work. Okay. From here, just bend your knees. All right.
And then your hands can come up by your head just to get them out of the way and relax your shoulders and then roll your knees and your hips side to side. Kind of like a windshield wiper and let your pelvis rock a little bit side to side. Gently in the range that feels comfortable to release your lower back. Okay, great. Good. Very nice. Okay, thank you. Come on up. Alright.
Time for a little self massage. So move these, uh, towels out from the front and uh, I'm going to teach you the preparation for the rolling. The rolling like a ball. Okay. So the rolling like a ball position. Traditionally you're starting at the front of your mat and you start in a position like this, they'll remember the cat cow we worked on and we want to evenly distribute the flexed position. All right? So we want to feel that, but sometimes it's hard, uh, for um, beginners to do this because there is a little bit of fear of falling back there, right? So we're going to alleviate that and start already down. Okay?
So we've already fallen and what I want you to do is draw. Go ahead and draw the legs in so your tail comes up and find that kind of curved flexed shape you did when you were on your hands and knees. And I'm going to allow you to have your hands behind your knees, okay? Behind your knees, but you do use your arms a little bit to pull your body forward. And you do use that abdominal area to pull the pubic bone towards you.
So do you feel yourself already working a little bit? Yes. And the shoulders are down from your tailbone to the very top of your upper back. This little bone here. I'd like you to roll just there. Don't think about coming upright so it will look something like this and you can go ahead and kick your feet.
Yes. Just be careful. We don't roll onto the next, yeah, there we go. Go ahead and just inhale and exhale. All right. Can we make it all the way up, Wallah? Oh, I better get up here.
Thank you so much for coming to progression too.
Progressions: Putting the Fun in Fundamentals
Mention
 |
Cathleen Murakami (Teacher) |
 |
Rachel K |
|
|
Usha R |
 |
Marta A |
|
|
Melissa G |
 |
Gladys C |
|
|
Mooyeon K |
 |
Mercedes G |
Comments


Saludos desde España??


@ Mooyeon, I am so happy you learned some new variations....thank you!
@Gladys...y besos to you! Muchas gracias


You need to be a subscriber to post a comment.
Please Log In or Create an Account to start your free trial.
