Description
About This Video
Transcript
Read Full Transcript
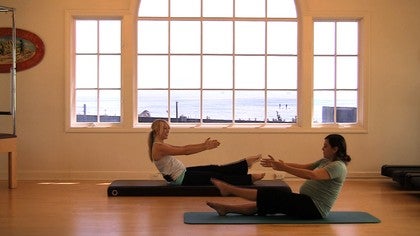
Hi, my name is Leah sewer. Today I am back for my second installment of our classes on plots and pregnancy. And I'm excited to be here once again. And again, this is our second installment. All right. Okay, so we have Marissa with us here today. Merissa is 34 weeks pregnant. Um, and I at this point am 24 weeks pregnant. So we have quite a bit of a difference between our pregnancies here.
I am still on my second trimester and Merissa here is in her third trimester. So we're going to go ahead and just a, the movement that we're going to do today is very appropriate for both, um, second train, most of anther Chai, Mr and certainly very appropriate for those of you that are in the first trimester as well. So Maurissa we're just gonna start with some gentle breathing today in the room to get into our movement. Great. Okay. Okay. So we're going to start here with our feet together or if you feel more comfortable, you can cross your ankles. We're going to start with some nice gentle breathing.
You can keep your eyes downcast or you can completely close in whichever you feel more comfortable with. So just relaxing here into this position, feeling nice and elevated through the spine as best as you can. Just feeling nice and we lax through your shoulders and we're going to breathe in through the nose with an inhale and out through the mouth and in through the nose. And I'll do the mouth and breathing in. So feeling that expansion of the rib cage, the lifting of the sternum, and then Xcel soften into your breath. Great. Two more like that. Inhale, letting each breath just come in. Nice relaxation and exhale.
And one more. Inhale and exhale. Good. I want you to go ahead and place your hands really low on your belly. Good. I keep your elbows nice and soft. There you go. Adjusting your position, that's fine. And we're going to take a nice big breath into the nose. And when you exhale, I want you to think of lifting the belly up nice and gentle and inhale. Let the belly fall into your hands and then Xcel lift it out. There you go. Beautiful abdominal work there. And Inhale, let it soften into your hands.
You're breathing way down into your pelvis and then XL nice and lifted all the way up. Great. And inhale, just feeling your shoulders stay nice and open. Nice and natural here. And Xcel. If you feel a little kick with this deep breath breathing, just feel that connection and take your breath in. I'm feeling little kicks, myself and XL lifting up. That's really nice. And take another breath in and exhale. Great. So we're gonna continue with the idea of breathing up into the belly as much as we can and breathing down into the pelvis through the class. Exactly. So take your hands right down by the sides. Go.
So feeling nice and elevated through your spine. You're going to inhale, lift your arms up. With your exhale, you're going to hug a tree and you're going to round your back. So you're just going to bring your head forward. There you go. Inhale, take the arms back out to the side and extend the spine and exhale, rounding. There you go. All the way. And then inhale, elevate the spine. Great. And x enough, like you're going to narrow and hollow your belly button and, and try to keep your shoulders nice and low and then inhale, articulate up and sale. So as we grow, we get bigger here, we start to feel a little confined in our body. So we want to feel that nice element of reaching and expanding out through your fingertips. There you go. Then exhale, rounding and inhale, expanding, filling your ribs. Get wider, your chest gets more open, you feel that pull through your arms and exhale.
Great breathing and inhale open all the way. Beautiful, good, enhance, come down. Great. So you should feel a little zing through all that breathing. Right? Good. So I'm going to face you now and we're going to carry on here. Let me just adjust this real quick. Okay, so now we're going to place the bottoms of the feet together.
We're gonna do an exercise. We call through the pipe and you'll see what I mean when I show you here. It's take a nice big breath in through the nose. You're going to go chin to chest and you're gonna roll down top of the head going down to the feet. Inhale, you're going to articulate to a flat back and exhale, you're going to come up. So we're going through in that nice semicircle kind of an action.
Take your breath in. Exhale, Chin to chest, rolling down of hollow, the abdominal thing here. Inhale, articulate up to a diagonalize. You're feeling your back. Great, and exhale out. Let's do three more in that direction. Inhale, prepare XL. Chin to chest, elbows soften. Inhale, articulate all the way. Feel the stretch to the back of the hips and exhale, breath in and exhale. Chin to chest. Feeling the tumbling of the spine and think of articulated from the base of the pelvis all the way up through the crown of the head and XL. Keep ourselves steady. One more breath in and exhale down.
Breath in and exhale. Great. Now reverse it. We take our breath in, we hinge forward in how we hold in that position. Then we come from the pelvis as we Xcel round the pelvis, hollow the abdominal wall in and roll that beautiful. Inhale, prepare. Exhale, reach longer, longer through your waist as you come forward. Inhale, take a pause. Then exhale round your back, drop your head and Roy yourself up. Give me three more breath in and exhale forward.
You can use your arms to help support you. Take the breath and as you hold through the length of the body, then exhale, start from the bottom and work your way all the way up last to breath in and exhale forward, keeping the abdominal wall drawn in as best as you can. Beautiful breath in. And exhale, letting the shoulders say soft and relaxed and breathe in. X Sub Ring Yourself. Forward. Breath in, and exhale. This is going to help to release any tension you feel in your spine.
As you start to grow in the belly, they're putting extra pressure on that lower back. How does that feel? Good. Fantastic. Okay, let's go ahead and sit with our feet. Just forward and I can take your feet so they're flat onto your mat. There you go. And we're going to put the hands behind the thighs. Good. So again, just take the distance, whatever's appropriate so that you can really feel like you're elevated through your spine. So you're sitting right on top of your system.
And so according to where we are in our pregnancy, how big our bellies are, everybody's going to be a little bit different, but don't be shy. Use your arms to help keep that elevation. Great. So you're gonna take your breath in here. So we're going to kind of build on that same movement pattern that we've been doing. So now with an Xcel, we're going to curve the lower back. Exactly. Just that we roll those hips underneath us and then inhale, we restack it up.
Good. Then XL rolling back. Now feel like the pubic bone is going to come underneath you and up toward the ceiling and then inhale all the way up. So this is our pregnant lady abdominal work. There you go. So we're really focusing on the trans versus that pelvic floor connection. And then inhale, become up. Good.
Imagine the belly button pulling in first. Yes. And then feel like you're holding a ball really low in your pelvis. Exactly. And then inhale up and just adjust the distance. What feels comfortable in your body? Great. If you need to put some extra padding underneath your hips, you're more than welcome to. Good and last one here.
Great work. And coming back up. Now if you feel a little bit more confident, take your hands up and we'll do it without the arms on the legs to take your breath in and exhale. We're going to go five times. Good. So keep that curve like a wave of your pelvis coming underneath you. Beautiful. And inhale that Xcel Durham, the abdominals, and keeping the shoulders low. Feel like the shoulder bays are going to drop down towards your center. Good.
And inhale that and excise you. Feel that warmth start to dry in your ad's low within your pelvis. Good and in hand. And again, so like everything comes in, you're just encasing your whole trunk. Beautiful. And inhale that and last y. Now this time go back only as far as you feel confident.
You might want to bring your feet in just a little bit so you feel more grounded and you're going to rotate to the right XL one. Center XL left. Good Xcel right now. Try to anchor your feet down through your mat. Give me two more, right? Keeping this leg steady left. Take your breath in and come back up. Good. You got another set in you.
Let's do one more. Take your breath in and exhale we go down. Great. So XL to the right now. Really hollow here through the middle. Aha as you pass to the center. So inhale through the center and Xcel to the left and wonderful. So focusing on those obliques, focusing on that stabilization. Chilis give me one more set.
Using your breath and to the left. Back to the center and all the way at. Great. There we go. Good. Great. Come all the way down for me. So it might want to slide your hips forward. We're going to do a little bit of bridging work, so go and lie down.
So arms are down by your sides. Heels are a little bit closer to your bottom. Great. So we're going to go into our pelvic curl. So we're going to take our breath in and we're going to occur of the pelvis underneath us and we're going to roll the hips up to the ceiling. Using your glutes and hamstrings at the top. Take your breath in and then roll yourself down, articulating through your spine, releasing any tension through the vertebrae, all the way to neutral pelvis. You feel that telephone hit. And then again, Xcel thread the belly button down, rolling up nice and steady through the feet, pressing the arms into your mat.
Take your breath in and exhale, soften through the spine, reaching energy out through the knees. Give me two more of those and breath into prepare and exhale. There you go. And take your breath in and ruled down. Focusing on rolling through the lower back.
And one more time for me. Breath in and exhale out.
So we're transferring energy from foot to foot, trying to find the stabilization through the spine app. Good. Two more sets. Using your breath, using your breath, and only do this if that feels comfortable. Only do as many reps as feels comfortable. Take your feet down, take the breath in, and now slowly roll through your spine. Roll through your spine all the way. Great. Good. So roll over onto your left side and put yourself up. Nicest low, good. And we'll come all the way up. Great. So that's our bridging.
We'll go into another set of those. We want to break up our time that we spend lying on our back. Okay, so let's go ahead and place our feet together. Good. Flexing the feet, bringing the toes back towards you if possible. Now what you can also do is bend your knees and if that doesn't feel comfortable, you can also slip a pad, a pillow of any sort underneath your hips as well. So let's go ahead and take our fingers in lace behind the head. That's it.
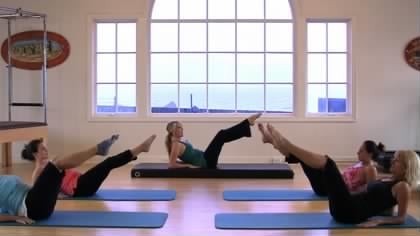
And trying to keep your legs up and if you need to keep a little bit distance between your legs as well, that's fine. So you're going to take your breath in and we're going to go to the right as we rotate with an exhale. Inhale, nice and lifted to the left. Good. And draw the abdominal wall nice and flat as you're doing a rotation. Nice work and twist.
Today and twist. Now make sure that you keep equal pressure through your heels and twists. You look great. One more time. So your left Schlitz and center. Take your arms out to the side and open your legs a little bit wider. Good. We're going to do a little modified version of the saw so we twist to the right with the breath and Xcel. We hinge forward.
Good in hell. We come up nice and elevated and XL center. Good. Inhale, get a little bit taller through your spine. Excellent. Maintain your flat back. As you hinge forward into your saw, your hand goes onto the outside of the foot. So you're basically signing off that pinky toe. Inhale, you come back up to the rotation and then back to center.
Inhale, rotate. With that, adjusting your hips. Exhale, turn the back palm away from you. Song off the Pinky Toe. Look right down at your knee for me. There you go. Inhale, come nice and lifted and XL center and to the left. Inhale the abdominal wall drawn in and exhale, bring it forward. Inhale, come back up and Xcel center. Now if you'd like, try it with your legs extended.
Let's go two more sets as much as you can, only if you'd like. So inhale and exhale. Take you down. Good. Inhale back up and exhale, center. Good and twist to the left. Exhale, keeping the abdominal wall nice and drawn in held Baca and center one more time. Each way. You're almost there. Really tough on that spine, keeping that spinal control. Inhale, come on up and XL center last one to your left and pull in the abdominal wall in. Exhale, reaching forward. Inhale, rising backups at the top and Exhale, center. Wonderful.
And take a little breather. Who Good? So why don't we go ahead and sit with our legs just crossed in front of us again. Actually you can stay facing that way. That's fine. Yeah, just nice and comfortable there. Good. We're going to do a little bit of arm work without any resistance. We're basically just using our own weight of our arms and gravity as our resistance here. So fingertips are going to come right down by your sides. We're going to bring the arms up and we do little circles going forward. So XL, now I want you to try to be focused on not elevating your scapula towards your ears. There you go. So where we're working here is a group, a little muscle called the deltoids. Yes.
Trying to keep the scapula controlled. Good. Keeping that elevation through your spine, keeping the eyes up. You'll start to feel that work. Sneakin probably about now. There you go. And now reverse it and push back and forward. Good. And just every time you breathe, breathe into the center body.
So you're working from that middle portion so you're not putting excessive weights or pressure into your lower back. So you're keeping yourself supported. Good. And I'm doing about 10 to 15 somewhere in there so you can stay with me or you can count whatever's appropriate for you. 10 to 15 good, nice and elevated through the spine and bring the arms here. Turn the palms up. If you need a breather, just lower your hands down. If not, continue with me. XL Up. Inhale down, Xcel up. Inhale down. Now I know a lot of times we think about getting the abdominal strong, the pelvic floor strong so that we go assist us as we go through our labor and our birth. But we gotta keep in mind too, after we're done with that, we're going to have a little eight pound, six pounds, maybe 10 pound baby attached to us are going to be holding him with our arms constantly.
So we want to use our arm work here to help develop that endurance and that strength in our upper body and also to help us keep that upper back nice and active. Good man. Lift up.
Elbows bent at a 90 degree angle. The upper arm stays parallel to the floor. Taking the breath in, just open out to the side like goalpost position. Exhale and inhale back to center. Exhale. Now if this isn't enough for you, you're more than welcome to add little hand weights to it. Two pounds, three pounds. If you're really daring, you can go for the five pounders, but something like that, just to add a little bit extra work, a little resistance. You can certainly build up to that as well, so you can start maybe with no weights and maybe build up to one pound or two bout two pound. Excuse me, and go from there. Good. Now here, you should feel this across your upper back. You're getting that perfect without losing your postural control, meaning I don't want you to pop your ribs or pop your belly out excessively or use your lower back.
I want you to try to maintain the stability of your spine and what you're moving. Here are your Scapula, your shoulder blades, and your arms. Great. One more time and pull it out here and then open reach, reach. There you go. Dropping those shoulders down, reaching, reaching, reaching and take it down. Beautiful. You're looking really good. Good. I'm going to turn this way and do a little bit of, so as work. Now I know when we are pregnant we tend to get a little bit tight in our soul as just because of the postural adaptations that we have as our bellies grow forward. I pelvis tilts forward, but yet I want to get a little bit more ab work and we're just going to do a little bit of legless room to go back down.
I'm going to do a second set of our bridging. Okay, so arms are going to be in front of you. Good pointed feet stream to take your breath in now. Excellent. You're just going to roll back. Now this is a test spot, so you may not want to go very far. You're going to lift your right leg up for me seven times XL.
Good. One more time. Each leg and excellent. You're doing really well and lived, and if you need to take that pause in your work. I would just suggest you sit with your legs crossed and you just go back into your breathing until you're ready. Good. And come all the way back and exhale. So at this point you should feel nice and warming your center body. Your back should start to feel good.
You still want to keep that nice rounding hollowing of the abdominal wall. Beautiful. And up and up. If I counted right, we have one more and take your breath in and come all the way yet. Beautiful. That was good. Let's do one more bridging. So let's go ahead and go down onto our backs. Nice and easy. We're going to do one pelvic curl up to the top and we're going to do 10 marches on this next set. So arms are down by the sides.
Now making sure that your throat is nice and open, your collarbones are clavicles are nice and open. You can feel the back of the shoulders into the mat, which is difficult. Sometimes you want to take your breath in and then you want to haul the ads, peeling the spine up to the top, to the bridge and pressing the arms and the feet down through the mat. Let's lift the right leg up first. Exhale, one down left leg.
Now I prefer to do this sitting on my knees. If that doesn't feel comfortable for you, you can sit on your bottom with your feet crossed. So if this doesn't feel comfortable after a while, you can always change it. Exactly, and you're just doing best modifications. You could also sit with your knees open that way you have a little bit more space here to allow your belly to rest. Good.
So we're going to interlace the fingers behind the head. Shoulders are nice and open. Go ahead. So we're going to go back to some spinal movements. You're going to take your breath in. Exhale, you're going to curve your back, allow your elbows to drop down, and then inhale, you're going to open it back up, lifting the heart up toward the ceiling. Good Xcel, start from the belly button pooling in there you go and fleet.
You're going to stretch out that lowest mine, dropping the head, feeling that stretched through your shoulder blades, and then inhale without elevating the shoulders. Just rise up to the top, filling that heart open up to the ceiling and again, exhale. Let me see you do a few here. So you're really hollowing and feeling like you're going to lift that belly in and up to your spine. Beautiful position. Then inhale, unfold yourself. Yes, and then go into your extension.
So just feeling that flow through your body and then Xcel hollow it in. Good. So much energy at that. You almost lift yourself up off your heels and then inhale, open up. Very nice. Last one for me. You look beautiful and Xcel, so this should feel really good. I'm even going to dare to say the word he yummy on your back and your spine.
It's exactly what you want. Then inhale coming up and just adjust the range of motion to what feels best for you. Now I want you to take your left hand down onto your hip and go ahead and go back to neutral for me with that. Good. Then you want to turn yourself to your left. There you go. And you're gonna do the same thing, but on the rotation.
So you're going to curve over the left aspect of the rib cage and then inhale, you're going to elevate up into the extension. Good and Xcel Hook underneath the left rib cage. Good. And inhale, and Xcel just keeping your gaze nice and soft, filling the meditation and the repetitive of this, of this movement, focusing on your breath, on your body awareness, because that's so what you're going to need as you go through the entire pregnancy, but particularly as you go through your labor and birth and exhale and all the way up. I think this next one we'll make five and again rounding. You should feel that hook underneath your left rib cage.
And then inhale all the way up and release. Do you feel that warmth on that side? Perfect. And let's go to your right now. Again, at this point you might start to get a little bit uncomfortable sitting on your knees like this. So just adjust your position, sit on your bottom if need be, or place a cushion underneath your bottom and your heels, whatever feels comfortable for you. So let's go to our rights. So we're going to twist first, keeping our stability and Exa we hook at [inaudible] over and then inhale back to our extension. And exhale. There you go.
And in how? Reaching three more for me. And exhale over the top and inhale, come back up and exhale over the top. Hooking right underneath that right rib. Hallowe'en the abdominal wall in and inhale up. And one more time. Exhale. And then we'll get off those legs.
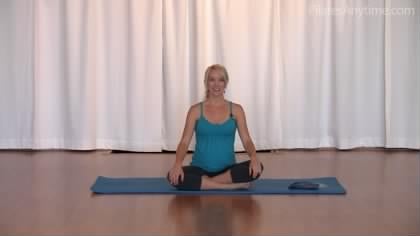
Let the blood kind of circle back down to the lower part of the legs. Okay, so let's go ahead and sit on the bottom again and taking your feet out. Oh, just shake them out. Okay, so let's go ahead and do, let's take our focus actually a little bit to our lower leg. So let's go and sit with our legs again closed. If you can't open, if you need to, you can place your hands down by your sides for a little bit of support and you're just going to go through your feet back and forth. One, two, three. Now I want you to look at your feet and try to spread out your toes. Like you can spread out your fingers. Exactly. There you go. Now every pregnant woman knows that they get swollen in their feet and their ankles, particularly towards the end of the day in case from just a normal natural thing. But we also want to maintain that skid circulation through the lower part of the legs, through the ankles and through the feet. There you go.
And if you feel more comfortable sitting on some cushions here or even sitting on a little stool, you can do that as well. You just want to get yourself in the most comfortable position. Now I want you to make circles and I really don't mind which way they go. Just yeah, just circle, but just pay attention to which way they're going because we're going to reverse it in just a second. There you go. Enjoy the crackles. If you're getting some cracks in those ankles and now reverse it and just keep your breath steady. You don't have a particular breath pattern here, but just keep your breath nice and active. Aware, nice and steady.
Yeah, just feeling your start to feel maybe a little bit of a burning come up into the lower part of the leg. That's okay. One muscle that we're working there is the Tibialis Interior. There you go. Keeping yourself nice and elevated, thinking about your postural control. Good, nice. And we'll just shake it out in the best state. Good.
I want you to take your right leg place in the ankle if you can over that left thigh and flex your left foot. Good arms are going to come up good and you're going to reach forward as best as you can, as much your body will allow. And at a certain point you'll place your fingertips and your hands down onto your mat. Now what you should feel is you'll feel a stretch through the back of the left leg and you should feel a little stretch to the right hip as well. And if you don't, just simply lean a little bit deeper into it as much as you can.
Keep those shoulders nice and soft and breathe here for me. Now for some of us keeping our foot on our thigh, on our femur here, it can be a little bit uncomfortable. So just adjust it to where you feel comfortable and if need be, you can place a towel or a little pad underneath your foot and come back up nice and slow. Great. And let's switch other side. Okay, it's a nice and elevated arms. Come up all the way. Good. And then you hinge forward and then place your hands on either side of that right leg.
Now ask yourself if you're rotating one way or the other and try to square yourself up. There you go. Now if for instance, for me, I feel a lot more of my Piriformis, stretch the back of the hip on my left hip because that one tends to give me a little bit more trouble. So you might have a discrepancy from side to side. So you just want to adjust your position appropriately. So sometimes we need to Lange lean, not lean, but lengthen out through our back a little bit more and hinge forward. Yes. And try to feel like maybe like your um, tailbone is going to flip out behind you and that will put a different angle on your pelvis and your spine, which will cause the muscles to get pulled at a slightly different angle, which might deepen the stretch a little bit more. And remember to maintain the flex foot on that right leg, you will feel the hamstring and the cat stretch as well on that right leg.
And that might be what you feel more than the hip stretch. And that's okay. Everybody's going to be a little bit different. And just breathe here and slowly at, okay, we're going to lie down on our sides. So you're going to face me and go ahead and keep your head down at that end. Great. Okay, so we lie with our bottom arm, so it should be your right arm and then go ahead and bend your knees so you're hearing exactly. Now the first action is gonna be to turn your hip this way, as you're going to keep your knees together and you're basically going to bring your toes up toward the ceiling and then take it down. Inhale, exhale and down. So basically what we're doing, we're spiraling the thighbone inward. There you go.
And you want to try to maintain stability in the top part of that pelvis. So your pelvis doesn't rock forward and back, but it means things is level, stat kind of quality. As you move that leg, there you go. Three more. Breathing out every time. Two good and one.
Now take your top hand, place it over your head, onto your ear, and then rests down that way. Now what you're going to do with that, the same time as your leg is you're going to lift your body at one [inaudible] and two. So kind of awkward looking, but what we're getting is that rotation of the head, you also should be feeling that oblique work, using your breath, not creating tension in your nuts. You're not literally pulling your neck up with your hand. Your hand is there to offer you support. There you go. Beautiful. And app three more. Keep your breath steady excel too, and exhale one that looks really great. Good. Now take that hot plague out. Good. Bend your bottom leg.
More than 90 degree angle from me this time. Good. That looks great. So now go ahead and just take that left hand, sits down on the mat in front of you. You're going to take that leg up, you're going to bend it in. You're going to take it out. Inhale, take it down. Exhale up
Exhale, inhale. And Downey should start to feel the outer part of the hip. Get a little bit warm as we are starting to work the musculature there and up. Draw it in. Take it out and down. Three more up. Draw it in.
Take it out and down and up. So it has this very nice flowy quality to it. We're maintaining that stability. Last one and in out, hold it. Do little circles for me.
So you want to draw the abdominal wall. In this point your hip is getting very fatigued. So you want to keep that focus good. And Go the other direction. It should be about 10
So bring your knees in so your knees want to be in. So your have a nice sharp angle at your hip and a nice sharp angles. You can bring it in past 90 degrees. Go ahead and bring your knees in. Just a touch more. There you go. So keeping everything nice and steady, you want to just gently feel like you're lifting the belly off the mat. Just supporting it. And we're gonna rotate. Yeah.
So we go lift up one and to now feel like you're a lengthening the top side of the waist as you take the body down. So it's really about hooking right underneath your ribs as opposed to just lifting your head up. Three more.
Great. Bend your bottom. Me a little bit more to the 90 degree angle. Take the top leg out nice and long through your body. Feel even your upper back. Connect. We go in hell, one XL, two in health, three down on, 4:00 AM Andy down. Now feel really nice and long through that leg. Reach it long, beautiful and down and reach it long. And every time you breathe out, just fill the abdominal wall.
Pulling in a little bit tighter toward the spine. Good. And reach it in. Lengthen it. Let's go for four more. Keeping the waistline nice and steady so there's not excessive movement in the pelvis. Up drawed in. Reach it out and down to more and up.
And then member, we're going to finish with our circle goals. Go ahead and draw it in. Take it out and hold it and circle.
The form and the control are going to want to fly out the window. So we want to make sure that we maintain that. Use your focus, use your breath. Three, two, and one other way.
You're going to place your handouts to the side here. Good. Now we're going to do a little bit of a side plank, a little bit of a side bend. So we're modifying the normal, I would just say the full version that we do in the place mat work. So you want your hand to be placed out fairly far away from you. Try not to hyperextend the elbow, but fill a little bit of squeeze through your Bicep and nice and strong through your shoulder and place your hand just down at your hip.
So simply we're going to XL. Lift up.
So I want you to do is just swing your legs around. So we're ready to do the other side. So again, this is really a full body exercise cause we're incorporating shoulders, upper obliques, a little bit of leg. So everything's involved here. Yup. So go ahead. Yeah you want, we are one. Let's say your foot have your top leg to be slightly in front of your foot of your bottom leg. Okay. So you're gonna squeeze those legs together.
Taking your bet. Then we're going to just go up and down five times XL
Adjust if you need to. Inhale, exhale, look down at your hand. Inhale, reach, Xcel down and Ah, and side bend, reach and down. It should feel good. You should start to feel that challenge on the bottom. Shoulder. Reach and down. Two more times for me. app and fooling yourself over. Reach and down.
Beautiful Work and I and over and reach and down. Whooo. There you go. Great. How you feeling? Good. A little bit more for me. Good. All right, let's keep going. So why don't we come up onto all fours. So we're going to go into some quads.
Are Pet work here for some back extension? I can get this guy on. Okay. I don't think that's going to stay. Keep it down here. Okay, so let's go into our all forts. Legs are nice and open. Okay, so we're going to start very simple here. We're going to slip the right leg out, lifted up.
Draw it in and inhale and up and down through the transition to the left leg and hell and up and down. And you have so keep your head up just a little bit. There you go. And makes you lift the belly up. So I want to see that you're lifting your leg from your glutes and not necessarily from your back. So try to give me a little less kick in. A more of a gentle rise from your buttocks. Yes. And bring it in.
And inhale, exhale and inhale. Exhale. Slide it in for more. Reach. Lift down. And, and so that here you have to remind yourself of your per hoster control. Are you sinking into your shoulders or you shrugging up towards your neck? You want to keep everything long, are you losing your abdominal connection?
And in last one and out, up and down, and in. Good. Come back to your center position here. Now I want you to take your right arm up, take it out to the side. Exhale, bring it forward and down. We're going to switch arms. Lift the left arm up. Exhale, inhale and down, right arm lift up. Exhale, inhale.
Now this is a challenging exercise because it's really tough to maintain the equality from shoulder to shoulder and not to rotate or tip from side to side. So focus on is if you had a tray, and since we can't drink alcohol, we can't use wine or Martinis as an image. So we'll just say water, water glasses on your shoulders and you don't want to tip that tray of glasses over and make sure you breathe into your abs, keeping that Nice Center body control, lifting the belly up towards your spine, creating a hammock for your baby with your abdominal muscles. Draw down one more time. Each arm. Inhale, exhale, inhale and down. Last one and lift. Exhale. We'll take a little break after this and down. Hoo, Hoo. Good and come forward. Little water break. Yes, and of course at any moment during this class, drink your water. Good.
We're going do another quadrat pad position, a little bit of a back extension. They're going to finish with some side stretches in. Then we're going to wrap it up from there. Great. So here we go, back onto all fours. Now I want you to take your right hand behind your head.
Now I'm adding this as a little bit of a challenge. If you don't feel comfortable or safe with your hand behind you and you can always keep both hands down on the mat because we're going to take the right hand behind the head and we're simply going to lift the chest up and take it down. Back to neutral. Think head, neck and chest strong through your left arm and Xcel down. Just five of them in how? Lift the backup and Xcel down. Good. Let me see these from you. To think head, neck and chest. Press down through your left arm and take it down. Try to bring your sternum forward so you're really reaching the out and take it down. Take your hand down.
You can sit back over your heels if you need a little lower back. Stretch in between sides. Good. Come back up again. If you need to keep both arms down on the mat, you're more than welcome to. So think long net from your mindset and draw your scapula nice and open to take your left hand behind your head. Good. So five times. Inhale up, exhale down. Inhale up. Exhale down. Inhale up. This is a challenging one.
Exhale down. Inhale up, draw on the abdominal Wallen. Exhale down. One more and reach up. Exhale down. Placed the hand down first. Good take toes underneath you. Good. We're going to lift up and exhale. Good. Holding this position.
Great position to pull your shoulder blades apart a little bit. There you go.
Now this is a balanced exercise but also side stretch exercise. So what we're going to do is we're going to think of going up, inhale and over and trying to tap our fingertips to the mat. Then exhale, use your obliques to pull yourself up and inhale up and over. So we're trying to maintain the stability through the pelvis by feeling like we're gently squeezing the pelvic floor musculature together. Then Xcel pool yourself up and inhale.
It should feel good. You should feel like you're pulling your waist away from your pelvis line and Accela up to more and reach, pull in the abdominal wall and keeping your eyes forward if you can, and XL, draw yourself up. Last one up, bend over and Xcel. Good and switch sides. Okay. And we'll go. Inhale, tapping the fingertips onto the mat and pull yourself out. Back. Sail. Inhale over the top. So feel that nice touch and you might feel tighter on one side versus the other.
And just pay attention to that. Drawing your awareness in should feel that nice pulling open like your rib cages fanning open. Then XL up last too, over the top, reaching your fingertips
So whatever that sensation might be, maybe a little bit more length through your spine, maybe a little bit of warmth through your shoulders or your hips, a little bit more linkedin stretched, whatever the word might be. But you want to definitely draw your awareness into that right now and see how that feels. So I'm gonna let you choose. You can either choose to keep your hands just gently down on your knees or you could choose to connect with the life growing inside of you, which I'm sure we all want to do. And just keep your hands really nice and low on the belly. Okay, so we're gonna go back and some nice, gentle breathing here. So let's go ahead and you can close your eyes or just keep your eyes downcast, just nice and inner focused here. And with each breath, I just want you to take a moment, recognize how you feel with each breath. So breathing in and just realize by practicing polarities you're doing something good for two lights now, which is incredible to think about and you're giving yourself time, which is most important than anything to connect to your own body, to connect to the life that's growing inside of you.
Preparing yourself for the marathon of birth and the birth is herring yourself for the marathon that is parenthood. Just recognizing those sensations deep within your body, filling the breath. Come in and out. One more time, and we're going to finish this as we started the class arms out to the side. We're going to float the arms up with an inhale XL, bringing it forward, hugging all that air into you, and then inhale restack your spine and XL, pool the that into your standard body rounding and inhale, flowing through your spine, flowing through your arms. And two more hollowing in filling, gentle squeeze of the abdominals, gentle tightening that pelvic floor musculature.
And of course that nice opening through the back and Xcel draw it in. And this time when you roll up, I want you to really focus on being right on top of your pelvis with your spine and your shoulders. It's just yes. Good. So this is where you want to be in between every one of those movements and take your hands down. And one more time. Big Breath in.
Pilates for Two: Modification Classes for Pregnancy
Mention
 |
Leah Stewart (Teacher) |
 |
Hagar S |
 |
Alice W |
 |
Ozlem D |
|
|
Laura T |
|
|
Toni F |
 |
Maartje V |
|
|
Carla A |
|
|
Gosia M |
|
|
Francesca R |
 |
Kerry H |
 |
Judit K |
|
|
JSeifel |
|
|
Saila P |
 |
Jessica T |
 |
Heidi VDB |
 |
Dianne P |
 |
Hannah M |
|
|
Bethany O |
 |
Lisa D |
|
|
Lise A |
 |
Anna N |
 |
Bonnie Machuca/PrecisionPoint Pilates |
|
|
Monika R |
 |
Kandie O |
|
|
April S |
|
|
gfit |
Comments


Congratulations! That is so exciting. I am so glad that you enjoyed the class and that you felt challenged yet safe. All the best to you in the remainder of your pregnancy and med school. Let me know if you have any questions.
Leah
I am so happy to hear that you enjoyed the class and that you are finding time to do it, even with a two year old. I know that this response is late and you've had your little one by now - Congratulations!! If you have any questions about postnatal exercises, please do not hesitate to ask.
Take care,
Leah


Great question. The idea of no spinal forward flexion can be complicated and sometimes confusing. It is true, with pregnant woman (2nd trimester and beyond) as well as women in their first few months postpartum, we want to avoid certain types of forward flexion. This includes forward flexion where the trunk lifts off the mat from a supine position (Chest Lift, Double Leg Stretch, Hundred). This type of forward flexion puts an immense amount of pressure on the already stressed abdominal and pelvic floor muscles, potentially causing more stress and stretch.
In saying this, the forward flexion I use in my pre- and post-natal classes here on PA are safe and yes, even challenging at times. Each woman will respond differently to these exercises.
(continued in next comment box)
I hope that this helps you out Heidi. I think that you'll find some very helpful cues by simply watching my classes. Please let me know if you have any other questions.
Take care,
Leah
I am currently in my 2nd trimester and i have been using your video to workout. It feels great after having done this.
It would be great if you could post some more workout videos as it would be really helpful and give a range of workout. I really enjoy your classes!
Thanks
Monika
I am so glad that you are using the prenatal classes here on PA.
I will definitely be adding to the pre/post natal classes in the future

Leah
You need to be a subscriber to post a comment.
Please Log In or Create an Account to start your free trial.
