Class #2773
Advanced Reformer Breakdown
Description
About This Video
Transcript
Read Full Transcript
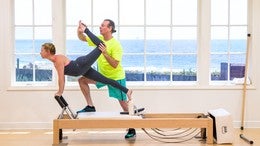
Hi, I'm Michael and I'm tone. So previously we did a whole advanced reformer and now we're going to go over some of those exercises that might be a little bit more challenging or that he might not be so familiar with and take them apart a little bit and build them back together. Sound good to me? Sounds like an idea fellow. Let's get going. Let's get going. No. Okay. So the first exercise we're going to go over is the high frog. So it comes in the session by your, um, the short spy massage. I in the advanced reformer, we have moved officially to short spy massage layer into the workout and replace it with the overhead. So if you still follow that order, the overhead earlier in the shorts by massage later, you can add the high froggin if you did not do that.
So if you do the short spy massage in the beginning and choose to do overhead at the end, then we would advise not to do the high frog in combination with the short spine because it's going to be too much too soon into our count. I hope that makes sense. So we're going to be on two springs. They had business down. We have a little bit of space between our shoulder boxes and our shoulders. So we have room to go over.
The setting of the straps is just the same as your short spine massage. So either when you have the loops, you use the um, the smaller loops or you fold up the straps. If you have a machine like this. So you're going to bring your feet in and we're going to set it up like a normal short spine massage. So we first going to do, let's do two normal shorts, back massage, and then we'd go. So any version of the short spine massage we'll do making sure that they are going through the machine or through their spine rolling nice and smoothly.
So now in the next one, we're going to go into the high frog. So we're going to pull it in. We're going to press out the same way. In a perfect world, you want to lift the pelvis up before you move. So when everything moves, she comes into a perfect diagonal line. Can you stay for a second?
So we want to make sure that the legs are not straight up because that would put a lot of pressure on the neck. The pressure is going to be in the upper back and the shoulders yet. So just um, let's finish your shoulder or your shorts by massage just to get her out of her neck for just a second. So when you do the high frog, that's the key point is that we are on an angle and that we are not straight up so that the pressure is not on the neck but in her upper back and shoulders. So we get into it, we curl up, we get in that alignment and everybody's going to be slightly different based on their proportion and under strengths. Now we tried to keep the pelvis open as she bends the knees, like have normal frog and then she presses out. Now the tendency, sorry, the tendencies as these keep going, as they straighten the legs, the butt is going to sink down.
So the cuter we often gave is push the hips up as you straighten the legs out. The hips are not actually moving, but that is a really helpful little hint. Let's do it one more time. So after four or five times you stay here and then you finish it off as a normal short, short spine massage. Now Romana used to do this in the middle of your shorts by massage, so not as the last one so that you have one more short spine massage to release the back before you go. So you have short span massage, two or three. Then you're high frog and then finish it off with one more full short spy massage to let the body settle. Does that make sense?
I can't hear you. So here we go. We go into the headstand front. So let's step off for the next exercise we're going to take our time with is the headstand front for the heads. Then front you can either use a little pillow or a folded towel. Anything works. We're going to have the headpiece up, the towel is going to be on it and the bar is going to go up. Now the problem with the neck, with the headstand front and back is the alignment of the neck.
We never know where to put it. If you think of it, can you, can I use you for a second? A natural position of the neck. So we have that long spine. The head is just straight up. Now if you tip that woop woop upside down, it should have the same alignment, right? So there really is no magic about where the head is at the end. The neck should just be straight on the body.
That's basically all we are looking for. Now we can place the towel down and place the head sort of in that crack position right where the headpiece goes up. That is for most people a secure space. So you cover that with your pillow, with your pillow, or with your towel. Now when we first teach it, we want to make sure that all the weight is on the hands and not on the head.
So the hand is going to be on the outside of the box. Be hands a little closer. Yeah. So you're really on your hands. And on the elbows down, but really hold yourself up and then the head is going to go down right into it and we make sure that come in a little bit more in so that it's nice and long. Then one foot goes on the foot bar now before six to here, before she pushes the other foot on it, we to make sure that the shoulders are set so she pushes in her arms and then the other foot comes on it. The first version of it is just rips pull up. There you go.
Just out and in and for a lot of people when you first teach this or for is do this. This is enough, right? The next stage when she get better is going out and I'll lower the hips into extension and then pull it back up. So this the second level I used to locate down there. Okay. Normally we do do that many now stepping back off with one foot, now push evenly with both hands and then you get off. The getting off is where most people get hurt during this exercise because they're so happy that they're done, that they survived it and they could do it, that they placed the foot down and just go off.
And because their head is in between those shoulder boxes, it goes right. And that's no good. Now if the client is very secure, you instead of having your hands here, you can place the hands actually on your back and have it fully on your head. So that would be a more advanced version of the advanced exercise. You want to try that, we can just do the position, right? So we're going to put the hand down the head down, the other hand down, and then we place the foot on it and we support ourselves here.
And then in a position would be the hand skill onto her lower back and she will push it out in this, let's not to the extension, but just go out and draw the chin in slightly and then place the hands back and then stepping off. This is a lot on that neck, so be careful as I feel. Okay, so now what we can do front, we can do back. So let's lie down on our back again, we're going to have an issue with the neck and how to get into it so we have to slide down a little bit. So keep going, keep going, keep going there. So I'm actually in front of that fold or the cracked where the head piece goes up, that hinge. So when she lifts herself up, she rolls right on into it, if that makes sense. The hands go against the shoulder boxes the other way. Yeah, right on top right now this way and on top of day ago. Now the cue, the most important part of this exercise is the capability of having thoracic extension. If they don't have a lot of thoracic extension, they are not going to able to lift up and back enough and they go on to just do this with their heads. So that's where you're going to get into trouble.
So the feet are going to be on the balls of the feet. You can be parallel or impliedly stance, whatever it feels the most secure. They going to push with the hands up and they go to lift up and a really going to push this part up to the ceiling. THRASS it out. Low of out in is that first part thank you Perez out there you go.
To make it harder, we can add a lower and lift of the heels, pressing it out and really think of that rib cage popping up. Now here push up so there's no weight on the head. Then the head goes down and then they roll down. So before you can go down you're going to have to take the weight off the head. Otherwise it's going to hurt the neck so you lift up the head is free.
Danger can curl in. You could make this harder by not placing the hands on the shoulder boxes, but having the arms on top. When you do that you want to make sure you hold the small pole from the short box, right? We don't like to have the hands loose because once they go to arms are going to fly around and then the body is going to fly around. So creating a close kinetic chain ish feeling just the bar would just be perfect. Okay, so guess what?
We got a ball. So we are going to do it with the bowl. So here we are. We are going to place the hands down. We're going to get ourselves into the position that we talked about. Now from here the teacher is just going to bring the bar and you're going to bring the bar up to the ceiling and then you're going to press it out who are right? And that's a lot of work. And then you take the bar away, you place the hands down, you lift up and you roll down.
Now just a little side note, this is helps them to stabilize themselves. So it's helpful but you have to be careful because when they're upside down, their eyeline is back. The arms are going to go to the top. But if I bring the bar here, they never going to find it. So you have to make sure that when you give them the bar that you bring it down here so they can see the bar and know where you are. Once they have the bar, the arms go up, right? So make sure that you make that distinction because they're not going to see where the bar is when you tried to give it to them. Okay,
Now in the backbends, first of all, you do not want to start them unless you can do the thigh stretch all the way down into the thoracic extension. So I'm just going to have you do that in the beginning. So for the thigh stretch in the back, then actually comes right after the thigh stretch in the classical order. So what we're going to do, and we're going to make sure there's three springs and we're going to do Joe's thigh stretch. Now in the thigh stretch too, oftentimes you want to come a little bit more forward. That's the chest expansion position. She's just having a little blonde moment.
That's okay. So for the thigh stretch, we always start here. Now what you want to really think of in the thigh stretches you drop the sits bones down. Nope, before even go sitz bones are drop down. Drop the sitz bones down towards bring the pubic bone up to your ribs, pubic bone up to your ribs. Yes, and you can sort of see the slight adjustment that she did. Now from here, what I want you to think of doing is keep that pubic bone going up and you're going to go back into the thigh stretch. Joe's going all the way down, all the way down. Now from here, she has to go into the thoracic extension without losing the center, which she's losing just a little bit. She brings her chin into her chest and then comes back up. If your client cannot do that, you have no business during the back then pasta period yet because they need that strength in the core because otherwise it goes into the lumbar spine and the arch happens there and it can be very dangerous and you've just, they now own your studio. So that's the setup.
Now you can just relax for a second. There's two bags, act beds. You've got the back, then with the bar down and you have the back bend with the bar up and you ask what's the difference? Well the bar down is easier cause it's less extension on the spine but it's harder to get back up when you put the bar up. The extension is a lot greater but it's easier to get up. Romana always taught us to do it with the bar down first and it's on two springs cause we're now going from the thigh stretch.
She's just finished it. We go the back bend two springs. So from here I as the teacher am going to put my foot here on the reformer just to make sure the reformer doesn't move. At this point I'm going to spot by putting my arm across the back here, her shoulder blade, she's going to bring her arms and she's just going to go back. Keep that pubic bone going up and she's going to find that bar and I'm going to keep it here and now she's going to go out with her arms three times, and then she's going to press with the thighs three times.
Keep that pubic bone pulling up to the ribs, and then she's going to come up and then forward and relax. Then she's slowly going to get up and I'm going to give her a little break. Now Romana also put breathing into it. We're not gonna do it, but we're just going to go through the breathing. You're going to inhale, exhale, back. Inhale, push it out, exhale back in. Inhale, exhale, inhale, exhale. Then with the legs, inhale, exhale, exhale, inhale, exhale. Then you inhale bringing it up and exhale over.
But I would not worry about the breath in the beginning because as you can see, it's a lot going on. Just get them to move. So how are we feeling? Do you want to try with Mara? Oh, brave soul. Now with a bar up, if you have the grads, equipment, safety, safety, safety for nothing goes wrong. You have got to put your foot here. If you're using balanced body or peak, they now have that little catch that locks the bar in so it doesn't fly up. So I'm going to place my foot here.
I'm going to bring the other leg that I'm standing on next to the reformer. So I have something to brace. Again, I'm in a spot by placing my hand here. Let's try the breathing. Let's see how coordinated we are. Inhale, you're gonna go back. Exhale, finding that bar. Inhale, exhale, inhale, exhale, inhale, exhale, thighs. Inhale, exhale. Inhale, exhale. Inhale, exhale. Inhale up and exhale over.
And notice how I help her upper mat extension and I help round her and keep the support and then she slowly and sue as a star. Thank you. Go ahead. Next exercise.
Now looking at our will tapes him from Joe, he actually has his, the head on the headpiece itself. So he has it on the slammed and we have found that that is actually for a lot of people more comfortable then right in the middle. Um, but so just so you know, you, when you get there you might want to play with the different starting positions. Um, and based on your neck and your thoracic spine extension, it might make a difference. So that's about the pillow. We do not need the foot bar, so you can have it down if you want to. We're going to be on two springs, we're going to use the straps and since it's a a long time on the head, you want to make sure those are ready to go. So wherever you are, make sure the easy to get so the client is going to lie on down.
Now, if you saw the other reformer work worked out with Su, um, you might remember talking about the position. So the idea is or not, the idea is the exercise is that your feet are going to be flat the whole time on the carriage. And right here is where some people are going to get into trouble based on the flexibility or based on their proportion. So if you ha are very tall or have very long legs, you might not be able to get your feet there. Um, so that means that your pretty much cannot do this exercise, right? Um, Romana every now and then a very rare occasions allowed you to be further down. Like for me on the carriage, she allowed me to be on my heels. But as a rule, she did not. You had to have your whole foot on it, otherwise you were just not going to do it.
So be very careful when you change that foot position because it's very easy to slide off. So you can always give them a pad if they get slippery or if they are fearful and need that extra security. So the hands are going to go be on the headpiece. Again, we have one of those headstands, but this time we going to be on that slant, so she's going to push her sternum up. He's going to be a little bit more up yet he's used to do it the other way. I'm more in your head. They're not that far. There you go, and we're going to really push that thoracic spine up. Really, he feet down, push into the feet.
The pressure on the feet is going to help her in a strange kind of way. Then I'm going to give her the steps again in her eye-line. Otherwise she has no idea where it is and then she's going to bring the arms down and up. They don't have to touch the floor all the way. They can if they have that control and flexibility, but now you really use the arms to push yourself up higher, so push up. There you go. Beautiful. Then give me the straps. Place your hands down again.
Lift up. Draw it ahead in. Soften that ribcage to roll down. Bend the knees in. Give yourself a nice little hug and there is your bridge. Beautifully done.
Let us move on to the balance control step off. So for that one we are going to take the bar, the headpiece down, we don't need the where the towel in regards to the spring setting in this whole section which comes together with the corkscrew in the tick tock and all that good stuff. And the spring setting is really not that important. It is only there so the carriage does not bounce around. So you add as many springs as you need to make sure that the carriage stays stable when the do the exercise. So it can be two or up to four. Right.
So we're going to build this up. So she's gonna hold on behind the shoulder boxes. Yes. Sorry. We have to make sure that their head clears the shorter boxes. Romana had the rule of like you should be able to put your arms behind you and then you're clear. So she's going to hold on to the back and now she's going to have the legs out and she's gonna roll up straight up into a stand.
The first part of the exercise is just finding the frame. So one leg goes down and she touches the frame with that foot. So she has an orientation and bring it back up and then she goes down and back up one more time. So she goes down at this foot, has to stay right in the middle. She cannot let that foot go out, down and up, and then roll down. So when we first teach it, this is the first stage of being able to keep one leg up and find this side of the frame. Then we're ready to get off. So magically she's now ready.
So let's roll up curling up. So the foot goes down and touches the outside of the frame. The opposite hand goes on top of the reform under shoulder box. Now this Lance's out on the corner, she touches, she lands with his leg bent and reach. So this leg is going to be important that it stays close to the, and relax for a second. Just stand up. So for a lot of people, this is it for now, right? This would be the second stage.
They just stepped down and they go to go lie back down and then do the other side. They might not be able to roll back on. They just do the roll off part. Now. Um, some people when they step down, you relax for a second. She's like, wow. And as they start off very enthusiastically with finding the frame and then as they go down, they slowly move the leg away from the reformer and they actually end up somewhere here from this position you never going to be able to get back on. Right?
So then you're going to have to cheat a little bit and let them hop back before you go back on. Right. Sue didn't need to because she was perfect because she's Su. So let's go back on and we'll do the other side. Right? So this would be the second step. Just the stepping off part. We hold on, we curl up, she finds the outside, she placed the opposite hand on and she on an angle reaches down. She lands on that leg and there she is.
Just stepped down, pump around and go back on. So now we're ready for our grand finale version. Collegiate. There you go. You roll up one more time. Oh, we find the outside. This leg is right in the middle. The hand goes on top of it.
She steps off and she lands here. I could do a little [inaudible] if I was inclined to do so. Now to come back on. It's important that they bend the standing leg. A lot of people want to keep that straight and then you curl under and you follow this foot.
This foot that is up is going to be your crucial point because that's going to be your reference point and then roll back down. Most people end up slightly crooked and then we moved them back down. Make sure it's clear. There you go. So when you go down, bend the standing leg and follow the top leg and then you're going to be most likely, okay, let's try the other side on your own this time.
Hand goes on it. Keep that leg out. There you go. And then find it. Now Ben, the standing leg, lift that leg up. Keep lifting it, keep lifting it, keep lifting it, keep lifting it, keep lifting it, keep lifting it. Whoa. There's for improvement on that side, right? So you could see that she was like fixing her hip and that she was not able to keep that like coming up and keeping it above the frame. So as they go up, once they start losing that leg and that leg starts to waiver in the wind, then there's no way for them to, to get there.
So that like has to be very strong up there. Otherwise there's no, um, the body does not know where it is. Okay, good. We're going to move on to stop Dontre [inaudible]. So just stars on one spring. And again, there are some different versions of it. The basic star or site bend, um, can be done in different ways.
So the first thing we can do is just find a side plank and just go out in, in, so here we go. The hand is in line with this shoulder box, so make sure that that is online. Then the leg goes against it. Now you have two options in the site, in the basic star, meaning this foot can be on top of it or you can bring it on top of the shoulder box. Those are your options over there and either one is fine for right now.
So she's going to lift up into a side plank. We're going to make sure that the top is curled. There you go. And we go out and back in and out. And that would be the most basic version of your site band. And then you step off, right?
So if they do just a side plank out in good for them, then you have lots of variations of bringing the arm and leg up, bring it to the front. You have Rhonda Jams, you can go absolutely crazy with that. So what we did in the previous state in the workout part is the following. Here you go again. One more time, one more time with feeling. Here we go. So we do two of each. That's what we did. We go up and down up.
Now kick to the front, kick to the back. But the leg I am keeps going forward. Now we did run the sham starting from the back circle all the way. Bring it back in. Then from the front, now we stay out as it circles around. Wrap yourself back. So now we end up in an attitude.
We pull it up in the attitude, we grace fully stepped down and reminded our little bow. This is pure for dramatic effect. It has no purpose at all and
Kataifi splits or otherwise known as the long splits. Now what you want to do is head rest is going to be up, bars are going to be down. It's going to be on two springs. And we have pads. You put one pad here I think you can see, and then you'll put the other pad across. Whichever leg is going to be in front. You said you wanted the right, like, sorry. If she's putting the right leg in front, we'll put this down by the left. Do you want the pad or not? You don't need it.
So you could do it with the pad or you can do it without the pad. Some people, the pad in front though, however is important. So you can also do this in first or second gear. But we're going to do it in first gear because I've heard extreme height. Um, but you could do it in secondary. If you had somebody longer, like tone was just here and he's a little bit longer and you can put him in second gear. Um, so we're ready. So we're going to start. She's going to stand right in the center. Now from here, Romana would spot by putting the foot so the carriage didn't move. If you were first introducing this exercise from here, you're gonna, she's gonna bend forward. She's gonna grab the sides of the frame.
Very important. I still have my heel here on the frame and my foot on here. She's going to bring her front foot, which we decided was her right foot onto the pad. Now you can add the heel here on the frame and on the foot bar the toes. That's what most people do. From there, you are going to heel toe your foot back to that pad from here.
I'm going to keep my foot on here so the carriage doesn't move. She's going to come up and she's going to straighten both legs. Now I've got her and I'm spotting or this way and the most important thing before we even move is she wants to put CLCs rolling in on her foot there. Bet I want the weight on the outside of the foot so she can really press and I want the front foot pushing straight in that knee. This one bring our arms straight up. I'll get out of my way from here.
I'm holding her here, so really stretched that legs in the first part of this exercise with me still having my foot for safety is she just goes out and in. This is my be all we do in the beginning. I guess with her, this is all we are doing now. We're going to just go out and in and I have my foot there so I could abort mission if needed to be. Now really keep the weight on the outside of that back foot you feel that helps straighten the leg. Then if she has this, we can go a little farther.
How low can you go? So if she can go into the full splits, great. If she can't, this part of the exercise is fine too. You don't have to go down all the way. Then she can do three times with their arms back, calm back as Romana would say. It's just a thoracic extension and notice where I'm spotting her to help her stay and relax and come in just for a second.
If you can do the splits going all the way. Not necessarily all the way down to the floor to the mat, but if you can go out here, if you can go out here and back with control without bottling, then she would have you add the circles with the arms. So Ramana taught this in stages. It wasn't just wham, Bam, boom. Thank you ma'am sound, which is what we're going to do. So let's pretend she really wants to push, push into that heel, that heel, push that he'll feel that for some reason she just doesn't want to push through that heel. That's a sous ism. My foot is very small.
Yes. Bring it up a little higher. Higher [inaudible] okay. Is that better? Yeah, so because her foot small, which is really great, I'm putting her heel more on the top. Do you feel that because her foot is small, a lot of people aren't going to have it all right there so she can really push. Now we're going to go out. How far? How low can you go? That's fine. So she goes here, then she goes back Venn. She would calm, brave back and up.
That's okay. So we would go forward [inaudible] forward and [inaudible] and bring your arms back towards me and come back up and that's all we can just forward and up. And then from here to get all the splits, the official way, she would bend that back leg, bring the knee down to the carriage, come forward and bring the other leg back on. Now if she was able to go all the way down on the splits, I'm not gonna Split, but you would be here and you would Comray forward as you go back and then you would pull it back in. You would go out and in, and then you would go reversed. And in reverse and in, that was my ballet lesson for the day. So the next exercise is the gondolas splits.
It's on one to two springs head pieces up and the foot bar is down, which I think it's already set up lucky ass. So she's gonna step on. I as the teacher, I'm gonna put my foot here, heel here on the frame toe there. So the character isn't move, but she did band so it didn't move. But you never know with those clients, they just, I'm going to put the guy in the Nepal right in the center. She's going to take this front foot and bring it there. I'm going to switch, which is a big no, no f I'm introducing this exercise.
I should never have taken that foot off. Bad teacher. From there, you're going to go out. You're going to heel toe it out. Romana for the history books. You stuck. Call that Susie Q it out, but I'm butchering it up bed. It's just heel toe, heel toe. Fun here. All she's going to do is keep this in and I'm going to keep my foot there and she's going to go out and n no, I'm going to bring her in once more. Now she's got her booty coming out just a bit. I want to think it. Pull the pubic bone up towards your rib cage.
Grab the sits bones down towards think of bringing them to the heels. You feel that good? Now push out and pull it in. Straighten those legs. Good. From here, we're going to stay in.
You can a band one leg only out and pull it in out. Pull it in three times. Pull it in. Now the other leg, I want to see this rotation. So the head of the femur and by dropping, pulling that pubic bone up. Yes and straight and the legs. Now we go out with the carriage and she does the same thing. Bend the leg. That time frame they have en and I want to see that.
I think we did that and that was better than the front splits. So the next exercise is the Highbridge.
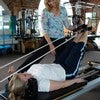
What makes this one is hard is getting into it and we'll have a little trick later on for that as well. So let's go over the mechanics of the, of the basic exercise. Going to lie on your back. Both feet are going to be in parallel on the foot bar and we prefer to be on your arches. It gives a little bit more stability. Then the hands are going to be on top.
Now this is where it gets hard because it's a long way from all the way down to go all the way up. So that's where she's going to have maybe a little problem and we going to have to help her. So from here we're going to press steroid on up and she needs to have a lot of arm sprain, arm strength, and upper bex strength to get up there. From here she tries to keep the arm straight and pressed the carriage out with her upper back and under out. So the arms stay as straight as possible.
Then the arm stay here and she pushes out with her legs press and think of pushing this rib cage up and then the head goes in and we roll on down, right? So that is our basic high bridge. Then we can do some very variations. We can do that whole sequence again with one leg straight up in the air. That sounds exciting. Let's try that. So we'd go push up Perez up all the way again.
How are we doing? There we go. So one leg goes up to the ceiling and now she can still do pressing with the arms. She can still push with that leg, that leg back into
Now as we talked about, it can be quite a long way from all the way down to go all the way up so you could use your long box and this is not something that Romana did. This is something that we do as almost like a booster box. Now when you do that, you want to make sure there is space for her hands to put steel on the shoulder boxes so you cannot put it all the way against it because then there's nothing to hold onto. So she's going to lie down on her back on the box. And as you can see, she is now much higher with her body.
So now it's going to be much easier to get all the way up for her. So we press and reach and it makes a big difference, right? So she can now still do the same things that we did before, but giving them that raised floor is going to really help them out when you first start doing that. Okay. So the next exercise are distending arms series. So the next exercise is a standing arm. It's actually a series. Um, it's probably the easiest exercises standing on the farmer.
It looks sort of scary, but it's not really that difficult. Um, I would always teach it on two, but you can go to one spring. Um, had pieces of foot bars down pads or no pads is always the choice. Pads. No, no pads. If we were gonna use the pads, one would go right here and one made here. But she's a pad list Kinda girl.
So we're going to stand up on the reformer. Now. Tone explained it beautifully in his advanced class that he did with sue earlier on a different channel from here. He's already put all everything together, so we're gonna have those extensors, so you want to make sure that's there. You're going to grab onto the handles for the first one that way, but we're going to do that in a second. I just wanted to show, then we're going to start in the center. From here, she's going to bring the foot front foot and you're going to have the crease. You're going to be right across the arch. Then she's going to heel-toe this back from here.
She's gonna come up. She's going to go forward and this is how far forward you're gone. That lunch is really gonna depend upon your flexibility of the Achilles. From here, I want a really deep lunge. This foot can be a little bit turned out and I want it that way, especially with sue and I want the weight on the outside of that foot. You see how she shifted the center? Let it go to what you want to do.
There she is. I want. If you shift to the outside, you can see how that works. The alignment of relax. Then like what we talked about, we have the extenders for when we turn around, but right now we're going to have the handles here. The most important thing about the handles is that you have the weight even across the whole ham. The little finger is just as important as the pointer and I want her to make fist. I don't want the fingers long. I want to fist do you feel that now, like I said, back leg weight on there. From here in that lunge, she is going to have a high contraction over, so the ribs there just going to soften the sternum is going to soften from there. I want this push up into my hand there you see that high contraction.
Now from here she's just going to pull the arms up as high as she can and release. Keep pushing up into my hand up and release. Let the head follow up into here high. That high contraction so has just a slight tendency. Good Matt? Like I said, it's a little hard and she's struggling, but she's safe because it's on the two springs for teaching.
Now she's a pro, so I'm going to take a spring out. Now, watch what happens, but now I've got her in all the right positions. I want that back leg. Put weight on the outside of the foot and you can see from that camera over there how it changed the alignment and soften ribs. Yes, there you see how she just fixed it. That is beautiful. How do you feel? And then slowly bring the arms and then she would slowly roll herself up. Then you remember the trick to turn it around.
You can keep it in one hand. Well not exactly keep their mind for now the teacher will just take the steps and you'll turn around. I'm going to readjust so we now have the extended straps. I put you on the spot there of how town got you to turn around. Remember from here we're in a lunch. Same thing. Ribs off. Really pushed to the outside. That back foot. You feel that?
Now use this foot does not have to stay in the center. It can be in right in front of the shoulder block. So you want to bring it, he'll tell it in front. This way more towards me.
It's arm circles that here we go. Happy. Now if you look the danger with these, you keep going and we're going to keep talking as she's giving me a little bit of lobster hands. I want the little finger in the circles too. Do you feel, feel the difference. I know it's hateful and reversed. The circles. No lobster hands. Even though we're by the ocean. I want little finger. Yes.
Then last one, circle up. Stay there. Bring your hands behind for the shave. Now what would be perfect is if you could just open those apples, just hair more. Good. Breathe, stir ratchet out and then lower it down. Slowly bringing your arms down. You'll be in the diagno from here and then we'll do the bicep curls this way. So you are going to be at a slant. The stays in and the arms extend all the way though. Cheater, God
Now of course I could have been a nice teacher and let her change feet in the front, but I wasn't was I?
Three springs does give a little bit more stability to the platform or to the carriage. But generally, um, we like to do it on two springs and especially with sue and her proportions, two is more than enough. Um, the danger of this is obviously falling down, um, because as they go, the, the, the Florida they're standing on is, might move a little bit. Um, they need to have a good squat. And the reason for that is, is that if they are not having a good squat like on standing on the outside of the Cadillac, the tendency is once they're down and they can't get up, is to start bending their arms to pull themselves back up. Now you can imagine that if I'm down here and I start to pool, the floor underneath me is going to move and I'm going to fall backwards into the well, which is generally not what we're looking for. So you want to make sure that they are absolutely never, ever, ever, ever bending the arms. Okay? So that's what you want to look out for because if you see them slightly go be right on top of it. There are two ways of getting into bed. You can either start down in the squat position itself or you can start standing up. We're going to start standing up today.
So she's going to stand right on the back edge with her legs in a parallel position. Now she's not going to be able to reach for that. So this is our first, um, problem point. So she's going to have her legs bent and slightly tipping over to grab them. Do not move. So now as she gets into the position and straightens her legs, the machine is going to move.
So that's where you're going to have to be careful that they don't lose their balance from here on. We rung them machine to move as little as possible depending on their proportion, the length of your straps, there might be some movement involved, but you want to keep it as straight as still as possible. She's slowly young to sit back on her heels and the arms move up as she goes. And then she slowly come to stand back up, back where we came from. That's where it is.
So this whole exercise is really much a balancing exercise than a real heavy duty squat exercise. She's gonna fold into her pelvis and then we come up. So are the ultimate control exercise because if anything goes wrong, they are going to be in the well going down and it's not a wishing wells on their yard. So now we can do this with one leg. Are we going to be brave today? Sure. Why not? So bring the legs a little bit more together. Take your favorite leg up, and then we are going to slow bringing the front leg straight, straight, straight, straight out in front. There you go. And then go straight. See and you see just even though she knows not to bend her arms, the body takes over and the minute they feel insecurity, arms get involved and a machine is going to move, right? So let's try the other, our leg straight in front, there you go. Reach, stare to sit back. There you go. And up you go.
Keep your chest lifted. There we go. Bend the knees, bring it, bring the machine back and then drop the straps, right? So you just want to make sure that that is not because it's a natural instinct movement and they are going to get right into it and they are going to move and fall before you even know it. So these were a couple of the advanced super advanced exercises that covered in the reformer that we did earlier. There's many different variations of it. And these were just some of the more basic variations that we learned from Rolana years ago, and we wanted to show it with you and with sue and thank you.
Yes, thank you, sue. Things flooded anytime and excellent.
Mention
 |
Michael Fritzke (Teacher) |
 |
Ton Voogt (Teacher) |
 |
Rachel |
 |
Carol-Ann T |
|
|
Sunni A |
 |
Christine H |
 |
Traci R |
|
|
Anette J |
 |
Reiner G |
 |
Heather G |
|
|
Jen W |
|
|
Yoly N |
 |
Michelle R |
 |
Jill C |
Comments


You need to be a subscriber to post a comment.
Please Log In or Create an Account to start your free trial.
