Description
Muscle Focus: Upper back and arms.
Objective: Strengthen the upper back and arms and improve posture.
Reformer Setup: Start with one medium or light tension spring. This exercise can also be done with no springs, or one to two heavy springs, depending on what works for your body.
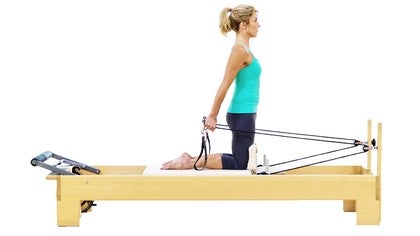
Start Position: Kneel on the carriage with the knees against the shoulder pads, shins pressed down, and the tops of the feet flat against the carriage. Hold onto the straps with a closed fist, above the handle, and palms facing in towards each other. Draw the abdominals to the spine, curl the pelvis under, and rise to kneeling. Maintain a straight line through the front of the body from the neck to the knees. Arms are straight and slightly in front of the body.
Movement: Without moving anything else in the body and keeping the shoulders depressed, press both arms straight back, keeping the elbows straight. Option to turn the head right and left while the arms are pressed back. Keeping both arms straight, return them to their start position. Throughout the movement, maintain a connection between the abdominals and the hamstrings, keep both arms narrow into the body, and prevent the back from arching. Repeat two to three more times.
About This Video
Transcript
Read Full Transcript
Hi, I'm Sarah. And today we're going to look at chest expansion and chest expansion happens to be one of my favorite arm exercises for a number of reasons. Works the back of the body. It helps with posture tremendously and also gives you an opportunity to really breathe in good posture. So those are the things that I want you to focus on, um, when, when looking deeper at this exercise. So Christie, if you can come to your knees for me, I'm going to kind of show you what it looks like and then I'm going to talk about some of the details of how I would like to see this exercise performed. First we want to have our knees right up against the shoulder vest and then we're going to hold the ropes up above the buckles on the tape essentially.
Okay, I've got a Christie on one red spring, but certainly a person could do this on a lighter spring, a blue spring or a yellow spring if you really wanted to just fine tune the mechanics of the movement. And also someone could do it on a heavier spring, a green spring, or sometimes even up to a red and a blue or two reds for people that really want to work the upper body. It's really up to you here. And what's most important for me is that you can maintain a solid position. So that's all the position starts with the placement of the legs. I like to cue that you're standing on your knees, but you want to feel that there's actually weight across your shins and into your feet as well. And then this can be a little bit scary at times because I'm going to ask you to teeter on the edge of reason.
Meaning I really want you to directly over your knees and many will, people will feel a little like they're gonna fall forward here. So if you're one of those people, please make sure that you start this exercise with caution and later on he'll give you some options so that it won't be so scary. Um, but for now we really want to create this straight line through the front of the body. So the hips are very open here. If somebody is very tight in the front of the thigh, we'll see a little bend in the hip and we want to try to avoid that. Okay, so we've got a nice straight line. We've got straight Elba. So I'd like you to first feel that the elbows are straight and we're going to go ahead and use an exhale to pull the arms behind you and an inhale to reach forward. Simply. That's the movement that I teach to begin with.
Now there are some variations and some classical versions that um, you know, I'll, I'll outline and show you as well. A couple cues here. Can you try for me to keep your elbows even straighter? So as you go back, the elbows stay completely straight. Beautiful. Stay there. Now at the end of the movement, I want you to think really about drawing the shoulders a little bit down and reaching the whole arm further back, not just the hand in hell to come forward and exhale to go back. Okay. Now some of the things that are really important to me, Christie, why don't you let your arms come forward and take a sort of arrest? Okay, so some of the things that are important to me, first, we want to make sure that we've got a really, really solid connection to both the abdominals and the hamstrings to support the lower half of the body. Now the other thing is we want to make sure that we don't Ark at the rib cage or arch the back. The moment you start moving.
So you really almost feel as though you're leaning into it just slightly. Okay, just slightly, but you're not. I'll often put my hand right here and ask someone to lengthen their low back a little bit. So if you can visualize my hand there and try to feel this wonderful length through your low back, hopefully you'll feel more supported here. Start with straight elbows and the arms just in front of your body. And now forget that you're moving your hands cause that's not what's moving.
Think really first about this idea of broadening the collarbones. Not necessarily squeezing together, but pulling the shoulders outward a little bit. And then the straight arms come behind you. Now this is the point where I want more, but I want to do it from the right place. Christie's arms are gonna burn holding this. I love it.
Can you straighten your arms just a little more? Can you feel, not that you're squeezing your shoulder blades together, but that you're opening your chest and pressing your arms back a little more beautiful and keeping them very narrow to your body. Awesome. And then go forward. Staying engaged the entire time. We're gonna exhale. Find that same position again. We want straight elbows. And then we want to feel this wonderful open chest feeling. Again, it's not rolling the shoulder blades together, but it's this sensation of widening the collarbones. Exhaling to press back. Beautiful. So when we do it like this, we're focusing on breathing using the muscles of the upper back.
And I'm strengthening the awareness of posture. Now classically, the exercise is taught a little bit differently and I'd like to have Christie try it that way. So here we would inhale to bring the arms behind you. You would add a turn of the head in one direction, the other direction, and then the arms will then come forward with the exhale. So certainly you can play with the different breathing pattern and the head movement, but please make sure that your shoulder blades, they're not lifting up and down as you move your head around or it can cause a little bit of stress on your neck. Okay, pause there for a moment. Christie. One of the things I often like my clients to do is to actually try this without any resistance. So you can put your straps down. Okay. And a couple. And Christy, would you like to sit for a few moments so that you can have a break on your knees? Okay, so go ahead and come back up to your knees for me.
And what I want you to pay attention to here is there's two things that happen a lot that I really like to avoid in the chest expansion. One of them is a, with your arms forward a little bit. When the arms come back, the shoulders were elevated. Chris, do you want to go ahead and show that? So we get this elevation and the, and then the shoulder ball kinda rolls forward a little bit and we want to try to avoid that. So one way for queuing that for me is to really, um, I, I already did cue it actually, this idea of opening through the collarbones and making sure that as the arms come back that there really isn't elevation. So we're going to stop before any elevation happens and reset the feeling of drawing slightly down and open as we send the arms just a little further back. Okay. So that's, so that way you're practicing this with no resistance. And then the other thing I'd like to, I like to focus on is the idea of bringing the arms and narrower so that you're really getting a little bit more lat engagement there.
So the focus should really be the back of the arm, the Tricep, and also the lat muscles. Now no tension whatsoever in the neck, although unfortunately so often I see well getting tension in their neck doing chest expansion and we don't want that. So another thing I often see is the hole when the, when the arm moves back, the whole shoulder moves. Initially, this usually happens because we have tightness in the pex. Now if you allow your hands just to go behind you and your shoulders to go forward, you are not in fact expanding your chest. So my dear sweet friends, we have to make sure we understand what's going on in our shoulders. So if I were you, I would practice this action in front of a mirror and make sure that you can really sense that wonderful feeling of your chest wide and open your elbows. Very straight, your arms narrow. And can I ask you a question?
Do you feel your body working? I totally filled with just thinking why did we even use springs sometimes. I mean I often do this with no spring and you can work so hard, you can do it up against a wall, you can do it sitting. Can you speak to the open position? Yeah, I can speak to the arm position. So I mean really for me the the arm position doesn't matter as much as the shoulder alignment. Okay. So um, class when we're holding the ropes, you need to essentially hold from with this grip so that the pole is correct.
However, go ahead and put them down. One of the things I really like to work on is in life we have to be able to put our arm in this position, our lower arm in this position and our lower arm in this position without the shoulder reacting too much. So I actually like to work all three positions quite frankly. What I mean by that is most of you will be more successful in staying open if you turn your thumbs out cause it's easier, it's going to bring you into your rotators a little bit more and allow you to stay more expanded. However, press back and stay there when you're in that position. If you can spiral the forearms and bring the hands to the grip.
Let's stay right here for now and bring your hands to the grip that we're going to use when we use the ropes. Then that's going to help you strengthen that mechanism there. Now go ahead and bring your arms out in front of you. And what I mean by being able to do all three positions is that in theory with your arms out in front of you, you should be able to spiral your forearms completely down without your shoulders needing to go internal, right, without falling forward. So if we wanted to put our hands inside of the straps and practice chest expansion this way, we're now working a different, um, opposition chain throughout the arm.
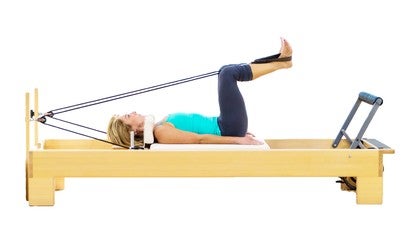
You're having to stay external through the shoulder and then we're actually, there we go. That's a beautiful neutral wrist right there. I like it. And that just feels different. It's still working the same general muscles of the upper back, but it's gonna work the forearm in a different way, which is so important. So for those of you who are not comfortable kneeling or you feel a little vulnerable, like you're going to fall forward or just want to try this a different way. Uh, there I, as I mentioned earlier, there are lots of ways to do it. So Christie, go ahead and step off and um, I'd like to have Christie try it sitting. Now, the challenge with sitting is that you need to have enough length in your hamstrings to sit with your legs straight. Option one, your knees could be a little bend or option two, you could sit on a box. Okay, so we're gonna s uh, show this, uh, a version here where she's sitting all the way up against the edge of the reformer. I left the same spring on, so we're on one red spring. You could be higher or lower. Her legs are straight.
Now if you find that you have a hard time fitting your legs between the shoulder rest, you certainly could bend your knees or adjust accordingly or cross your legs as well so that it's comfortable. So I'm going to have Christie go ahead and show this version as well. There's pluses and negatives to everything that we do. Well, this is a little less scary on the falling forward. It is actually significantly challenging to stay upright and it requires quite a lot of length in the hamstrings. So go ahead and take your straight arms behind you. Stay there for a moment.
I do like working in this position because we have to work that opposition of external rotation with the arms in a, in a more neutral position, if you will, or at a down facing position. I'm not going to get super technical there. Um, notice I want the arms to stay close to the reformer, although you can't get quite as close as you can when you're kneeling. So that's different too. But all the same rules are in place here in that we don't want the shoulder balls to roll forward at all. We want to feel this opening through the front of the body and drawing down through the shoulders as you press back, keeping the elbows very straight. Now if you want to try sitting, but you can't quite straighten your legs and sit up, right?
We can bend the knees, you can even put a little cushion under here if you needed to. And that would be just fine as well. Go ahead and put your straps away. And so the final variation I'd like to show is with the long box a. So let's put the long box on and this is just gonna make it so that you feel really comfortable sitting. Pretty much anybody can sit like this and you won't feel vulnerable at all. Um, and you still can work the same muscles and honestly, uh, this is, is very close to any postural position. Um, you know, functional postural position with the legs like this. So, um, you can either hold with the hands in the straps or if you wanted to work harder, you could hold up the buckles, but I think this is just fine.
So it's the same choreography. The straight arms go back. We're sitting nice and tall. We have this wonderful upright position. The legs should feel quite relaxed. And honestly, if the legs are not comfortable together, like this, a person could even straddle a little bit or relax and that's fine with me. So, um, hopefully I gave you a couple of things to think about while you're doing your chest expansion and let's become a nation of expanded chests.
The Pilates Essentials: Reformer Exercise Breakdowns
Mention
 |
Sarah Bertucelli (Teacher) |
 |
Kelly S |
 |
Hugo F |
 |
Noelle |
 |
Natalia D |
Comments


You need to be a subscriber to post a comment.
Please Log In or Create an Account to start your free trial.
