Description
About This Video
Transcript
Read Full Transcript
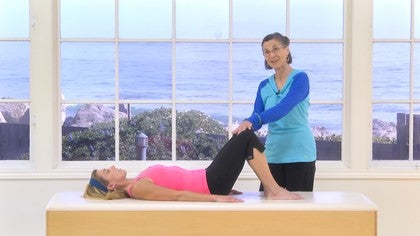
This is a tutorial on tucking and arching. Okay. Now the way Christie is lying, now she's just in a normal position. She's not doing anything with their pelvis. It's just lying flat. What people usually mean when they say tuck or curl, they use that word sometime is that the, the bottom part of the pelvis curls up and so the top part of the pelvis or the waist drops down or back. So she's going to do that again. So the bottom part of the pelvis curls up and it comes back down. You can think about it like your dog, right?
Who tucks his tail between his legs when he's been bad, right. That's what a Tuck is. Okay. A pelvic arch on the other hand is going the other way. It would be where she goes down by dropping the t is if she had a tail through the table, then the waist tends to come up off the floor and then back down. So an arch would go in the opposite direction. Okay.
So when people say you're going to curl, curl your tailbone, and then arch, that's what they're talking about. That's basically a Tucker curl and an arch. Okay. You're trying to keep both. When you're doing simple arch curls, keep both hipbones on the same plane. You wouldn't want to curl your pelvis and then tip like this. See? Then that actually complicates the whole issue about what's going on, right?
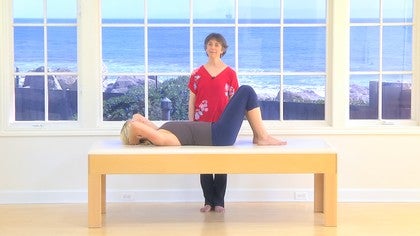
So you want to keep both these hipbones on the same level playing and you're just moving your pelvis around actually the access of your hip or your leg, if that makes sense. Now this looks different in varying positions. So what I thought we would do is straighten her legs first. Right? And you'll see there's a big difference in this position. When she talks, it's harder because of the placement of the legs, but you can see how this part of the hip lifts and then she relaxes. It comes back down. So she talks again, she's trying to get the tail between, but it locks up the hip.
Now when you do this with your legs in a straight position, it's a little dysfunctional because it does lock the hips and you can't get the kind of range of motion you might need through the hip. Okay, now we'd go back into the arch when she goes the other way. Then you see what happens with distortion all up here in the rib area of backups. So I'm a little bit out of the way and she relaxes again. So she's going down here as if she was arching. It travels all the way up the spine into the rib cage. That again is not a functional posture for straight legs because again, it limits what happens in the hip. Also puts some strain up in here.
So let's look at this in Quadra pad. So you're over on all fours. It's the same thing here. A curl and an arch, right occur was a tuck. So her pelvis is tucking as if it tail was coming between her knees, between her legs, and then the arch is, the tail goes out like a very happy cat, right? And then you go underneath and you go back out. Alright.
Those are both movement postures. If you were just go to, if you were to use the pelvis just to stabilize in neither a tuck or an arch, just in a stabilizing position, you would be here just like she was on the mat only she was turned over upside down. This posture is a movement and this posture is a movement. It's not really good either. One of those for stabilizing against movement in quadruples. It may be a little different in different relationships to gravity, but when you're in this quadrant pad, this is what you want.
If you're going to take an arm and a leg off the floor or do something to stabilize yourself. Yeah. So the pelvis isn't in a more central position. Can we use that word? Okay, now we're gonna sit. So now I'd like to deal with this same thing while sitting, right? So we're going to start this time. Well, let's start with the same.
Let's do the curl. So she curls back, tucking the tailbone underneath her. That's a tuck. And then the arch would be the other way, neither of which is a very comfortable sitting position. Right? You really want to be in between those. But again, this would be a Tuck, right? Again, the bottom part of the pelvis is coming forward and then an arch or the bottom part of the pelvis goes to the back, right? And then you have your middle position.
Your middle position again in a sitting is also used to stabilize against movement. Okay. Or to support movement is perhaps a better way of saying it. Now I'd like to do the same thing. Standing. Do you mind? So now we're going to do a tuck in the standing position. Would you just lift your arms so that they're, yeah, yeah.
Just there. And now tuck your pelvis and now arch your pelvis. There you go. You see the difference that happens as she does that? Tuck the pelvis and arch the pelvis. You see if the pelvis is tucked, it locks the front of the hip and limits movement, extension of the legs. So it becomes somewhat dysfunctional.
And as she arches it eliminated, minimize his flection of the leg, right, which is also dysfunctional. So again, you sort of want that middle pelvic position, right? That's directly level or straight up on the legs I guess I should say in relation to hip socket. So walking and movement is more efficiently achieved. She's going to do a bridge.
Basically she's going and she's going to do it by starting with the Tuck. So she curls her tailbone and then she continues curling, bringing the knees over the feet. She ends up in a bridge position and she rolls down. Alright, so there is a tip, there's a tuck. This could also be done as a lift.
So do one more as a talk and really exaggerate the Tuck. There you go. And she comes up. Now you're in a bridge and now she comes down rolling down sequencing through the spine. Now we're going to ask her not to arch but to lift. So keep the pelvis level as it is here. Lift the whole thing up.
See the ending position is the same and we'll roll down. So we don't change that. The way you get there is different. So this is a pill, I would call it a pelvic lift and all the way down. Okay? Now we're going to do, I'll curl up and an arch down. Now this is a little tricky. She's gonna reach her tail as if she could reach here. And that comes, excuse me, down first.
She's going to do this again. She does the upper body curl. Now she's gonna Tuck the pelvis curl. There's that, and then she's gonna rot and down. So in your fitness world, a crunch is usually means both a pelvic tuck and an upper body curl. Very often in Palazzo days, we don't do a crunch, except in certain instances we do, right? So this is an upper body curl. She goes down, this is a pelvic talk or curl and you've come down.
This is a crunch, OK? In hundreds for instance, when your knees are up to your chest, your arms are by your side and you roll up and you have to extend your legs. You do almost have to do a pelvic tuck just to support the legs. You feel that feels that. Yeah, and come down doesn't look quite like that because you've got the weight of two legs sticking out, hanging on the pelvis. But to support the weight of the two legs, you do need to feel a little bit of that curl in the lumbar spine.
Whereas in the roll up, let's take your legs out straight. That would actually inhibit the movement, right? So she's just going to do a roll up without particularly tucking. She's just rolling up. She goes through a rounded thing and forward. Right now she's going to attempt to do this with a tuck that will start from the beginning. So it'll go all the way down, right?
So start here and Tuck as you bring your upper body up. Tuck. Now she sort of stuck. It's not quite as easy to get up cause of leverage. Right? So this is one of those instances where you want this to stay in. Should we say neutral upper body comes forward and you roll on top of the whole thing to come forward and then you just go back and unwind. Okay. So when you need the support, you can use the tuck.
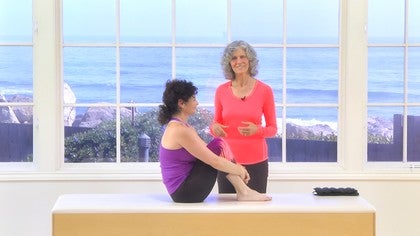
When it's a movement thing, you don't necessarily need to, right. Roll to the side. Sit Up for a minute. Face this way with the legs out for spine stretch. This is the one that is a really simple exercise. It's really hard to learn because people tuck and interestingly enough, there's no talk in spine stretch.
So she just going to take her hands up like it's on a tabletop and she's going to talk as she goes back. So see that collapse c, that's not terribly helpful for the back sit up again. Again, tucking when you're vertical in space is not really a particularly good thing for the spine or for the hips. Okay. So really what she's going to do is stay in a sort of central or neutral position and roll forward off of it. Now the effect may feel to you that you're tucked, but in this position, if she were to Tuck and tuck under and slide, it would pull her back off of her legs and that would not be spine stretch. Does that make sense? So you're sitting up, so again, the pelvis would just stay vertical. She reaches forward, right? And then she comes back up. So that's where a place where you're sitting, where you don't want to talk, but it looks in a way like you are. Basically what happens when you talk is that the whole thing just sort of shrinks down like this.
It puts pressure on the spine when you're in a vertical position, when you're in a suit, you know, lying on your back position. It's a movement and it's perfectly fine. It's roll over onto your belly. Let's do one more thing.
If you're going to do an upper body, upper back, swan and [inaudible] it you support through the belly, but that just means you make a sandwich between the front of your body and the back of your body. You don't make a pelvic tuck. That's different because if it relax for a minute, she's going to come up into a small swan just to small to here right now, if she would see now the spine is going down and coming up naturally. If she goes into a Tuck, now she's got all these information. This is not viable. I mean this is bad. Actually come back down. You don't want to do that when you, when your body comes up this way, the upper body, this part has to go forward, but it's not a tuck. It's the pelvis has to move into the mat.
That makes sense. And come down on arch would be the baby diaper, right? Where the little kid comes up there, you know? And then you rock, you dropped down. That's an arch when you're lying prone. This is an arch and this is a tough as movements, they can be fine, but as posture first for extension, neither one of them is appropriate. You don't want to do baby diaper because that takes this up and this up, which puts much too much, too much compression here, and you don't want to do tuck because it tries to put a curve here while you're trying to put an arch here and your brain is going, well, wait a minute, what am I trying to do? So when you come into a swan, you just stay with a nice heavy, simple pelvis. You lift the belly up without changing the spine.
So it's the the tissue that comes up to support this. You don't change your bones. Does that make sense? Yeah. So can you stand for a minute
Without moving the big pelvis. Yeah. Cause this is a big boney, like a square or a box. This is a box. This is a box. And if you move your spine by throwing the box around, your spine gets all messy, right? Yeah. You move your spine with your spine, you support your spy with the muscles of the trunk, and you leave your pelvis upright on the legs. Right. Okay. Try to do the swan right here and see what happens. Whoops. So, and try to go back. There you go. Right. That's doesn't look right. Do the opposite. Stick the butt out. That doesn't look right.
What has to happen when you come forward? When you go backwards with the upper body, you have to think that this pelvis as a unit comes forward in space. That's it. So it's not really that this doesn't move. It's that as this goes back, this whole thing shifts onto the front of your feet a little bit.
Yeah. So when you come up and she goes back, this whole thing, so the weight might even come a little forward. There you go. And there's her extension.
Thank you. You're welcome. Thank you very much.
The Successful Beginner: Movement Breakdowns
Mention
 |
Michele Larsson (Teacher) |
 |
Mia W |
|
|
Jelena B |
|
|
Violet M |
 |
Diana A |
 |
Erica V |
 |
Louise Renee S |
 |
Heather Q |
 |
Deanna M |
 |
Leonard T |
Comments


In sidelying, can it be just te same, but that the issue there is the length of both waist? In the case of sidelying you are applying the same principles, but now it is about 'shifting' the pelvis (kind of like salsa)?


You need to be a subscriber to post a comment.
Please Log In or Create an Account to start your free trial.
