Description
About This Video
Transcript
Read Full Transcript
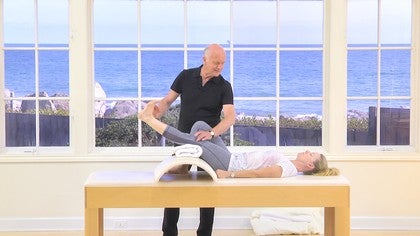
I'm going to go through a few exercises that I find very useful for strengthening the muscles around the knee. People have, ah, who are recovering from a knee surgery or or need trauma. This is good for them, but also regular people who come into a platas class and get onto the reformer and are unable to use their knees correctly. They can just use the joint and not use the muscles to support the knee. When you're working with someone's knee, you have to think not just of the muscles around the knee. You have to think of the support that above and below. For example, you need to strengthen the hamstrings, the glutes, the abductors, the carves, and then you start thinking of the front.
I never work the quadriceps first. I always start from the back of the leg, then the inside and then the front so that when you start to work with the front leg, the quadriceps, you have the support of the hamstrings and the glutes. So what we're going to do is, first of all, we're just going to show you a couple of things lying on the front too. To get the back of the legs working to end. If you'd like to lie on your front and play, what I'd normally do is if someone's going to do remedial work on their legs, they need to do more than just eight or 10 particularly if there's a problem you need to do sometimes 30 so if you've got someone lying on their front for that amount of time, you need to support the lumbar spine.
So I'm just going to place this pillar under the abdominals. So it's from the just at the top of the thighs up towards the rib cage, which will give this area some support and if necessary will I would support it under the armpit to help this to be open and relaxed. So we're going to get an alignment so the legs are slightly apart, not to work to get the glutes working first you imagine an area just roughly where the sip burns are and you take a breath in. Now as you breathe out, you gently pull the sit bones together. I mean they don't move, but as the sensation of pulling them together, which will work the glutes and the top of the hamstrings and then you relax, breathing in, breathe out and squeeze and hold.
Not only does it help to work this area of the, of the, the pelvis, but it also helps to open up the lumber spine. So breathe in, breathe out, and it's not a clench, it's a gentle pulling together so that you get this muscle group working so that when you're moving, if you, if you build up the strength, it will work without you having to clench it. So would, if there was an injury, you do quite a few of these. I mean I normally get my people to do about 33 sets of 10 so you have a rest in between. So once you've got this organized, you then need to think of the hamstrings. Now if someone has a knee injury of a problem around the knee cap or the Patella, if you're going to do this movement, it can be a problem with the knee itself. So what I like to do is to place a row towel just at just above the knee cap.
So takes the knee cap away from the floor. So when you bend the knee, you're not getting the pressure of the, the Patella onto the heart's surface. What it also does, if you elevate the knee, you're going to work the hamstring more because it's lifting the leg more inline with the correct postural position. So you don't work this quite some much as you've done. So you do a squeeze, a full squeeze and then let go 50% and hold onto that.
And from here we bend the knee slowly up to 90 degrees. So we get the hamstring working. So it's not a fast Ben, it's not a really quick sharp movement. It's a slow movement. What you have to make sure that when you bend like this, that the heel goes into the line of the, the pelvis, the sit bones. Cause if you allow the leg to go diagonally across, you're getting a uneven reading on, on the hamstring.
So quite often you have to manually turn the legs. So it's completely parallel to get that reading. And because I've rotated in, I'm getting more move more work in the belly of the muscle here. The other thing you need to watch is that as the knee bends, if the pelvis moves and lifts, that means the hip flexors are too tight. So you'd have to take the, take your client off the bed and the hip flexors to go back. Okay?
It's no good just pressing done. You need to stretch it before you continue. The other thing in this position, if like say for example, say this left knee had been injured or operated on in the beginning, this angle is too great. So you'd have to shorten the range. So I would start, I would put something, a box or something here. So in fact, the first set of exercises would be just a short range from there. And then gradually as the muscles got stronger, you could and large the range, make it larger. Okay.
So we've got this strong through the belly of the muscle. But what I would like is to get a little higher up towards the the, the gluteals here. So if you bend and then very gently lift and you'll get more work in into the top of the hamstring, then you learn and straighten. So bend 90 degrees are very soft foot on this. Don't think you have to flex hard and lift and you'll see the more gluteal crease as the knee lifts. And then Don, when you're doing the exercise, you need to look and see how the muscles working on both legs. Cause quite often if there's been an injury, the injured leg will have a different shape and the muscles will be weaker.
So you need to try and balance that up so you still work the good leg but much more on onto the bad leg. So we've worked the glutes and the hamstrings and now the cough needs to be worked as well. Not a good way. If you're lying on a bed like this is too, can any, can we move down? So your feet are hanging over the edge. From there all you need to do is to flex and to point and then you'll get the CARF working very simple over the edge of a bed. Now, what I w quite often like to do is to press. Say we'll concentrate, well let's say this is the injured leg. I'm just going to gently press against the metal tassels of the foot and point and now flex and points.
So you're giving resistance but also make sure that this the toes don't curl or spread cause I want the movement to be cut. I want to move into from the ankle. So point and a ankle, ankle, ankle, ankle. That's it. Soon as you do that with the toes or spread the toes, you're tightening up into the Achilles tendon. So it needs to be held so point not Amy's desperate to curl her toes. So I'm stopping it with my fingers and ankle. Yup.
And we can see how this is working here. Okay. Would you like to sit up normally I like this position to be a little wider. So what we're going to do is just lean back, bend the right knee up. That's it. Draw up the style of muscles. Now we're going to have this leg parallel and from here is slight pressure on the inner thigh and we're going to slowly slide it across, drawing up the stomach muscles. That's it, that's it.
And then back keeping the leg on the bed. Don't let the leg lift cause we don't, we try not to work the quadriceps too much. Obviously they're going to work but they shouldn't be working too hard and back.
And then with a very slight outward rotation to work a little further round into the doctors, so not overturned out just a little and I can feel the a doctor working there quite strongly. And with this you've got a bigger range of movement like the, you know, the one lying on your side where you like and lift the leg up. That's quite a short range. This gives you much bigger range. Also, what it helps is if you think of where the, uh, the it band and the, uh, the muscle at the TFL up at the top, this also helps to stretch that out, which needs to be stretched and across. Okay. Then we need to think of working the lower part of the quadriceps.
So what we're going to do is can you lie flat down and we say, so we've got this angle. Now here it's the, the heel is hanging over. Normally I would have something under the heel. I could use a yoga block or something because if they say the injury was to do with the, uh, a ligament problem to have their leg hanging, the weight of the lower leg is not good for the, if the ligaments have been damaged. So you needed to have the support. We're going to have a soft, easy flex. Make sure this is held.
Now we're going to think of just this area here of the quadriceps. Now what I want Emily to do is to imagine there's a string on her toe here and she's just going to slowly lift the leg up. So it's initiating in the just above the knee.
And we really want the bottom to be worked and so what we're going to do, we're going to get that nice easy lift and gradually the Le that's at low masters now lengthen and push into the field point the foot flex and then slowly Dan, so again that is working through the front here. If you need to work the quadriceps, you can always add a lift off the the the, the tar, a loft off the padding if you needed to. Right now this is strong enough. We need to get the work away from this as much as possible. Okay, let's have one more like that
Lex, it's good not to push down into the other question was do I push down into the the towel or the pad? No, you just rest against it. You can also from here you come up there,
Now the next one which is more difficult is working the Vastus Medialis, which is just this one here, which tends to be the last responsible for the last few degrees of straightening of the knee. What? What? The problem is that if you're not careful to try and get into that muscle, these ones take over. So I have to find, try and find a position where they don't work as hard as they'd need to. Okay, so we're going to lie on your left side. Now the underneath leg, we're going to have it parallel and [inaudible] flexed, not over flex just to there. Now this is the muscle group here that we want to work now because we're resting onto the side. The leg is not, the quadriceps aren't going to work as much.
The outer quads aren't going to work so much. So I want Amy to imagine that her leg is on a, like a track, a railway track or some sort of tracking. So the heel, the knee and the hip joint is on the same line. So what she does, she's not going to bend her knee. She's just going to relax the knees. So it's off the track.
Okay. Then I'm going to place two fingers at the front of the heel and my hand just behind the knee and watch it's going to do is just going to elongate the leg, pushing into my fingers with her heel and pushing back into my hand with the back of the knee. Push harder, push harder, push harder. That's it. And then relax again and lengthen into my fingers and push back into my hand. So it's a very small movement, but if you feel that working into this master, so it's getting the VMO working quite strongly, but it, it won't happen straight away. I think you need to do about eight or 10 before it starts clicking in and then relax and stretch.
Good. And then done. Good and rest. So just to recap, glutes, hamstrings, carves a doctors lower part of the quadriceps that is meaty, Alice. Now these are the muscles you need to strengthen. Now, what you have to stretch is you'd need to stretch the hamstrings, the carves, and the TFL, and the, quite often the rectors for Morris needs stretching. It usually can do that with a, with a roller. Okay. And when you stretch the hamstrings, make sure you get the into the back of the knee, because that often doesn't work so well. Okay. Thank you.
Active Aging: Common Aches and Pains
Mention
 |
Alan Herdman (Teacher) |
 |
Peter R |
 |
Isabel A |
 |
Kelli PHYSIQUE KINETICS |
 |
Karen D |
 |
Rajashree Srirangarajan |
 |
Maryam |
 |
Kathleen Fitzgerald Henry |
|
|
Marci C |
 |
Dianne H |
|
|
Poornima M |
|
|
Tova A |
 |
Fiona S |
|
|
Claudia M |
|
|
Jackie C |
 |
Sara P |
 |
Bobbie B |
 |
Judy S |
 |
Kimberly P |
|
|
Goyens Pilates |
 |
Marta F |
 |
Diana A |
 |
Michele M |
|
|
Nancy F |
 |
Carine K |
 |
Jitka R |
 |
Penny M |
 |
Lena S |
-83026.jpg) |
Gregory D |
|
|
Hydie |
 |
Lynn P |
Comments


-83026.jpg)


You need to be a subscriber to post a comment.
Please Log In or Create an Account to start your free trial.
