Description
About This Video
Transcript
Read Full Transcript
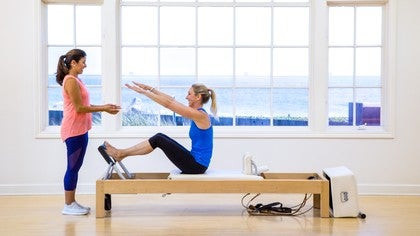
Okay. So we just did an intermediate advanced reformer and the transitions were very quick. So this is going to be a tutorial on all those transitions specifically for that other class. And again, you can feel free to fast forward through all of these and just find the ones that you had a particular difficulty with or needed further explanation. But I'll go through all of them from start to finish. Just the transitions right now. So we started off with our footwork.
So we have the grots reformer, which has four springs all equal tension. And I did my foot work on four springs, so I put four foot bar is up and my head pieces down. My handles are ready to go for my um, hundred and then my box, whether it's short or long as well as my bar are ready to go for the rest of my reformer pads are underneath. I have two underneath the a reformer. So I'm going to collect myself is very important part of the transition, pulling in my powerhouse in and up. And I almost want to think about a teaser as I lie down from my footwork.
So I'm not going to stick my bottom out as I sit down, nor am I going to take a long time between line down and pushing out. So again, I'm thinking about my teaser and I'm going to sit down and bring my legs up almost as a teaser. Turning myself, lying myself down and placing my feet, toes apart and heels together. Toes are as wide as you can do on the riff on the bar without losing your baby Cho and then heels together, not too high, not too low, but right there and we're ready to go. Then you pull the carriage in 10 times and we're going to switch to squeezing our inner thighs together, sliding the feet up onto the arch and it's right below the ball of the foot, not too low, close to the heel, but right below the ball of the foot. Toes rounded heels and you go in and out 10 times and pool in and after 10 slide the feet smoothly and evenly up to the heel of the foot.
Pull every toe back to kiss your knee and go in and out. 10 more times. Slide the feet down for the last of the footwork, just about an inch apart with the toes. Heels are up and you are going to go out. And on this one we go down to three and him pull up. So you stay out the whole time and we draw the carriage back in.
So that's your foot work. Here's the tricky part. For the a hundred you're going to give yourself a little bit of room from the shoulder pads. You're going to take either foot. I take my right leg and I slip it just under the foot bar to pull it up towards me. I take my left foot, slide it under just the bar, and I push it out as I straightened both of my legs down or put it on the foot bar. Okay? So that is how you lower down the foot bar. You pull up with one foot, slip the other foot and push it away. As you lower them both down, they're nice and flat down.
You're gonna think about what your x next exercise, which is overhead in this case. So as you grab your handles for the hundred, you're going to use one of your hands to flip your head piece flat and then you are going to be ready to go for your overhead. After your hundred bringing both knees in, you're going to be ready to just go straight out into your hundred. After the hundred we fold back up and we're going to sit up and drop two springs for the overhead. Okay, so we're going to take both handles in one hand and you're going to curl up always thinking about your teaser. So this arm has no tension.
I don't even care about this arm. It's not going to change the way I move my body from my powerhouse. I'm just gonna float up. I'm going to use my free hand to push on the mat and turn. I'm going [inaudible] is my free hand to drop one, two springs.
So I only have two on. I'm gonna use my free hand to turn right back and I'm going to roll out and be ready for my overhead. [inaudible]. I have a little bit of space between me and the shoulder pads for it. After my overhead we did four. I'm going to bend everything on one count to do my coordination.
So elbows go down to my mat, head comes up and knees into the chest on one count. Here we go. We're going to fold up and we're ready to go. For Coordination. After coordination, you're going to take both handles into one hand and we're going to think of our teaser again as we have to spin around for rowing. The only thing is you have to drop one spring as you spin. So from the powerhouse, again, not really using this arm. I'm going to roller, I'm going to spin, I have to bend my knees to slip them.
Between the shoulder pad, I drop my spring and I turn around carefully. Make sure you have one hands distance behind and the first rowing is pulling into your chest. So you start with the handles up like this and you're going to pull as if you're doing the hug on the short box. So that's the first one. The second one is the 90 degree angle. So the garage handles swivel really nicely.
So all you do is from your waist and powerhouse. You lift up tall, pull up your elbows into a 90 degree and you're to go for the next one. Then we go into our third rowing, which requires us to turn around. So we're going to lay our handles next to our shoulder pads. Not right there, but just in front. And I'm going to kind of use this shoulder pad and my free hand to gracefully spin around. You can low keep your head piece down. I was trained to lift it up as I turned, so I keep that in mind and I'm going to turn around.
We're still on one spring. The handles, you put your thumb inside. Nice and both hips again evenly against the shoulder pads. And now this is called from the chest. Okay, so I'm ready to go for my third rowing from the chest. The fourth one, you pull your toes back and put your hands down by your hips and you round your back into a c curve and you're ready to go. From your hips. That's the fourth one. Now again, they swivel nicely and I'm just going to turn in my wrist to put the palm of my hand in the handle like so, but I'm going to do that while going crossing my legs.
So I'm going to kind of pull on the reformer, crossing my legs and coming up. Ideally want to be a straight line from my tailbone to my fingertips, making a diamond with my hands. Okay, and then that your elbow is going straight back for shaving. From here you keep tension on the reformer on my one spring as I switched legs and open for the hug, the arms are on a nice classical line with your shoulder higher than your elbow. Then your wrist, palms facing forward, powerhouse always in, and that's the hug we're done with our rowing series. We're going to hang up our handles and grab our long box.
I'm going to put these straps in, I'm going to grab my bar and it would be better if I grabbed both handles at the same time and lower at the same time, better for my body that is, and then Tuck it in. I don't think I quite did that in the reformer I showed. Okay, I'm going to add a spring because we're just working on the reformer. So you can do swan on the barrel, but to stay on the reformer, you can do swan on the reformer. You put a pad, teeter tottering on the edge, so it's more comfortable for your pelvis. So two springs, I'm going to put my hands just past that black pad. Step up onto the foot bar. Now I'm going to push, uh, put the hands out a little further and I'm going to lie down, push out and lie down my pelvis, right between my navel and my hipbones. There we go. And then bend the knees to bring the carriage home and just hang out. So this is how I start my swan k.
So my pelvis is right on that edge with my pubic bone or tailbone down and the hip bones just above that edge. As I hang to get out of the Swan, I'm going to put my hands here. I'm not going to let my shoulders lift. I'm going to pull up in my powerhouse. As I stand up on the Bar, I remove the pad to the side. No graceful way about that. Drop a spring and we're going to lie down. Again, I'm going to put my hands here, push out and lower evenly in a pushup position.
You're going to keep the handles here. I'm still pushing with my feet the carriage out. It's only on one spring. I'm going to grab the leather than grabbed the handle and I'm going to reach up as high as I can so that when I let go with my feet, the strap is taught. You don't want to be here loose. You want to crawl up as high as you can.
To start your pull straps for the t, the second pool strap you slide down. Put your hand now inside the loop and pull a little bit on the carriage out to straighten your arms straight from your shoulders at shoulder height to step off. This is another tricky transition. Both handles in one hand. I use my left cause I'm going to step off to my left. I step off, always trying to use my powerhouse moving. I don't really just stop. I turn as I get off to add a spring with my free hand. So now there's two springs.
I grab a handle in each hand behind me and I don't let there be no tension. I'm trying to be, have a little bit, not moving the carriage though, but just enough so I don't have to really reach for that bar. So I'm going to take my left hand and I'm going to put it down on the Mat box as we always do. Everything hand, foot, hand, foot. So Hand K, left foot, middle of the bar, right hand. Okay. And I'm now not going to lower my bottom. That wouldn't be very hard. We've always want to work, so we're going to use our bottom and our powerhouse.
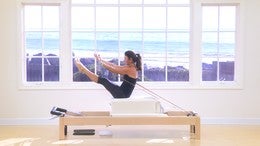
To lift our right leg forward and then use our body to have our tailbone off the front edge as we roll onto our back and are ready for backstroke. Now we'll go into teaser, both handles in my right hand and I'm going to roll up into a teaser. The trick is is I kinda turn towards the ocean as I sit up and I pull my right hip back with me as I sit up. So I'm going to roll up and turn and I kind of pushed my right hip back that way. Hold my teaser. Amusing this a little bit to counteract my stretch.
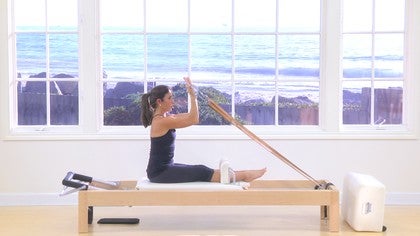
Take off the spring. Now I'm going to push the left hip back, so I'm really on the box. As I turn or as I turn and I unfold ready for my teaser. Next is short box, so I put both handles in my hand. I roll up and I'm going to hang them over the back edge for a little bit. Short box, you want to lower your head piece?
Both handles lift up over the shoulder pad. That'd before thy Hook. Have your bar right in front. Ready to go add a spring. And I didn't use a pad, but it is a lot of people like to use a pad seed that you don't feel like you're slipping and you kind of have it a hands with distance from that back edge. Grab both straps.
And I don't like to Hook my foot in as I'm sitting down. I prefer for my clients to step up and then slip their foot in. I feel like you're gonna twist your ankle, doing it the other way. But, and then again, measuring just hands with before you start your hug. So it's hug. Then we grab our bar and we do flat back, and then we do side reach. And then we always rest in between.
And then we do twist and then we rest and we put the bar away.
I'm going to do need my head piece to be up. So I put it right in the crook of the little bump. I need my pad over my head piece. My feet are going to go right here in the, um, the ball of the foot is going to go right here where the crack goes up. And then I don't need to change my springs cause they're on two.
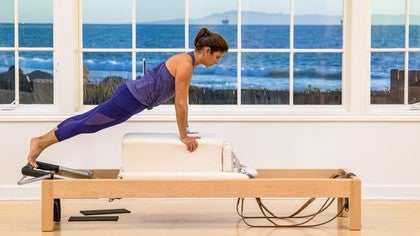
I'm going to lift my bar up and we're ready to go. The reformer is set. Now what is the transition? So the transition is always hand, foot, hand, foot, and in this case we take it a step further and almost have you in a pushup position before your final foot comes up. So I'm going to put my right hand on the bar. I'm going to put my left all of my foot right in that crack like I was saying, but see how ugly this shape is? I'm going to change that.
Now as I put my left hand, I'm going to straighten that leg using these muscles, using these muscles, putting my hand here and then holding myself in almost a plank. On one leg I'm going to bring up the other leg and that is the transition for long stretch. For Down Stretch, I'm going to try to minimum emotion to lower my niece, separate my feet, and the goal is to have the ball of the foot on the mat with the heel on the shoulder pad and your powerhouse is lifting your chest up to begin glutes and back of the thighs are working. Transition for up stretch, you're going to fold up. Powerhouse pulls you in. Lift those knees up, slide the ball the foot forward a couple inches. So you're on demi point. Pool those ribs in or open up the upper back instead of being flat and you're ready to go for the up stretch.
Elephant heels come straight down. They should be against the shoulder pad, but because I'm only five foot one and three quarters, I'm going to bring them forward a little so that my shoulders can be over the bar that holds the springs and then I can pull up into my c curve. So that's elephant. I'm done with elephant and I'm going to cross over to step off and we're going to go into long backstretch. So I'm going to start the dancing of the pat. Bring the pad here.
It's ready for my ah Sha stomach massage. I don't want to take too much time setting ups. How you got it ready? And I'm going to put my hand, my right hand, my heel automatically goes against their my other hand. So hand, foot, hand and now always work in your body as you get the other foot up. I'm ready to go for a long back stretch.
Try Open my collarbones as much as I can have my hip set, I'm done with lawn back stretch. I'm going to bring my foot down and I'm going to step off and I'm going to turn around for stomach massage, adding two springs. Now one, two and now I'm going to sit down. You can have the pad all the way forward, but you do have to always be mindful of your box and your shoulders have to be directly over your hip bones while you're in your see curve. So if you're in your tailbones all the way in the front edge, but your shoulders are back here, you're not getting that position.
So I sit right here because I have a nice stiff backs, good Peruvian, stiff back, as Ramana would say. And I'm going to have my tailbone on the front part of that. Something I always enjoy working on in PyLadies. So again, if my shoulders were this far back, I wouldn't be able to sit here. I'd have to move the pad back even further. Okay? And I'm going to bring my arms to the front and try to have my shoulders right there. That's the first one, four springs.
A second one is I'm going to drop a spring. Sorry, I'm gonna use my stomach and I'm going to move both hands at the same time while lifting and opening my chest. Now if the first one was too hard on four springs, you can start off on three drop a spring and do this one on two. If you find that you're just really pushing your bottom out of your pants, then you should try doing this on two until you're strong enough to do it on three. So this is the second one, hands back. Then we use our belly to hold us while both arms come forward. Drop the spring for the Rory.
And then we do the twist. It stays on two springs. So if you've dropped to two springs, you never drop lower. And we do the twist after the twist. We're done with our short, our stomach massage series. Step off and we're going to lower the bar down for that.
Um, I'm sorry, don't lower the bar. Bring the pad down, just teeter tottering on the edge for tendon stretch. Lot of different challenging, uh, variations for tendon stretch today. I just did not the very basic where you sit on the bar, cause you can do that. You can sit down on the bar like so and warm up your lower back and those hamstrings by pushing the heels down and out and then pooling up a little bit and then sitting back down and bending the knees. You can do that. But I went ahead and started with my heels, pushing down my powerhouse, pulling up and wrapping and squeezing my thighs and I was ready to go.
So that's, and I started from here and I went out and I pulled up as much as I could in front of the bar and that was tendon stretch. Next we're going to step off, bring our pad off, and we're going to do semicircle. You could put a pad on the foot bar, but this one's got a pretty good grip, so I'm not worried about it. I came back here to prepare for short spine massage. So this is a little tricky. You're going to, there's a handle and there's the hardware and there's the leather strap.
So if you kept the hardware right there might get all stuck. So I like to slide the hardware down. Then pretend the leather is like a thread going through. The handle is the eye of the needle. So here's your thread that goes through the eye of the needle and you let it fall. Let's do it on the other one.
So I let my hardware go down and then I put the leather through the handle. Everyone always tries to put the handle through the leather, which would look something like that. But no, it's hardware. Then leather goes through the handle. Okay. And you can either hold onto these or put them down while you lie down, but they're going to go here on the I hook. So for short spine you, I'm going to hold onto them, but you could have left them hanging there. Okay. So I'm gonna hold them between my thumb and forefinger behind my back.
We are still on two springs, actually between my middle and forefinger. And I'm going to sit down and lie down and my head pieces down and I'm ready to go. For short spine massage, always try to move from your center and both legs coming in, not one and then the other. Okay. We're trying to stay balanced and working our stomach and our powerhouse and the arch of the foot closer to the heel. This time goes into the strap and you pull down trying to get your pelvis relatively flat on the Mat. Knees are bent no wider than your shoulders. Straps between the legs.
Then you're done with your short spine and the legs come back. Very important that you hold onto the handles and not just the leather. As you take the straps off your feet, it's very big safety because the handles often are like an iron and they just hit you in the forehead, seen it many a times so then you can hang up your handles right on those little eye hooks and I'm going to put my toes on the foot bar. My hands are going to push away from the shoulder pads, sliding my body away. And I'm going to try to get my pelvis relatively off of that front edge before I attempt to lift into position. I also, um, demonstrated it extending my body even longer by doing fists.
Again, I'm not too tall, so that feels better for me. But if you are nice and taller, it feels better to just keep the heel of your hand. That is absolutely fine. So to lift, I'm going to squeeze my seat, curl my tailbone up, and use my powerhouse as I lift up. And then slide down. Don't have the best top to slide, but I'm trying to get a straight line from my shoulders to my knees.
And there we go. So now I'm in position for my semicircle hands are on the mat, almost against the shoulder pad, not up here. I'm really trying to keep a long neck. Okay. And I'm not getting really tight up there and my heels are not sitting on my bottom, nor are they too low. They're right there. All right. And we're going to slide back and we're all for chest expansion. All right? Hopefully you're still with me.
So we want to be really safe with chest expansion when we do it, especially thigh stretch. Our hair can get caught in the springs. As you stretch the spring and go into your back bend, the hair can get into the spring and the spring closes and it really can be dangerous when it holds on. So I'm going to grab both my pads and I'm going to put one pad over my springs. We're still on two springs. Okay. So the whole chest expansion, thigh stretch and arm circles are coming our way. One pad goes over the frame and the bar just in case anything happens with the reformer spring loses. And we don't want to hit our head hard here.
So I'm going to put my hands on the shoulder pads while I kneel down and I'm going to hook my foot on the back edge so that I can really use my hamstrings and glutes to almost lean my weight in front of my knees and use my powerhouse to pull in and up. Opposite. You don't want to have this line going. You want to really be as square and tall and long as possible. Okay, so, but while you're getting into position, you're gonna grab your handles and again, [inaudible] the hardware a little bit to grab onto your strap and then use the straps to kind of help pull your seat forward and you're ready for chest expansion. Then five stretch. I'm going to let go of my leather, both handles in one hand. I'm going to turn a little bit, sit down on my bottom, move my pad, cause I need three springs for thigh stretch.
I'm going to add a spring, put my pad back on, especially this one for safety. And now my knees come all the way up against the shoulder pads and I'm going to slide my leather even more so that I can grab up even higher on my strap. Okay. Again, not a good look. You're going to use the back of your leg, you're going to use your seat and you're going to use your belly to pull against that. And when you pull back, you pull back with everything you've got. Okay, so that's your thigh stretch position. Ready for arm circles. Both handles in one hand. We're going to step off to the side, carefully turn around. Now we kind of don't need the pad so much except that a lot of people can propel themselves forward, which would mean you'd lose a tooth or something scary like that.
So that's why that pounds there. So now I'm going to take a handle on each hand behind me and I'm going to put my the ball of my foot on the Mat right before the shoulder pad, the other knee, and then the other knee or the knee, and then the other knee. Again, not the shape of body we want. We want to squeeze forward. Pull your belly in, and this one starts with the arms just in front of your body for your arm circles. All right, now we're done with those and we're going to put both handles in one hand carefully step off. Next is long spine massage. I'm going to take my pads off, put 'em down and I'm going to add a spring.
So all these transitions are important so that you can do a whole heart strong reformer in a lot less time. Okay. Get all those exercises in. So we're going to let the hardware go down a little bit and then put our hands going to our hands. Going to hold both the strap and the handle. Same thing on this side. Let it slide a little and then your hands going to hold both the handle and the strap. I'm going to grab both of my extensions might seem a little tricky, but it's not too bad and I'm going to have one extension go through.
Sometimes I think I grabbed one that was a little over commitment there and I'm going to just hang it on this hand. Now use this extension. It takes a while to get comfortable with this where it doesn't seem like it's a quick big mass practice, practice, practice. And now same thing like short spine massage. You can either hold onto them or you can hang them right here. And I'm going to lower my head beasts. Okay. And I'm going to hold on to them, but it's kind of easier to hold on to short spine. Actually, now that I think about it because your straps don't get, so let's try to do this transition with leaving them there.
So you're going to come over here, we're on two springs. Use Your powerhouses, you lie down and it's always helpful if you give yourself just a few inches so that when you lift up nice and tall, long guide didn't quite give myself enough room on it, then you can really get a beautiful long lineup. So I'm going to grab these and I'm going to look at my straps and I want to make sure that the hardware, this little clip is on the outside of both of my straps. Okay? That is the most important part because they can unclip if they're in the middle and they rub against each other and they won't feel comfortable, obviously if they're on your foot, on the arch of your foot. And they certainly can unclip also, if they're more up here where all the handle is. So using my powerhouse, I'm going to bring both of my knees in and at the same time closely as much as you can, slip both feet in and now I am arms by my side, pelvis flat. I'm ready for my long spine massage, which is delicious and now I'm going to, I finished that so I'm going to carefully take my straps off and I demonstrated that I like to use these little hooks and unhooked them, which is a little tricky while I step off and I guess I just do that to a, if I'm doing super advanced exercises I can go ahead and be ready for the next set of exercises and not have to fool with it later.
But for the series we just did, you don't actually have to do that. All right, so now we're ready for knee stretches again. We moved from one side to the other. Either way, as long as it makes sense since I was there, I'm moving this way. I don't need my straps, but I do need my head piece up and now I'm going to put up my bar. My springs are still on too. So that was my next thing I checked. I'm still on too. I did. Um, I need my head piece up, not because my head's going to be on it and knees stretches.
But if I had a shorter reformers is called a regular, uh, it's called the long. Actually there is a regular size where you might end up hitting back there and you would hit the head piece and not be able to take care of your reformer too well, but so that's more of a care of your reformer. But the next x series is going to be running and footwork running in a pelvic lift. So you want it to flow nicely. So the headpieces up hand, foot, hand, foot, you're gonna pull your body into a nice c curve, sitting two inches off your heels ready for round back. I did a tricky transition.
The next exercise is a arched knees. Knees stretches. So you pull your belly in, stretch your chest bone in one direction, stretch your tailbone in the opposite direction. And this is the position, but I did so using the springs when I finished my rep, 10th rep and I was pulling in, I used the springs to transition. So I'm going to do a quick five here and on the fifth one all demonstrate that. So I went out and pulled in. So this is two and pulling in and now here as I come in, I'm going to transition.
And then I did the same thing for knees off, knees off is your hip are going to be right over your knees and then your shoulders are kinda over the bar that holds the springs, but you're still trying to be an a c curve. So you're going to try not to drop your lower back like that, but you're going to try to push evenly with your arms, scoop in your belly and have the knees hover off the mat at ankle level. So one, two, three up right there. However, I also use the springs to keep the motion going and to lift into my knees off. So I was here and I'm going to do one belly is lifting my chest as three.
One more and I'll transition and pulling in into my knees off. You can eventually get a little further back, but we'll just start here and gently lower down your knees. All right, we're almost there so I'm going to keep it on two springs because this is more of an advanced reformer. If it was more basic, I'd go back to where what springs I used on my foot work. I'm going to do two springs for my running and pelvic tilt. Now I want to walk out of the studio looking tall, so I'm gonna use all those muscles as I lie down.
So I'm going to pull in and I'm going to lie down. Set my toes this time only an inch apart. One day you might be able to do it parallel toes together, but we're going to intermediate dance just a little bit apart for your running, so you stay out here while you run. Then we're going to pull in and we'll do pelvic lift arches on the corners. Notice that all the transitions are not one and then the other are sloppy.
They all keep the flow of the exercises. So both legs open, okay? You keep your turnout, you lengthen your bottom away from you to lift up and curl your tailbone. Very different from just crunching in and or using your back to lift up or pushing out. As you lift up, you want to engage your bottom hamstrings, lengthen your spine and tailbone away as you roll up. And you're going to go out 10 times, draw it in. And then as you roll down, you laying thing out as well.
Slide your feet together once you're done and hug your knees in and kind of roll around a little bit each direction if you want. And we're ready for our side splits.
So I am now on this side. So I'm going to change my reformer from this direction. I'm going to lower my bar by lifting up the foot bar support, and I'm going to put one pad along the frame. This side of the reformer just barely goes over one of the [inaudible], the edge of the pad. That way I have a whole pad to put my foot on instead of it coming really up high onto the bar. Uh, like I said, one spring, and then this pad is going to go, not flat, but just a little bit up onto the shoulder pad. All right, so now I'm going to keep the carriage home.
As I step on the carriage relatively close to the springs. I don't want to step out this way or put any energy out this way because if I do so the carriage goes out. Okay, so safety, we need to keep the carriage in. So I'm going to step close to the springs. Lift up. I'm gonna put my right foot on the frame, which I was calling my stable leg. And now I'm going to try to keep nice and square while I heel toe my left foot out to the pad, trying not to move the carriage much or bang, no banging. There we go. And you're ready for your site's splits. Then I'm going to heel toe that foot back in.
So this is just transitions. It's not the exercises. I'm gonna bring my right foot back in and I'm going to turn towards the springs. Again, a safety cause if I turned away from the springs it's going to make the carriage want to go out and that would make me lose my balance and hurt myself. So I'm going to turn towards the springs and I'm going to put my left foot on the frame this time, which again my stable foot, I'm going to try again to keep my frame my box as I heel toe my right foot out. Going up onto that black pad.
You also want to make sure that the heels and the toes are on the same line, not one foot in front of the other, and then the arms went straight out for this one for the second side, split heel toe, my right foot back in trying to keep the carriage home and I'm going to bring my left foot and I stayed on the reformer, but it would be better if you just stepped forward and set up your reformer. If you're learning transitions especially. So we're going to take this pad off, put the support barred down again, add a spring. Our front splits and thighs split are going to have two springs no matter what level you're at. I make a v with my pads now where the point of the V is over the head piece. I'm going to put my hand, foot, hand, foot, and I'm gonna put my right foot on the bar in between my chest bone and my shoulder. Okay. It's bent and my weight is more forward so that I can lift my left leg freely.
You could heel toe your foot all the way back, or if you're stronger in your powerhouse, you can lift it up. The heel goes down right on the head piece and the foot turns out as much as you can against the shoulder pad. If I was a dancer, I would have much more of a turnout and then you're gonna use the back leg to go out. After you do three of those, we're going to really think about my frame and my powerhouse and I'm going to pull back until my front leg is a right angle so that my hips are at the same levels, my knee, and then we use my powerhouse to lift long through my arms. And ideally it's hard with this headpiece to put my hands one over the other behind my head. All right, so right angle with that front leg. And now the exercises with the front leg, not the back leg. Then using my powerhouse, I'm going to reach long through my arms, hold onto the bar and turn my back foot so the heels up on the shoulder pad and lower that knee down.
Now I'm going to have the carriage home with all of these muscles working and pushing forward. Three reps like that, finishing by letting go and then going into a back extension. We repeat it on the other leg so we bring our right foot down so that we can stand on it and then you can bring your left foot forward, but you can also just bring it right up to the bar between your chest bone and your shoulder. Again, heel toe, the right foot or the back foot, or had your powerhouse lifted up and put it back. Turn out that back leg three times pushing with the back leg. Then we bring our body weight back a little so we have a right angle hip at the same levels of knee. Use the powerhouse to keep your body square reaching through your arms.
And then the hands go one over the other, behind the head, pushing out with the front leg for three times and irrelevant if possible, try not to be too low. Then reach back through the arms, hold onto your by safely. Turn your right foot. So the heel is against the shoulder pad, lower the knee down, and then you're ready for your last exercise. The thigh split, and you're abusing the back of your leg and seat. You're pushing out with that back leg and then coming in and the last one ends pulling up in your powerhouse and stretching. And that completed all the transitions for our reformer.
Rhythm and Dynamics: Tutorials
Mention
 |
Monica Wilson (Teacher) |
 |
Kay F |
 |
Pilatesdiva |
 |
Lynn P |
 |
Rosemary |
 |
Erin |
Comments


I will be referring to it often during my learning process....
You need to be a subscriber to post a comment.
Please Log In or Create an Account to start your free trial.
