Description
About This Video
Transcript
Read Full Transcript
Hi, I'm Claire Dunphy Hamani and welcome back to this tutorial, which is all about shoulder girdle placement and the head and neck placement. So in the last tutorial about the rib cage, we explored the standing position and the rib cage placement so that it settles over the hips. And what we're going to talk about now is what happens to the head and shoulders after your place that way because the body's gotten so used to being behind and our shoulders and head come forward to give us this feeling that we're upright. And so here we are and and it's like, wow, what do we do with that? So, um, we're going to use the Cadillac. This is one of my favorite places to go because you have the full support of the mat and I can easily use my hands to give feedback.
And the, and the mat itself gives feedback. So we're going to just start getting some mobility, doing the push through and push through teaser. Then we're going to build some strengths and move over to the arm, spring supine. And then we're going to take it to a kneeling position. And try to see what happens when we're more upright in gravity to see if we can put together this whole rib cage area with the chest opening and that big breathing that we talked about. Sounds like a plan. Yes. Okay, so come on to your back. I won't name move over here and just take the bar and [inaudible]. One of the things that we can just establish right off the bat is starting from the base, building it all the way up, getting this all pulled together, getting this all zippered up and really kind of almost letting the ribs slide up. Shimmy up here a little bit more and lengthen all the way through the neck. So she's holding onto the push through bar and the spring is pulling up and all I want you to do, Amy, is to bring the shoulders down with the same amount of pressure that you feel of the spring. So it's not that much on this, but it's that feeling of like reaching out and pulling back and the whole time we're keeping the back ribs anchored.
Now I use this exercise in Rehab after shoulder injuries, especially where the client is needing to get the placement of the ribs so that they can get their range of motion back without just doing that. And also to get the alignment so that it prevents future injury. Okay, so the collarbones are wide and it should feel nice and it should feel easy. Right now in the meantime, because we're thinking about length, we're going to carry that length all the way up through. So she gets nice traction. Okay?
Just bend your elbows to the Mat, let your upper arm come to the mat. This is our first stopping point so we can check in. Okay? So put that in your brain cause we're going to pass through this twice in each movement. Then you reach back overhead and here I'm lengthening from the back, right? And then bend the elbows wide again, controlling the back ribs and then it comes up and there you have it. You got the feeling. So we go on your own pool.
Let me feel you here. That's it. And reach and lengthen. And so you get that nice two way action up out of the back. Then again, control it as it comes through. The lower body's also working. So it's almost like you've got a foot bar there. Okay. And again, take a breath and reach and take a breath and straighten.
Good. That's enough of those. Now bring your head in between your arms and here we go. Start to slide up, slide up, slide up, slide up. Stay there and keep reaching the bar up and we start working our way down it. Reach up, reach up. Try not to move the bar. Just put this down first. Go ahead.
Go ahead. There you go. All the way down. And when you land, you try to land with all this pulled together and one reached two and three and four. Chin to chest. Curl up, up, up, up, up. Now pull the bar behind your head and straighten your arms up. One, push it away and again, but you keep this anchored as you reach up. Yep. And reach. Now push it away. And we get long here. Chin to chest so that you're making all that space. Land through the shoulders, pull through again deals good.
Just keep breathing and kind of keep moving and then bring your head up one more time and I'll kick your legs up and down. Up, down. One, up, down. Two Up to here. Three hold. Now let go of the bar and retrieve your toes. There you go. Reach up from your back. Reach. You're going to touch them. You're going to touch them. You're going to touch them. Yeah. You see where my hands are. There you go. Now we're on forward.
Take your hands behind your back and stretch and then lift your arms up. Pull the, there you go. Put your head down. Yes. So you're really pulling into here and then circle around to your toes and stretch. Okay, so we've got a little bit of mobility going on in there and a little bit more awareness. Come on to your back.
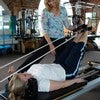
So the whole idea here is the arms straight springs are going to help keep her connected into her powerhouse. But because this is all about getting the chest and shoulders and neck to be aligned, we're not going to let all this happen. Okay, so let's just start. We're using our kind of a firm arm spring and I've got it set a little lower, so she's really going to be pulling under herself. Can Nice long reach here. Pull all this together. So just like before, and go ahead and reach hold right there. Reach longer, reach longer, reach longer, and try to open this and return and go again a little lower this time. Try to open the chest and use the surface of the mat to give the feeling and then reach out and come forward and go again and reach.
That's it. Now reach out. That's it. Good knuckles to the toes, crown to the back wall and then come up, up, up, up, up, and again. Nice and long. How's that feel? Good. Push away. There you go, Amy. Me, stay with it. Now let this open and, and Amy was saying, God, I opened my shoulders in my ribs. Like to come up. Yeah, that's the work. Reach forward enough. Now let's circle around together and I'm going to have you Amy open so that when you pull, you pull from there to your hips and come up and just keep working that way. Take tension out of the neck and keep tension on your springs.
There you go. Keep tension on the springs and go. There you go. How's that feel? Reverse it. So this is where you're wanting to work. You're still pulling from the powerhouse, but you're not letting it round the shoulders. Good. And then great. And if you can feel that working is tiring. Good enough of that.
Now let's come all the way up to the top and kneel and we're going to build on that. So she's got it all together. It's a lot of work. You don't have to do a budget and repetitions. Couple of well done ones. Makes the huge difference right in the right spoon. Right spring. Okay, so just about an hand distance from these rails and I'm gonna let you open your knees apart a little bit and your feet apart a little bit. And think of sending your tails straight down. Grab this. There you go.
And back up a little bit more
And then let the chest open a little bit more. Now pull the bar down and take a deep breath in. Knuckles to the floor, crown to the ceiling. Just open. Oh my mile. So already then here we go. Inhale, pull. Look to the right, look to the left. Look to the center and push into the spring as it comes up. And again, inhale, stay strong, grow tall, look left. Look right. Look centered. Excellent. One more time. Inhale, pull down, chest high and look and look, she's going to be sore tomorrow. Center.
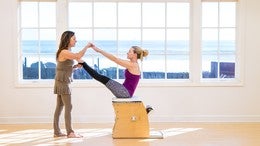
Exhale, but see she's doing it with intention. Inhale pool and Lyft. Go, go, go girl. That's it. Look, look, center and reach into an exhale. Nice work. Thank you. So now you get the stretch. Well you want to use the barrel and we'll open to finish and hopefully just teaching that over time in the body. Um, let's you find a new normal, which is all we're trying to do is like, we come into our work, we, we, we, we work clean. We think about what we're thinking about and then we find a new normal. Okay. Okay. Such pretty equipment, isn't it? Okie doke.
I'm going to just get this out of the way. Excuse me. Okay. That's it. So go ahead and roll yourself back. Alright. Is that okay for your neck? Yes. Okay. Stretch your arms to the ceiling. That's it. We want to keep this long. We want it to be on the verge of uncomfortable on the verge, but not into that pain zone.
These ribs just kind of gently reach towards the barrel and the belly is scooped up. So don't think of a pelvic tilt. Think of just a strong pull through the belly. Then inhale and reach and think of lengthening. Instead of going low, think long and exhale hands to here. And inhale again. Just let that open the feel good and exhale, come down and take your time to pretend you're in a big bubble and you want to kind of reach beyond the bubble and exhale the meantime.
This is pulled together. Now we'll move into circles. So stretch and we can do this with weights too. And again, inhale, exhale. So add in the element of breathing. Inhale, inhale, inhale, push away my hands. Exhale, exhale, exhale, and inhale. Inhale, inhale. And then we'll reverse it and go the other way. So inhale, inhale. Don't let this splay upwards.
Exhale to fill into the back. That's it. Exhale. One more time. And then take your hands behind your head are all there. You Go. And help your head up and come forward and take a little stretch here. There you go. And then bring yourself all the way up. Okay.
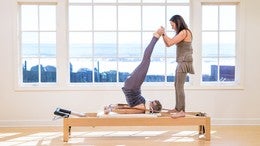
And then one final things for her while she's here is come around to the back. Stand up on here just to give yourself a boost and just reach up. Okay. And you can separate your hands a little further. There you go. And let your thighs just beat touching there. And now she's going to try to get all this pulled together.
Make it long there. You feel that now? I love that line. It's awesome. Okay. But you're kind of have a little help with gravity. And then from here, just pull up and hold one. Hold to hold three and release it a little legs together and pool again. Up. Hold one. I want this to work a little. Thank you ma'am. Uh, he, there you go.
And release it a little c and again. So it's funny, as we, as we're working up here, you start to see the things that happened down below and how it all relates and then release it and step down. There you go. So there's a lot more in discussing the shoulder girdle and all the ways the head and neck relate. But, um, I hope that helps you find your new normal. Thank you.
Mention
 |
Clare Dunphy (Teacher) |
 |
Elizabeth D |
 |
Jennifer S |
 |
Michele B |
 |
Jill C |
 |
Kathleen S |
Comments


You need to be a subscriber to post a comment.
Please Log In or Create an Account to start your free trial.
