Description
About This Video
Transcript
Read Full Transcript
Chapter 1
Introduction
Hi, my name is Benjamin Dagon heart. Welcome to a series of tutorials that focuses on the small pieces of apparatus that Joe has invented. There's so many tools in the traditional work that are less familiar to modern teachers that we don't often see used in the studio anymore. These are smaller pieces of apparatus in comparison to the reformer or Cadillac, but they're small for a reason. We have, for example, tools like the toe and foot corrector that are very specific to teaching us about the alignment of our feet or the head stretchers. And the next stretch for that focuses on cervical spine alignment tools that we don't often use because so much of Audi's focuses on global movement.
These are great tools to use for imbalances, to create a corrective exercise repertoire for our bodies and to build more awareness of our posture. So the pieces of apparatus we will focus on include the toe corrector, the foot corrector, the next stretcher, the magic circle, the hanging straps, the bean bag, and others. What I want you to get out of this series is to get an understanding of how comprehensive the pilotis method truly is. That it's not just the reformer or the mat, it's not just about your core, your center, your abdominals, but that Joe pull out, he's truly had your full body and mind and invented pieces to showcase how all different pieces in your body fit together. I'm excited to share these tutorials with you and hope that you get a new appreciation for the smaller piece of apparatus that Joe Claudia's invented and perhaps learn a thing or two that you can incorporate into your own practice.
Chapter 2
Toe Corrector
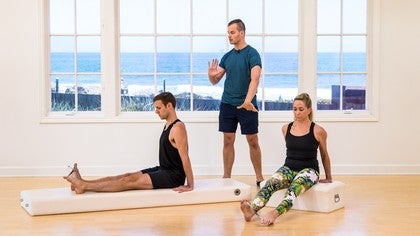
Hi everybody. My name is Benjamin. I'm here with Karen and Benny and we'll be looking at the Tokyo rector today. Um, it's called the tow corrector. I like to think of it also as the tow connector because, um, what all these tiny tools that we use in pilates and traditional PyLadies have in common is that they help us become more aware of certain areas in our body that sometimes get lost in the shuffle as we figure out a global movement patterns. So just taking a very quick look at this tool here, we'll see that it's very similar to the next stretcher in that there was a square that is around the spring that pulls the spring into a very clear trajectory. You will see that this spring is not going to be able to bend in any one direction. It pulls always towards the center point, keeps the body somewhat safe for, and the feedback that you get somewhat clearer in your body as well.
So there's two loops on either end of this. We have a pretty significant amount of tension running through the body here. Um, these loops are really meant to be wrapped around your toes. We'll see, um, that there's many different positions in which we can do that. So, um, let's take a look at some of the exercises we can do with them. You'll get that one. Uh, let's talk about positioning first, right? A lot of these exercises will be done seated depending on your level of flexibility in the hips and your back and how you feel that day.
You can do this with your legs straight out in front of you. That's what Benny is going to demonstrate. We'll send you feed that way and wrap the loops around your big toes. You can also sit on an elevated surface so that your legs can still be extended. We can work on rotation of the legs there and you place, um, those straps around the big toes there.
So what we're looking for in this exercise, um, to get used to how this toe corrector moves is whether we can focus on connecting the entire foot through the ankle, through the knee, all the way up into the hip so that even something as simple as pulling the legs apart becomes a full body movement. So begin by using your hands against the surface that you sit on to maybe lift yourself up a little bit to lift out of your seat to make sure that your seat is engaged in that you can press your heels out of your body. And then from there begin to rotate your big toes away from one another just enough so that the spring begins to pull back into your toes and then stay with that for a second. Right? We're not looking for a lot of sensation right away, but rather give ourselves enough time to figure out how does this inform the way that my legs and my feet feel here, and then slowly coming all the way back in. We're repeat that a couple of times. A great way to get used to the tow corrector or connector, if you want to call it that as well as the legs are being pulled apart.
Clearly the alignment of the big toe is poured inwardly towards the central line of the body. We're not really looking to change alignment just yet, but work on muscular tension that hopefully comes all the way out of your hips. Slowly rotate inwards. Again, we'll just do one more on this last one. See how far you can actually pull the spring open by way of rotating your entire leg, your thigh bone, your knee, and your ankle coming along for the ride. And we'll start to notice this is more of a hip exercise and actually your toe exercise slowly we treat back to center. If this doesn't quite work for your body or your knees, feel funny here.
You can also bend your knees a slight a little bit, bring your feet closer to you, you'll get a very different sensation out of the exercise and you can do that in either of these two positions. So let's do just a couple more here. Set yourself up super tall. Rotate your thighs apart, knees slightly bent, pulling the legs away from one another. Feeling the spring. Now more aggressively, the farther you go, pull the toes in towards one another. Again, just going on a journey of what that does to you and then slowly coming back and hopefully you'll get a sensation that your toes at that very distal point of your body are still a part of your center. One more time. Pull the legs open and pause from here. We can play around a little bit, keeping the tension on the spring.
We let the left toe rotate in a little bit so the left leg comes in towards center and pulls right back out. Repeat just on that side. Two more times. Left leg comes in slightly and pulling back out, so even if we just see a tiny little bit of movement, there's a lot of sensation that runs through the body. We keep the toes apart, we let the right toe come in and pull back out from there. Of course, because of this polarity and because we look at the body as a whole, we continue to encourage that lift of the spine, that deep breath in and out through the nose and that connection to the center. One last time, pulling the leg in and releasing and then just let your feet relax for a second. Let your knees will ask, maybe shake it out a little bit and I'm sure you agree that's quite a significant amount of work running through the hips here. We'll just do a couple of other things here to see, um, the options that we have. There's many, many creative uses of these, but this is some of the exercise repertoire that the choker record is really good for you using.
We'll take the legs again in that external rotation ever so slightly. Then we begin to point the feet away from us. Some point the toes away from you, keeping the tension on the spring and then slowly flex you feedback, push out through the heels, curl your toes back towards your shins, maintaining the tension at that twice more, pointing the feet away from you and flexing back in. Curling the toes back towards the knees all the way out. Sitting up tall. One more time. Point the toes away from you. Sit Up Taller for the legs, the feet hold point, just your right foot and then alternate your feet. Left foot points, right foot flexes. Another variation on the theme. All the way I'm looking for how do my toes and the alignment of the bone matrix of my feet. How does that correspond to the movement of my legs, my hips, and how can I catch that in my center?
Still maintaining a lift and getting my body used to a few novel positions in my full alignment three and switch two and then let that go one. All right, so that's just one of the many uses here for the toll corrector being wrapped around both your toes. We're gonna look at something else here and we'll, we'll look at Karen here for a second. One of the things that a lot of people are very unaware of is that their toes out, sometimes up to 10 completely different things when they start moving, right? And we're going to take the toe corrector off for just a second. And just taking a close look at the feet here. Just place them next to one another. Nice and comfortable.
And then go ahead and press the toes all the way down into the mat and you can follow along with that there as well. Then that's it. And then as we see the toes pressing down, you'll start to notice there's actually something else happening in each toe. Some of them roll in, some of them roll out the left side, doesn't do what the right side does. And that is not necessarily something to be concerned about, but it's interesting to notice, right? Um, try that one more time. Progressing all 10 toes down. So every step you take, you know that your toes have a different way of processing that, right?
So that you keep reinforcing a movement pattern and we're trying to change that, right? We're trying to create good, effective, efficient movement patterns here. So if you see something that's really off in the way that your toes relate to the ground, um, there's a way that we can use the toe corrector here as well. That is quite tedious perhaps, but totally effective. So just holding onto one end of the toe corrector here and then pick one toe that you want to work on right now. We'll just do one for demonstration. Say obviously that's 10 of them, but that will take us all day to get through, right? So in this exercise here, I suggest that you place the strap a little closer to the front of the toe here and then rest the tools down side by side.
We're looking for a super relaxed foot here and then there's two things we could do. We could either pull up really strongly with the toe correct and then press the tore down against that so it becomes more of a concentric action of the foot pressing down, right? The other is to keep the foot relaxed and then just see how far we can pull up without actually lifting the toe off the ground. Right? So keep the toe relaxed and then pull up gently creating the smallest amount of load and resistance and teaching the foot that it can be relaxed and pulled into place and then release. If you still see that at the slightest bit of load coming in through the toe, the toe starts to go in or out or somewhere where you don't want it to go, then you can begin to use your fingers and actually pull the toe in the direction where you want it. Let's try that one more time.
Sometimes also hold hard to hold onto that right now. What's of course important for this type of exercises that your body is still comfortable, right? Because we're curling forward and holding onto the toe corrector. It might get into other parts of your body here. So be aware of how you align your posture there and then let that go.
So it's not the most exciting of exercise, I'll admit that. But for your body, for your nervous system, for your brain, and for the way that your feet will feel after it's quite significant. And that is what this tool, that talk corrector really excels at doing. Putting your toes back on the grid, so to speak. All right, so one thing for, for home use of course that's worth noting is that this devices fairly expensive to buy, um, and fairly useful to pretty much everyone I know. So, um, one of the things that in case you don't want to invest into having one of these on your own, which I do recommend because they're quite fierce, um, is to simply use silicone wristbands as, as a replacement. And there's, there's other forms of rubber bands, Broccoli bands that you could use. Um, I think that silicon wristbands for one, have a really good amount of density, usually, um, a loop length that is very similar to a traditional toe corrector. And the best way to actually use them is to tie them together. That's what I always do. Um, and all my clients get one of these tubes at home.
Um, and I hope they do use them at home. So you're just tie them together and then you have your own little makeshift toe corrector. So, um, I'll just show you a couple more exercises how we can use these, integrate them into your home practice and possibly even into your entire Claudia's practice. Just using this. Let's talk about the Pilati stands for awhile. Right? Often we refer to the plotty stands as a turned out position where the heels are together and the toes are apart. And I think often it gets confused with, um, a dancers turnout or dances first position. Whereas I really think of that stance as, as a movement in and off itself.
And we're going to use the tool corrector or rather a makeshift toe correct or just a single loop so they can wristband, um, to, to sort of highlight that, right? So play along with this here. I'm going to place this around. Um, the big toes. I prefer to use, um, a narrow toe corrector then than the ones that are traditionally used just for this very drill here so that we don't have to go into an excessive turnout and we're going to begin with the toes actually side by side. I'm just bringing you the feet, all the way to gather the legs together so that we find this connection to our midline here, right? And then just starting to explore how we can actually rotate the legs apart. Similar to what we did seated earlier on, shift the weight back into your heels and then from the tops of your thighs begin to pull the legs apart until you get the slightest amount of resistance into your toes, right? Because the toes are being put in words. It gives us a really nice tactile feedback of what rotation from the hip boot can feel like. And how supported that fields for the knees and thighs.
And then you can release that. Again, we'll do that just a couple of more times. Shifting weight back into the heels, pulling the band apart, feeling the groundedness of your feet as well as the strength that emanates out of the ground through the legs all the way out through the crown of the head. And then releasing that again. One more time. So what as you go into your practice and every time you are in that position, this is a really great way to have a sensation that you can take with you for your practice. You can release the feedback in next hour. We're going to demonstrate how this looks if you took this onto the mat.
All right? So one of the ways that you can integrate this into your practice is by, um, especially if you just use silicone wristbands, is by using just one of them to see how your polarity stands, right? That position that we take very often where the heels are together, tow slightly apart and natural turnout line, how that can be re informed by um, using the silicon wristbands around your toes. So I will go through a couple of mat exercises here. We'll do our a hundred we'll do a roll up and our rollover.
A variation where the leg stay together using this as sort of a makeshift little toe. Correct. We're going to place that around the big toes. The heel stay together, right with only one loop you have, um, you don't have to go into a wide turnout to start feeling the resistance that gives you just like we explored earlier, lift out of your, see to find that rotation into your legs. Take that with you as you roll your spine down. And then we go into a a hundred from here. Lift yourself into position, reach out through the legs, maintain the tension there and then begin to pump the arms. Breathing in for five. Breathing out for five. For the purpose of this exercise, we don't have to do a full hundred. We'll just do a couple of breaths here.
Really feeling how that then informs the way that our hips hold the legs up and place and how our spine actually has a place to move away from. It's quite informative for this exercise that we, um, where we often take the toes for granted or grip them in ways that are not actually helpful. One more breath. Inhale, exhale all the air out and then release the legs down. We keep the legs slightly turned out to keep the rubber band intention, flex the feedback however, and then bring your arms up and over your head. Inhale, lift yourself up. Exhale, take a stretch over the legs and we'll start to notice. It's actually quite hard to keep an awareness in the toes because we often just don't arms overhead. Inhale lifting XL, stretch over the legs with control coming down, keeping that rotation from the hips and you'll see that the hips are really placed nicely for this exercise as well. We'll do one more.
I'll roll over after this just to showcase that you can relax your arms down by your side. Reactivate that band out of your hips and then pick up your legs, lift the leg straight up, and then lift your hips over your head, keeping the legs together for this variation. Keep pulling into the band as you roll yourself down and lengthening through the size of the waist. Lower the legs as far as you can. We'll just do two more here. What you will experience doing this is that it's really hard to keep the band engaged throughout and maybe that's the lesson that you can take with you even you don't use it around your feet. One more time, lifting up and over, and I think that's really what a prop should do. It should become a way to highlight something that otherwise it's hard to feel in your own body so that afterwards, hopefully you can't unfeel it anymore.
Chapter 3
Foot Corrector
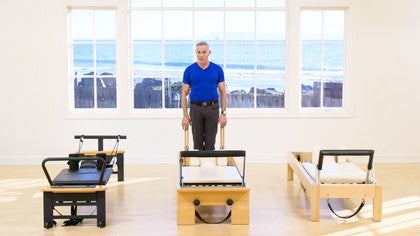
Hi everybody. My name is Benjamin. I'm here with Benny and Karen. We're going to be looking at the foot corrector right now. The foot corrector. A lot of people don't know. This is actually the first piece of apparatus that Joe [inaudible] patented back in 1922. It came just before the reformer, which interestingly enough actually was in my view, a horizontal foot corrector. It didn't have any straps, didn't have shoulder blocks. Uh, it didn't use springs even.
So the first reformer was essentially a foot corrector that you could lay down on, right if you ever read the patent for the universal reformer. That's really what it was about to connect the lower body strength in the arches of our feet. Um, two years before that he developed a foot corrector, which makes me think that plot is really as a fitness method and a movement training method that looks at the body from the ground up and seeks to build strength from the ground up as well. So, um, the device itself is a pretty sturdy heavy piece that you can step onto. It has two little towers on either side of this pedal that we see here with resistant springs that hold the pedal up. The pedal itself, um, can move in a variety of ways. It can move forward and back. I don't know if you can see that very well. It can move sideways depending on how you load your foot onto the pedal. Um, so it reveals a lot of inflammation and how we tend to load our feed. Um, as we walk, as we step up, as we climb, um, as we moved through life on our feet, we don't use our feet nearly enough anymore in everyday life.
So this is a great way to reconnect to them, uh, for, for people that really need more attention in their feed than just doing footwork on the reformer. Um, both the toe corrector, which we looked at previously, and this device, uh, will be great medicine for, for Sore and tired feet. Right? Um, and as I said about the toe corrector, I often look at these devices also as a foot core nectar, right? Not just a corrector, but also a piece that connects our feedback to our bodies. So the way that we use that, there's a variety of them is first by standing right next to it, finding your comfortable stance, aiming to place a right toes on top of the pedal. So you'll have to, um, choose a little bit where you want to place your left foot in terms of how much you can stand out of your standing leg here without locking your knee back, without having to shift weight in order to move the pedal down. For right now, you're essentially just standing on one leg here and then standing tall on your left leg. Begin to press down into the pedal and just see how the springs begin to pull back up into your foot.
And then keeping the pedal down even just that little bit. See if you can create a sensation of how the spring tension travels all the way up through your ankle, into your knee, into your hip, into your spine, perhaps even fostering a little bit of a connection into your stomach, into your core, your powerhouse, whatever it is you call that. All right. And then you release the pedal back up and try that again. Perhaps pressing down a little bit stronger, never at the cost of locking your left knee back or overly engaging your left thigh, but really pressing your right foot down, fostering and connection into the hip as well as into your center. Always working on an uplift, always working on breath because we are looking at the body as a whole, even though we're becoming fascinated with the feed here.
Release the pedal up one more time and then pressing down. This is again as I said before, plays where we can look at whether we tend to roll the pedal forward or back or more to one side than the other. We're trying to look for very symmetric, even movement down and up and then we change that position to the arch of the foot. So just like on the reformer, we now curl the toes over the front of the pedal, the heel coming down behind the pedal, and then with the same sense of lift out of our standing leg, we press the pedal down, becoming taller, holding the tension and see how it travels through our body upwards through the crown of the head, releasing it back up. Let's do that one more time. So we travel through different foot positions in order to stimulate different parts of our feet, right? There's a ton of nerve endings in our feet and we try to just wake them up here, maybe strengthen the arches a little bit and let that tissue around the bones enough feed that usually gets very tight and as underused to give that a little bit of mobility and flexibility. Juice it up somewhat and then we come to the heel, fall. The final portion, you might have to step your standing leg in a little bit.
Bring your heel right on top of the foot corrector, pull the toes forward and up as well. Really spreading the bone matrix of your feet open here and then pressing down into the heel. Again, finding an uplift to the rest of our body. Meaning that with breath and then releasing the pedal up. Right. And as much as you don't want to look down the entire time as you do it, it's a great place to become fascinated with what the pedal is up to here as well is going more to one side than the other. That may be because you're standing too far off to the side.
Playing around with that, always looking for how does the spring pull itself through my body? How does that tension travel through my body and how can I stay long on top? Release that and step off to the side for a second. So that's one of the uses we have for it. We're now going to use the other foot, um, for a different set of exercises where we actually lean weight into the third in order to maneuver the pedal. So position yourself so that you can step forward and place your left toes on top of the pedal and your heel right in the back of the long portion of the foot corrector so that your toes can flex away from the pedal.
You have weight in your back leg. And then we take a mini lunch step forward in order to bend the knee to load the pedal and to almost pull it down with the toes like we're trying to pull the toes towards the heels and then lifting back up from there. You can take your hands to your hips here to keep your hips in alignment and then you can keep your eyes straight forward letting your body travel with an upright spine as we pull into the pedal, really strengthening the arch of the foot and then lifting back up out of it. Lots of sensation that travels through the body here as well. We'll take one more, pulling the pedal down and lifting back up.
You can choose to be perfectly parallel through both feet here or slightly turned out with your back leg. Even slightly turned out with your friend leg. You can play around with different positions. We'll do one more thing here to showcase what this foot corrector can do for us. We'll now go into a sliding motion of the foot where we start from the same exact position. The heel is down heavy. We try to pull the toes down over the front of the pedal. Again, looking for symmetry and then sliding the foot over until we land on your toes.
In the short end of the foot corrector, slowly letting the heel lift up at the end. It's very hard to slide over the foot corrector without using socks or a little towel underneath. Then lifting back up. Beautiful Arch and pulling the heel back over the foot corrected. Then return letting the spring release. At the end of that, we'll try one more round. I'll keep your foot corrector in place. He appalling down, sliding over. There's a lot of um, tissue work that happens here as the springs constantly pull the pedal up into the very vulnerable part of your soul and lifting up, pulling back nice and then slowly releasing the pedal.
All the way back up and then you can step away from the side. So there's other things we can do here, but they're always revolve around bringing the sole of the foot on top of the spring, starting to maneuver the spring around to then see how that informs the rest of us. It's about creating a sensation and a better blueprint of how to organize our ankles, knees, and hips. The way to look at gait and truly changed the way that we experience our feed. Hopefully something we can then take onto the reformer and get it done in less time. And that is our foot corrector. Hi everybody.
Chapter 4
Airplane Board
My name is Benjamin. I'm here with Benny. We're going to be talking about the airplane board, uh, for a little bit. The airplane board of prop that is not often seen or used. It has its name from the exercise that it is really designed to help perform better. It's essentially just a, a board that is about as wide as um, our hip distance stance would be when we're standing up and it has loops that we can slide our feet into. We're using it in conjunction with the legs springs predominantly so that it gives us a sense of symmetry and support and actually something to stand on as we go through exercises that are very simple. Again, a great way to connect to our feet as well, which would be um, walking up the chain a little bit from the toes and the feed that we've been worked on in the previous parts of the series.
Now looking at the airplane board, we are going to be working on a Cadillac, attaching really heavy duty springs to this. So we're working with [inaudible] leg springs here. Um, we'll attach them here while he lies down on his back, head towards the Poles and already positioned yourself about an Omni with away here we'll just do some basic leg spinning exercises using the airplane board. So the loops obviously phase the body here so that we can slip the feed right in there. I'm gonna help you there sliding one at a time in. Sometimes these loops are a little tied by design, so make sure that you have a good snug fit here. And then we just begin with some pressing outs whose like parallel frogs.
Essentially you'll see that the airplane board really keeps the springs out of the way of the knees as well. Making sure that the arms reach back so that the hips are anchored down and then we go ahead and press out and come back in. So unlike frogs with leg springs where the heels connect, where we have a sense of center, I'm here, the feet are somewhat apart and the way that the body will automatically perform. This exercise will reveal a lot about asymmetries that happen inside the body. The legs might shoot off to one side because the legs have no other place to escape to cause the airplane board keeps the feed side by side.
We'll do one more bending in and then pressing outstay. Now with straight legs we're going to add another movement here. We take the leg straight up and straight down. Again checking in for whether the feed wants to go off to either side, either to his right or left, but also to see if the board starts to become a little tilted right, which is really great to see from the back here. Looking for perfect symmetry is also right in front of our own eyes as we practice.
So it's a really great feedback tool to check in with the alignment of our hips driving good balanced hip extension and flection through the body. One more time pressing down and then we begin. The exercise is called the airplane that this board has his name after we begin by bending the knees in, pulling the knees in towards the chest with a little pull on the poultry, we can roll the hips up to come to a place where the springs don't hold up as the legs extend straight up from here into a jackknife like shape. Then we go lichens long spine massage on the reformer into hip extension, pushing back into the Poles, engaging the spring and then with perfect symmetry through the airplane boards. Slowly rolling the spine down until we arrive back in.
I'll start position the knees bend back in. We'll take one more this direction. Curling the hips under, actually stretching the legs up, pressing into the airplane board so that we really stand on it. Rolling down. Bend the knees back in. And then we reverse that movement. The leg, straighten out, the hips, curl under. So this now looks very much like short spine massage on the reform of the knees.
Pull down with no tension on the springs. The hips lift up and while still standing here on the board, the spine rolls down. One more time, pushing back to the arms, out to the legs, lifting up and over, always with your eyes on the board to readjust and self-correct your movement as you go. Press the legs out just to finish that and then bend your knees all the way in and then we'll take this thing over your feet. So the airplane board can be used for other things as well. I'm just going to detach it here for a second. Um, Joe Pilati is himself, had um, a trapeze that we now typically use for some hanging exercises that was used underneath the knees as well because the airplane board actually has this carvings that are nice and round. We can also hook that underneath our legs.
I'm going to change our springs from two heavy duty springs to our roll back, our springs. So the roll back, our springs typically attach way higher. They're also much shorter. Um, so they still give us a decent amount of resistance. They're just not as strong as our leg springs. So we're going to face the airplane board so that the curves are really on chops so that we can hook our knees right on top of that. This exercise is often also performed with a roll back bar. However, the round dowel of the bar sometimes pulls into the knees quite uncomfortably. This is a little bit more doable for the body.
The exercise called rolling stomach massage, it has many other names as well. That's what I typically call it. The heels can be together in this position. And we begin very similar to our airplane, just with a short legs, bringing the knees into the chest and then lifting the hips up the hips. Stay in place. The knees push up in away from us. And having that support behind our hamstrings of that airplane where we can set the feet down, roll the spine down, or take one more round.
This way the knees bent in, falling in towards the body, lifting the hips up so you can really see how this is very similar to the airplane. Exercise the feet land, then the spine rolls down, knees come in. We're gonna reverse the process from there. So bring your knees into your chest and then roll the hips back down. We're going to start the other way. Lift the hips up, fold your knees up and into the biggest radius possible. And then sigma mentally rolling down onto the tail, which arrives last one.
More time to hips. Lift up. So here you can really see how the plane airplane board poles into the backs of the thighs. Really bringing the lower body towards the upper body with a great sense of support. Bring your knees back in. I'll have this in place. You can release your feet out and that is your airplane board.
Chapter 5
Magic Circle
Hi everybody. My name is Benjamin. I'm here with Karen and Benny. Uh, we have a magic circle in our hands.
We're going to talk about that for a little bit. Um, nowadays the magic circle is made out of plastic back in the day was made out of metal. Um, rumor has it that it was the steel band around a beer keg. Um, that was the inspiration for magic circle. Um, it actually looked like a steel band that had wooden blocks attached to either side to create resistance exercises. And there are several photo charts of Joe Plod. He's using it, calling it the magic circle. So, um, it's not necessarily magic, but it definitely does a lot of great things for our posture as well as just, um, again, building a connection with parts of our body. Um, essentially wherever we choose to put in on the mat, we um, in modern teaching use a lot of different variations that include the magic circle. Here are some of the more traditional uses of it. Um, I will get out of your guys's way. Um, we begin with having the ring in between our hands and the arms outstretched in front of us. As with any exercise will choose a good posture. Here are the heels out together, toes apart of the ribs, an arched and twisted the spine nice and lifted. Now because the ring gives us resistance on the inward push, we try to not necessarily make the circle super small, but instead use that resistance to widen the space. At the other end of our limbs where we hold the ring, we take a deep breath in on the Xcel, begin to press your hands towards one another. But instead of getting the ring, really feel how your upper back widens, how your shoulder blades pull away from one another, like a very small hug with long arms and then release the ring again.
Take a deep breath in. We'll do that again. On the exhale, try to link the closing of your ribs, the breathing out of the air to that closing on the ring and the strength that you build in your upper back. That width you create across your chest. We'll take one more squeeze like that. This is one of the most basic uses off the ring. Xcel all the air out. Try to get a little bit taller while performing this very small isolated movement into the ring and then really said we're going to bend the elbows now and bring the ring a little bit closer to our rib cage. So the albus wing out to the side.
You hold the pads on either side of the ring with the heel of your hand. We take a deep breath in here, elbows ring out to the side on the XL. We now try to make the ring as small as possible, holding the space between the shoulder blades. Nice and why the chest lifted and releasing the ring with control going again. Exhaling all the wild. Stamp your feet into the ground.
Stand up really nice and Tyler link this to good posture. Release the ring. We'll just take one more like that. Deep breath in on the exhale. Squeeze into the ring, feel your upper back widen and puff out. Empty the Lens and really is the squeeze on the ring. So those are two uses for the magic circle here for the arms and shoulders for good chest placement for deep breathing.
Now we're going to place the ring between the knees, so you're going to bend your knees a little bit still with the heels together, toes slightly apart, and you placed the ring right inside your knees. The padding allows it to not be super uncomfortable. And from there we try to keep the ring in place to start, but make it as wide as he possibly can without losing it. Right now, the hips have a tendency to sit back in this position here. I want you to bring your hips slightly forward, lean your upper body back, open your chest and put your head right on top of your spine. Take a deep breath in. On the exhale.
Push your heels into the ground and straighten out the legs to close the ring. See how the rain forces you to stay symmetric. Otherwise it would pour one knee forward, one knee back, and then slowly open the knees again. Take a deep breath in. We'll do that again, except press your heels into the ground. Stand up, close the ring, open through the chest again, linking this into a full bodied sensation and releasing the knees open. One more time. Deep breath in. On the exhale, press your feet into the ground, standing up tall, and then releasing.
Grab onto the ring to release it from your legs. So two of the users where we can use the ring to really foster a connection in to our limbs, arms and legs. We're going to go into our feet next. So similar to the last exercise, we're just standing where we foster a connection to our inner thighs. This will continue on that path, but we now place the ring in between the feet for which, which is a very hard thing to do for the dancer. We have to sickle the feed someone exactly in place the pads right against the insides of the souls of our feet. So yeah, exactly.
Roll onto the outside edges of your feet and place the feet as close to the path as you can ride. You can take your hands to your hips to get a connection into your hip alignment here and to maybe even press down into the hands and lift the spine up because we always want to teach the body that that is part of every movement we make. So we'll start with a deep breath in here and then with the Xcel to find the effort in our body, begin to close into the ring, pressing the feet together, and you will find the inner thighs start to kick in as well as an opening through the back of our body here. And then releasing that and you'll find all kinds of other sensations. Maybe your knees start to be not okay with the movement and then you just have to find a way to rotate your thigh out of the hip to allow for the ring to close just a little bit. And then opening why there's many muscles at play here.
So don't be too specific about the sensation you're looking for in terms of a muscle that's working, but see if you can use the squeeze into the ring as a way to lift out of your hips, out of your back, get a little taller, breathe a little free, or get your feet a little stronger and then releasing it. And if anything, it'll teach you something else about our fee that even our toe and foot corrector weren't able to teach us. Be Okay in that alignment. It's alignment. We can release this. It's an alignment that comes back and exercises like the seal on the mat or short spine on the reformer when we bring the feet into this position. So those are some of the lesser known traditional versions of incorporating a magic circle into your practice. Hi everybody.
Chapter 6
Bean Bags
I'm Benjamin.
I'm here with Benny and Karen and we're going to be talking about the being back for a second, which is really the most analog of devices I think are part of the body's method. We have a wooden dowel, a piece of rope and a bag that holds some weight, sand, rice, whatever you choose to put into it. And it's all about risk strength as well as a connection of our hand movement into our upper body strength. Obviously it all funnels back into our center and our core. Um, and yeah, a lot of people I find that practice pilates have issues with there is holding planks, connecting their arms to their centers. So this is a really neat way to explore that and couldn't be any simpler than that. Um, so we have two options here to perform this movement and there's two of them. Uh, one would be standing on the ground, which means that you only have so much to move the back down towards or we have Karen standing up here on a chair so she can really take the full range of motion, right? I'll take a dow, you can essentially do that as well if you don't have a beanbag at hand and movement of flexing and pointing and grabbing with your hands. Um, the way that that triggers a muscular response in your forearm all the way up into your shoulder complex is, um, quite effective in an off itself, even without any weight. And it's easier for me to teach while doing it.
So we all begin with our heels together, toes apart. Just to link this into our, he's experience, the ons are out in front of us. The doll is hopefully long enough, so that allows you to place your hands at about shoulder distance. We look for great posture here, off course, or the ribs on arch. The heels press down and the spine lifts up nice and tall. And then from here we have two movements.
One would be to the dowel away from you flexing one hand and then pushing the wrist up and forward and then going side to side to slowly begin to unroll the rope. Yeah, make sure that you hold it out of the right way here. So that is the first direction that we're working into. We're rolling the dowel away from us as it were with the hands, always looking for big flection of the hand. And then really grabbing on until the rope fully unfolds and you'll start to notice this becomes much more than just about your risks. It's really a challenge to your posture.
You need to press your legs into the ground and lift the crown of your head straight up. Once you're done, you start to pull the dollar towards you to begin rolling it back up. This fatigues the muscles that hold your arms out in front of you fairly quickly, right? So we'll just do two full rounds here, coming up, lift through the chest on arch the ribs. Become aware of how your feet will lay to the ground right there. The whole body is working just like anything else in place. Your whole body is asked to participate in this seemingly simple movement.
Pull it all the way up to the top. When you're done, you get a moment of rest. We're almost there. Another interesting thing to look at also is where you pull the rope, right? You try to keep it as centered as possible mostly so it doesn't throw you off kilter. Now from here, we're going to turn the dial around. Now facing the other way so that we have a different movement challenge here.
We're going to pull the dial towards us to start unrolling the rope, which is going to go about halfway down cause I think you get the picture right now. You roll it down, always stamping the feet into the ground, getting even taller through the spine. Yes, getting a little warmer through the shoulders here as well. And as you can see on these guys, that flection of the hand becomes more and more labored as we go, right? Because those muscles, as I said, fatigue fairly quickly. Let's reverse that and begin to push the dowel away from us as we start rolling the rope back up, coming all the way to the top. So again, it looks like it is wrist strength, exercise and a risk strength exercise only. It really is not. It involves your entire body, your posture, your breath.
Once the rope is short, release the bean back down. That is already it. So again, you can use just a dowel to create that same movement pattern, uh, tried for yourself. Um, I think it will be quite effective in helping you with your planks. Hi everybody. My name is Benjamin.
Chapter 7
Neck Stretcher
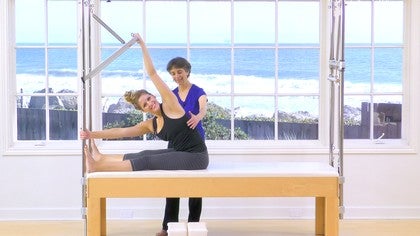
I'm here with Karen to talk about the next stretcher for a little bit. The next stretcher, another tool that a lot of people either have never seen before or are really scared of because it's essentially a heavy metal spring with a metal cage that you strap around your cranium around your skull.
So it's a little bit intimidating looking. But, uh, really what this tool excels at showcasing is how our neck posture, uh, relates to our movement that we practice in plots all along. And I personally can think of anyone who doesn't need to invest a little bit into awareness of how our head sits on top of our spine. So I'm keeping that in mind. Uh, we'll, we'll show you some exercises that really highlight what this piece is best at doing. Now talking a little bit about how this piece is built. We have this very static construction of four metal pieces that actually keep the spring in one trajectory, right? This is a spring that cannot bend as it returns inward.
So it always pulls up out in a very predictable direction. And the feedback that we get from it is also highly predictable to our brain and our neuromuscular system and the way that we perceive this. Um, we also take the security measures by always holding the strap that wraps around our head with our hands as well. Um, and then another thing, because as you can see as I'm pulling this spring open, I have to labor through that quite hard. This seems like it would be a lot of impact that I would have to put on my neck. Right? So clearly that's not a structure that we want to load too much. So what we'll pull the spring into, the other direction to take some of the load out of that spring is by attaching it to two of the heavier springs that we have in the studio.
So we use our really heavy legs springs here and you will see that as I engage the spring, now I will have to labor way less hard to make this much movement happen, right? Because the springs pulled us, um, the opposite direction because we use two springs to attach the next stretcher too. It also gives us a sense of where our center is and it pulls us always to a centered place. So it's essentially a really safe environment to work in. Of course, if you have any concerns with um, your cervical vertebrae, this might not be for you. But, um, again, for most people that I work with, they will get to meet this piece sooner or later, probably sooner. So we'll walk through a few exercises that are already familiar to us as Pleiades practitioners, rollback spine stretch forward or thighs stretch and we'll see how this can inform the way that we experience the exercise and feel the exercise. So have a seat for me here facing this contraption.
We're going to wrap it around the head. It's also highly fashionable, right? It's a beautiful little headband who doesn't love that? Um, and because there is an opening, that strap is hopefully bigger than your head. We're going to use our hands to hold and pinch the strap shod so that it can slip off of our heads, right? Super important for obvious reasons, right? And again, just to reiterate, the spring is pulling straight out being held by this cage light construction, and it is diluted by the heavy leg springs that pull in two directions so that we always have a center point to relate ourselves towards. A word of caution about how you use your hands here.
It seems very tempting to begin pull with your hands on the strap to already give yourself that traction because that feels so good, right? Um, however, in order to get the most bang for your buck from this piece is, um, you want to make sure that you don't use your hands in order to pull on the spring. You really just use your hands to secure the strap. The rest of the movement happens from our spine. So we'll take a roll back from here. She sits himself up nice and tall, curls the tailbone under to begin rolling back without really moving too far or without sinking into her spine. And we used to stay right here. If you just follow the spring tension and how it pulls on the very top of her spine, right that spot right between her ears. It gives her a sensation of being able to check in with how she can organize her spine and what do you want to feel is a sensation that pulls all the way down to the bottom of your spine.
Feeling your center relate itself to the posture of your neck, and then we come back up from there, releasing the spring completely sitting up super tall, hopefully with already a somewhat for your neck. We'll do just that a couple of more times. The more comfortable you get with opening that Spring and loading your spine like that, the more good it feels, the deeper we can go into the exercise here. Always staying for a breath and then lifting back up at the top. Super Tall. One more time. Rolling back. Ironically, what we're not looking for is a sensation in the neck.
You shouldn't come out of this thinking like, Oh yeah, that had felt really great in my neck. I mean it will feel great in your neck, but it's really mostly about, um, teaching you where your neck is as you move through these exercises. Well now take a hinge out of the bag, out of the hips, lifting the spine up and backs of the spine stays straight. We'll see that there's a 90 degree angle of sorts between where her body leans towards and how the springs pull on her. We'll just do that two more times. Very different idea. Even though it's the same movement direction for the spine, it's the same Paul from the springs that we get, but here we will feel the neck a little bit stronger. Very good. Coming back up, we'll take one more and can of course choose where you position your springs here. I like to place them as high as possible, which is not necessarily Reggio pull out he's had them, but I believe that that gives us a sense of up and forward through the springs rather than compressing down into the posture that we tend to already have. Um, you can go ahead and turn the other way. So we have to reorganize the strap around us, facing the other direction for the spine. Stretch forward just like on the mat, but having something that teachers as where a head isn't that exercise and how we can relate to it, right?
One of the culprits of spine switch forward is that we tend to collapse forward and down. Forget all about our head. Here we have something. I literally pulled our head back in space and gives us a sense of support. So again, without pulling actively with the hands, she lifted herself up, takes a big stretch forward over her legs as she rounds her spine, pulling the square almost unto her back, lifting back up with the inhale. Deep breath in. Exhale, rounding forward and down. So this contraption, just like the toe corrector, if you remember, it, has the same exact shape which was much bigger. Um, we're also called the magic square by Joel Plots. We'll take one more up and forward, rolling down, puffing out the back, feeling how the spring pulls the neck and to a better decompressed alignment. Lifting the spine up.
We'll also take a hinge in this position here for which we have options to either keep the legs straight, but as you can tell, this is quite a massive amount of hip flection here. So a way to relieve that is to open the legs a little wider and in fact straddle your Cadillac technique that we see on a lot of the original pictures of Joel Palladio's is working. You can even horseback style, how do you legs into the Cadillacs and what you take a deep breath and you lift up and with an almost straight spine leaning forward again feeling how the spring opens behind us. You can see how it pulls into a square as if wherever. Take two more here, lifting up and lifting forward. There it is and Pauling back in one more time. Stretching up and forward really allowing the sternum to pull forward through the arms. We come all the way back up from there, we let it go and then you can take it off your head.
So would you agree it's not necessarily a ton of sensation that runs through the neck, but it helps us really connect into our spine and how our um, head posture relates to movement. We'll take one more exercise here facing the springs. Again, we're going to be up on our knees coming up a little bit higher. We can perform a variety of exercises here. We'll do most of them standing outside the Cadillac. However one of them that's really good to do on your knees as the thigh stretch, right, which we know from the reformer and the Cadillac work.
Now we have a different sensation about it because the springs pull not our arms but our head so you find a position that works for you, right? If you plan on going really deep into your thighs stretch, you might want to back off a little bit and get a lot of support from the springs. If you feel like you're not quite sure how far you want to go. Start with the springs somewhat loose. The spine lift, the body leans back, hindering from the knees until the spring starts open. And then stay for at least a breath. See if you reorganize your neck against the spring and then lift yourself all the way back up. We'll do that. Two more tacks.
Lifting up and out of your knees, Pauling the spine back, pulling the spring open. Nice. And then lifting back up. Remember not to pull with your hands, we'll take one more lift of take your body back. And so hard not to pull, it seems like it's the right thing to do, but actually stealing some of the sensation that you would get from the spring. Otherwise. And that is our thigh stretch with the next stretch or you can take that off. Pretty cool. Right. All right, so there's plenty more exercise we can do on our knees. As I said, we'll actually take them into standing, which is our next developmental stage and how we um, progress movement. So, um, we'll be right back. Here we are again with the next stretcher. Um, we are now working on the outside of the Cadillac doing some standing exercises using that because sure enough, um, our head posture is also very important when we're standing up probably more so than anywhere else, right? So, um, hopefully these exercises help use the next stretch in a way that informs the way that we carry our head in everyday life. Um, words about the history of all of this.
Rachel Claudia's was a boxer more than anything else. Um, so neck strength had a whole other importance to him as well personally. Um, but again, I don't want you to look at this as a way to strengthen your neck as much as just creating more awareness of how it sits on your body. Right? Um, the attachment here is at about head height of the body, right? If you have the availability to adjust that somewhat. Um, again, if you go a little bit higher, you'll get a different sensation from it. You definitely don't want to be lower than your own head height. All right, so Ben is going to wrap the strap around his head, facing it to begin with, and we'll do a lean and a squat essentially, right? So starting from a turnout position, maybe not quite as turned out, um, and almost starting in a position where the feet are right underneath the shoulders so that the second he would lean back from here, the springs would begin to open, right? You can try that a couple of times, just even before adding any other movements of the body leans back in one long line and then coming forward.
Use this as a way to get used to the way that the strap pulls on you in a standing position. Because now, sure enough, you have to organize the entire length of your spine. Very quickly. We'll take one more. Avoiding a chin to chest, and again, avoiding pulling with your hands on the strap. We come back forward. I almost want you to take a mini step back from there so that now we go ahead and lift up onto the toes and lean the body back into that spring tension. So we have to do very little of that, right? It's think of a plank shape through your body here, come back down and release the spring. Try that a couple of times.
Finding your balance on your toes, leaning your body back in one long piece. Really firing up that length through the back of the neck. So then hopefully afterwards your neck fields a lot longer than right now. One more time, the body leans back from here. We begin to bend the knees like footwork. Bend the knees, try to sit down on the heels.
Really feel how the springs pull you up and forward. Stand back up. We'll repeat that twice more. Take it down. Keep the length through the crown of the head and press back up. Pushing the ground away with your feet. One more time. Take it down. Stand back up. Really feel the length of your spine.
Connect that the heels meltdown at the spring. Tension subside and then we'll take the strap and adjust it so that we can now face the side. This is more specific to strengthening the, um, the sides of the neck, right? The muscles that really are the power lifters of our head. You'll feel them quite intensely just by way of keeping your body vertical and leaning into the spring. Very easy, small movement, easy does it and you don't want to go super far. The second you go in, you will start to feel at the muscles on the side of the neck begin to kick in. Nice and then we slowly return so it'll take only a little bit of movement.
Always making sure that we're somewhat centered, but again, keep in mind that the two springs that the next stretcher attaches to always pull you towards one center point and the cage around the spring really gives you a clear trajectory. Just one more time. We're not going to do too many of them because these muscles get easily overwhelmed for good measure. We'll do the other side as well. Turn around face the other way. I don't want him to leave crooked here, right? Heels together, toes apart. You can again, less than your turn out a little bit. Take the body out to the side, look for sensation that runs right through your neck and then see if you can let that travel down the sides of your body as well.
So you get your obliques and QL. All the muscles that organize unilateral fashion, they start to kick in as well. One more time, but always with an awareness of how your neck relates to that one last one. Take it up and coming back in. Then we'll finish with a version of the spine stretch that comes with the lunge step.
We're going to face out in a way from the Cadillac all the system and make sure that he stays right in the middle. Yes, you're good. And then we take one step forward. We'll just do one side here. The right foot steps forward. We significantly bend into the knee. The spine is in line with the back leg so we can use the back foot to actually push into the ground. He takes a deep breath into start with the XL. He Pauls forward through his head, through his entire spine and bringing his nose towards the knee until his lungs are empty and the movement is completed.
And then he inhales and lift himself back up. Deep breath in. Go again. XL rounding forward, rounding down just like your spine stretch, but in a standing position you'll see where the spring would pull his head. Right. Again, he's not using his hands to pull on the strap. You can recover. Come back up. Let's take one more deep breath in. He's not pulling on the strap with his hands, but he's allowing his, the top of his spine to really move into the spring maneuver.
The springs open and then he lifts himself back up and then he can take the strap off. And those are some of the exercises we do with the next stretch. I think his neck fields, it looks a little bit longer. I hope it feels that way too. Um, so yeah, don't be scared of the next stretcher if you have access to it and somebody who can coach you through it. Um, I think it's a wonderful thing to experience and to carry with you as you surely have to think about your head posture all day long. Hi everybody. My name is Benjamin. I'm here with Karen.
Chapter 8
Breath-a-Cizer
We're going to be talking about the breakfast sizer or the pinwheel. It's a metal pinwheel that Joe pull out these devices, one of the different pieces of apparatus that he created to help us visualize our breath and build a stronger relationship to it. In his book he wrote above all learned to breathe correctly. What he meant with breathing correctly is that you learn how to create a full exhale, right? It's very easy to hold our breath when we inhale. It's very hard to fully exhale and then hold your breath. So by, by focusing on a strong exhale with each one, we both strengthen the diaphragm as well as teach o body to maintain a sense of breathing throughout any kind of movement challenge that we throw at the body in this work. So, um, this is um, metal pinwheel that has a little straw like opening on the other end, which is um, helping us to create a narrow opening to breathe through, which again makes it a little bit harder to breathe fully out.
We're going to use a little mouth piece here, um, to help us get this exercise done. So you're holding in your hands and essentially all you do is fully exhale, right? It's as simple as that, but you shall find that it's actually quite a lot of effort to let this wheel turn as long as possible. So I'm standing up nice and tall just to link this to good posture as well and all of the things that we learned in pull-outs. So she's going to take a deep breath in holding the Stroggins her mouth, fully inflating her ribs into all directions forward, back, side to side, up and down. And the XL is going to start to move the wheel as long as she can.
We see the closing of the diaphragm here, the closing of the rib cage until the wheel stops turning. We'll try that a couple more times just to get used to the sensation because often we don't really think about how long we exhale, excelling fully, letting the wheel turn as long as possible. Closing the ribs, squeezing the last bit of air out of the lungs. We'll try one more here. Breathing and getting a little dizzy as part of the exercise as well. Exhale all the air out. Keep the wheels spinning. Empty the lungs, so now we're adding movement to that. Similar to the way that we lift our head, neck and shoulders up in the a hundred we're going to create a head, neck and shoulder curl forward and down, making sure that we don't close up the passage. Way for breath. After that, we'll take it to the mat and see if this teaches us something about our head, neck and shoulder alignment. Starting the same way, we take a deep breath in on the XL. Begin to curl up through the crown of the head, Chin over, chest.
We round forward, we round down again trying to Xcel all the air out of the lungs and then with the inhale restacking the spine, taking a full breath in. We'll just take one more like that, filling up the lungs, exhale, Chin over, chest rolling forward, rolling down, really puffing out the upper and middle back until the lungs are fully empty. Inhale to lift back up and then you can release your disease from doing all that. It's, it's pretty dizzying, right? It's a lot of effort and hopefully also helpful in finding your center of power in your exhale. Now we're going to take that to the map. All right, so now that we're on the mat, we typically choose to breathe slightly differently from what we just experienced with the breathing wheel. We try to not labor through the breath nearly as much and power through.
We are looking for a more normal breath, but what we just learned about using our muscular strength to really force the air out can be helpful in how we position our neck and exercise like the 101 leg stretch whenever you have your head, neck and shoulders lifted. So we'll see if we can link those two sensations to one another. Take your arms over your head, reaching far, taking a full breath in, and then exhaling through the nose, but until the lungs are fully empty, curling yourself up and forward. Creating that same sense of space through your cervical alignment as well as your upper back to not shorten the breath. Inhale to release back down and reach the arms over the head XL leg.
Breathing into that wheel again, up and forward through the arms deeply in through the center and then releasing back down. We'll just take one more here, fully inhale and then fully XL along with the movement of curling up and forward, reaching out through the arms, reaching out through the legs and then releasing all the way back down, arms overhead and then you can relax from there. Right? So the breathing wheel, even though it is not necessarily linked to what we do on the apparatus, it can teach us something about how to use our strength for breadth and how to align our neck. Super useful in your practice. Hi everybody. My name is Benjamin. I'm here with Benny.
Chapter 9
Hanging Straps
We'll be talking about the hanging straps, sometimes also called fuzzies. These are great straps to use for a gymnastic work for several stretches. The ballet stretches are often done with these. Um, I wanna specifically use them for um, a deepen version, something that is a wonderful way to end your practice, especially if you were crazy hard, uh, because you can literally reverse gravity for a second and let your body be fully suspended in the opposite direction. Let go.
We will also create some opportunities for back bending here, both in the backward bend as well as off to the sides here. Um, you can just go ahead and allow yourself down, head towards the straps and then with an Hansel on the Poles, pull the knees into the chest. I'm going to give you a little bit of support here. Bring the hips up, and then we set up the straps one at a time. The big toes typically end up on the outside of the strap here so we can hook ourselves in. We'll just release the legs. And then we always begin with a half hanging position where the body is pushed onto the table. The arms just have a lax by the sides and this is already a pretty awesome place to be. Clearly that might be some contraindications in terms of uh, blood pressure, um, injuries, right to the spine where inversion is contraindicated, right?
So proceed with caution. If that's the case, this is probably not something you'd want to do by yourself as well. You want somebody to spot you through here. But as you can see, this is an incredibly relaxing position. The low back, it's not forced into flection. It's just nicely hanging loose. We explore the breath in this position and if this is comfortable, this might just be all you'd want to do here. We're going to proceed. Of course, we'll take the hands back to the Poles and begin to slide the body back, inching towards the polls, taking the answer to the other side so that the body can fully slide off. Always keeping the hands on the polls until you're clearly aware whether your head can hang freely without touching the ground. Super important for obvious reasons, right? Um, that is when we would choose to adjust the straps, shorten the straps and find all kinds of other variations.
Now the body is almost completely relaxing down. We wanna make sure that the back is not wedged into the edge of the table, but really free from it so that it can lengthen out against that. I recommend keeping the eyes open so that you don't get crazy dizzy and mostly continue to breathe. And again, this might be all you're going to do here. You can choose where you place your arms. He has them cross. You can extend them out. We're going to take a Highbridge from here.
Some Cadillacs have a crossbar at the bottom that you can easily hold on to. We're going to use the outsides of the frame here, holding onto the outsides to push ourselves out into what would then become a high bridge. I'll give him a little assist here to create more length through his upper back. Coming out of his lower back a little bit. Yeah, pressing out against the floors and another option here. Take a full breath into the back, pressing down into the straps as well to create that full body tension.
It's a beautiful sensation of beautiful way to explore your back mins if you have them in your practice. From here, slowly brings himself back against the edge of the table, takes his hands to the Poles. Benzes needs to pull himself back onto the table. That is one of the backbones we'll do here. We'll try a couple more. This is the squirrel. He's going to turn his head off to the side, pulling himself off the Cadillac or the system a little bit here. This is sometimes a little cumbersome to transition into. You turn away from the pole system that supported you, holding onto the top of the table, finding your way around into that full rotation, trying to square the hips and then straightening out the arms to create another back. Then opening through the chest.
You can even walk your hands a little bit to your right here. [inaudible] exactly to be inline with the legs. Holding that for just a breath pressing out through the arms. Very nice and then slowly coming all the way back in. Once your head here in the transition, you're going to bend your knees to pull yourself back onto your back, falling yourself over to the other side and then we'll do the same thing there of course as well, pulling off the table and then moving away from the pole so he turns over his left shoulder here on this side. You've got it.
Move yourself a little closer to that pole again because the legs will want to stay on a diagonal there. You got it. And then press back out from here, straightening out the legs, squaring off the hips as we go. Very nice and then come all the way back in again. Wash the head as you pull yourself back into position because that was more work than he signed up for. Are going to take another restorative backbend here. He's pulling himself off the table. Just one more time and because that feels really good and because I am here, I'll spot that a little bit and give him a sense of weightlessness through his body. You can release your arms back here. Hold on to me. I'll hold on to you.
And then we allow the body similar to that Highbridge we took earlier. To take a little bit of weightlessness into the spine, I'm going to start gently rotating in from side to side. Make sure that you still breathe, that your head hang free, that your eyes stay open and then we slowly make our way back. All right, so there's the edge of the table coming right at Ya. All right, and then take your heads back onto the Poles. Now we finish up with a little monkey swing.
He's bringing his hands up on to the legs, climbing up like a double leg, a tree on the reformer, swinging his body back and forth on the forward swing. He's then releasing down, letting the hands come off his legs, and then releasing his spine all the way down. So go ahead and release yourself back into a half hanging position to have a final moment of rest. Maybe a final breath, maybe letting the hips rock a little bit side to side. It's one of my favorite things to do. And then just sort of waiting for the hips to come back to center. Point and a moment of stillness.
And then the most complicated part is getting out of these things. He's going to hold on to the straps, pushes into the straps who lift his hips up a little bit, and then one foot at a time or very skillful with [inaudible], both of them out at the same time. He slides his feet out, roses themselves down, extends his legs, lift his arms up and forward. We'll finish this with a roll up, going into the opposite direction for a second. Very nice work. Super Restorative. Great Way to end your practice. There's many other things you can do with them, but since they're called hanging straps, that's where we're going to do today.
Have fun hanging.
Workshops: Free Workshops
Mention
 |
Benjamin Degenhardt (Teacher) |
 |
Peter R |
 |
Celeste E |
 |
Marci C |
 |
Rajashree Srirangarajan |
|
|
Shannon |
 |
Juli W |
 |
Vanessa C |
 |
Don S |
 |
Tracy Sue du Plessis |
 |
Sharon S |
|
|
Joanne Smith |
 |
Francisca A B |
|
|
Amanda L |
 |
Lucie Bécus |
|
|
Reformerchick |
|
|
Veronique G |
 |
Kimberly P |
|
|
Michelle S |
 |
Sylvia T |
|
|
Hydie |
 |
Joy N |
 |
Ewa |
Comments


You need to be a subscriber to post a comment.
Please Log In or Create an Account to start your free trial.
