Description
About This Video
Transcript
Read Full Transcript
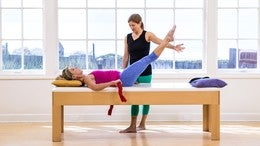
Now we'll be doing this. The seated exercises that are modifications for osteoporosis. We'll be starting with spine stretch. So Kristy, if you could straighten out your legs, first thing is to see if the person can sit up straight with a neutral spine position. Yeah. And then you could also use the dowel behind the back to check that. And if they cannot sit up straight with the neutral spine position, you'll either prop them up on something or bend the knees.
I think the easiest thing in a math class that's moving quickly is to just bend the knees, right? So hold onto the back of your legs and then use the legs to actually help you hinge forward at the hip joints. Because we're going to be doing the spine stretch, has more of a hinge. We're not going to be doing the spine inflection stretch. That's it. So think of leading with your tailbone and then returning to vertical and again, hinge forward and return to vertical. Now straighten your legs.
So if if someone like, I'm sorry, someone like Christie who might need a little bit of assistance could use a strap around the feet and do the same thing. So if you're getting to the point where you want to get that length in the hamstrings, you want to try to sit in that neutral position, take the stress off the hip flexors. It's wonderful cause this can be brutal on the hip flexors for somebody that's really tight. Yeah. And again, you're thinking of rolling the pelvis forward, like a wheel leading with the tailbone. Now stay here and then lift the heart a little bit. Yeah, there you go. That's more of a neutral position there. And then coming back up.
Hold that for a moment. It's hard to keep this. Yeah. Yeah. So let's, let's get the dowel. So I think the dial might help for Christie to become a little bit more aware of our spine positions. So let's start in that neutral position and then take the low back away from the dowel. There you go. And trying to get the mid back to the Dow. She's a little flat and the thoracics and it's harder for her to touch all three points. That looks good. And then, yeah. And then that might be a little too much for her neck because she's a little flat in the thoracic. So sometimes what I do, and she's coming off here, so that means she's losing her neutral position, is take my fingers like this around the dowel and then you can hold it against the mid back and fill up that space for the flat back.
And that's a lot easier on her neck. All right, there you go. See that's more doable for her. The other one was a little bit, um, too retracted for the neck. Yeah, that looks great. And she's maintaining those points of contact. So at home, if Christie was gonna practice this at home, she could wrap a washcloth around it, tape it, you know, just put some thick, um, substance around the dowel and then put that against the mid back. Does not use this and not use this strap. Right. And you can just hang on to it or stick it in your shirt.
I have people who stick it in their shirt. So I'll fill up the space for her and she can practice. And you want your thumb in between the dowel and your low back. If you hold it so that your hand is in front of the Sacrum, it's going to change the relationship. So you want your thumb right in the low back.
And then I'm going to fill up this space for her now go. So she had a washcloth wrapped around in that than she would be able to feel this three points. Okay. So that's a little bit, yeah, a little bit too much. There you go. A little bit too much there. Yeah, go. That's it. So it really makes you work those hamstrings into a little more link. Excellent. Right. And then you could do a little bit of a curl with it, hold onto the straps, sitting up in the neutral position, and then do a slight curl back. Yeah. And then back up again.
Just wa working the pelvis, mobilizing the hips and the low back a little bit. Yeah. And then without collapsing in the mid back. Nice. And Return. Now I like to go right from the spine, stretch into the saw. Then they get, makes a nice transition and it's very similar. So I want you to put your hands behind you actually.
And then I want you to imagine that you're a football player and you're quite large and your bulky muscles, right? And not so flexible, right? So you're going to take it way back. There you go. All right, so you're going to see a lot of this in class and the poor, the poor football players trying to sit up straight and has not enough hamstring length and is really challenging. So we'll have you straighten your arms instead of tall. That's it. So that might be the very first part of the saw is that you're just doing a little stretch of the chest and trying to get more upright practice rolling the pelvis forward and backward and then getting an into a neutral position. So you put your hands back as far as you can, being in a neutral position.
Now take this right arm and bring it towards me. And then I want you to push into my hand to allow you to rotate a little bit more. So push it in the back way. Yeah. So, oh yeah. So you get a little bit of a stretch there for the saw and then take it down to the leg and you create that in your body and that spiraling up. So there's the soft for somebody that has a lot of decreased flexibility and has a hard time sitting up tall and then come back out of it and then take the other arm, reach it forward. I'll give you that little bit of assistance so it can help you understand what to do.
So you're going to keep this pelvis anchored and then help yourself rotate a little bit and then take the hand to the side of the leg and do that same thing again, spiraling up, letting yourself get some assistance, especially with some thoracic mobility into that rotation. Nice. Yeah. Right, right. So they can do this if they don't, you don't wanna force to end range. You want to use gentle pool, just a little bit of assistance. And then it takes a lot of stress off the hip flexors. That makes it a really nice exercise. Now if you're more flexible, you can take your hand down, go into the saw just like you did and you were leaning back. Right. Take the left hand down and then just start to reach that hand forward and make it more of a hinge. Yeah. And stopping there.
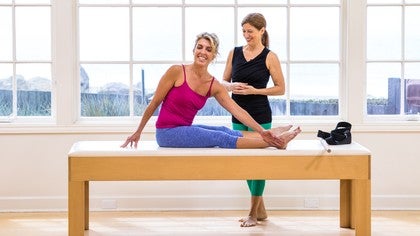
So she's starting to get a little bit of yeah. And then rotate. So it's more about, yeah, I think she just got a little adjustment there and then I'm back to the center position. Exactly. And so I think that is a, that's the way I used to teach it in the large health club setting where I had a mix of people. I had lots of older men in the class, people that were not so flexible and they were thrilled to be able to do this version instead of trying to really struggle to get down and sweating bullets to try to get there. All right, so I hope you enjoy that one. Let's go right into spine twist. I'm going to have you bend your knees and place your hands behind your thighs. All right.
Separate your feet a little bit just to get kind of a relaxed wide position of the pelvis. And now just allow yourself to rotate to the right and give yourself a little stretch there. Nice. And look over your shoulder and see what you can see behind you. And then back to center and then twist to the left. So it's really about spine twisting rotation, not so much about hamstring length. Yeah.
And look and see what you can see behind you. Okay. And now take the left hand and put it on the outside of the right thigh. Okay. Back of the hand. Yeah. Against the thigh. And then start to rotate [inaudible] yeah. And straight. Yeah, he gonna straighten the arm and no force. Just very gently reach the right arm back. Yeah.
And you're going to go into that palm down reaching back position and there's a little bit of spine twists there. Now see how far you can look back behind you. Yeah. And then again, limiting to about 75% of the range of motion. Please don't force it if you feel like someone's forcing it or I would just take the arm up and just let you do it without any assistance at all because you won't get to full end range without assisting yourself, right? If you really forced, then you're going to wind up the ligaments, compress the vertebrae, and could cause a compression fracture. So we don't want that. All right?
Now let's try it to the other side so they can see from the back. You're going to hold the legs, hold the legs first, and just do a simple version of it, and then really keeping that length in the spine and you want a softness when you're adding rotation. You don't want to be really holding yourself up too rigidly. You want to think of that spiraling up and a soft feeling or quality in the spine. Now take this hand to the back of your leg [inaudible] and then reach this hand back. I like the palm down and reaching back like that.
Take the shoulder around [inaudible] and then imagine that you're pressing into the wall behind you and then shoulder down, you can do palm up to, if somebody has got their shoulder way up, then certainly palm up. Yeah. And then take the arm up and see if you can maintain that position. There you go. So if they pop out of the position, then you know they've gone way too far with that. And those are just some easier ways to do the spine twist. You can certainly do it the traditional way without the ballistic bouncing, without forcing to end range. Um, but this might be a nice modification for that.
Our next exercise will be the neck pole and we'll start in the long spine, long set position and then head mid back, sacrum against the dowel and then reach back with your hands and hold the dowel. So I'm assuming that she's already done this with spine towards, I'm sorry, spine stretch. We did this modification of the hinge and now you're going to try to keep those three points of contact. And then remember Christy has a little bit of a flat back. So I'm going to give you a little ease in your neck if you want it.
And then let me take my hand and put it here. There we go. Yeah, that's nice. And then she's just going to do the hinge back and that's actually part of the, the initial part of the neck pole anyway. So she'll do that a few times. And so anyone with osteoporosis could easily just do this part instead of the full roll up and roll down. Thank God they're probably so thrilled they don't have to do this neck pole, right? Yeah. And then come back up. All right. And then let's take this away and then do the same thing with the length here and just do a slight curl back.
Just a little curl back of the pelvis and then back up again. And then again, if somebody has tight hamstrings, they can just do bending the knees. Yeah, they can bend the knees to do it and then it makes it a lot harder to control. You know when your legs aren't straight. Yeah, yeah. You can put a roller underneath or something like that too. You know, that would keep the legs in a stable position. Nice. You can also put something under here onto, I mean not under, on top of here. Okay. Yep. And then like wait or, yeah.
Or you know the strap something across the top where you're hooking your feet. If you're at home you can put them under the sofa and something like that. Good. All Right, nice. So you just adding that little bit of a curl and keeping it safe for someone with osteoporosis. All right. One of my favorite exercises is the hip twist and the teaser modifying. Those.
I really love to modify these. I like to think about them and I like to think about them from a yoga perspective versus [inaudible]. So I'm gonna have you do an avast [inaudible], which is a boat pose in yoga. And the difference between boat pose in Yoga or Nirvana and teaser is the spine position. So let's do, let's go ahead and do the teasers since you probably know that one, right? I bet you know that on, right? So you're going to do, I just want you to take the teaser up into the position because you're not going to do the roll up in the roll down because it would be contraindicated. So go ahead and get into your position for the teaser. All right?
And you're going to notice her. I'm going to help her so she can really get that curl in her spine. So I want to get as much flection in the spine and I want it to, I want to think about it being like a u shape, so push into my feet. So that would be what I'm going for with a Peloton version of the teaser. Okay. Now I'm going to change it into an avast. Anna, take it up to neutral. Yeah, hold onto the back of your legs. Thank God. Yes. Yes. Right?
That is what yoga does with an Avastin or boat posts. So that's going to be a bit safer for osteoporosis, but it's a lot of work on your hip flexors and you don't use much abdominals with it. So we're going to do kind of a mishmash of the two. So let's curl back just a little bit. Yeah, there you go. And that would be more of an Osteo safe version of the teaser. Okay, now let's get into it. Little by little, come down [inaudible] take a little break there. All right, now what you're going to do is hold onto the back of your legs and then hinge back [inaudible]. And now a slight curl of the pelvis. So you're taking the abdominals away from the thighs. Beautiful.
You're going to maintain that position of your spine. Lift one leg up in the air, and with a bent knee, yet we're going to do basic to more advanced. Okay? And then with the other leg up with a bent knee, and as long as you can hold that position, excellent. You're gonna let go with one hand, straighten the right leg and bring it back in. And now hold onto that one. Let go with this one.
So that's a wonderful way to do the teaser while everybody else is doing some other variations. And then extend the right leg. Let go with the hand. Extend the left, right? Hold the, hold the legs again. Bend the knees, bring them in. Nice. Alright, now you're gonna extend the right leg. Lower the leg down, all the way back up again. And then same thing with the left. Extend the left. Exhale, lower down. Inhale, lift. You're welcome to reverse the breathing. Now last one, both legs lower and lift.
That's nice. And back to center. Now one more time. Extend it out. Let go with the hands. Lower and lift and lower and lift. Bring the knees in, place the feet down and breathe. Very good. So that would be the teaser variation.
You can go right into hip twist with that. So you take your hands behind, right? The, the easiest modification for the teaser would be with the hands behind the back as you're doing here. So you're gonna take your hands behind your back, you're gonna do a neutral spine position and then curl and then roll forward and curl. So take it into a slight curl. Lift the legs up one at a time. Yeah. So just think really beginner, not able to balance, right? You're going to take the legs up to here and then here. Okay, nice. And then extend one leg, bring it back in, extend the other, bring it back in, extend both and now extend, right lower and lift.
And you're working to see that the person does not change their spine position. So my hand, if I'm in a private, I'm behind their back. If I'm in a mat class, I'm looking to see that everybody's keeping their spine in alignment, right? So whatever position you establish at the beginning is you, you maintain. So and the farther the hands are apart, the easier. And if it's really hard for people, which I do have that a lot in my older adult mat classes, elbows on the elbows, right, then you, you don't want to fall back too much into that flection.
So it's a slight curl about like that. And then same thing, lift up, up, extend, extend both lower lift. Then when they are able to do that, you bring them up to their hands, then eventually to no hands. Right? Okay, stay there. We'll go right into the hip, twist, bend the knees up to tabletop and you might go one at a time. If they're beginner, it's okay. And then let's keep the knees glued together and we're going to go to the right just halfway and then back to center and left neutral. And here you're in a slight curl and a slight curl and if you're concerned you can be in neutral. So that was, that was with the curl. Let's look at it in neutral right there and then here.
Nice to advance it and to come over to here. Hold that position not too far because it's good. That lever arm is going to get long. We're going to extend the legs, bend the knees and return and then coming this direction, extend. I'm palpating that lumbar and bend and return and then coming up to the hands, a little more challenging, right? Take the legs across and then extend, bend and return. And then with the knees bent, extend, Bend and return and then extend more advanced. Take it back.
That's it. And left. Exactly. So it's not not a large movement. It doesn't need to be large. And then that, that can be done just with the rest of the class as if they are doing it. You can do circles with the legs, scissors, all kinds of variations there. Keeping that chest lifted. Hands behind the back. Okay, good. So that was teaser and hip twist. Now we'll go into open leg rocker.
It's a great place to go from the teaser to the open leg rocker. So I want you to bend your knees, hold onto the back of your legs and then hinge back a little bit. Yeah, there you go. That's it. Now see if you can lift one leg up into the air and then walk the hand up to the Shin. And I'm looking to see, can she keep the spine in a neutral position here? Cause she's just got to do the balance part. You're not going to be doing the rocker part right?
Can you get there and then extend this leg and walk it up, right? So you establish your spine position, you stabilize it, you make sure that you're in a balanced position. She could be here all day. It looks like this looks wonderful and that, so that's what you're looking for is to see if they can get there. Now I really think it's important to be able to get to this balance position with the knees bent first. So you're going to put the feedback down, pulled on to the back of the legs and then kind of hinge back a little bit, finding that. So they have to have control of that and you'll want to make sure you have good control of that at home before you start to crawl the leg up. Crawl, crawl the hand up the leg.
So take one leg up and reach [inaudible] and you can just practice with, it's a lot easier to hold the distal part of the leg than it is the proximal. Right. And if you have longer arms, you could hold the back of the legs, heath arms bent. Right. And then see if he can get there, right? Yeah, yeah. Nice. And then come back down. So you're just basically going to be practicing your balance and your spine stability with that. Okay, good. All right. Our last exercise in the seated position will be boomerang, which has a couple of parts that I want you to focus on.
One is the shoulder mobility, which will help prepare for double leg kick and then the dynamic control of the legs. So we're going to take the hands behind the back and now again I'm going to look to see if she can be in neutral position and just bend your knees and kind of take the heat off of your hip flexors. Okay. Hands behind the back, palm to palm. And then I want you to try to stretch here. So while the rest of the class is doing the full boomerang, someone with low bone density might just do this part of the boomerang to get the chest to stretch cause maybe you didn't get that in the class, right? So just keeping your hands down, stretching here. That's it. And taking a moment there. Inhale, lift and then return.
Now one thing that I think is nice about doing this stretch is to use breathing to assist it. So you're going to take an inhale to prepare. Do you ever go back to bent or just leave? Yeah, yeah. You can bend [inaudible] inhale to prepare, exhale to straighten the arms and lift. And so that exhalation actually drops the rib cage down as you're trying to lift it up. So you get that internal little stretch to the chest in the pecs and exhale, really feeling the ribs dropped down a little bit as you try to pull the shoulders away from the rib cage, get that really good Pec minor stretch there so you could focus on that during the boomerang.
And then if you could lay on your side and then roll to your back. The other part of the boomerang that you could practice is to take the legs up into the air and then find that vertical position. And then you're going to do pointing the toes open to hip with and then rotating externally and then little scissors, scissors, scissors, open wide. And then scissor, scissor, open wide, scissor, scissor, open wide. And you can go even wider if you want to play with that a little bit. And people might be jealous of you during the math class and being able to do that. So that was the, all the sitting variations for the classical mat work for osteoporosis.

Bone Health: Modifications for Osteoporosis
Mention
 |
Sherri Betz (Teacher) |
 |
Cynthia G |
 |
Sueli F |
 |
Sarah Edwards at Positive Pilates Solihull |
|
|
Sue D |
 |
Liliana D |
 |
Sophia F |
|
|
MARILENA C |
|
|
Cecilie J |
|
|
Leslie S |
 |
Gaylene W |
|
|
Melissa S |
 |
Giglia M |
 |
Deborah Wasko |
Comments


You need to be a subscriber to post a comment.
Please Log In or Create an Account to start your free trial.
