Description
About This Video
Transcript
Read Full Transcript
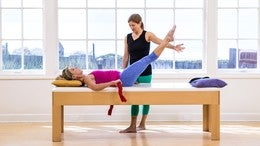
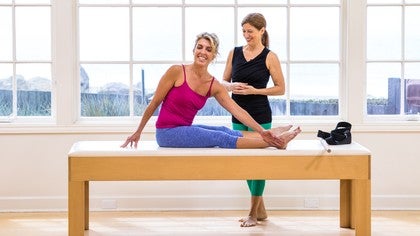
We'll now be looking at modifications and variations in the prone position for someone with osteoporosis. Thanks Christie. And I come down to your stomach and we don't need the pillow just yet, but we will in just a moment. Um, one of the things I think is really important about the prone work, especially if you're on a hard floor and you're on a mat, um, that's thin. You need a pillow for the ribs. I have had colleagues who have told me that they've had rib fractures in their mat classes with s with the pressures on the ribs while doing this one.
Um, I did have a client who had a rib fracture during a mat class and she was making a transition from swan to sideline and had a rib fracture. Um, we can't really know if it was the pressure on the rib or the rotation in the spine that happened. She's quite strong and that she did, um, experienced that rib fracture. She's healed up and doing well now, but we do have to be very careful with the ribs. So I'm going to have you place a, uh, a pillow. You don't want the pillow too thick because that's going to put the spine in in flection. But I'm a thinner pillow. Works really well. And you know those pillars they give you on the airplane. Um, those are actually perfect because they're, they're fairly thick and they have um, the length to go under the pubic bone in the ribcage. You, you don't want them a short ways. You want a long ways so that the length of the pillow is under the ribs and pubic bone also cushions the pubic bound nicely for some of the prem work as well. Do the rips break in the front or the back? The front. Yeah.
So usually you see the anterior ribs in the front giving too strong of a hug can break a rib in the back. Um, we usually see with the prone exercises, the, the ribs break in the front. Good question. All right, so first thing is to get the length in the spine, hands under the forehead, shoulders down and back. And then thinking of aiming the shoulder blades toward the mat. Yeah. First thing I want is to have Christie lift her head off the mat without changing her arm position. So I want you to lift your face as far away from your hands as you can. Keeping yes, keeping the hands and arms glued to the mat and feeling the sense of lifting through the throat. This is like, I call this the abdominals of the neck.
The deep neck flexors are really working here. You're going to keep your eyes on your thumbs imagining that you have eyes under the collar bones that are going to look in the same direction as the eyes of the head. So that looks great. And this is what I call my swan preparation. So now you're gonna take this hand and bring it to your forehead without dropping. Yeah. So I'm looking to see if she's dropping the head or dropping the chest. Take that hand back down. Switch hands and lift the left hand to the forehead.
Excellent. So now she's targeting that upper back here and then pay the place that hand down. Now take both hands to the forehead. Yes. So you don't see any adjustment in your body there. That is unusual. So take the hands down. Usually you see people drop quite a bit because there's weakness in these back extensors. If you just keep your hands down the whole time, you're using your arms to assist with the mobilization of the spine, which is great, but it doesn't build strength.
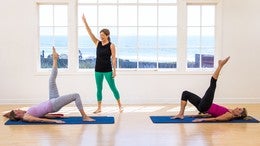
So let's take the hands out to a goalpost position. So hands wide on the mat, you can keep your hands on the mat here. And if you're on a, um, a regular floor, you know, you can put your hands off the sides of your mat, keeping the arms glued to the mat. Now take the heart up and forward. Good. And you're gonna keep the lowest ribs down. And if you keep your arms glued, it will stop you from going any further at a certain point. And you're really gonna target that mid back. Now you're gonna lift this arm and this leg at the same time. It kinda helps you counterbalance. Excellent.
And then you shouldn't see any dropping or rotation. And then left arm, right leg, beautiful and down. And then both arms up and down. Excellent. That's great. And that's showing stability in the mid back. Now you're going to take your hands into the traditional swan position, and I'm actually gonna take you a little further back so that your hands are right into your collar bone. So that'd be a little farther back if you were going to do swan pressing all the way up, this is where you want your hands to be so that your arms are vertical.
We'll talk about that in a moment. Now this time you don't have anything to glue you down, so you're gonna keep your lowest ribs pressing into the pillow as your chest lift up and forward. And then I want you to think of pulling your chest through the frame of the arms to open through the collarbones. Beautiful. So you will do some scapular retraction here and then keep the low back length into by drawing your tailbone down so pubic bone and ribs are down. And then lift the hands. This is where you really need the pillow. Exactly.
There's a lot of pressure on the ribs and pelvis. That's it. And you could hold for a few counts. You can also put some weights in your hands. With this, you can go up and down. So you take the hands back up and then go up. And then lower inhale, exhale up. You can inhale up or exhale up, whichever one you feel, assist you more. That's nice.
Then place the hands down and you're going to go hands back behind you. So your fingertips are right in line with the top of your shoulders. And you'll see when she comes up into the full swan, you're gonna pick your pelvis up and pick your rib cage up. And then elbows slightly bent and pulled out to the sides, right? So then when she comes straight up, her arms are vertical.
If they're not vertical, she's gonna put a lot of stress in her low back, coming back down, pelvis first, then the belly, then the ribs lengthening. As you come back down. Now take your hands more in the traditional swan position where your elbows are kind of on the floor like that and push up into your full swan. Okay. With the hands this far forward with someone that does not have good lumbar stability or abdominal muscle strength. If you sag here at all, you're going right into that low back. The forces and the compression on your low back is really uncomfortable and for a beginner that can be really challenging for them to to know how to support that hammock from the bottom. Okay. Does that make sense? Yeah. Okay.
And then come back down. You have to have, you have to be really strong to be in that position. I think it's a great progression, but for beginners, I want those hands really far back. If they're going to go up into the full swan one variation, we're not going to do the swan rocking. That would be contraindicated and swan two and three would be contraindicated. Now we'll slide the hands forward into a swimming position and I want the, I'm hands at the ends of the mat or the edge of the mat. So you're, if you're on a yoga mat or a pilates mat, your pinkies will be touching the edge of the mat.
Your face will be one inch off the mat, your neck is length and you're feeling like the throat is helping you support your neck and then your pubic bone is touching the mat and then slide the hands forward. Shrug the shoulders up towards the ears. So I want you to be able to do this sliding of the scapula without dropping. So you're really holding the position and your face is an inch off the floor. Your hands are probably sweaty, right? And they're not letting very well. Good. Just like that.
So I want you to really have good control of that action and then place the hands palm down and then press up and let your hands drag back. So I'm going to help you come up. Right? That's it. Then once you get to the full position with your ribs still on the pillow, you're going to press into the hands and lift the chest. Yeah. So see how much more motion she got in her mid back with that now provided there's no low back compression or pain. Right? Good. Okay. From here. Exactly. Lift that arm and that leg. That's it.
And back down and keeping the stability of the shoulder girdle and the mid back. Perfect. And this is the way I teach this one. Most of the time in my large cr, excuse me, swimming. This is the way I teach the swimming, um, exercise in most of my mat classes with older adults. Yes. And with anybody really with humans. And then lift the arms up.
Then she can do the full swan. But most of the time we have to do a lot of work on scapular control, which is why we did that at the beginning. And then she can do the pulsing of the arms and legs. So for the traditional swimming now ironically swimming, [inaudible] and larger range of motion with the arms, take it, take the arms a little bit lower. That's it. There you go. And then you can, you can have the shoulders away from the ears a little bit more. Excellent. And take a rest. Ironically, swimming at the activity and the water is the worst exercise you can do for your bones.
And swimming in Peloton is actually the best exercise you can do for your bonds. So that mid back and that thoracic extension that you're getting there and that strength in your back extensors with the load of the arms and the hip extension is actually targeting the bones of the hip and the bones of the spine. So a lot of load on the hip, but certainly certainly targets the spine. So that would be the ultimate goal for someone with osteoporosis to be able to do the swimming exercise. Then they add weights in their hands, eventually one pound water bottles, you know, and then two pounds, maybe up to three or four pounds would be what people will be able to do. Would, you wouldn't do much more than that. Um, and that will provide a, an a significant amount of load to the, the mid back. All right, now let's go up into double leg stretch because this is the very similar movement. So let's take the hands back behind the back and go into the traditional position where you grasp your wrist. Yeah.
And let's just look at that and lay your head down. So what that does is that gives you a little bit of internal rotation shoulder stretch, which is fine. Most of the time when I'm working on with people with Kyphosis is getting opened up here. So I'm gonna have you, uh, clasp your hands together, palm to palm, straighten the arms and then look down at the Mat, right? And then lift up as high as you can. So the arms are going to actually help you lift up, see how much higher she can go with the arms pulling down and back. So that actually gives her a little more motion in the spine and um, doesn't give her more strength than the swimming exercise, but certainly a little more motion and it feels really good usually.
And then I can give her a little assistance if I want to. Yes, the Sherpa is always appreciated and then coming back down and then you can of course do the kick kick hat, head to turning. Um, variations would don't do anything for bone health, but they're nice coordination and modifications and variations. All right. Now take your elbows onto the mat and getting ready for single leg kick. This is one of my favorite abdominal exercises for preparation for pushups and for people with osteoporosis because it can work the abdominals quite strongly without putting the spine at risk for fracture. So from here, elbows or just under the shoulders and then ribs are connecting with the mat at first and the pelvis is connecting with the mat. Now there's a couple of ways I've seen this where you keep the pubic bone down on the mat, but sometimes that is confusing for people. They're not sure.
Like what am I doing here? So if she just started bending her leg and doing something here and kicking and kicking, you know, it's like that wouldn't, it's like people ask, what is this for? So let's prove to her what this is for by putting her in a little bit different position. So we're going to pick the, the front of the pelvis up in front of the ribs up. [inaudible] that's it. And then look down at your fingers, right? We're going to get her in kind of a neutral position there already.
She's working those abdominals. Now tuck the tail just a little bit, uh, and leg letting go of the buttocks, right? And then let the low belly do the work. So I want you to scoop that pubic bone is if you're scooping the sand at the beach and you're going to connect the ribs to the pelvis, your pubic bones off the mat, about one inch. I'm going to take the pillow out so you can see that you don't always need a pillow with this exercise anyway. So she's just about one, maybe two inches off the mat and then do the knee bend, bend, and down. Now you really see that hip flexor pulling on the pelvis, but the abdominals are winning. I call it a tug of war with the abdominals and the pelvis, right abdominals and the hip flexors. Yes, that's it.
Now taking that position here and then coming back down, rolling down through the pelvis. Now you notice I asked her to let go of her glutes because she can make the whole thing happen from just squeezing the butt, right? She could probably do the whole thing and stabilize her pelvis from the back. But I really want her to get that the front of the pelvis to do the work. Okay, so that was single leg kick and then that gives us a perfect preparation for the pushup.
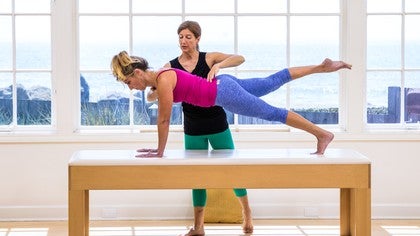
So I'm going to have you go into all fours and come up to your hands [inaudible] and one of the things that I first try to work on is the spine alignment can use the doll for the back here and then the elbows. So I'm really interested in what the elbows are doing. If you lock your elbows, you can't access your serratus anterior basically turns it right off. And this is so important in the pushup. So you're gonna bend your elbows, pull the elbows a little bit wider into my hands. So sometimes I'll take a theraband and wrap it around the forearms and have people pull into the forums cause I want the Scapula to stay wide. On the back. I want the rib cage to stay lifted up and the back of the neck to stay long.
So that I think is her excellent position there. And she's really having to work here. Now I'm going to put my hands right in front of her scapula and the back of the armpit, right over the Terry's major. And then I want you to push into my hands and you in a protract a little bit. So push up towards the ceiling. Yeah, just a little bit and then back down.
So I want her to feel that scapular work there. So this is going to stay on throughout the whole pushup. This is the hard part cause as soon as the triceps fire everybody, let's go there. Serita's all right, now pushing up a little wider. Let little water go up a little higher. That right there. So I'm going to give her that position. She's a little bit flexed here, but I think that's good because she has a flat spine.
So whatever positions she gets in in quadruple is what she's going to maintain for the pushup. Now I want you to imagine you have a glass of water or your favorite beverage on your tailbone music room. Extend the legs back one at a time. Yes. Excellent. Now I'm watching. She's doing a really good job of stabilizing this scapula and not so much on this side. So I'm going to have her push into my hands. Yes, that's better. And press away from the floor. So that's what we work on in class.
And then sync and press. And this is the perfect place to start practicing. Before you ever bend your arms, I actually want you to do the leg pull. So extend the leg lifted off the table and then back down and then extend the right and back down. So I'm watching to see that she doesn't lose that scapulary position.
That's it. Nice. Alright, now from here, give me three pushups or maybe 22 four that the veteran challenge. Nice. And I wanna I'm going to put my hands here so that she stays wide and of course I've fatigued her serratus anterior and then back up. Go ahead and now bend the knees. Rest for a moment. Sit back. Yeah. Um, so I'm really working to maintain that scapular width as she does her pushups. So I might have to take her to the table and have her do the pushup from there.
I did some tutorials on plots anytime for some of these exercises. One of them was the swan, the three parts one, the thoracic, um, strengthening tutorial. And then the shoulder tutorial is also one that I covered this sort of concept. All right, very good. Now come up to all fours, lay on your stomach. And another favorite modification is for the rocking exercise.
So we're going to take your hands under your forehead. Want to just rest there. And first thing I want to see is can Christy reached the, the right foot with her right hand? [inaudible] yeah. So if she can do that, then she's ready to go already. Now I might need to get a strap if she can't reach the foot. So I would have her wrap a strap around the foot and modify that just because of our hip flexor mobility. Right. So she doesn't have good hip flexor mobility.
So I'm watching to see that the knee stays in alignment. It doesn't swing out to the side. And I'm also watching to see that the pelvis doesn't, doesn't extend. So if her, her buttocks come up into the air and she arches her back, then that is going to be, um, a need for getting the strap because she's obviously our hip flexors, pulling her pelvis into an anterior tilt. So you're gonna keep the pubic bone down and then lift the right leg off the floor if you can. Right. And then again, pubic bone stays down and then many people will not be able to do that. One thing that makes it really nice is that you use the strap and you, you work from there.
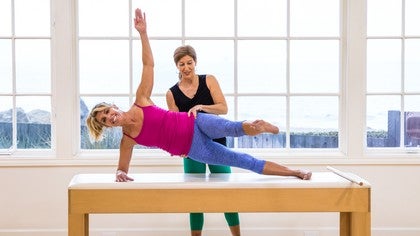
And then that makes it a lot more civilized for people with tightness in the clots. That looks really great. Now I'm going to have you keep a hold of this foot and come up to your left elbow and come up high. Put your left elbow underneath and just take that a little cross like that. And just under the arm, just under the shoulder. That's it. And you're going to add a little bit of thoracic extension with this.
Keep the low belly lifted ribs off the mat, and then take the arm, keep the arms straight. [inaudible] and now press the foot up towards the ceiling. So now you're in the rocking position, but just from one arm and then you take the leg off the floor, pushing into the hand, and then put it back down. Inhale, exhale to lift the leg. So while everybody else is rocking, you're doing this and exhale to lift and return coming all the way back down. Cause I know you need it from all the hip flexor work we did. I'm gonna just switch sides and have you do it on the other side so people can see this like, okay, so the first thing is to see if they can grasp the leg.
Um, I think I'm going to get the strap and show the modification for this side. So the truck table, strawberry yoga strap works really well for a lot of different modifications. So I'm gonna give you that and then hold onto it. And, and, and pretend like you have pretty tight hip flexor there. That's right. So it's gonna look something like that.
And then you're going to take the leg off the floor, pressing into the strap, let the arm externally rotate. So you get this wonderful shoulder stretch and hip stretch. Keep the knees close together. That's it. Cause that it band will really pull that leg out to the side. Sometimes if you have tightness there and then press nice.
So that's what it might look like if somebody has a really tight hip flexor and then come up on the elbow. That's it. And you can also let go of the strap on you while you come up. And then adding that thoracic extension component and then lifting the leg. Right. And you might not be able to lift the leg. Maybe you just keep the leg down and then you pull the heel towards your bike with the strap.
Cause she's flexible enough that she doesn't even need the strap. So it's, it doesn't, it doesn't, it doesn't work for her too much. Right, right. She's got long arms and flexible hips. So then she can go ahead and grab the foot. Yeah. Nice. The strap is very nice for people with tight hip flexors. Yes. And you can flex your foot. That's it. And then take it down, release the arm and hands under the forehead and rest.
Thank you, Christie. That was wonderful. Thanks everyone. Hope you enjoyed the tutorials.
Bone Health: Modifications for Osteoporosis
Mention
 |
Sherri Betz (Teacher) |
 |
Delia Ford |
 |
Deana |
 |
Marcela S |
|
|
Stephanie T |
 |
Francisca A B |
|
|
Cigdem A |
 |
Fiona |
 |
Sintha K |
|
|
Christal F |
 |
Kimberley Michelle |
|
|
Samantha B |
 |
Jamie K |
 |
Joyce Dev |
Comments


Swimming is a low gravity sport where forces on bone are reduced. It is also a repetitive endurance activity performed at low intensity. These two factors make it less than ideal for bone health. Adolescents who are primarily swimmers have been shown to have low bone density as adults. Here are several references: Bravo 1997, Bellew 2006, Derman 2008, Emslander 1998, Falcai 2014, Greenway 2012, Scofield 2012
If you mean the Pilates Swimming exercise, then, yes, I think anyone with almost any spine pathology should do the swimming exercise to keep the back extensors strong. If extension is contraindicated or painful, it can be performed in neutral spine. The long box is a good place to start so that the shoulders are not required to be in full flexion.

You need to be a subscriber to post a comment.
Please Log In or Create an Account to start your free trial.
