
Premium workshop
You can view a 2 minute preview. For details, scroll down below the video.
Description
Learn what this veteran of Pilates looks for when he meets a client for the first time. Watch how he adjusts his choice of exercises based on the results he sees from the preparatory exercises he gives to this client. Listen to the cues he gives to this new client that help the two of them develop a vocabulary they can share as they move forward in their training. Julian offers ideas on assessing your client, modifying exercises and how to generally help you and your client feel successful as you begin your working relationship together.
There is a lot packed in to this 50 minute class!
About This Video
Transcript
Read Full Transcript
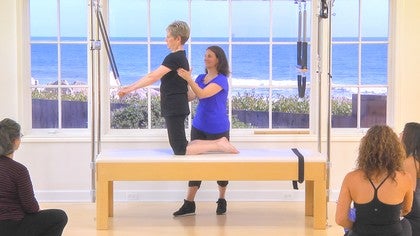
Hello everybody on Judy and little foot and I own and operate JL body conditioning plotters in del Mar, California. And um, Lena has been kind enough to be my demonstrator for today. What we're going to do today is we're going to, I'm going to introduce you to some exercises, some prep exercises for the classic work, just basic exercises that everybody can use. You can use them as homework, you can give them to your clients as homework or you can use them as a regular workout depending where the client sits on the, on the ladder of learning. Okay. Um, Lena has had a baby 12 weeks ago. Congratulations on your first one. Okay. And what we're going to do is it's sort of going to be like a trial and error.
What I really want to show you today is how, um, how I look at the body and how I, how I change what I'm teaching to that body. We always talk about customizing the program to the client. So the exercises, as I said, we're going to do today, our prep exercise is to get the hamstrings to fire correctly. Um, how do we bring the head and shoulders forward in forward flection without the Trapezius, um, or the scalings tightening up? How do we get the back of the leg to fire? So when your posteriorly tilting, you feel as if you're pushing your bum up towards the ceiling or lifting the pelvis up versus lifting from the quadriceps. Okay. So without further ado, should we start? Okay. First off, we're just gonna have leaner stand and I'm just going to do some bullet points of what, um, IC and how are we going to use the exercises to hopefully find out the correct muscle groups? Um, as I said that are going to help her when she goes into her [inaudible] session. Okay. Obviously 12 weeks out from having a first baby, she's going to have all kinds of issues in so much as the abdominal wall has been attended. Um, she's going to have an anterior tilting her pelvis. Um, the stomach muscles probably might or might not fire, which will hopefully get them foot. Okay. She's going to pronate. Um, obviously from carrying the baby, she gets in, she gets implements. Wardle you know, when you go to buy the Volvo. Okay. So should we stand up?
Okay, first off. Okay. When you're looking at a client, are you really looking or are you just saying, oh, nice hairdo or whatever. Okay. So when I'm looking at a client, okay, could you turn to the side where it's like, okay, so you're looking at your, your cervical, thoracic and lumbar spine. Obviously I'm looking at the knee joint. I don't ask or F or have the client fill out a large medical history because I've found over the years of teaching that clients leave a lot of stuff off that history. Um, when you look at it, you go, Oh, you've got this, this and this. But really when you lay the client down and you're working with them is when they start to feel comfortable with you and then turn around and start to share what's going on in their body. So at the beginning, I'm watching when they come in, how they carrying their purse, how they sit down, do they out, do they supernate? Are Their shoulders even? Um, all of the things that you should be looking at.
But I think sometimes we neglect to do that. Uh, cause we just lay him down and start them on the work. Okay. So I'm looking now you're going to turn around to the front for me. Okay. So I'm looking at clavicles see where they sit. Okay. Notice to the left shoulders a little higher. Okay. As you noticed or hopefully noticed when she was standing with a side towards you, she got an anterior tilt. Of course she does. Okay.
She's just come from childbirth. Okay. She hyper extends into her knees and she was [inaudible] a little bit, you know, I always say to people, you can tell what's going to go in the body by looking at a one inch square and that one inch square is this large knuckle right here. Okay. If they pronate, if she rolls her arches down, okay, this knuckle over years is going to get a calcium deposit cause this foot will s will eventually just open out. It will swing out like so. So the knee joint and the hip joint are going to react to this. Creating an anterior tilt in the pelvis. Okay.
The which point your Solise muscles and your QL is in your back are going to tighten up. So we know when she lays down on the reformer or if she does exercises laying down doing mat work that she's going to have to address that if she wants her body to function correctly with both sides working simultaneously and also evenly. Okay. So as I said, we've looked at our body quickly, but we don't really know bring the insularly. We don't really know what's going to happen until we start to work where the muscle patterns are. Okay. I think of the body as rotation through the lower legs and then you zigzag through the torso, up to the crown of the head. What do I mean by that? What I mean by that is, I mean by if you start at the souls of the feet, this is the foundation where this work starts right on the soles of the feet.
You wouldn't build a house on a rocky foundation. So why would you try to build a body on a rocky foundation? You know, the foundation of the souls of the feet has to be solid. Okay? So she's going to bring her toes in just slightly. For me, the arch, the medial side of the foot is slightly lifted. There's even pressure to the metatarsal heads and it's going to feel for some people that there's a lot of work on the outside, the lateral side of the foot, okay? If you watch her knees, if I might just pull up and I promise as far as I'm going, all right. Okay. Okay. If she drops her arch in, just drop it in for me just okay.
And she bends her knee. Look where the knee goes towards midline. Okay? That's not really the correct alignment that you want. However, if she keeps the arch lifted and even pressure here, when she bends her knee, that knee will go over them. The middle of the foot. That's the alignment that we want. We doesn't matter whether she's laying down, prone, supine, whether she's standing, whether she's sitting, it doesn't matter, okay? The alignment should remain the same. So with that in mind, the arch stays lifted. Think of the energy wrapping around the back of the CARF and coming up into the Vastus medialis here. Okay? You then wrap the muscles around to the back of the leg where the hamstring goes into the gluteal fold. Okay? Everybody or ladies, I know that you want to have a, a nice, nice firm, Pippa bum, as the saying goes. So you want to think of the hamstrings coming into here.
You don't want to think of the term side for me. You don't want to think of the upper glutes working in here. You want to work right in here. So we've wrapped the muscles around the back of the gastros and coming up into the Vastus medialis. As I said, you wrap around into the back of the leg here. Then you start from rotation to zigzag through the torso.
Just hold your arms there for me. Okay? So think of the energy coming from the back of the leg up to the lower abdominal wall. You're not going to posteriorly tilt your pelvis under like so what you're going to do is you're going to think about bringing the lower abdominal wall to the spinal column, spinal column and belly button being attached by a cord. I don't care what sort of visualization you give to the client, but what they want to think of doing is pulling and making the area from here to here as small and thin as possible in conjunction with holding the back of the leg or firing the muscles. You don't want straining them. You just want to win us in them. Okay?
So the stomach pulls in and the AB pelvis should not shift. It doesn't shift on its axis. It stays where it is. You just draw the belly in. Okay? From there you come diagonally through to the lower scapular, the shoulder blades drop, we'll leaving the neck. Okay, so there's no tension in the neck from here. You go diagonally through to the sternum to open up in the chest here.
So the stern and lifts and the scapulas drop. Okay. They don't think pinch, they think down in the back at the same time, you don't let the rib cage punch forward. All right. At this point, when you've come through the sternum, you're going to come up to the atlas. So the crown of the head is going to rock back slightly. So the cervical curve is embraced. You don't want to think about looking with the third eye, dropping the chin like so why not? Reason why, and this is only my personal view for what it's worth. All right?
So you can choose to use it or not, but it might set some things going in your mind. If you look with your third eye, the cervical curve starts to flatten, the Chin starts to pull back and the scapulas start to roll forward, right? We are working the wrong end here. You need to work down here. So as I said, if she pro Nate's, she's going to anteriorly tilt the pelvis. The shoulders are going to drop forward for balancing. She's going to probably bring her chin back slightly.
So just dropping the shoulders down here and lifting the head is not going to help when she stands up and she starts to walk, we've got to approach it from the bottom. So these exercises that we're going to start with is how do we fire these muscle groups to work correctly and how can they use them when they leave the studio? Clients often look fabulous when they're laying on the apparatus or doing their session and then they walk out and they slumped back out. Okay. So it's not what we want. We want to take the work that we teach at the studio and we want to keep it so that they get the benefit outside. Okay. Alright, this lay down for me and you're going to have your head here and your feet down here. As I said, these are exercises that over the period of teaching for 35 years now, um, I started teaching. I was too, I know I'm two years, 35 years of teaching. These are exercises that um, I've seen other people teach and I've just kind of customized it to mine and I've played with it over the time for myself. Okay?
They're quick and they're fast and they work okay, so we're going to start. She's going to bend her knees, her heel stay in line with the, with the, with the hips and the knees and the feet are aligned. Again, she's not going to pronate. She's not going to let the foot swing out, okay? We're going to place a small ball between the knees. Now we are not going to crush the ball, okay? If you crush the ball or squeeze really hard with the ball is going to send the wrong energy, the wrong energy into the muscles, okay?
We want activity on the inside of the legs. We don't want the ball to actually change shape. In other words, we don't want it to flatten. We just want activity on the inside of the legs. The clients might shake. That means you work in the right muscle groups. All right? Okay. Knees are in line. As I said with the hips, heels you in line with the hips, the arches are lifted. The sacrum should stay down. This area here, the sacrum is sacred as far as I'm concerned. When she lays down here, I don't want to see the hip flexors tighten and tighten and the pelvis tuck.
Can you just open your arms there for a second? Thanks. What we don't want to see is the pelvis rise like so, so the back flattens down. That's not imprinting the spinal column. That's a posterial tilt to lengthen the lower back. True imprinting is to be able to leave.
Drop your tailbone slightly down there in a neutral position. The Sacome stays where it is and you shift the spinal column back towards the table. Okay? Not just tuck your pelvis under. Okay? You are not working the muscles. All you're doing is shifting the pelvis, right? Squeezing the knees together. Now I want you to think about a couple of things here or tell the clients to think of a couple of things.
The ribcage right is very important in this position. There is activity between the ribs. You're not dropping the chest down. So the the trapezius fire, the scapulas stay where they are, and she's going to gently rotate the palms towards the ceiling. I'm going to have her arms in a different position in a moment, okay?
But I want you to see the position of the pelvis and what's gonna Happen in here, right? So she squeezes just activity on the inside of the legs. She's going to activate the ribs first, right? And she's going to posterially lift the pelvis towards the ceiling, but not lift it. She's going to push from her hamstrings up, not lift with the quadriceps. If she lives with the quadriceps, you're going to work the quadriceps and the hip flexors. You tighten up your hip flexors, you're going to anteriorly tilt, and we want her to posteriorly tilt. So it's a contrary indicated muscle work. That's the way I feel about it. So activity on the inside of the legs, the ribs drop, she's going to squeeze the back of the legs, pull the abdominal wall towards the floor and pull away from my fingers.
As you curl your pelvis up a little more for me. Lifted up a little more. Pull your belly away from my fingers more. Keep going, keep going, keep going. Stay there. Now very often what we might see is they're good with this portion, but when they come, keep coming up for me. Keep coming up, keep coming up, keeping up. But she didn't do it, which I'm very pleased to see. Okay? But what happens is roll down a little more for me.
What happens is we get that posterial work working and then what happens is they release the spine and aren't sharp. You want to think or give them all the spine all the way down for me. Something to think of. These are your teaching tools, your fingers and your eyes. So you take your teaching tools and you say to them, for one of a better way, better description, think of them as sharp sticks and you don't want to draw blood, okay? But you want to lift your pelvis up towards the ceiling so you close.
She works the back of the legs. She doesn't let my fingers touch your belly as she curls the pelvis up. Keep becoming, keep becoming more. Put your ribs in. Pull your ribs in more. More. There we go. When you put your ribs in, do you feel it more in the back of the legs? That would be, this means good. Yeah. Okay. Okay. So, and then she rolls down one vertebra at a time. Again, from the rib cage first.
So firing pattern insides the legs, fire, bottom, rib drops. Squeeze the back of the legs. Draw them together as you curl up. Exhaling and inhale as you roll down. Now I'm looking at her from here. Okay. But as a teacher, you need to look from all angles. So you come from the front here or from the bottom here.
Curl your pelvis up for me and I'm seeing that our right hip comes up faster than her left. You might or might not roll your spinal column slowly down when you're holding that little one. Do you sit with it all the time on your right hip or not? Yeah, kind of. Okay. And gently drop the ribs curling up. The reason why it's good. Keep going for me. Do three or four more and slowly rolling your spinal column down. There's activity on the ball. If you can pull the ball out, that means that she's not firing with the right muscle groups. Okay?
Cause they know activity on the inside of the legs and close the ribs down one vertebra at a time so you can drops all the way down. Now this area, stay right there. This area here is a telltale sign. If you put your fingers right here, you'll feel if the hip flexors fire up. Okay? Cause you tuck your pelvis really hard and squeeze your knees, hug tight. You can feel them punching dropdown. Okay? You want them to feel relaxed. You want to try to switch them off if you can. It's hard. Okay? Yeah, switch them off. You feel how you punch him, right. Okay. So as I said, little activity on the inside, the legs, back of the legs, bottom rib, inner back of the legs and bottom rib.
Curl it up again or the tummy incur lead all the way up and slowly roll the spinal column all the way down. A little bit of homework. Again, squeezing the back of the legs up gently and slowly down by like 10 of everything personally, I think tens a good number versus three or four and squeeze everything as you curl all the way and soften as you roll all the way down. So we have addressed firing right slightly different muscle groups. Now we're going to bring her forward in flection using that same area, keeping that same sacred down on the table. When you see people come up with forward flection, what I see a lot of is the pelvis lifts, Tuck you bet there, and then she brings up, Whoa, that's a little too much. When she brings a head and shoulders forward, drop your arms and slide them up to your knees if you can. Right?
See how she lifted her sacred. A sacred needs to stay down and I can put my fingers on those hip flexors and they come into play a lot. As I said, you want to try to keep them relaxed a little bit for me. So what we're going to do if you just sit up for me then okay, we lay a towel, towel, towel down. Okay. Head goes about eight inches or 10 inches from the top. Lay down flat for me. Good. Okay. You're going to bend your knees all again.
So once again, we don't forget what we've just done down in here, but we're going to work from the other end, right? This area here wants to stay where it is and when you come forward and flection, it's not this, as I just said, okay. This area stays where it is and you think of lifting up through the crown of the head and lengthening up and over, not through. Does that make sense? So this area here remains where it is and then she's going to bring her head and shoulders forward. Okay? So what I do is I tend to put the flat on my hand down, slide it down to the sacrum. Drop your tailbone onto my hand. Okay. Work the insides of the legs for me. Good.
The pressure on my left hand should not change. In other words, the pelvis should not come up off my hand. All right, she's going to place her fingertips on top of the thighs and she's going to bring her head forward. Good. Can you drop your weight down into my hand? Ah, okay. And down it goes very simple. I mean you just saw it drop three inches. Okay. It look kind of okay, but the weight changed on my hands. So keep the weight on my hand. I'll become, that feels different than it and they have good and relaxed. Okay, now she's good because she's not firing with our neck. Okay? So how do we approach this area of forward flection? It's always been a contention when people turn around and come forward.
So what we do is we're going to grab hold of the corners of the towel. We are not going to bring the elbows down towards the knees. We're not going to drop the chin like so that's gonna fire the same muscle groups as the ones that we want to to to relax. What should we going to give her a visual on? Is lifting the elbows up towards the ceiling and bring them up and over the knees. Feel that more in your lower abdominals there. Yeah, and then at this point here, right is when you start to dig in and give them the firing pattern of what she's going to use. So she works the inner thighs. The sacred stays down.
Drop your bottom slightly for me. There we go. She closes the whip. So all of this works. She the elbows together. She lifts them up, up, up, stay there. Her gaze is up towards the diagonal there. The sacrum stays down. Good. Squeeze that. Just tighten just to them. Now draw the tongue in. Breathe in through the nose and out through the mouth and pull the belly away from my fingers. Lift the elbows up though there.
That's where you want to be filled. The difference there. Breathe in through the nose and breathe out. Keep the energy up into the elbows, up into the elbows. If I place my hand here on her elbows, don't move your arm and you'll feel them start to drop when they let go. So the energy needs to say on my hand and elbow, feel that different sail and everybody let's go. Trust me everybody, let's go. Okay. When they breathe, there's lots of different ways of breathing. If you breathe diaphragmatically and you let the abdominal wall go and you tighten your abdominal wall, when you're in this position and you let your abdominal wall go to expand, what's going to happen? What's going to fire? Your back is going to take over.
So what's going to happen again, excuse me, is your lower back is going to fire versus the front of the body. All right? So we want to think about expanding the rib cage, pulling the abdominal wall in, and then exhaling closing the ribs and pulling the abdominal wall in. So this girdle is tightening, but you're still getting oxygen into the lungs. You need oxygen obviously cause you want to flush the lactic acid build up. So just drop your arms down by your sides here. Okay.
Place your hands on the side of the rib cage. You're going to breathe in and part my hands wide. Good. Now breathe out in closing. Good. This time. Breathe in. Pull your stomach in as you close them are ha. And again, breathe in. Partner. Pull away from my fingers. As you breathe out, draw the tummy in. Good.
And it don't lift the pelvis. Breathe in and breathe out. Good. Okay. Now that breath pattern is what you're going to do when you've got your head and shoulders forward. Does that make sense? Bring your elbows in. Take a deep inhale. Exhale. Keep the sequined down as you come up. Good up. Drop your bottom into my hand. There we go.
Pull your elbows up towards the ceiling. Breathe in through the nose, out through the mouth and again into the nose. Out through the mouth. Squeeze in through the nose. Out through the mouth. Good in through the nose, out through the mouth. Pull the belly away from my fingers. Ah, drop your bottom and have in through the nose, out through the mouth. Drawer. The abdominals in. Good. So this area here, keep going for me is what we've talked about. Okay, she's 12 weeks out.
These muscle groups. Here's what we want to try to get to work five again. And she can do this. When she's sitting in the car, she could just pull her stomach back to the spinal column, you know, while she's driving. And when she's sitting in the light obviously, and Jordan and relax down. Any pain at all, Phil? They're building a wall. Good. Okay. You're going to sit up for me, okay. And slide back about three or four inches. So what do we use those exercises for?
Let's take a very simple out of the classic repertoire, the spine stretch. Let's approach it slightly differently. Back up a little more for me. We're going to incorporate, we're going to incorporate what we've just learned and we're going to keep that lower portion of the back where it is and she's going to go forward in flection, but ah, but we're not going to let our back move off my hand. Are we now? Okay. She's going to draw the toes back and we're going to approach the hamstrings in a moment. All right? So what I'm going to have to do is I'm going to have a soften her knees.
So we eliminate the hamstrings right now. Her toes will pull back and she's going to keep energy into the heels and the hamstrings are going to be out of the action because they're slightly bent. The hands are going to be in line in front of you. The lower back is on my hand and she's going to drop the crown of the head, draw the abdominals in and up as she stretches the hands forward towards the heels and try to keep the pelvis right the I feel that stretch. Now drop your forehead down for me and relax the shoulders and for me, just relax there. Take a deep breath in.
Now Stack your spinal column one Virta Bra at a time as you come back up and the scapulars drop. Okay. We introduced the foam roller. They can sit up against the wall. Imagine this is the wall. Okay? Her sacrum is going to be back up against the back of the wall. So Benji lilies and back up just a little bit more for me. There we go. Okay. And keep your sacrum where it is. Okay. Crown of the head, his back scapulas pull back.
So now we're seeing when she's in this position how she wants to pinch the shoulders back towards the, towards the, um, the wall or the foam roller. Okay. And letting the ribcage go forward again, we're going to approach that. So I'm always looking to see what the next exercise is going to be and then what we're going to do for the client to help them get the most benefit out of the work. She stays with her knees, so she draws the abdominal wall back towards the wall. She gently slides the hands down and forward as she lets the crown of the head thoracic spine start to peel away from the wall. Okay. Just a little bit more till the bottom ribs stay there. Comes off.
Okay. At this point here, the abdominal wall pulls in a little more and she thinks of lifting up. Keep going and over. I am applying pressure with my fingers to bring the rib cage back and I'm proving pressure with my thumbs to allow the back to go over and forward. So she gets a big long stretch through here. She doesn't just shift the back down. There's energy, there's abdominal wall pulling to the spinal column to protect the lower back.
Okay? Feel okay? No pain. It's all good. Now we're going to talk a little bit about firing the hamstrings. I like the knees bent for a lot of it, okay, and the reason why is it takes away from the hamstrings. You're to flip over on your tummy and as we know, not every body has very flexible hamstrings. When we are, let me just give you that. They're good. When we're prone and we start and slide backs, your feet dangle off the end of the table for me. All right, we've got a wild bull floating around there. Okay? Your forehead is down for me and your hands are underneath your forehead.
I'm not going to worry about this area here, however, I am going to want her abdominal wall to pull into the spinal column. Now just watch a second. So what she just did there, she posteriorly tilted. Drop it again. Drop down. Now pull your stomach in. See how she's posteriorly tilting. There is a tucking of the pelvis. Relax down a second.
We want this area here to remain where it is and we want the abdominal wall to pull up towards it without changing the lumbar spine. Okay, so I'm going to place my hand here. Now just pull your stomach in. That's it. A little, no more than that. Okay. So the upper glutes don't fire. All I want is the lower abdominal wall. It's exactly the same as it was when she was rounding forward. We've just flipped her over on the tummy. We haven't taught the pelvis, we've left it where it is, and we've just drawn the belly up off the floor.
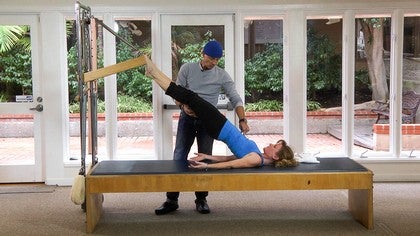
As I said, we're going to leave the shoulder blades where they are right now. We're not even going to worry about them. Now you're going to gently for me, Lena, don't change anything. Just lift your left leg for me and relaxed him. Okay. And again, for me and relaxing. Correct? Not Bad. Okay. Could just give you a regular, um, correction of lengthening the leg away. Okay.
Or we can fire with the correct muscle groups to lift the leg. It's not gonna come up on its own. So the muscle groups are firing, but I want them to be aware of the correct muscle groups. So lifting one more time for me. Okay. Stay there. If she thinks of lifting her heel, the knees gonna soften and it's going to thin. Okay, that is not wrong. It's just different. All right, well I want her to do is work from the hamstring here. So when she lifts, lift from where my fingers are, formula in it. Aha.
See how the leg lengthens first and then gently come down. Lift it the way you used to [inaudible] and down. So the knee events. Okay. And now linkedin through the hamstring. Ah, and lift it. Okay, so she lifting from the hamstring, it stops the range of motion on the knee. Right? We need to talk about the ILIAC crest in here. When she lifts the leg, if she lifts it too high, the hips are going to shift. Or what's going to happen is the QL is are going to tighten up.
We only want to lift the leg as high as it can go without letting the lower back fire or cramp. Okay. So take a deep breath in and linkedin this leg away just to there. No higher than that. And inhale as you come down and again, gently just to there and down. So there is no pelvic whatsoever. Gently lift and down. So it's a smaller movement than they want it to be.
And gently now as you lift the leg to the stomach in for me, Lena, there we go and down. Relax the shoulders. Two more. [inaudible] little slower for me and don't lift it quite so high so we can look if we see the creases on her top here, change. Lift it for me. There we go. Too High, okay, because it's contracting and relaxed. Now you're going to do the right leg. Gently lengthen away, lift it easy and gently down. Okay. This right hip is tending to lift.
So I'm going to place my fingers on the ILIAC crest here. Just draw the stomach in for me. [inaudible] not too much. Then I'd just just put his stomach in. That's it. Okay. Now gently lift the leg. Easy, not too much, and down. It's a lot more stable. And again, draw the tummy until it there. Feel how it's supported now and it looks a little bit different.
So any of the work, any of the leg kick, two leg kick, single leg kick, any of that where we're talking about working the hamstrings when she bends her knee, bend the knee for me. What we shouldn't see is any change in here, if we see any sort of tilting of the pelvis, it means that the quadricep is not lengthening away. Does that make sense? So if you were to bend your knee, I feel my hamstring fire like crazy. Now I've lost it. Now I feel it. Okay. So when she bends her knee here, this Iliac crest should not change. There should be energy out through the thigh. When she bends in the end, I do it passively to bend it in. It's gonna feel very different.
Okay? We also need to think about when she bends the knee, we don't pronate or supinate because we're firing with different muscle groups, the incorrect muscle groups as we know. Okay? So take a deep breath in. Gently leave this Iliac crest where it is and bend the knee easy, a little more to there and then gently down and the game. So we keep going. So we activated the hamstring, which muscles we wanted to work with the first exercise and we're now shortening the muscle as it lives, making the alignment correction that we want and down one more time for me to stay there. We stay there, we deepen the contraction, leave the hip where it is and think of pushing the heel towards the ceiling. So gently lift the heel towards the ceiling up there and gently down. Now it's not going to be a large movement. Leave the hips where they are.
Gently push the heels just to there and down and again, lift it and down. And my hand being here, I can feel how she wants to pronate. Okay, so I'm just having my hand here to keep it nice and square lifted up again just to there and down. Try and draw the abdominals in, stay there, hold it where it is. Leave the knee where it isn't. Extend the leg out and bend the knee. And the game. Extend the leg out, push into the heel as you do so and gently bend. Good. And again, relax the shoulders for me. Lena. You feel those hamstring by any chance? Yes. And relax down. Okay, so we just recouped. Okay, four exercises. Very simple. First we locate, lengthen and lift the leg off and gently down. So we do 10 of them. We can make it into a full exercise versus a preparatory exercise. Give me one more, Huh? And Bell and gently lift up until the hamstring member and down. One more time. I call him there. That one go. There we go. And down. Now she leaves the knee where it is.
Number two is the knee bending and extending out the hip remains down and the gain gently bend. Easy, easy, easy and down. Less is more with these exercises and bend. Stay there. So that's number two. First one, lifting. Second one here. Number three is pushing the heel towards the ceiling and even the hip were easy and down. Smaller and gently are up. Good and down. One more time.
Gently stay there. That's number three. And the fourth one is from here, lengthening the leg out, leaving the knee where it is, and bend. So we're stretching the front of the thigh and the Solos and push the abdominal wall pulls into protect the lower back and the game. One more time and stretch. And she's working the adductors to keep an relaxed down. Okay, on this right leg. Bend the knee. Lengthen the leg away from me. One gently down and too easy. Exhale to lift, no lifted up. So repetition two and down and again, and three, exhale and down. So this is a tempo and gently lift.
Good. One more time. Relax your shoulders and lift. Stay there. Okay. And down. Leave the knee down. Gently bend the knee. I'm going to align it up and gently down to then do it again. Good. And down and three. So we'll just do five and down and four. Good and down. Keep the hip down one more time and five, stay there. Relax.
Push the heel up. Gently leave easy. Each smaller. Remember, leaner, smaller. Okay. Jaw, the Tummy, energy lift just to there and down. And you can't see it because the camera's over there, but when she lifts the leg and she makes it smaller, the external obliques and transverse abdominals on this side are pulling in towards mid and down. One more time. Stay there. Leave the knee where it is. Lengthen into the heel, push the heel away and gently bend and gently out. Upper glutes, relaxed. Lower abdominals. Pull in. Lumbar spine is supported.
As I said, these are just exercises that over time I've chosen to use and they tend to work. They're very simple and as I said, you can use them as an exercise or as a prep exercise. Relax the shoulders
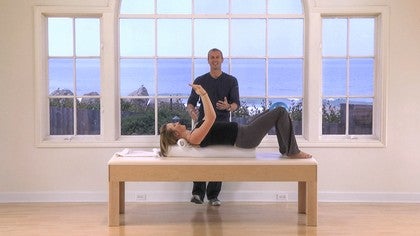
And I hear in many, many polities studios. Drop your shoulders, drop your shoulders, pull your shoulders down, put your scapulas down. You can say that until you're blue in the face. If you don't educate the client on which must of groups need to be activated to draw the scapulas to where you want to be. As I said, you can talk until you're blue in the face. So with that in mind, we're going to bring this foam roller again into play. And you're gonna flip over on your back for me. And you're going to lay down on here with the tailbone here and your head here.
Okay? So lift your bottom up and lay down in the bank. Okay, she's going to bend the knees. Okay. Move down about two inches. That will stay there. Okay, we've got to take an owl. Make a small neck roll. Just lift your head on. Good and down. Now in this position, I want the crown of the head. Lift the chin slightly.
Okay, so the cervical curve is embraced here. All right? She's not dropped her chin, which we talked about. So the neck roll is very, very important. How large you make it. Just lift up a second if we don't make it large enough
If we make it too large, if we make it too large like so we start to see the Thrones. You can't talk. Okay. Which is same thing as when did you put it here? She pulls your shoulders back. She looks like a little Purdue chicken. Okay. With the chest or pushed forward, which is not what we want. Okay, so as I said, we rolling a towel up for me has worked
She's not protonating. She's not super late in the heels. You in line with the hips. They have dominal wall is in. The palms are going to turn towards the ceiling. Crown of the head is down, her sacrum is down. Can you tilt your pelvis? Not like that. Drop it down. There we go. Hip flexors are out of it. Tailbone is down on the edge. All right. She's got to stabilize, otherwise you're going to fall over, so we just bring the ball back in and place it back between the knees.
All right, pull it down. It looks better. Okay. Inside of the legs are working. Good. Bottom rib is pulled down, but it hasn't changed the position of the spinal column. She turns her palms to the ceiling. As we know, if we remove everything in the skeleton, if you take all of the ligaments and tendons away and lay the bones down, they just externally rotate. We want it to be nice and relaxed. Open up through the Pex here. Scapulas drop down on the back. What I don't want to see here in this position is the pinching.
Like I said this, what we want to see is the scapulas drew up. Okay? On the bat it hangs nicely. What we want to do is act to access the run Boyds and lats and allow the scapulas to pull in towards midline in towards that spinal column. She's laying on that tube. So she's got a large expanse on her back that she can pull the muscle groups working into mid line, which is what we want. Palms are towards the ceiling, the shoulder blades drop, nothing changes.
All she's going to think about doing is pushing the hands back through the table, back through the table, not pulling it back and letting the humerus head rise. Does that make sense? So the Trapezius here, a nice and relaxed. It's a smaller movement than they want it to be. Push the arms back and relax. Push them down towards the floor. That's what I'm after. Okay.
And relax and again and push them down and relax. Good. Take your hands. Plays some on that midline of that Scapula riding here. Okay. And you want to feel those muscle groups pull or the scaffolders pull in towards good into that tube. You feel that and relaxed. Now do it. And don't let your ribs move different. Yeah. Okay, so you're opening up through the sternum, which we talked about when we were zigzagging through. Okay.
Scapulas were dropped. Sternum lifts up. Crown of the head is in the Nice, relaxed position. First exercise. She pushes back, as I said, to activate the muscles. Once she's got them, she leaves them there. She pushes the arms down and she's going to do something like snow angels shoulderblades drop and she's going to bring the arms out level to the clavicles. But what she's not going to do is when she pulls them back, she's not going to lift them. When they come forward, she's going to pin them back and she's going to slide the arm back to level and down without letting the trapezius fire too much scapular retracts, stays where it is. Slide your arms out as if you're doing snow angels just to there and gently come down. Don't let your humor as head move and again and gently out just to there and gently down and again, good and keep them on the table and gently out as if you're trying to good gouge out down through that table and that's not really a train going by. That's a figment of our imagination and down and the game and gently out stay there. Now she's going to do a very California thing. She's going to hug a tree.
Okay. What she's going to do though is she, when she brings her arm up, she's not going to let the Scapula pull off that to the scapula when it comes in. I shouldn't know if I was to look at her scapulars where the whole arm was forward up, out to the side of down. The scapular remains where it is. It's held in space so the Scapula is going to be back and just the arm is going to move out and in, so bring their hands together for me just to there. Can you bring the shoulders back to the two? Aha. It looked fine, but when we corrected her, she dropped it about four inches. Well, three in, gently over and again and close them up
Can you drop the shoulders back again to two? Good and gently down. And again, keeping them back for me and again, feel the difference there and down. Where does that bottom rib? Where's the inner thigh? Where's you lower abdominals? Good. And gently lift and down. You're now going to put them all together. Okay. Scapulas drop arm, scoop forward. Good into the hug. A tree into the snow angel.
And again, up they come
And gently bring me on them and the game out and they go close your ribs. Aha. Throw the tummy in, finger.
So the difference there, and gently up, turn the palms up and then, then she drops them. Apply a little bit of pressure. Feels Nice, doesn't it? Then tell anybody else spoil you. Open your arms out,
All right? How do we get those scapulas? How do we, how do we relate that? Okay? To the everyday exercises. Take a door frame. If the door frame was here, you put your arms up as high as possible. Lift your shoulders up around your ears. Imagine that you're going to pull yourself up to the top of the door frames and you draw them down and then you slide them up and draw them down. Does that make sense? Okay. We're going to go slightly diff, a slightly deeper this time in a lay on your belly like so. Okay,
Stay there and gently slide the hands along the table. All right, so draw them back. Pull the scaffolds back and down and then gently let him go forward. Forward, forward, forward, forward, forward, forward, forward, forward, and pull them back. So there's like a swarm preparation and gently push. And again, retract the is back. Pull back, pull back, pull back, stay there. Okay.
Don't change anything in the relationship between your hands and your elbows. And then open the hands up off the table and then gently bring them down and then slide the hands forward again. Scaffold is retract. Stay there. Yeah, they stay where they are. They're not gonna move anymore. Just the elbows are gonna lift towards the ceiling.
Not Bad at all and gently come down. Very good. Try and stay out of here though. Stretch the arms forward. So what we don't see is we don't see them drop when she lifts the elbows. They don't continue. The scapulas don't continue to move. They're stabilized where they are. So you kick in alerts a little more.
Pull them down, stay there, lift the elbows gently out and up. Good. Stay there. Hold them there. Don't let anything move. Hold your tummy in. Now. Can you stay there and straighten your legs a little for me or don't fall over? It's not good cause you're on the camera. Good.
Stretch them a little more fire with the hamstrings. Draw the abdominal wall in tight. Keep the shoulder blades where they are. Don't change anything. Just push both arms out. Don't no. Keep your head where it is. Push both arms out over your head. Stay there and gently pull them back. Good.
Relax the Trapezius and gently push forward. Stay there. Gently bring the arms down again, don't change anything. Length in the right arm away from the left leg. Linkedin as you stretch. I have trapezius down. Okay. Gently linkedin there and down. So when she lifts the arm, it's not this, it's that, that movement. Yeah, so when she does the swimming, it's not about the trapezius firing up in here to move the arm. Okay.
That is a cross diagonal work. The SCAP, you're pulling down towards the hip here? Yes. The fingertips and the toes or the leg on the arm or just the arbitrary. We thing this waving in the wind. All of the work is back in here. Does that make sense? So she stretches the right time away from the left, lengthens and relaxes. Left arm and right leg pulling back as you lengthen and down right arm and left leg. [inaudible] and down left arm and right leg.
Reach it full of scaffolders, back and down, right arm and left leg. And of course the benefit to being on the roller is she moves if she doesn't, hold on. Okay, so we don't want it to fall off obviously. So linkedin away, stretch and down and the right arm and left leg lengthens and relax. Good. Okay. Sitting up for me. Facing the camera. You're going to have your feet dangling over the edge. You're okay there? Yeah. Good. No pain. Good. Okay.
Preparation for the mermaid shoulder blades down. Chin is lifted. Okay. She's going to lift this arm up for me. I've placed my palm up on the edge here and we gently stretch her over gently. Linkedin. Now we can shorten on that right side and linkedin on that left side.
Or what we can do is think about what we've talked about when we've come forward or when we've extended back and that is lengthening. So she's going to go over my finger, not through it. Stay there. Feel the difference there. Now if this shoulder, if it's not two dimensional and it's three dimensional, you don't feel the external obliques and transverse abdominals fire quite so much. So we want this side to lift and gently length in a way. You feel the difference out and then gently come back to center. And again, lifting up. Ah, where's your focus day? Their arm is up because the Trapezius is relaxed. Now remember, okay and gently over my finger. No, no, don't shift your spine.
Keep the weight evenly distributed on your hips. Go over my finger a little more. Good and gently come back to center. Good. Cross your legs. Indian soul for me. Version one. Now she gets to do it herself. Okay. With our legs crossed, Chin is lifted. Shoulder blades down gently over you go. Big Switch.
Hold your tummy in any pain and gently back to center. So we don't just sit them on one hip immediately. We get the body used to moving first and back to center. Good. Okay. Now you're going to sit on your right hip for me. Okay. So your legs are bent. Okay. So facing me that good?
Just like so she's going to hold onto this shin. Okay. Hair and makeup, they forgot to show up this morning. So we'll have bags under the eyes. Okay. Shoulders down. Chest is lifted. She gently extends the arm up. This hand is here again. And what I'm doing is I'm not pulling her down and over.
I'm lengthening up here and pushing down at the same time. Through that stretch. Yeah. And gently come back to center and again, she goes over my hand, up and over. Up and over. Up and over. Up and over. Yes. And back to center. If she doesn't feel it quite deeply, it means that she's made it three dimensional, three dimensional, which means she's shortened on the front side. Okay? It's gotta be one straight line, two panes of glass, one in front, one behind, go to the other side for me. Any pain at all. Good. Lift the arm up with the Trapezius, down, shoulder, down, holding on.
Tommy. Use him gently lift and reach. Good. Hold something in. [inaudible] and [inaudible]. Here we go. Lovely. And back to center. And again, they'd go over my hand, lift up over my hand, gently, Linkedin, linkedin, linkedin, linkedin, linkedin, and gently back to center. Good and relax. So there's a few exercises that all flection and extension. Okay. Extension back, flection forward.
But most of all it's about firing with all muscle groups, working the body as a whole versus isolated muscle groups that we fire at the beginning. And then we put everything together. So even if they're just doing a posterial tilt, you are thinking about the soles of the feet, the inner thighs, the ribs, not just where the pelvis is going. Okay? I hope those exercises help and um, if you like them, buy in and we'll do a few more later on. Thank you very much indeed. Bye. Bye.
Workshops: First Time Clients
Mention
 |
Julian Littleford (Teacher) |
 |
Laura S |
 |
Katherin Saoud |
 |
Gia Calhoun |
|
|
Tova A |
|
|
Mary S |
|
|
Margaret B |
|
|
Carine M |
 |
Hannah M |
|
|
Reformerchick |
 |
Jill Y |
|
|
Marijane P |
|
|
Cathrine D |
|
|
Gaynor H |
|
|
Sterlin M |
 |
Mirella Martire |
 |
Tamara G |
|
|
Rachael B |
|
|
Scilla L |
|
|
Mimi H |
 |
Kristi Cooper |
|
|
Leslie W |
|
|
Josephine F |
|
|
Pam S |
 |
Anna L |
 |
Sue T |
|
|
Janie J |
 |
Darlene H |
 |
Lynn P |
 |
Jamie K |
Comments

Thank you PA for exposing us to all of the different styles of teaching and the skillful teachers you bring to this site. I feel so fortunate to have this site to turn to.. I learn something new almost everytime I log in! I teach from home so it can be a bit isolating. Its almost like opening my door everyday & welcoming some of the best and most experienced Teachers in the world into my my little studio.. Thank you for bringing Julian back , hope to see more of him.


You need to be a subscriber to post a comment.
Please Log In or Create an Account to start your free trial.
