Description
About This Video
Transcript
Read Full Transcript
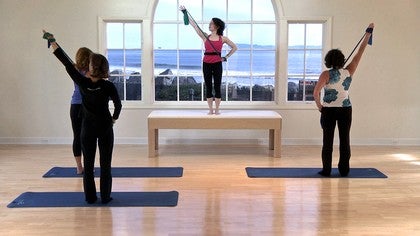
Thank you for joining today at [inaudible] anytime. And our class today is going to have two themes to it. One is dealing with the band, so you're going to be using a theraband and a medium. Pretty much a medium tension will be optimal. And we're going to be doing a lot with our upper body, a lot with shoulder setting and positioning for stability and mobility.
And the other theme though that's going to be recurring has to do with choices and the choices that you have in your body and to explore the different options rather than just always going in the same pattern that you may have grown accustomed to. So we're going to begin by taking our band and holding it halfway so that it dangles on either side and then place your foot on it about halfway through there. And you may need to even grip up a limb or choke up a little bit more, but I want you to have sufficient tension and you're going to let your head fall away from the band so that your gaze is still forward. And we're starting off here with a little scaling stretch. So you may notice what I just actually did was pulled my head into alignment. It was jutting forward a little bit. And when it's in alignment, you're going to feel a little bit more of that middle scalene area and take a breath in. Excellent. And now let's get some anterior scaling.
So we're gonna look upward and rotate our head to the direction of the band. And so you should feel it here in the front of the net, connecting down to that first rib there. And you want to make sure that you're not jutting your Chin forward here, you're keeping your head in alignment and it's not a side bend either cause we're trying to isolate it up in the neck.
And now let's return to the original position and look down in a way. So we get some posterior scalene here and careful not to side bend too much. Yep. Because then you don't get into the net quite as much.
It feels pretty nice. So now we go to the other side. And the reason that I'm doing this is that I find that very often in Peloton is we get very tight or put it this way. We become very tight throughout our daily lives. And then we try to go straight into [inaudible] and we can't get that nice motion through the head and neck and the release through the neck in order to access more deeply into the core in the powerhouse because of that restriction that's still there in the neck. So releasing it as the first thing, let's tilt her head away from the band. So releasing it as the first thing can be very useful before we continue to build and build our foundation. So take a breath in
And now let's get the anterior scaling. So to access that we have to have a sideband and a rotation. So we look up in the direction that the band is. This is also an important one for dealing with our first two cervical vertebra. Because a lockdown, especially in [inaudible] and the joint above it can create quite a bit of havoc throughout the entire neck because you have to have, uh, almost a majority, about 50% of your rotation right there for the rest of the spine.
And now look down in a way. So you're getting a little bit more post to your scaling here, although I'm actually even feeling it in a different spot, which is interesting. So take a breath in and exhale and let's return back to center. Ooh, make sure that your hands have knock on blue so it feels really nice as the first thing to do. Again, you only want to do it to the extent where you feel a stretch. If you start to feel yourself resisting and pulling back, then you're going to back off. All right. And I promise the class is going to get a lot harder now, but that was your enjoyment for the beginning.
Let's take our bands here and you're going to place your thumbs forward and drape the band over your thumps. Keep your elbow straight here to begin. This is how we're going to start it off to get into position. Now what I'd like you to do from this point is widen your hands just a little bit more so it's actually wider than your shoulder distance. Flip your palms to face, you circle around. So now when you have your hands this way, you're gonna have it just a little bit wider than your shoulder distance so that you can relatively comfortably open and stretch the band.
There we go. Okay, so let's just actually do this a couple of times right here. As long as we're here, extend your fingers so that we don't have to grip our hands at this moment and widen out and return back in. So a little scapular retraction and horizontal abduction through the shoulders and just once more now Ben, one elbow in and straighten it out. And again out and then bend the other elbow in, straighten it out and straighten it out. And now feel expansion. That's expansion that I want you to continue to have in your body that stretch in the band as you reach fingertip away from fingertip. Now Arch your back and now what would it be like to swing your ribs behind you?
And now what if you could have them in the center in between those two extremes where you're really filling the back body with air, but you're not hunching and exhale and relaxed. We're now going to start quadruples today. Okay, so we're going to go on to all fours keeping and maintaining that position. And I want to start you off in this a little bit more unusual position because when we work against gravity, there's all sorts of feedback that we get in our body. So I want you to sink into your shoulders for a second. You may feel a little bit of stretch in the shoulder capsule, all those ligaments there that are a static stabilizer holding your arm bone in the socket, and now lift up out of it. Now if your head were facing north and your tail, we're facing south.
I want the eyes of your elbows to face southeast and southwest. So if my head is Canada, then my right I have my elbow is pointing toward Florida and my left is going to go toward Arizona, California. All right. Now I want you to lift your heart just a little bit and I want you to press or stretch the band slightly so that you can feel that outer portion of your soldiers engaging. Now shift your weight back and sit on your knees and lift your hands and return forward once again and shift your weight back. Lift your hands and shift your weight forward.
And now we're going to get onto our backs. That's going to lower onto our backs, but we're going to keep our hands holding the bands and we're going to explore that connection that we just experienced. I'd like you to begin with your feet, hip distance, knees bent. Put your fingers up to the ceiling. Now keeping it just a little bit of tension on the band. Lift your hands overhead and now lower the band down. And once again, lift the band up overhead and lower the band down.
And last time, lift the band up overhead and lower the band down. Now let's move the band underneath our feet. So I want you to still continue to feel that connection into your triceps that can provide some stability for the shoulder. So inhale here. Let's exhale and do a little pelvic tilt. Flatten the
So we're moving those wheels of our pelvis so these wheels rock forward and exhale, rock the wheels back. Inhale, rock the wheels forward. Exhale, rock the wheels back. One last time, Ian. He'll rock the wheels forward. Exhale, rock the wheels back. Lift one foot up at a time and to tabletop here. And we're going to practice some knee folds.
We're going to inhale and we're going to exhale. Lower the right foot down, continue to feel the tension on the band and the left foot down. Inhale up and the right foot down. Softening the ribs. Inhale up in the left foot down. Now let's pause. And instead of exhaling as we lower. Let's inhale as we lower inhale and exhale to rise. Keep the tension on the band and exhale to rise energy shooting out through your fingers and last time so we don't have to be too engaged, a little bit engaged, but not so much as required.
Now extend your feet up to the ceiling and bend your knees and extend your feet up to the ceiling and bend your knees. Now take your band and wrap it around one foot. So we're going to get out of our hip flexors. Before we start going into our hundreds, it's going to feel really good. You're going to lower your foot all the way down and you're going to lift it back up and you're gonna lower it down and lift it back up.
And now just circle it out to the side and around and up and circle it out to the side and around and up. Now Cross it over your midline and you're going to be actively pushing your foot into the band while you're grounding the opposing hip. Now bring it out to the other side and see if you can feel that stretch on your inner thigh. Bend your knee and see if you can feel the deepening in the hip socket. Now push your foot into the band so that you straighten the knee and return the foot up to the ceiling and slowly lengthen out through the heel to lower as you zip up through the low belly and opposition.
Let's try the other foot.
And now let's bring it out to the other side. Feel that adductor, that inner thigh stretch. Now Bend your knee, but you're actively pushing your foot into the band so that you might be getting a little strip in the capsule as well and straighten your knee and return up to the ceiling. Now loosen your fingers, making sure again that you have circulation and that you still have fingers. You're going to position your band underneath your thighs or in front of your, but I should say once again, make sure you have a little bit of tension on it because from here we're going to inhale, we're going to exhale and we're going to do a little cervical nod and then we're going to crawl forward, reaching the band forward and where you're going to return back down. Inhale and exhale, cervical non curl, returning back down last time.
It's the Chin that leads the way by extending and reaching out through your hands so that you feel that connection is your shoulders. Your shoulders are no longer just limp. Now extend your knees for a little bit more challenge. Lengthen and lower them in. Turn out in front of you. Let's pump the arms. Inhale two, three, four, five in XL.
So we're connected into that low belly, connected through our inner thighs, connected into our arms and our trunk. And inhale, two, three, four, five, and exhale, two, three, four, five. And inhale, and exhale, two, three, four, five. And inhale, and exhale, two, three, four, five. Now let's mix it up a little bit. Inhale, reach the hands up. Exhale, lower them down. Inhale up so you feel a little bit through the shoulders, but in a good way. Lower down. Two more. Inhale up. Exhale, lower down. Last time. Inhale up. Exhale, lower down.
Bend your knees and the lower so that we mix up a little bit with the rhythm and pace. Now from here, I'd like you to bridge up, pushed your hands straight down into the mat and lower back down. And once again, bridge up and lower back down. So reach your right foot up toward the ceiling. Lengthen your left foot out in front of you, and let's do some single leg circles here. Lower around and up. So we crossed the midline to begin and up crossing over, around, and up to more over it. So notice how free that hip might feel as opposed if you had not done the work with the band first. And now we reverse it. Lower down and up.
Exhale around and up and exhale around and up. And last time. And switch legs. Okay, so you can bend one knee if it feels that your hamstrings are very tight crossing over to begin [inaudible] over. So we've engaged the back of the leg in order to free up the front of it just a little bit. Two more. And last one and reverse. And over, around and up and over, around and up and over, around and up. Let's just do one more around enough and no, move our feet again. So we're going to lift our fingers up toward the ceiling.
We're going to do a little roll up and you're going to roll all the way forward. Now rather than going for as much curve as you can. See if you could maintain an equal distinct curve throughout your whole spine. So that may mean that you're not curving very much and you're going to slowly lower down, reaching out through your hand, maintaining tension on your band and lowering or lengthening the band fingers, reaching away from your toes. And once again, exhale. So notice I get to about right here and I don't immediately lead forward with my chin, I ark up in order to come forward.
So it makes it actually a little bit more challenging because I'm not giving way into those little areas of the spine, the phys sets that have a lot of mobility. And once more. Inhale and exhale and this time place it around your feet and pull back for a couple rows. One, two, three, four, five. Let's pull back with her right arm and rotate. One back to center. Rotate to the left, back to center. Rotate to the right, back to center, rotate to the left. One of the challenges that we encounter often in Polonius is that we don't do enough in my opinion of bent elbow work so that we often are working or lots from a very long lever, straight elbow position and this is very functional. Think about it, you're opening a door, right? You always bend your elbow, you pull something down from a shelf, you bend your elbow in and let's do one more.
I know. Reach forward, shake out your fingers and making sure that you still have sensation in them. Reach forward with your hands and let's roll back down again. See how much you could minimize the curve as you roll down, bend your knees in place. Your feet are on top and we're going to do some of our ab series here right now. Knees are bent. Hands are by our sides. Inhale, we're going to exhale ha none. Curl forward.
And we're going into our single leg stretch here. So we're going to straighten one leg out and switch and switch and switch. Speed it up. Ten nine, eight, seven, six, five, four, three, two, one. Bend the knees, lower yourself back down. And we're going to do double leg stretch by moving our band overhead. So we're going to non curl up, extend your feet out and just bend in, extend and bent.
So this is very helpful again for your shoulder so you have that connection into the sockets last time and lower yourself back down. Move the band once again underneath your feet. We're going to have a little play on the single leg. Pull this time you're going to nod and crawl, extend your feet, extend your knees, reaching your feet up to the ceiling. Now lower one thigh into the band and switch.
So it's like a little trampoline that it rebounds off of. Push, push up, push, push up. If this is strenuous, feel free to lower your head down. Push, push up, push, push up. Push, push up, relax down, and we're going to try it a little bit with the double leg pull. Extend your feet up to the ceiling. Inhale, exhale, nod and curl forward extending and reaching out through your fingertips. Lower your feet down and trampoline back off. Lower your feet down, trampoline, back off.
You don't want to let your pelvis roll forward though and last time and lower yourself all the way down. Whoo. Let's roll onto our stomachs. Let's get a little bit of prone work going on for our backs. I'm going to have you begin a bit differently. Your hands are going to be by your side, so the band will be directly underneath your thighs.
You're going to reach through your fingers, you're going to reach through your toes and we're going to do a little bit of flight here, a little bit of tricep work as we reach the band up into the air and lower back down. Reach the band up so we get a little tension here and lower back down. One last time, reached the band up and lower back down. Now grounding through that pelvis. Still reach out through the crown of the head. Lengthen, lengthen, lengthen and reach up with your hands so you feel a little tricep.
Work with your back extension and lower back down and again, lengthen out and up and lower back down. And last time lengthen out and up and lower back down. Now let's move our bands so that our hands are straight out in front of us.
Now if you can bring your arms out to the side so that you're stretching through the band and bring them back behind. You bring the arms out to the sides and up overhead. What we lengthen crown of the head to tail. Bring the arms out to the sides and straight behind you and last time out to the sides and up overhead. Make sure that you still have circulation in your fingers. As always, let's prop ourselves up for a moment here.
I want you to sink into your shoulders, just see what it feels like and have enough tension here on your band so that your hands are indeed soldier with the part and sink and rise and sink so that there's really no shoulder stabilization activity going on and lift up. So now we're engaged here through our serratus anterior, the muscle here through the side as we lift. And what that's also doing is flattening your shoulder blade onto your spine. So as opposed to the weeding sensation. Now in that position here, I want everybody to take a moment and we're going to do a couple of external rotation exercises. So we're going to rotate, or actually I should say we're going to move our hands out to the sides, firing our external rotators of our rotator cuff.
So the reason this is very effective is you're stabilizing your scapula through that Serita's anterior by lifting up through your heart while you do your external rotation. [inaudible] let's do two more here. Rotate
And then we lower back down, lengthening out through our fingers, lengthening out through our toes and our toes and feet and thighs arch up and lower back down. And then we arch up through the upper body. And now let's combine those two motions. So we lift through the lower body and then we rise the upper body and we rise through the lower body and we rise to the upper body and keep going. And last time. Feel a little bit of tension here, particularly not through your body, but I want you to feel the tension through the band and lower yourself down.
We're going to do just a little bit of the sidekicks series. So we're going to kick front and back so you can go front and point the toes to reach back and flex forge and Ian Hill to reach back and make sure that we're not counter leaving too much with our chest
You're going to bicycle forward and bicycle back and bicycle. Actually it, it isn't really forward and back. It's still forward the whole time. And I want you to reach forward and lower yourself down so your hand is still here. You're going to continue that bicycle motion we just did. So you bend the knee in and then you're going to rotate onto your [inaudible]
And we're going to speed it up just a little bit and we keep pedaling [inaudible] bend the knee in and last time, and we're going to end here with a nice stretch for our chest. As our foot reaches forward and our same side arm reaches back.
And careful not to tilt forward and last time and lengthen back. Lengthen, lengthen. And now we're going to extend the elbow and reach up and lower down. So it's not really a full kick, it's more of just arking up and lowering down. So seeing how much you could possibly lengthen out through the toes just to there and lowering back down.
So we're kind of mimicking the motion with the upper and lower body and back in. All right, we ready for our crazy bicycles. Let's just try the bicycles with the lower portion first. So we just bicycle pedaling and we bend the knee in and we reached back and we bend the knee in and we length and back. Now stay there, extend your arms out in front of you. Bend the knee, Ian rotate onto your back and reached the street knee all the way behind you. As you rotate your spine, that's it.
And make sure your foot is slightly in front of your bottom supporting foot. It's going to give you more stability and bend the knee in and rotate it behind you. Reach forward then to reach back with your toes and reach forward with that hand and bend the knee in. And once more, feel the stability through your shoulders as you point your foot forward. But that same side hand reaches back and last time reach the foot all the way behind you reaching your top arm forward. Exactly. And actually we should stay here for a stretch, but then we're going to end like we did on the other side, bending the knee in and feel the stretch on the chest.
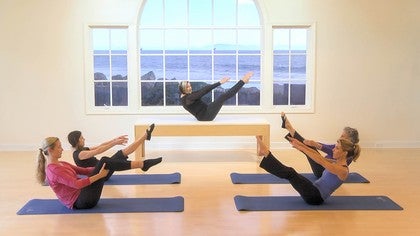
So now we have our top foot in the air in front of us and our top arm in the air behind us and help yourself sit up. Let's come into a little bit with teaser. Make sure that you still have your fingers, place your hands. So the idea is yes, we're using the band the whole class, but it shouldn't be taught around your fingers or your hand the whole time. It's just there to give you a little bit more sensory input unless we're actually doing some resistance. So I'd like your finger straight out in front of you and we're going to lower ourselves down partway and return back up and Loris hills down again partway so that it's not a collapse. There is still a lift. It's a, it reminds me of a seashell being Sioux here at the, at the ocean, it's, there's a curve, but there's integrity as well.
So it's like I'm following the curve of the seashell, but it's strong. It's not collapsed. And then I lower myself down. So we're going to go with our arms underneath our hands again. We're going to breathe in, bending your knees and let's exhale and try and tease her up and bend the knees and teaser or back down and bend the knees. Teaser up, lower yourself back down. Now let's lower the feet. We're going to extend the knees and we're going to try and rise up for a teaser with straight legs and we're going to lower our feet or Laura thighs, I should say, down into the bend to help us so that we don't feel so much in our hip flexors.
Inhale and exhale, lengthening out to rise. Soften our ribs. Ah, yes. Lower back down. Inhale and exhale. Last one. Now let's lower one foot down here and back up. Let's lower the other foot down and back up.
One down and up. Other one, down and up. Bend the knees and keep the arms up. Bend the elbows, push straight forward. Then the elbows push straight forward. Two more. Bend the elbows. Push, and last time bend the elbows and push.
Let's put both feet into the band. Let's get a little stretch here. You're going to bend your knees and I want you to push your feet into the band and bend them again and push that. We can gauge the back of the legs to get out of those hip flexors in case they've tightened up and last time bend and straighten. Lower your feet down. Place both hands on in one pocket, so to speak. And now you're going to remove your hand from the pocket as if you're taking out a sword and put it back in and look at it.
So we're bringing in a little PNF pattern here and down and look at it and down last time, see if you could extend your hand, extend your fingers, relax them so that they stretch a little bit and back down. Let's try the other side and pull and replace that sword and pull and replace it. Two more. Pull and replace it last time. Pull and replace it. Now bring your arms up overhead and we're gonna try another interesting abdominal exercise here. So your body's going to be with your feet just a little bit wider than your hips.
We're going to roll onto our side in one piece. So you're going to push off your right foot and roll. I'm sorry. Yes, you're pushing off your right foot. Rolling onto your right side. Sorry. But you're using your right foot. You're not using your left foot to do it. That's why I say that.
So slowly lower yourself back onto your back. So let me repeat that. You're pushing into your right foot because you're rolling onto your right side. Yup. So it brings in a lot with the [inaudible] here. [inaudible] so your left foot is going to have to be off the ground pretty much the whole time. Lowering yourself back onto your back.
So once again, the left foot lifts off the ground, push down into your right foot to help yourself onto your side. You can use your head a little bit because that's going to give you some of your multi-fit eye muscles.
Push off your left foot toe girl onto your left side. So your left hip is doing a lot of the work. We're getting a lot going on through [inaudible]. We're getting a lot going on through the glute mead, the hamstring, and back onto your back. Try One last time. And there's also quite a bit going home with your obliques here and lower yourself onto your back. Breathe in, extend your hands and let's do another roll up.
And now let's actually, let's all do the same leg. I apologize. Let's extend our right foot out behind us and I want you to take your left hand and you're going to circle inwards. You're going to do a little spiral motion as if you're looking toward that foot. And now I want you to open your spiral and reach up toward the ceiling and spiral. So you slacking and then you extend and stretch. And if you want, you could even extend your fingers as long as it's not too tight and spiral and stretch. Let's try it on the other side so we extend our left knee.
Forgive my lack of clarity before that was my fault. We're going to take our right hand now, the opposing hand, and we're going to do almost as if we're threading the needle, that little felled in Christ motion. And we're going to look though toward our extended knee and foot. And then we're going to reach up and feel the stretch. Feel that nice rotation through your spine. Beautiful and spiral and extend. And last time, spiral
Return here into her quadro pad position. When you're ready, you're going to Tuck your toes and we're going to shift your weight back and we're going to open up and spiral a little diagonal spiral and return back into pet. And straighten your knees. Little downward dog. Bend your knees, lift the hands, stretch the band on the opposite so you're getting a little rotation with extension. Return the band forward. Straighten your knees and stretch. Bend your knees and extend with rotation and lower your hands and stretch the knees. And last time, bend the knees and stretch and return the hands and stay here just for a downward dog for a moment. Extend your fingers, spread your thumbs. Make sure that you have weight into your thumbs.
Push the ground away, lift your heels, lower your heels, bend your knees, and we're going to do a little interesting variation of our [inaudible] pushups today. We turn in your band, come back into your position for PyLadies pushups. You have several options. You could be on your hands and knees in a quadramed position. You could be all the way. Yeah, all the way, I guess you could say. Here, I'm in a half plank and then you could all be all the way in a full plank. I'm going to be in a half plank, so we're going to bend our elbows three times here, pushing one, pushing two, pushing three. Now we're going to walk our feet inward.
We're going to keep our backs relatively straight and we're going to stretch our bands. One, two, three. So you're in an exaggerated hip hinge. With your knees bent. Be sure to bend your knees looking straight downward, but bring your head up right a little bit. So bend your knees and look up. Bring your chest up. There we go. And lower your hands down. Walk your feet back. And three push ups, push up. One, push up to push up. Three, walk your feet in and be in this exaggerated hip hinge position.
So we're now going to extend our elbows out. One, two, three. Walk your hands back or we your feedback. Forgive me, I don't even know what's up or anymore. And three pushups, one and two and three. Woo. And now walk her feet all the way in. Extend your arms out in front of you with the back straight. And now reach up to the ceiling.
And now open your arms just a little bit and lower your hands in front of you. So inhale open and now see if you could bring them all the way around for beautiful stretch of the chest. After we did all that chest work, return your hands. And once again, returning your hands up behind you. Feel that little bit of extension, returning your hands up and forward and last time, return to your hands, up and behind you. And now returning your hands up and forward. So let's all face one another. You're going to face me, I should say. I guess that would be one another. I want you to have a wide stance here so you can finally let go and just have it draping once again with the draping of your band over your thumbs. And now just grab it raw, real Tivoli freely.
I want you to reach over to one side and then you're going to reach over to the other side. And now you're going to do your folding action. So it's going to be a little bit shorter. You're going to reach over to one side and I want you to straighten the elbow and see if you can maintain the humerus backward in the socket so that it's not protruding forward. Two, three, now bend and lunge and arch up is if you're creating a rainbow over to the other side and now bend the other elbow. One good, two, three and now lengthen out and reach creating that rainbow all the way to the other side. So let's go up and over and up and over and up and over. Last time, up and over and now bring your feet together.
Lift the arms up overhead. Hopefully at this point you feel a little bit more connection of your shoulders into your trunk. Notice where your ribs, you have a choice. Could your ribs be forward? Could your ribs be back? Let's see what would happen if we shift our ribs to the side and back to center. Perhaps you could shift them to the other side.
Now I'd like you to breathe any which way you please, but just notice the expansion into your back body here and down. No. Now lower the hands. Continue to feel that sense of expansion into the back, body and down, and once more, lower the hands all the way. And let's place our hands so that the palms face us face inward toward our bodies and see if you get a little bit of tension on the band, just a tiny bit. So you remove the slack, see if you can feel that connection of your shoulders connecting directly into your trunks and exhale.
Mindful Movement: Full-Body Exploration
Mention
 |
Rebekah Rotstein (Teacher) |
 |
Lou M |
 |
Danai Pappa |
 |
Louise P |
|
|
Wendy K |
 |
Janja T |
|
|
Randee E |
 |
Katarina S |
|
|
Debbie W |
 |
Jolene B |
 |
Cindy W |
 |
mbrown |
|
|
Michaela W |
 |
Kristi Cooper |
|
|
Ileana V |
 |
Valerie B |
 |
Danielle R |
Comments


You need to be a subscriber to post a comment.
Please Log In or Create an Account to start your free trial.
