Description
About This Video
Transcript
Read Full Transcript
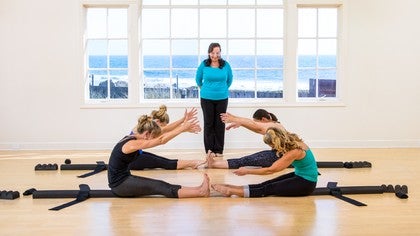
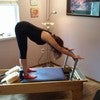
Hi, I'd like to invite you to come in, lie down on the Paris Center. It's a device I invented basically to teach dancers how to use their back ribs to breathe. And as you lie down you'll notice that there are two accessories on it. One is the head support, which you can adjust so it's directly under your occiput and that you're comfortable. And then your rib wrap, which you'll wrap around your lower rib cage on your exhale, not tightly, but just so that you can feel it and envelop your entire rib cage so you, you get a more three dimensional sensation when you do your breathing. Okay, I'm going to just make yours a little bit.
So take a deep breath in and as you exhale you just lower it and wrap it there. Okay, so I feel comfortable. Good. All right, so then the first thing we're going to do is just lie down, arms by your side. And I like to have the palms up because it keeps the shoulders wide and I'd like to encourage you to breathe into your back ribs and feel the weightedness of your rib cage. On the Paris Center. Now the Paris center is a double convicts role on purpose so that the spinal processes of the entire trunk can float in that center channel and has nothing that pushes up on it. The two convicts sides support your ribcage and also your pelvis.
So you'll feel that your pelvis is weighted the top of your pelvis and the bottom of your pelvis. So as you inhale and exhale, just do it as natural as possible. And imagine the diaphragm moving down as you inhale and up. As you exhale, as the diaphragm moves down, it's the contraction of the diaphragm muscle increases the intra abdominal pressure and as it moves up, it allows the front rib cage to come closer together. And if you actively in inhale and exhale, then you'll help the diaphragm dome better. So doing an active exhale will actually increase the excursion of the diaphragm.
If you put your hands gently on your rib wrap, you can also use the kinesthetic cue on your exhale of moving your front ribs toward each other. And that also will enable the diaphragm to move up and re dome so that it's ready for its next long excursion on your inhale. Very nice. And now on your next exhale, let's see if you can just do a very gentle pelvic rock, moving your pubic bones towards your belly button and feel how your pelvis is weighted at the top of the pelvis as it rolls off the bottom part of the pelvis. That's nice and see if you can do the whole movement on your exhale. Exhale and return and feel the weight of your pelvis.
Alright, do it a few times. Feel your back ribs really expanding into the Paris center and on your exhale, roll your pelvis and put it back down. Nice. Now release your pelvis and let's just work at the neck a little bit this time as you just double check that your head support is in a comfortable position this time as you exhale, just think about lengthening the neck, moving the head away from your shoulder girdle, not lifting, just lengthening the back of your neck. That's it, so that you get a little length between your upper thoracic and your head. So that spine has nice smooth movement.
And as you inhale, the normal thing is for the cervical spine to slightly extend. So you can allow that to happen. And as you exhale, you can lengthen and now see if you can combine the pelvis and the neck so that you get this very long, long spine on your exhale because the neck is lengthening and your pelvic is raw. Pelvis is rocking. Moving your pubic bone toward the belly button, you feel nice length through your whole spine and your spine is processes in that nice center channel. So there's nothing pushing up on it. It's free to move, which then allows those little intersegmental muscles to relax as well. That's nice. And you feel how weighted you are, the upper pelvis and when you come back down, share the weightedness of the pelvis so you're not going to tip it forward and come off. You're just gonna stay
So that part of this whole process on the Paris center is about learning what your body can do. And so we're going to move the arm up on the inhale so that as you breathe into your back ribs, your shoulder girl, your right arm will come up over your head and then down on the exhale and you're going to pay attention to how your shoulder girdle moves on your rib cage. Feel free to alternate. Yup. Do it on your breath. Inhale, arms up, exhale, arms down. And remember you're still breathing into your back ribs. So the movement of your shoulder girdle on your rib cage is just as if you were doing 10 different things at once because you're breathing into all of those ribs and the entire Scapula glenohumeral joint and arm are moving and you're not taking your ribs with it, which is what generally happens when you lift your arm and you're not so focused.
And now on your next inhalation you can lift both arms together.
And now on your next exhale, slide your right leg straight out. And remember that the leg is coming from the hip joint and not the lumbar spine. So the pelvis stays neutral and bring it back in. So we're going to do a little lek slide and continue feeling that same weightedness in your pelvis. So pay attention that your pelvis isn't rolling off to one side and then at the end of that leg extension your ankle.
Yeah, that's it. Nice. And now let's combine it with the arm going up on the inhale. Same side arm goes up and then comes down. That's it. And alternate sides. Good.
And feel the back ribs going onto both pair both convicts, cities of the Paris center. And now relax your arms down and just breathe. And on your next exhale, bring your right leg into table top. Feel the weightedness on your pelvis and then bring your opposite leg up as well so you both legs are up and now you're supported and stabilized by your trunk and your arms. And now straighten your right knee up to the ceiling and then your left knee up to the ceiling and you're continuing your breathing into your back ribs.
Exhaling bringing your front ribs toward each other and feeling that diaphragm internally and flex and point your ankles. And now alternate the flexing and pointing. And now turn your hips out in, in. Feel the rotation from the hip joint. Continue to feel yourself weighted on your pelvis and bring your legs in parallel. Flex the ankle, bend your knees and lower your feet down.
Good. Inhale, circle your arms over your head, big wide circle. Exhale on the way down. That's it. And again, feel that the shoulder girdle is moving independent of the rib cage and that the rib cage can continue breathing. Very nice. And now we're gonna continue the arm movement. Continue the arm movement, and now we're gonna add a little challenge. We're going to start moving the legs faster so the feet are going to prance a little bit.
So push off the floor and move your feet a little faster. Keep the breathing going the same. This is one of the important things for dancers in particular because as soon as they start moving fast, they want to breathe faster. So the challenge here is to maintain your breathing cycle even though your legs are moving faster and then start jumping off your feet. Keep the breathing going. Very nice and back to prancing.
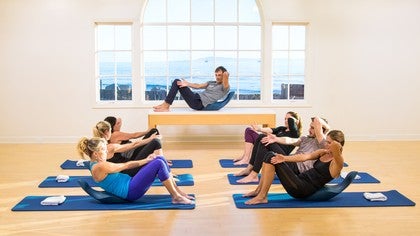
Nice and slow it down and stop and circle your arms down to the floor and breathe into your back ribs. Exhale, bring your front ribs in, breathe into your ribs. Exhale, keep your arms down by your side. Palms up. And let's do a little homage to the hundreds. So we're going to inhale a percussively on four counts and exhale on six and relax. And inhale, two, three, four. Exhale, relax. Four, five, six. Inhale, two, three, four. Exhale, three, four with warming up. Inhale, two, three, four. Exhale. Now you're gonna lift your chin and roll the back of your neck as you do your inhale. Two, three, four, stay there.
Inhale, two, three, four. Stay there. Three, four, five, six. Inhale, two, three, four. Straighten your legs up to the ceiling. Four, five, six. Inhale, two, three, four. Exhale, two, three, four, five, six, and that percussively. Just keep inhale and keep the arms going. Four, two, three, bye. Thanks. And rest. Bend your knees and lower down. Good.
Bend your elbows. Inhale, exhale, straighten. Lift your arms and head and down. Inhale, bend your elbows. Exhale, straighten. Lift the arms in head. Inhale, bend your elbows. Exhale, straighten, lift. Bend the knees up to table, top and back. Down. Inhale. Exhale. Straighten these up to tabletop and down. Good. On the next one, you're going to straighten your knees and and straight and back down.
Does this remind you of coordination and stretch up and roll down. Exhale, Aye and down. Exhale up. Stay up there. Separate your legs. Abbott, Nadoc Dab and Nadoc, dap and nat duct bend. Roll down. Inhale. Exhale, come up Eben. Adeq quick movements.
Keep the breathing going the same and then one more time. Exhale. And that's it. And down, relax your feet. Put your arms down, passive breathing. Check into your back ribs. Make sure your pelvis is weighted. And now separate your knees and feet slightly and just allow your knees to fall to the left and unweight that right side and bring it back on the exhale.
This is a nice way. Go to the other side, just nice and gently sway off and back on keeping your breathing going. Just sway off and back on. That's it. So you feel how you can unweight one side of your pelvis and take the weight back on and how the other side of your pelvis doesn't want to come off. Good. So this is a good one for you. Yeah, it's a good one for you to practice.
Learning which side, you know which side you favor, more or less. It's good information. And now put your arms out to the side so that you have nice with going across that whole clavicle shoulder girdle. And as the knees drop to the right, the head rotates to the left. Nice and small movement. Inhale, return on the exhale. Inhale House way. Exhale, using your own oblique abdominals to pull you in, initiating from the pelvic girdle. Okay, so really use the center to get yourself to the center.
That's nice, nice and easy. And back to the center. Relax. Come back to the starting position and just do your breathing. And as you exhale, let's do a little bit of a pelvic rock into a very small bridge. So you're going to roll, really do a post. Here are your pelvic tilt, and just lift up to your waist and roll back down and feel that as you roll back down, you're taking the weight back onto your pelvic bones evenly.
So see if you can pay attention to that whole center of your body moving up and down. That's it. You feel how when you were going down you were going like that. So your goal really is to find that center between your pubic bone and the midline and try and come back down and lower yourself down the same way. Very nice, very nice. Good. And now just take your rib wrap because you're going to unstrap yourself and open it up because we're going to do full full on bridges.
So you just pull it open and remove your head rest. Move it up and out of the way completely. So it's off the Paris center. Put your arms by your side and let's do, let's do a full bridge all the way up. Let's do an articulating bridge so that you start exhaling. Roll up and follow it up.
Feel the weightedness on your upper rib cage and exhale, roll down ribs. Come down first ribs, come down first. Nice,
And now just relax and have another nice passive breath. And then you're gonna do your roll-ups and roll up. Straighten your knees and nice stretch the arms over your head. Hello. [inaudible] and roll down
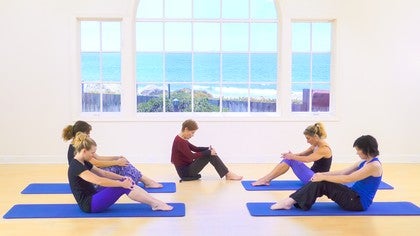
That's it. Very nice and roll down. Certainly can't hide anything. Can you and relax. All right, now we're going to transition into the seated posture. So if you will all do your roll up once more this time and stay up and roll up and stay good. Good. And relax in this position.
And then we'll come off and take your head support and your rib wrap off and then we'll turn the Paris center perpendicular. So we're gonna go in and take the minis now. Okay. And we'll take your minis and put them right next to your legs cause you're going to use them. Okay. You're going to sly forward with them and do a little bit of forward bending.
Nice. Inhale and exhale. Um, I, I personally don't have a preference. You can turn them upside down though and then it'll be on the flat side. The easier to keep your hands together and roll. Yeah. Push out where you can do it as you're doing it with your fingers in the middle.
That's it. And now you can put them behind your back and this time for sure the flat side will be up. Okay. Put it behind your back because you're going to press down and lift your pelvis up. Inhale up, exhale down and really extend your elbows.
Very nice and down. And now the next time you go up, lift your right leg up when you're up there and bring it down and then your left leg up and bring it down and sit down again. And one more time. That's nice. And keeping this nice and level pelvis. So don't drop the leg, don't drop the side of the pelvis of the leg that's going up. Have a seat. Good. We'll do one more time and lift.
So you want to maintain this position of your pelvis nice and neutral without dropping and come down and bring the minis next to you again. And let's do very gentle forward slide forward flection. Inhale into your back ribs. Really feel both sides of your ribcage and return sitting up straight and again, slide and deep inhalation into your back ribs so that you really feel the breath right there and come back. And now bend your knees and put your feet together.
Very nice. And now we're going to move around to the other side, and Neil on the Paris center, and you're going to put your tibial tuberosity right into the channel, which will make it very comfortable for you to kneel. It's one of my favorite things to do on this because it's very hard to kneel. Yeah. So this part of you, this part of you, goes into the channel. That's it. That's it. So the goal here is to extend your hip joints. So just relax, inhaling into your back ribs more and exhaling really getting your front ribs down.
Inhaling into your back ribs here. Exhaling, bring your front ribs down without moving your shoulder girdle.
So we're transitioning from supine to partial weight bearing by, but still moving the shoulder girdle on the rib cage. Good. And now just keep the arms down and we're going to shift the way to the left knee and bring the right leg through into a lunge.
Nice breathing. Inhaling and exhaling. Really feel the inhaling into your back ribs. And when you're ready, you're going to switch legs. Bring the leg back onto your knee and switch the other leg forward. So when you do that, you really have to focus on pelvic neutral position so that you don't drop too much and push down onto your thigh.
Good. And now put the knee back so you're on both knees again. Good. All right, so now we'll take our minis in front of us and we'll do a little cat cow. I think I like it better if you do it on the flat side up, right? So we're going to inhale and extend our spine, and then exhale and flex. Inhale, exhale and flex. Inhale, extend your spine, exhale and flex, and again, inhale and extend.
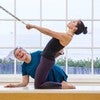
Exhale and flex. And then let's come to a nice neutral position of the back. Curl the right toe. Wonder and lift the left leg to the back. Straight back first. That's nice. Keep the leg there as you inhale into the back ribs.
Exhale, lift the belly button, and now with the opposite arm if you can up, that's it. Don't drop the hip, that's it, and put it down and bring the leg down. Cat, cow again. Inhale, extend. Exhale, flex. Inhale, extend. Exhale, flex. I want you to try to extend more on your thoracic area than your lumbar. That's it. Exhale, flex one more time, and then find the neutral position again and curl the toe under and lift the other leg behind you. That's it. Keep the breathing going and opposite. Arms Straight and back. Down.
Inhale, exhale. Stay in neutral pelvis. Curl both toes under. Inhale, exhale, lift the knees. That's it. And Inhale, stay there. Exhale, lower. Stay there. And Hale.
Exhale, lift the knees. Inhale, stay there. Exhale lower last time and lift the knees and lower and now reach back with your right foot and then your left foot. And we'll push up into a plank. That's it. Inhale into your back ribs. Exhale, lift your abdominals. Really activate your abdominals. Inhale into your back ribs.
Exhale and bring your knees back onto the Paris center. And then just sit in kind of a child's pose position so that you can relax. Good. So come out of child's pose and take the weight onto your hands and knees and curl your right to wonder and stretch your left leg behind you. Keeping the leg straight.
Bend and straighten the knee several times. Bend and straighten and really work on using your hamstring and your glutes without arching your lumbar spine. Continue the breathing into your back ribs and return switch legs stretch and bend and straightened. Keeping your ribs elevated. Don't sink. Yeah, that's, that's the one for you really there. Hold those ribs there. Good. And now come down. Go ahead.
And now we're going to step back with the right and then the left. And hold the plank again. Inhale, exhale, Pike.
Inhale plank and put the knees down and child's pose once more. Breathing into those back ribs. Really feeling those back ribs expanding on either side.
Nice. And now we'll come to a stand and turn your Paris center around because we're going to balance. So turn it on its other side and we're just gonna stand on it right in the middle. Good. Just balancing in the middle. Now let's have you stand one foot in front of the other. Good.
You can put your arms out to second and just take a step or two forward and then a step or two back.
And now step and reach the leg that's not on the Paris said or reached the foot toward the floor so that you actually standing on one leg, you add duct and a B duck, the weight bearing leg, that's it. And put the other leg on and drop. So you aide DNA be duct, you're getting the inner and outer range hold of that Gluteus medius muscle. That's very important for gate
All right. And rotate your rib cage to one side and return to the center. Very nice. And now to the other side and returned to the center once more rotate. So the pelvis stays level. So if you're rotating left, try and keep that right pelvis back. If you're rotating right, keep that left pelvis back. So you feel that dissociation at the waist between the rib cage and the pillow.
Very nice. And not just step to the side and step off your Paris setter and pick it up. Put your finger, middle fingers underneath the channel on both sides and let's hold it over your head.
Exhaling front ribs come down in toward each other, breathing into your back ribs. Exhale, front ribs come down and toward each other. That's it. Breathing into your back ribs, rot. Roofs come down and toward each other. We're gonna do the same dissociation. Rotate to the right with the rib cage, keeping the pelvis front and returned to the center and inhale, left ribcage. Here's that. This one's hard.
You and return to the center. So that's the one you need to work that side. And turning to the right rib cage and center. Turning to the left. Nice. Okay. And bring your arms down. Thank you very much. That was really wonderful. Thank you. Thank you. Okay.

Anything Goes: Work with Physical Therapists, Osteopaths and More
Mention
 |
Marika M (Teacher) |
 |
Noelle Iturbe |
|
|
Cynthia G |
 |
Ivan Z |
 |
Anne-Marie S |
 |
Patti Eppolito Kreiner |
 |
Sarah D. Carrasco |
 |
LOUET I |
 |
Michelle H |
 |
Lesley Powell |
 |
Joan Breibart |
 |
Breige O'Donnell-Smith |
|
|
Veronika A |
 |
Ashley B |
Comments


It has been an invaluable tool for all my clients from professional movers, injuries and my older clients.
What I love the most is getting the nervous system calmer to overcome tension patterns that take away from good function.


You need to be a subscriber to post a comment.
Please Log In or Create an Account to start your free trial.
