Description
About This Video
Transcript
Read Full Transcript
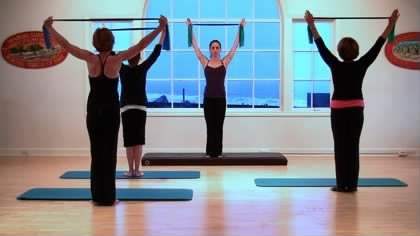
Okay, I'm going to take your band and you're going to stand on it. So you've got a and band and our hands are gonna step down onto it. Kind of make a curl. I told him no, just hold it still. All right. And then just be careful when you're coming up that you don't strain yourself.
All right, so you're just holding onto the band. The feet would be, or just parallel to one another. Further down you hold on your band toward your feet. The more tension or the more the band is going to pull down on your arms. So there some information for you to do with what you sh standing tall. Allow the shoulders to simply drop down. He'll feel the band, pull them down.
It feels kind of good. Actually. Let's just do some shoulder circles. We're going to roll the shoulders forward and I'll lift him up and a reaching back and let the band pull down, but also begin to engage the back muscles as you pull down on your shoulder blades. So we just mobilizing the shoulders. Think the theme for today is going to be lubrication of the joints, mobility, synovial fluid, synovial fluids, his candy, and just working the shoulders. And we're going to go the other direction now. So we go back and then we left round for it and just set them back in place.
Let's see that two more times. Lifting, letting the shoulders sink, and then just pulling them back into place. One more time down. And then with the arms just down the sides of the body, have a little press inwards with the upper arms lift tall through the top of the heads of the bands pulling down on the ounce. But your lifting through your spine and we're inhaling Xcel for a standing roll down. We allow the head to fold forward. Okay, we're rolling your body down as you do so the band will initially start pulling you forward and then the band will release tension and just let that happen. That's fine. Take your body down as low as you wish to go today. Breathe in when you get there. See that you're balanced evenly on your feet. And then exhale as you start to lift up through the abdominals.
As you get high enough, feel suretech engage the band or crew. The band will start to have tension and we just roll up using the [inaudible] began to increase the stretch and inhale and exhale. The head goes forward, melt the spine forward, feel that the hips, they just over the feet as the band releases the abdominals. Pull in and up even more. The spine just fluidly releases down over the legs.
Inhale and exhale to roll. Feeling the shoulders being pulled downwards down the back. As we return ourselves up towards straight, we're going to inhale again and exhale to go down so far. Okay. Goal today or our theme today is mobility and fluidity. Movement in the joints. Let's remember that the spine is a series of joints, letting the body letting the spinal Lincoln and then as we roll up, let's see if we can find a sense of creating space in between the joints of our spine, allowing the head to lift up last. This is going to be our last one for the day.
For now. Anyway. I can't promise anything for the day, but this is it for now. So do with it what you wish. Feel the shoulders broad and heavy. Feel the top of the heads, perhaps stretch a little further into the floor. Inhale and exhale as you come on.
Taking the feed into a small v shape of the Peloton stance. Arms up front. I like to hold with my thumbs, but if it fists felt better to you, you could always. The closer your hands are, the more attention you'll feel. And we inhale. Exhale, stretch the band feel as the arms. Reach out, the shoulders don't squeeze together. They stay broad and inhale and exhale. Press in here as we stretch the band, we're endeavoring to lengthen and lift this fine, perhaps taller and taller every time and press. So just warming up the muscles of the effort back and release and stretch and release and stretch and release. How about two more pressing the upper back while you're at it? Zip up the legs, squeeze from the heels all the way to the Tush, and then we're going to take the arms. Let's go where you go right now.
Make it easy and pull the band a little as you come down and let it go a little as you reach up and then give it a little pull up there and then start to bring it down. And as you go, see if you can perhaps bring the band a little further back each time, but not at the expense of having to jet the head forward or take the neck out of alignment. Also, be aware that as the arms go backwards, the middle of the body stays in control so the ribs don't lift. It was reaching back through the shoulders, increasing the flexibility of our shoulder joint. Let's do that one more time. Arms. Uh, from here, we're going to bend the elbows, no movement in the neck. We just stretch the band as we bring the band to the top of the head. Inhale up and exhale. We go forward. Inhale, the band comes up as we continue to stretch or open the shoulders.
Maybe we'll get behind our head, but again, it's only if we can stay in alignment of our spine. Arms forward and up again,
Align the side of the body to stretch and then contracting from that stretch to lift ourselves back to vertical. I'm going to do one more to the other side, reaching over and lifting. Letting the arms come down. This time we're going to add a little foot movement so you'll rise up onto the toes, reaching the band back and then bringing the band. Let's go all the way down to the legs this time and then rising up onto the toes. The band goes up, stay up on Utopia. See about bringing the band a little further back.
Maybe you'll do a full circle. Let the band come back. As it comes overhead, we start to lower the heels and the band comes back towards the legs. Let's do that two more times. Lifting onto the toes, sense of buoyancy through the body. Stretching, lubricating the shoulder joint, but also creating or thinking about maintaining stability in the joint as well. So if we're having to lift our shoulders to move the band, that's not necessarily an ideal situation. All reaching bath, the risks are strong and straight. Lifting up, growing a little taller, maybe rising a little higher. Homo and walls fell down and last time not burdening the band. Nice job, bringing it back behind you all the way up onto the tippy toes and in down the front. Okay, have a seat and then take the band. We'll use it for most of the day. If your um, hands get tired, just put it away.
Um, and again, um, how many encourage us to yes, use the band to create perhaps a different feeling in the exercise, but also because it's going to give us some help in certain things. We want to look for a little bit of depth. So what I want us to do is bend the arms out to the side as we grow tall through the spine. As we exhale, the knees are bent, legs are together. We're going to curve away until the arms are straight. The shoulders stay over the hip.
So there's that deep sea curvature in the spine. Inhale, bend the arms, grow through the spinal, lifting the chest. Exhale, curl at the pelvis, move underneath you as you deeply contract through the abs and stretch into the sea curve in how we live. I left creating a little rowing work and XLV curl and anyhow we lift and XLE Carla, it's more of just a the abdominals drawing back to curve the spine rather than really going back a lot here last time. And then we curl through the spine. As we continue moving here, we're going to keep holding onto the band. We're going to start to bring the lower back down into the ground. Now that band will help us a little bit, so I'm getting encourage you to go deeper in your abs. Inhale, pause, and exhale to curl.
We're going to do two more little quicker XL to curl back. Stretching away from the scene in. We pause. Oh, let's inhale and bend the arms. Exhale, start the journey forward with the body reaching the arms back straight. Sit and tall. Inhale, bend the arms. Start exhaling as you move your pelvis first, allowing the arms to straighten in heels upon the elbows. Stretch the arms, peel back up. All right, we're going to go into what we call them mini rollout.
So with the band in your hands, come down and tell your just just about the shoulders right at the shoulder. That tips of the shoulder blades. So this would be our chest lift position. Yes. From there, look for a neutral pelvis, tailbone down. And then we think about taking the chest forward, the very small movement coming just behind the pelvis and inhale to go down and exhale to go forward. Hollowing and scooping through the abdominal. If it's a little too hard to stay down that load, just go into find a range of motion that feels like challenged you.
Allow the band to support you enough so that you can focus all of your energy into the middle of your body. As you rolled down, feel yourself coming down right through the center of your spine and excelling to come up. So lots of us are one sided in one way or another. Some of us are overdeveloped more on one side of our back than the other, so that side of the back will want to come down first or heavier. So we've got to focus on the opposite side of the body working for control. Last one, coming all the way up. This time I'm going to sit tall, bend the arms to the sides. Allow the arms to straighten again. Start to let the pelvis move out from underneath you, peeling your way down towards the tips of your shoulder blades and then rotate towards me the top hand.
We'll come over that back knee bull shoulders plugged into the back and then we just curl forward and back and forward and back. And as we go up, you want to hollow and create a carving action through the waist and forward and back. Last to forward. Remembering that we're looking to maintain our best in neutral spine position. Neutral pelvis position. Excuse me, spine is nowhere near neutral at this point. Come back to center. We're going to go to the other side.
Both sides of the pelvis are level and we go down and we left to come down. Let the beam pull the shoulders down away from the ears so that the focus is all in the trunk. We're going to do four more here. Exhaling, inhale to come back. Exhaling, inhale to come back last too. Last one. Make your way back down. Rotate into the middle and roll your body yet. So I think that we'll just leave the band there, stretch the legs out and take a quick stretch forward over the legs.
Here comes a cheat you lifting, curling the spine, inhaling and exhaling as we take it down. Let's do one more lift and come on an inhale. This time as we go back, we're going to bend the knees, so we're going to slide the feedback coming down to the middle back. Breathe in and breathe out. Shoot the legs out. As we stretch over the hips. Inhale, I want you to feel that that pulling back of the legs comes from deep within the trunk. Inhale and exhale. Allow the feet to slide forward three more times. Exhale, we slide the feet in. Rounding the spine, breathing and stretching the legs out in forward.
Last to excelling to curl back. Feet are pretty light on the mat and stretching forward. Here comes our very last one. I'm going to add on x so we curl back, come to the low back, make sure it's steady and still reach the arms into the hundred position and just float the knees up into the chest. Inhale, allow the toes to reach and just tip the mat and exhale to pull back. If you wish to create additional challenges, take the arms up as the legs go down and then press the arms back and heel, arms up, toes tip, and exhale. We pull. As you're pushing down with your arms, create a sense of energy.
Like you've got weights in your hands or you're pushing something heavy away from you. No pressure of that. Imaginary force comes from Jeff's underneath the shoulder blades. We're going two more times and last one. So with the legs lifted into the air, we're going to take the body down, going into a rotational exercise. We're going to lift up, but come towards me. So you come up and you reach past that up. Opposite thigh. Inhale to go down.
So to lift and reach across to the oven and inhale to go down. As I lift, I let my inside hand press against that leg to try to help me get further and lift up. Pay attention to the knees. They're gonna speak to you about what the pelvis is doing. So if they're still, chances are your pelvis is still there. Moving around, chances are your pelvis is too
Time lifting and reaching. Come all the way back down, leaving the arms overhead. Place one foot down followed by the other. She's going to scoot a little forward and we inhale going into a pelvic curl, so the arms are floating overhead. As we exhale, we're just going to hollow out through the ABS. Press the lower spine into the ground and a lift the hips up. So keep your arms up there for now in Hilton hold. Exhale. Feel that as you reach your arms away from your spine or from your pelvis, that'll give you an additional stretch there.
Really work your way through the lower back. Inhale at the bottom and exhale. We curve again, so we flattened through the back. We peeled the hips, holding the arms up there and exhale and to come down as guiding the spine, thinking about one bone at a time, creating space last time. Exhale, and to lift this time. Inhale as you press your arms down, feel the pressure of the upper arms and exhale to curl the spine down again and they take it into a little bit more legwork. So we're going to roll ourselves. Let's pick up the leg closest to the window, hold it in a tabletop position, and then just come down through the spine, bone by bone.
Think about being as symmetrical as you are with both feet on the floor, tailbone touches, and then we hollow out the absolute like just comes with the pelvis. As you roll and we roll down, keep the arms long and straight. Exhale to roll app. Create a sense of stillness through the pelvis and XO Inter roll down and out. Let me go one more time. Rolling down, reaching the arms. Feel activity through the backs of the arms and the upper back.
Rolling back up on the Aksia. Pausing when you get there, allow that foot in the air to come to the ground. Take a minute to organize your pelvis. Pick up the opposite leg and we have four. Squeeze the legs towards one another as you peel down bone by bone. Reaching all the way down to a neutral pelvis and then curving the spine to lift, pressing into the back of that supporting leg and rolling back down.
Yeah, and again, rolling up, enrolling down
Look for a sense of peacefulness here. So reaching. If you have enough flexibility in your shoulders, try to bring your arms together. And so they touch behind you. It's an inhale as everything stretches in it. Exhale to pull everything back and everything stretches and we pull everything back. We're going to do three more and to keeping the strong flection in the spine. There's our last one. Pull both hands to the left knee.
Stretch the right leg forward. Use your arms with purpose to curl yourself up a bit higher and we change. Push down on the knee and down on the knee. And as you push down with your arms, feel the knee pulling forward so there's oppositional forces at work here.
Reach and reach one more to each side. Reach and reach. Turn towards the bent knee, hold onto the outside of it, push into it too hard to curve more and then we change. We press and press and press and press and press. Now take the outside. I'm in a reach one. I'm presses, one arm reaches two and two and three and three. Here's one more.
We're going to do one more set of four with the hands behind our head or any of the variations that you prefer. Two and two coming up to three, three, four, and four. Let's bend the knees into the chest. Allow the head and chest to come down. Lift the head and chest back up. Pause there. Can you mobilize the pelvis? Now bringing the thighs towards the body. All of this goes down.
Spine goes down. Exhale, chest lifts up in here. Exhale, pole. This comes up. Inhale, put the pelvis down and Xcel to lower the body and he'll prepare. Exhale to the left. We're going to do five in Hilton. Intensify that girl and Xcel feeling the pelvis. Inhale, the hips come down and we released last two looking for deep abdominal contraction, curling the pelvis, placing it down and releasing down. One more to go here. It lifts. Curl the pelvis, place the bovis down.
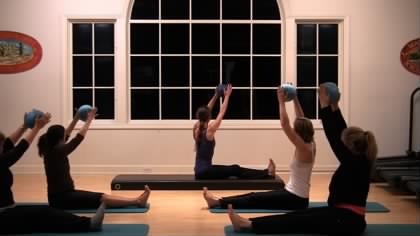
Lift the chest a little higher still and lower the body down. Oh my goodness. Girls, I don't know if I had affected you like it did me, but that was hard for me. Here we go. Lift the head and chest, rural yourself all the way up. It did. It did a good to hear. Okay. So we're going to do this spine stretch forward with the band. Um, again, we'll be rolling in and out of band tension. So don't worry about that too much.
The legs are s can be straight or it can be bent. Okay. So as we sit up, we've got a little bit of tension on the band and we inhale as we exhale, we're going to allow the head to go forward. Rolling yourself down. And as you do that, allow your Elvis to just soften. Don't Yank on them to the sides, but just allow them to bend to the, the chest reaches down towards the legs. From there, continue bending. Now here's where we want to create a little bit more work as we pull the shoulders back and lift the chest into extension. Dive back forward and keeping the elbows soft. And as we roll up the arms, we'll straighten. Loving that.
Inhale to sit tall, exhale to come forward. I don't know how any I was at the moment, just gently soften so you have a little bit of tension, but not a lot. And then we create tension as we lift the back towards the chest, towards the toes, just a little bit more. Um, come up a little higher. Dab. That's it. And then we stretch the body forward and then we allow the arms to straighten as we left. How about three more? Just like sal. Excellent to Caroll.
Gently bending the arm, maybe go a little further down and then feel the tailbone reaching back. The front of the hip bones reaching for the elbows, bending to the side, the chest lifting, the chin stays down. We dive back down and we articulate our spine. Here's the last one. We're rolling it down.
I'm going to take it just a couple of times through rowing and then into a rotation. A board don't yell and it's contagious. Okay, so straight arms. Here we go. You're going to rotate the shoulders so you'll feel your hands turn up. Sit up a little straighter. Helen, there you are. And bend the elbows to pull back. So here it is. We reach the arms forward, rotate the arms down, pull up in as you pull, grow the spy and reach and we get a nice strong upper back contraction. Maybe a little bit of a stretch to the chest. That would be a bonus.
Reaching. Sorry to have late call. We're turning, we're changing sides, rotating the palm up, reaching the opposite arm. It feels like a bow and Arrow to me. So one arm pulls and one arm reaches and we pull back and we turn, stretch the backup and focusing on those upper back extensors. So important for us to keep those strong and back. A couple more times we turn and we go back.
This is it. One more to each side.
I'm going to hold my hands pretty close to my feet and we're going to bend that knee and just situate yourself. So you're sitting just behind the pelvis there for a single leg teaser. And so we're going to stretch the Arma. Make sure you have enough room to roll back, tucking the pelvis under. Try to keep the legs still rolling yourself down.
Rolling yourself back up. And as you get up close to the leg, let's bend the arms and lift the leg to the body. And then we're reaching the arms back straight as the arms straight and the pelvis is already moving. We're already rolling down into the mat. Back of the head touches had comes up. Start curling. So get up as high as you can before you use your arms.
And then using the arms to increase the extension of the back and the flection of the hips. Start to move the pelvis out of the way. We're going to do two more. Nice stilling back of the head touches. We're rolling yourself back up. Yeah, lift, pulling the leg up into the body and then back and down. We're going to do a little interim exercise here.
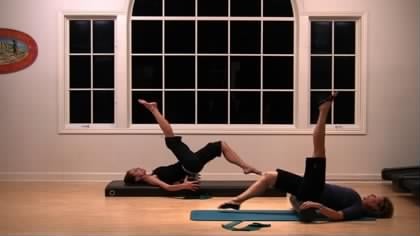
So when she get down onto your back, bring the leg up, uh, organize your hands as much as you need to to be able to bring your elbows down onto the mat. I'm going to do our leg circles here. So here we are back into that notion of fluidity. Allow the leg to cross the body, bring it around, and so we've all done this without the band. I don't eat more than we can count probably. Let's remember the concept of using the abdominals to stabilize the spine, but at the same time letting the band support you enough so that you can feel the rotation of the femur inside of the hip joint just spirals around with them.
It's going to be our last one. We're going to pause at the top. Go the opposite direction. It's just down across the body, up, down. Don't think arms as you go into that last movement. Think apps and ABS. Pull the leg beyond where the band pulls you. Bottom foot is pointed. Let's keep that top flexed.
Here's our last one. Want us to hold it at the top. Walk a little higher on the band. Take your leg to where you can feel a good stretch, so maybe vertical. It may be forward. A vertical may be further back. We're going to bend the knee, bend the elbows out wide, drawing the elbows down towards the ground and stretch the leg. Inhale as the knee bends, we're just going to do five. So make them worth it. X.
So we pull down on the band as we create that gorgeous stretch. Enjoy reaching that leg into the air. And last two times reaching the elbows. Why the SCAPULA stays still? He goes, I last one. Maybe just maybe you'll pull that leg back a little bit further and then allow the leg, you may have to adjust your hands to go back.
Set it in place for the single leg teaser, roll yourself. And perhaps as you lift your body and lift your leg, you'll feel a little more freedom in there. And then just stretch the arms and allow the leg to come down. This why is, I'll take a stretch forward while you fix that. [inaudible] changing into the other leg. So we'll do three full ones and then we'll take a break. All right, so let's bend the knee to bring it in. Sit just behind the hips.
Stretch the leg and here we go. That leg stays totally still. As you're rolling down feeling the pelvis move, look down at your hip bones. They should be straight across. We roll all the way down onto our backs and we lift all the way back up using the abs first before the arms start to assist us. And then at the top we get a lot. Let the arms work, let the leg pull back, allow the arms to straighten as you start to mobilize through the lower back.
Anchor with that bottom leg. Keep that leg strong, the leg both legs strong, bottom leg pressing down the top leg, pulled into the hip joint.
All the way down. Here's our little interim bottom leg strong. When she gets down onto your back. Oh, how the leg to come up to where it feels comfortable to you. Adjust yourself so that you can place your elbows down in Dorsey flex, the top leg. If the leg is going to swing to the inside of the body, it's going to reach down in around. It's going to swing again. Feel again, that mobility that having the band allows you to have, but utilize that extra mobility to see if you can go deeper into the exercise mentally.
We'll get the stretch done and we bring the leg back. Feel that the pelvis is level and down and stable. Bend the knee. Bring the elbows out wide as you stretch the leg up into the band. Inhale to bent. Work at a range of motion that feels challenging but comfortable to use.
You don't want to overdo it in Hilton band. Phyllis, sense of the long muscles there last two times
If you have any doubt, if that's you're actually neutral, feel the front and the back of the hip bones. That should be straight across. Um, my feet are kind of, um, they're not forward of my mat. They're just lined up with my tailbone. So they're at about a 90 degree angle in the knee joint, but not the hip joint. Okay, so you can either prep yourself up, are they all the way down here, comes to the clam, reach into the band and then close and reach into the band and then close. You need to hold your pelvis.
I like to hold my pelvis just to be really aware that it's not moving at all and reach my band. Stretching. Let me go further each time and reach
It's a cooling out to go up and down and then linkedin out to go and bring it down. And Marie
Here's a modification. You could use your arm, you lift your legs and you just pull the ribs a little closer to the pelvis. It's not high. I'm still kind of on the bottom side of my body, so either with the hand it's small, but we're creating a shortening in the waist instead of keeping it long. I'm gonna do that three more times. Reach, pulling the belly button back into the spine and reaching. And here's our last one, or reaching, and Dan. All right, here's the tricky bit. Bend your knees, put your hand down, swing your legs around to the front, slide over to the other side and lie down. Not so tricky. After all, I thought it would be trickier than it was. Sorry.
Sorry if I let you down. All right, we've got our ribs in, we've got our abs in, I've got the band around our knees and here comes our clam. It's just out and down. So work that down. As much as the app feel that you're resisting the band, the knee comes down so you feel the inner thighs engage and and up and [inaudible]. Great place to focus on the breath. Focus on the skill of keeping the abdominals in on both the inhale and the exhale.
Last three and down and two and a and a one. And here we go. The knee goes up, keep the thighbone lifted. Just turn it in the joint and toes down and knee down and toes down. And as the foot lifts up, you're trying to take it beyond the knee and toes and knee. And so I was feeling that drawn.
But pretty simple work in the hip joint. Here we are. Back to the idea of Lupus we're creating within the joints. I'm going to do three more. Turn and tip and turn and tip. Last time, maybe that wasn't within three, but let's bring the legs down and together. Slide the legs out.
Strong inner thighs had down on the arm. Choose what you wish to do with your arm or your opposite arm and then just allow those legs to float out in space. And then they come down and away working through the entire front side of the trunk
Remember you can always keep your hand down. So you would lift your legs and press into the arm to lift the trunk or you would just slide that top arm down the side of the leg as the body lifts in the leg lift.
So pressing into the shins. Find yourself so that your hands just tuck my shirt in. Sophia. I can prove that I'm not actually letting my stomach hang out. Um, shoulder blades down, abdominals in, we're gonna do here is just raise the a slide the right leg out along the ground. So just reaches down to the, touch the floor behind you. Take a look down the front of your body, seated the pelvis is straight across, and then bring the head back up. And all we're gonna do here is lift the leg up, down. So working the stability of the trunk, working the shoulders, working the hip. You're going into hip extension. You what? Glute? Lot of glute up there.
A lot of hamstring.
Both hands on the ground would be a great modification and then the leg just moves in the spine rounds as the knee comes forward and back last to hand or no, either one is appropriate and last one.
Here we go again. Setting the shoulders nice and strong on the back. Slide the opposite leg out. Look down, check the pelvis, abdominals in, and then the leg raises up behind you and just reaches down to tip the Mat and lifts. So maybe the most challenging thing here is the stabilization of the shoulders. Continue to check in with them from time to time, making sure that the back is an arching as the leg lifts into the air, holding up on the ABS as we pick up that like we've got a four more
I stretch the arm forward the right arm, keeping weight on the left arm. And here we go. For our knee stretch, we curve the spine. Reach the right hand underneath the knee on top of the knee or hold onto the, or just keep the right hand on the ground, curling the spine. That's it. No matter what you're doing with your arm as you curve your spine, your shoulder blades pull down your back and wary and pulled on your back. And last three, pulling back. He was two more.
Here's our last one. Keeping that left arm, shoulder strong, reaching out, letting the arm lifting with it. Take the upper back just a little bit into extension, and then we take the hand to the ground. Let the leg slide to the ground and folded in to sit down on your feet for a moment. Stretch the arms out in front of you. Maybe set a little bit of RSQ the arms and then coming all the way back up and to come into a friend support position here. Forgot the hands once again, just underneath the shoulders and a slide. One leg back. Tuck the toes under. Feel strong in that leg, so push it towards the ceiling.
Slide the other leg back and only want us to do here is hold. Feeling the prone abdominals working. So we're pulling up away from the ground with our, our stomach reaching out through the top of the head, reaching up through the legs, just breathing, just breathing, staying strong. Hold for 10 more breasts. Feel how much the abdominals work to support you here.
Nine breathing in and out through the ribs. Hey
Can you take your band? That was hard. Did I promise that it was going to be easy? She stopped yawning. She had to focus our energy on as something else besides how bored she was. Okay. Take the band and just wrap it around your hands. The further in you go, the more resistance that you'll have.
I'm going to give myself quite a lot of space today. Just let the elbows come down to the ground. Okay, so turning the head to face, me pulling the abdominals in. You're less just hovering the legs up. I'm going to kick in towards the hips. Three, two, one. And then as we lifted tobacco extension, we're going to stretch the band and then turn the other way. Let the elbows come down a wide one, two, three and stretch the band. And again, turn to three lengths and stretching the band eyes on the ground and head turns each time to three danced.
Yeah, the last one. Techniques that. One, two, three, Hailey's Rach out. All right, last one, two, three are stretcher. Hold it there. I'll allow the legs to come to the ground. Shoulder blades dropping down. We're just going to lift the arms and arms and arm and two and one. Gently lower your body down to the ground. On one hand, put the band away, bend the arms so that the hands are dirty, just under the the shoulder. A slightly wide of the shoulders, forehead down on the ground for another little upper back extension.
So we press gently into the forearms, guide the shoulders down and away from the ears and then just lift, trying to stay down on the ribs, but just setting the breastbone forward. Nice and small, but should be intense. And then we lower the body down. Let's inhale as we left up, pressing into the arms, allowing the spine to extend, feeling the strength of the upper back as you do that and release you guys look great. Upper arms, shoulders guide down, abdominals are in. Don't think about heights. Think about length. How much space can you maintain in between the joints of your spine and then we release. Let's do three more long legs, long spine, reaching out in space and release last two times guiding the elbow points downward, sending the breastbone forward. Allow the eyes to come slightly forward just to the edge of the mat and we release. Here comes our last one.
Forms pressing in shoulder blade is going down, lifting and release. Okay, girls, let your back relax for a moment. When you're ready, help yourself up and sit back on your feet in rest position. I was wondering if you think that we share the room, have them on camera so that people don't leave where just to prove that she exists. Okay, you guys, we're going to end with just a little bit of footwork. So I'm going to hand each and everyone of us a ball. Here you go, Helen.
[inaudible] I've got these on tiny little tennis balls. They're actually, they're made for small dogs. We're going to stand up to use them to stand up to you. Then I just want to finish with this. Um, so you might want to be on the ground. Oh, probably be a better surface to work with.
So just put the ball down on the ground. Uh, if you don't have a small dog ball like we do, you could use a racket ball or a tennis ball. These are nice cause they're a little, and they can get in the crevices of the feet. So I just want you to put your big toe on it, the ball of the big chart. So if you push your toe down, you'll feel, you'll see how that joint turns a little white and you're just gonna roll it along the, the pads of your feet and roll it back a little long. The pads of the fee pushing down on the ball as you go towards your pinky toe and letting up on it a little bit as you come towards your big toe and pushing down as you traveled to your pinky toe and just easing up a little as you come to your big toe. We're going one more time.
Okay. And then we're gonna s if you need to step in a little, just feel free to move your feet around as much as you need to. Roll the ball towards the center of the foot right underneath the arch and then they are down on it. This is where all your connective tissue in your feet meets and let and just ease off and bear down. I just put in your weight. I'm just leaning into it and he's off. One more time. Bearing down if feels sensitive. That's exactly the spot that you're wanting to feel is often.
Now we're going to go from the big toe down, the arch of the foot towards the heel and just rolling back and forth along that in step, there's three times
So let's take that ball and move it right to the center of the feet and then we're just going to lean into it. Bear down on it. Oh yeah. The one is that the foot of your injured hip are so sore and release and press. Just a little press are just been bare down
And then just step off the ball feeling how alive the feet feel. We're just going to bend the knees and as you bend the knees, let the arms come on and then press the arms down, gathering energy through the whole body. From the heels to the tip of the head. Bend in sync and then pressed at this time as you bend your knees, take your arms to the sides and left and eScience and left. And then raise the arms over head. Let the back extend just a little bit and open up the shoulders as the arm circle down, breathing in as you lift the arms, allowing the answer float up in space, circle them down and back.
Pressing the shoulder blades down. Here is our very last one for the day. Gathering energy, allowing the arms to reach down. And with that, thank you for coming.
Slow Burn: Restorative Workouts
Mention
 |
Meredith Rogers (Teacher) |
 |
Gary M |
 |
Cynthia G |
|
|
Anna S |
 |
Zombina |
 |
Candace A |
 |
Geovanna L |
|
|
Mary F |
|
|
Francesca N |
|
|
Anita C |
|
|
Lola A |
 |
Pele |
|
|
Colleen Goidel |
|
|
Dawnna W |
 |
Amy C |
|
|
Virginia A |
|
|
Renee K |
|
|
Elaine F |
 |
Jennifer S |
Comments


You need to be a subscriber to post a comment.
Please Log In or Create an Account to start your free trial.
