Description
About This Video
Transcript
Read Full Transcript
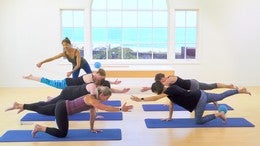
Hi, I'm Kathy Murakami. And welcome to progression a fundamentals class number three. If you missed a the class number one and two, you may want to go back and check them out because we are laying the groundwork for your guaranteed success in the Palladio's methodology. So today's lesson is starting with Becca. So Becca is going to place her hands here on the window.
And so you all have probably a wall in your house. Yes. And so, um, I'd like you to place them. Can you come a more this way for me? Okay. I need the hand straight in front of the shoulders so your hands are going to be placed on your wall. So your index fingers pointing straight up, straight up. Open the webbing. Okay. And have your hands as best you can straight in front of your shoulders to start. Okay, so the arms are straight.
Now we've already gone over plum lines, we've gone over the Bisquick formula and connecting the dots. And again, I'd encourage you to go back to lesson one or two to get what I'm talking about. So Becca is lined up here with her plum line on a diagonal. She's now weightbearing on her hands. Again, very important. You can kind of look at your hands and think that your hands are your shoulder blades. So the shoulder blades ACU I like to use a lot is your shoulder blades are parked on your back and it should feel like, you know, many of us could stack up in this position and we would not fall off if she were to round. No.
And the Scapula were to go out to the side and I was going to try to do that. Be on her back. I would probably fall off. No, don't move your arms. If she were to conversely collapse inwards will collapse. You know people collapse. Collapse your shoulder blades in in. She doesn't know how to collapse this way. Straight arms.
So she super adducting. Yeah, she can't do that. Oh she, she's just cannot collapse. If that were to happen, then again, I would not be able to be on her back. So the placement of the shoulder blade on the back is super important. Then I'm going to just ask her to move a little bit further back. So the heels are lifted so that if we were to weight bear on one leg, only remembering the inner thigh line, the ball of the big toe into the floor, the pelvic floor, the deep abdominals, the shoulder blade connection, et Cetera, et cetera. She could sustain this and I want her to go inside her body and feel the inner matrix. Then she could switch sides changing because this is the position you would be in for a little more advanced exercise, uh, in the politesse repertoire called the front support.
Thank you. Then we will have her turn sideways. So we're gonna keep the left hand on the wall and she still is going to be a little bit of a lean. So let's step out just a little bit. The shoulder blade still anchored the hand, not too much higher than the shoulder. And then remember as we learned last lesson in era, there's some intention here of sliding the arm down and then she could levitate one leg out to the side. So that left right leg will be here. Something like this.
If she wants to feel more of a contrast in reach, she could open up that second arm. Something like the Pilati Star. Yeah. Very good. Okay, thank you. So I'm sure all of you have a wall at home as I mentioned. And the way to build a strength in this is to go from a wall, then maybe to your kitchen counter weight bearing in the kitchen counter.
Then a little bit lower to the dining room table, a little bit lower dining room chair, little bit lower Ottoman. And then the next place would be the floor, which is where we're going to go next. Now we're going to take this information that I just shared with you about the placement of the shoulder blades and we are progressing rapidly, so rapidly. We're going to go right down to the floor immediately. So ladies, please, uh, face your heads towards the center line, put your legs and your feet together and then place your hands with consciousness on your mat like Becca had on the wall. So the index finger pointing straight ahead. Open Up, the fingers flatten and almost feel.
What I also kind of like to feel is that there's a slight, without lifting the fingers up, a little slight Pauling or clawing action of the fingerprints, finger pads into the floor. Okay. Organize your shoulder blades, head, neck and shoulders. Yes. And then we will breathe in. And then as you breathe out, you're going to stretch one leg back and curl those toes under. So you are getting ready. Energize that back leg. Connect your dots, take another breath. And then as you breathe out quickly slide the other leg back and press the legs to gather. Very good.
And now we start to breathe in and breathe out. Inner thighs, very strong. Inhale. Exhale. Number two, really feel the a anchoring of the shoulder blades. Inhale, exhale. Number three, face away from the floor. Inhale. Exhale. An option is to float one leg up. Option option. Okay, don't have to inhale, exhale, put that leg down. Inhale, exhale. Bring the other leg up as an option, not too high.
It stretches long behind you and bring it down. Inhale, listen carefully. Exhale slowly. Bend your knees. So they touch the floor and you are still in a plank. So the weight of the hips are forward. That's it.
Hold there. Still press the inner thighs together and then exhale and then return open the knees up. You're in a child's pose if your knees and your [inaudible] back are okay with that position. Very good, very good. So in general, weight bearing exercises are challenging for the female population, right? So that progression, like I said, from the wall to the kitchen counter or bathroom counter table chair automation floor over time, over time it'll work. When I started I was super wimpy. I couldn't do anything. All right, so we're going to move along to sides.
Stretch side stretch. So I'd like you to all lie on your sides with your heads to the right [inaudible] and what you can do if you lie. Okay. There's a couple options here with your props. You can have the rolled up towel under your waist because what we're doing in this position is trying to maintain that plum line. Yes. And so the one tell your tell can go here or if you don't really need the towel to remind you about not collapsing sideways, you can use this towel and place it between your ear and your arm.
Either way. Yeah, arm, I'm not super picky about, you could fold it up like this. If you have the right sized ball, you also can put your head on the Pol as well. All right, there you go. Alright there looks great. Uh, from here what I'd like you to do is bend your bottom knee back, back so the thighs are parallel and you can flex that foot. So you have a lot of surface of that bottom leg on the flex, the top foot that is your left foot. And then gently reach it away from you, reach it away from you.
So what you can do is you can put your own hand on your hip bone and glide it away, glided away. And what you'll feel is a little bit of a lift off of that towel or lift off of the space of the waste away from the floor. So right now the leg is still on the floor. That is your left leg still on the floor. Okay, very good. And let me get you repositioned. Let me take your hand per s.
Good. It's like that in great, very nice. Okey-Dokey. Now really feel the front body in the back body pressing together. Remember all the dots, the inner thighs, the pelvic floor, your deep abdominals, the shoulder blades, and now place your left arm on the side of your leg. We did this earlier, I believe in lesson one with the ball under the hands. So you really have a sense of the shoulder blades sliding down the back, sliding down the back. Okay, think of this as a side stretch or a side reach.
Take a breath in. As you exhale, reach the leg away into a distance. Slide the arm gently down the leg, and then hover your right ear above your arm or your towel in the opposite direction. So the sensation is again, kind of like my slinky image that you feel the spine lengthening out in a contrast ing direction through the leg. Hold that position. Keep the foot flexed. Inhale there. Exhale, return to your starting position and repeat. Breathe in. As you breathe out, slide your arm down, soften the ribs in in the front.
Hover the ear. There's no crank in the left side of your neck. Hold there, breathe in. Bring your leg up a little higher. There you go. Exhale and return back down. And let's do one more breathing in. Exhale, lengthening the waist, lengthening that. Oh, look at that. Very nice. Hold that there.
Keep your position and then lightly puts your left fingers down in front of you. Like a little kickstand in front of the chest. Okay, keeping the pelvis stable. Inhale, bring your leg forward just a little bit. Exhale, bring it back to the starting position a couple more times. Inhale, rolling the whole wheel of the hip and again, rolling back here and rolling forward. Pause. Taking it back just a little bit though. Heat wheel of the hip rolls forward. Don't lift. Exhale, bring it back to the starting position. This is a preparation for Palati sidekick. Exhale, upper body, no tension. Inhale, okay, and exhale. Very nice.
Reach the leg away again. Out of the waist and return it back down. Take a break and then we'll turn into the other side. Very good. How'd that feel? If you have a longer waist heads to the left, really feel that straight line again of your, especially the lateral alignment, your lateral alignment. It's really um, very important. Your set up, you probably want to be a little bit more in the middle of your mat. Yeah. Okay.
So feel the length. I break the stick out and they all start shaking the length here, the length here, and then bend that bottom knee so your thighs are still parallel. If you need a reminder, you can put your right hand into the hip bone and just give it a gentle pull. Watch that the ribs don't pop forward. You want to keep your leg on the floor yet ladies, just slide it away. Yup. And watch that. You don't build any tension in your upper body. There you go.
Then right hand alongside of the thigh. Very nice. Roll the collarbones open. Beautiful. Inhale here. As you exhale, slide the arm, reach the leg into a distance and the crown of the head in the opposite direction. Pause here. Inhale, exhale and return. Every time you come back down the legs a little bit longer. Breathe in and exhale, lengthen, reach away. Great. Hold there.
Inhale. This is a nice one. Pull back here. Exhale. So then I just kind of use my body weight and my hands are free. Once more. Inhale, exhale, stretch that leg long. That's it.
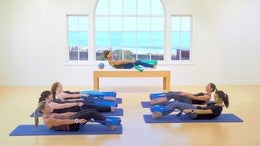
And then gracefully put your right hand in front of you for a light kickstand and take the leg forward a little bit without that pelvis moving. Exhale, return where you were forward on the inhale. Exhale and return again thinking there's a little wheel in the hip joint and return. Then taking it back, roll back just a hair and forward to the neutral position and take the leg back a bit and center and once more and center reemphasize the length, the out of the center of the torso, legs stays long, and then return it to the floor. Beautiful. Very nice. Roll on your backs and give your back a little break. Okay. Do we have the weighted balls nearby?
Yes we do. Okay. So ladies on this side, you're a actually gonna need to turn around. Can, May I borrow yours? And uh, let's have everybody sit up to start. So in our previous progressions we were doing the rollback. We used the ball to help us. You remember for support? Yes. They remember. And then we use the rubber band for support and then we use the rubber band for support. Yes. So we went back in time. Okay.
We're going to go a little further back. Not Quite to rebirthing, but we'll see. Okay. So we did an abdominal curl earlier where we felt the weight of the arm as a challenge to our position. Yes. Okay. So now we're going to use these weights and the weight of the arms to help us in a roll up or roll back. So we'll start here and then as we exhale we'll below back.
So we kind of go through this abdominal curl position where we had the ourselves on the a squishy ball. We, then we went back a little further to the 1970s right. So the weight here forward is going to help you then your unfamiliar body all the way. You're not going to collapse here. You're going to stay a little bit out of tension. The inhalation is to here.
At the lower tip of your shoulder blades because you need the exhalation right there. Right when you take your body weight away from the floor and come back up. Right. So it's that moment of truth. Yes. If you do this
Come here. Yup. Very good. And have the legs a little bit apart. A little bit apart. A little bit apart. Makes it a bit easier than the legs together. Initially flex your feet up, arms are forward, palms are up taken. Inhale, exhale and soften the chest. Searle Vac. Think of drawing the abdominals away from your toes. Rolling down, rolling down, rolling down. Touch your head. Inhale, roll your head, neck, shoulders forward. Exhale and return with a happy face.
Inhale and curve it down. Take your time. Two, three, four, your good. Five and inhale, head, neck, shoulders forward. Breathe. Reach your arms forward. Okay. Try not to push right at that point. Okay, good. Come all the way up. Right.
And everybody continue curve back. So with Cameron, she has a little trouble with the role of so she can feel right around here. It gets tricky, right? So she should stop around here. Then she's gonna breathe and be relaxed and a return. Yes. Okay. Versus trying to continue because it all way up in between, uh, trying to go the full distance. Make sure you come to upright versus leaning. Yeah. Yeah. Okay. Had not quite, so there [inaudible] I'd rather have her work in a range where she's not going.
How long is Kathy gonna keep talking and sit up, take your feet more forward. And two more. How the rest of you doing? Like, how long am I going to hang out with her? Good. Last one. Make this your best one. Mental power. Everybody breathe out beautiful and all the way back up. Great. Rest. Can you feel how they help you? The balls are helping you leg. Levitations are next.
These are fun. These are super fun. You Ready? Okay. You're going to take the squishy ball. We are going to lie down. The hardest part of lying on your back, keeping your eyes open. So keep your eyes open. Lift your hips and we're going to place the ball on the Seagram sacrum.
So the sacred is between your lower back, your last verb of your lumbar spine and your tailbone. Okay. Your tailbone. So if you would first touch those muscles right along the sides of your lumbar spine and they should be relaxed. They should not feel bunched up or tense under your fingers. If they are, that probably means the ball is too high up towards your head and your over arching or extending your lower back.
We want the ball to press the pelvis up so that lumbar spine kinda hangs into the space. Okay. Hangs into the space. All right, so we're still remembering all of our dots, our inner thighs, the pelvic floor, the deep abdominals are shoulder blades are anchored as well. The breath is moving in and out of the body, in, sideways into the back. The exhalation always recommit sis to that internal matrix. And then from this position with consciousness, we breathe in and as we exhale, slowly bring one leg to tabletops. So tabletop is 90 degree. Nene 90 degree at the hip, okay? Not too bad. We will take the second leg up.
So as you exhale, very slowly do this because there can be a tendency to, when you take the second leg off to suddenly grip into the lower back, okay? So we want to keep that work on the interior. Now if you find in this position, you overfill your hip flexor and low upper quadricep area firing, you can bring your feet down a little bit lower. If that doesn't take it away, you can bring the knees a little bit closer, but not to the point of this where you're collapsing inward. Okay? So keep those legs as best you can. Close to 90 degrees, hip and knee. Arms will stay down on the floor for right now. All right everybody.
We're going to inhale and stretch the right leg towards the ceiling. May or may not straighten because of your hamstrings, but please energize the leg. Then as you exhale, you slowly lower it a little bit away from you. Breathing out, feeling the weight of the leg. Start to challenge the abdominal area. Please pay attention that you don't bring the opposite knee in. Hold that position. You inhale and reach through that straight leg and then as you exhale, you bend the knee and return monitoring the tension in the rest of your body.
Inhale the left leg up, up, up. Exhale, lower, lower, lower. Inhale. Stretch your energy out of that straight leg. Exhale, return. Great. Keep moving. Inhale, right leg. Two, three. Exhale, lowering. Yes, wobbling part of it. Inhale, stay. Exhale, return.
Beautiful. Left leg up. Breathing out. Hold it there and return. How's it feeling right leg up. Does it feel longer now? Longer leg. Exhale, Teresa it away.
Hold it there. Coming back last one left leg up. Nice. And exhale again. Monitoring the bent knee doesn't come in. Hold it there and return.
Let your knees come to your chest for a moment. Take a little mini break. Okay. And then we're going to up the challenge a little bit. Yes. So there's some options here. Some options. The options are going to be, and you don't have to do this if you're not ready.
Remember if you start shaking too much or not breathing, uh, then it's, you're not quite ready for this yet, but you can bend the elbow. So you're in what some people call dead bug arms or robot arms where just the upper arm stays on the floor. Okay? So that takes away half of your arm, but you don't want it touching. Your body is just straight up or you can take both arms straight up to the ceiling if you'd like as an option. Two. Hm. So make a choice and remember, you can always put the yes.
Exhale to lower. Inhale, sustain. Exhale, bring it back. Inhale the right leg. Exhale lower. Hold it. Breathe. Return. Inhale, lift. Exhale, lower.
Sustain and bring it back. Okay, everybody just put the elbows down and the hands down. This is your grand finale for this. Kay. Feet and knees together, feet, knees together. So remember we decided that the arms and legs could be kind of heavy. Yeah, so we're going to double our bet here. Now inhale both legs up.
We turn out into that little piles. V that's heals together. Seal the back of the thighs. Exhale, lower the legs, two inches deep. Tense your face and chest. Inhale again. Exhale. No, a lower, another couple inches. Inhale again. Exhale, lower wherever you want to go to. But don't go into the twilight zone. Hold it there.
Bend your knees and return parallel. Ooh, that was one. Only one more. Only one more. You can do it and if you're really cocky, you could take your arms up again, but you don't have to. Inhale the legs up. Stretch energy through. Rotate, open. Exhale. Lower a smidgen. Your choice. How much? Inhale a little bit more. Good.
Inhale, chef's choice. Good. Stay. Inhale. Exhale. Bend your knees in return. Very nice. Rest your arms. Okay. Put Your v down. One at a time. Okay. The good part without lifting your bum. Roll it off. Roll it off of the ball. Okay.
And then stretch your legs all the way out in your back. Should feel pretty good. Ah, yes. Okay. Stretch. Take a deep breath. Reach out beyond your body. Exhale it out. Oh, okay. Take it again. One more. Take a deep breath. Whoa. As though your organs are breathing. Okay.
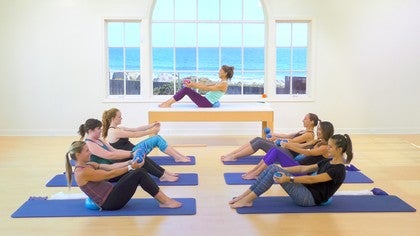
And then release. Okay, very good. Roll to your side. How are your abdominals doing? Are they having fun? Yeah. Good. Right. Okay. So we've been working on the uh, progression to the hundred. So today you will have the option of letting go of your baby blanket, k your towel. So it will look something like this. Now remember, if you're not ready to do it, that's okay. You just keep using the towel until you feel that you can let go and not have an excessive amount of neck strain. And let me remind you, let me say this, two on this. If with the towel you get to 10 breaths. Yes.
And it's like piece of cake. Okay, I can let go now. But then when you let go, the 10 breaths isn't possible. Then you're going to back up again and start kind of back all over again. So just remember that because you don't have the towel helping you so quickly, I will show you you, um, no prop here in the, in between the inner leg. Organize your inner matrix. That's the inner thigh, pelvic floor, abdominal shoulder blade connection. Focus on the breath. Inhale side and back. Exhale, pull the towel up, up, up, up, up, up, up, up, up, up, up. Stay here.
Inhale. Second breath had gets heavy. Third Breath and the exhale, let go. Reach forward. And the reaching forward isn't wimpy. You really mean it. You really feel those shoulder blades sliding down.
So like we did in lesson one with the arm against the leg member with the ball. That's what you feel. Yes. Okey-Dokey. And then as a bonus, maybe we'll try that leg thing we did in the last class. Huh? Okay. Ready? Organize your brain. Elbows off the floor a little bit more and call just a hair more here.
That's it. Great. Inhale. Prepare your mind side back. Ribs open up. Exhale. Pull the towel. Look forward between the inner thighs immediately. Inhale here. Exhale. Head is heavy, but don't fall back. Beautiful. Inhale here. Exhale option, let go.
Reach the arms forward parallel to the floor. Great. Inhale, two, three, four, five. Exhale, two, three, four, five. Inhale, two, three, four, five. Exhale, two, three, four, five. Inhale, two, three, four, five. Think about both legs coming off the floor, but they don't. Inhale. Two, three, four, five. Exhale, two, three, four, five. Who's counting for me? Somebody. Is that six or seven? Nine. I know it's not nine yet. One is that a little, ah, Dah, Dah, Dah, Dah. One more. One more legs are still light.
Legs are still light and then roll back down. Ah, great. Rest your arms and roll your head side to side. Yes. Good. Not Good. Okay. Okay, so remember, let's try this one more time that, um, let's see you almost all let go of the towel. So that was great. Let's um, come forward. One breath. We're gonna let go. Second breath.
We're going to think about both legs getting really super light or low third breath. Okay. Then we're going to inhale and exhale. We're going to bring one leg up. Fourth breath, fifth breath pressed together. Elevators, doors shut. Six breath. Exhale lower. Let the legs come in. Okay. Okay.
Isn't nice to know what you're in for. All right, everybody. Elbows or off the floor. Legs together. Okay, so let's have the elevator doors shut already and you have that inner thigh support and we breathe in. We pull forward on the exhale. Curl, curl, curl, curl, tailbone, heavy thighs, strongly together, little breath. Exhale, release, arms forward, scapula sliding down the back. Inhale, exhale. Legs, super light off of the floor, but not lifting. That's it. Breathe in. Exhale. Right leg. Levitates pause. Don't fall back. Beautiful. Inhale. Second one.
Press those thighs to gather. Inhale. Exhale, stay. [inaudible] last breath. Exhale. Roll Down with control. Yes. Decelerate. Nice legs into your chest if you want. Whatever you need. Oh, that was good. Yes. Yes. Okay, great.
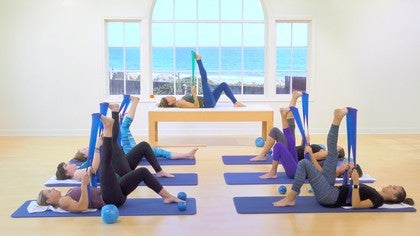
So next class will be the progression from that. Whoa. All right. Very nice. Ladies, if you would please sit up for just a moment. Just a moment. All right, so we're going to do a little preparation for single leg circles or leg circles and we're going to use the support of the rubber band. Yeah. And the finished form of this exercise, if you haven't seen before, is to, let's see, I'll make this stabilize. The pelvis and spine have the one of the legs fully extended and we're making what's called circumduction or small circle of the thighbone in the socket without losing control.
This is kind of challenging because the very muscle that helps to move the leg tends to overgrip when it overgrips it grips into the pelvis cause they, so everything wants to go. So we want to kind of think about the thighbone like a soup spoon. And your hip socket like a soup, like a soup pot. You know when you stir your soup, you're not banging on the side of the pot. It should be there in the center.
And to help us feel more the back of the leg, which tends to go to sleep and leg circles, we tend to use the glue quad a lot. We're gonna use the rubber band. Okay, so I'm going to have you all eye down and remember, attention, intention, no tension. So your attention is going to be on breathing and moving as well as keeping the pelvis still as possible without feeling tension rigid in the rest of the body. We will place the foot, the forefoot, including the toes into the bands. We'll cover the toes, stretch your leg up, and then have some tension between, now you can have tension between your hand and the foot, something like this. Okay. And then just to start, let's bend the supporting leg so that foot is flat. All righty, so leg is straight.
So let's point the foot that's in the band at cit. And then what I'd like you to do in this knee, what I'd like you to do is when you point that foot, the toes are covered so that your forefoot has to work into the band from your hamstring, the hamstring origin, where it starts, which is your sit phone. Okay, right here. So your mind is on the hamstring in this area. Then with an exhalation, press your leg down into the band from the hamstring. Just enough to feel it working. Press down towards the center of the room.
Yes. Pause. Do we feel the hamstring working ladies? Okay, here's your challenge. Still feel it on the return. Let the hamstring control the return. So here it has to somewhat feel like it is shortening. Try not to overuse your foot and then control the return. You feel like it's somewhat lengthening. Okay, so go ahead with your breath.
Press down into the band so you have a little bit of resistance and then control that return. Keep that sit bone reaching down.
Are we there? Yes. Can we feel this? So we've are have awareness of the back of the leg. Yes. Amanda, you can keep your elbows anchored on the floor. Yeah. So Elvis, sorry, I did mention that. Elbows anchored on the Florida. Try to keep that tension out of the upper body. Then we're going to make that little tiny circle. All right. Little tiny circle. But we're going to actually go to the outside first.
So a little bit to the outside of your shoulder. Exhale, press down away from you using your hamstring and bring the leg back up. Don't over crushing midline there. So you're going to go outside a little bit. Press down and then just come straight up. So technically it kind of looks more like the Capitol Letter D. Okay, so you're taking it to the outside, round down and then straight up the middle.
You can already start to fire way up here, right by your sit bone on that leg that's supported by the band and from that area, press down into the band.
It does not need to overgrip in the front. It's fully supported by your band. We're trying to kind of redistribute the workload in that leg. And it's challenging because quadriceps on the front, there's four hamstrings on the back. There's three. There's always one more player on the quadricep team, you know, so it's, it's tough.
One Open. Inhale. Exhale, press down and around to inhale, open. Exhale, press down. And around. Three, inhale, press open. Exhale down and around four. Let's just do one more and our, wow. Okay, very good. And then bend that knee. Okey-Dokey. So let's go back to the first side.
How'd we do? Can we get that lesson? Do we feel a little more back of the leg? Active as the hair? I know. Back of the leg. Sometimes you know it's on that extended coffee break. So the supporting leg now is your left leg. Let's stretch that all the way out and flex that foot.
And what you can do with that straight left leg is find that hamstring already. Find that hamstring already. Not so much by squeezing into the thigh, but actually what I do is I little bit think of pressing my leg down into the floor. Just a, just a hair, just enough to feel something happening there. Okay. All right, here we go. We're going to go to the outside. Inhale, exhale, press down and come up. One inhale, exhale down, and come up to inhale to the side and around. That's number three. We're going to reverse it. We didn't practice this on the prep, so you cross over just above the pubic bone and then press down around to the outside and come back up across the pubic bone. Inhale, press down and around and up to one more.
Keeping your mind in the back of the hamstring or that moving leg. Three, here's your challenge. Take your foot out of the band. Um, put your arms either down at your sides for more. Challenge out to the side for a little less challenging, greater stability of the upper body. Move to the outside. Inhale, exhale around and come up like you're still pressing against that band. Two and breath working numbers. Three, reverse cross over the pubic bone on one and exhale two and inhale and exhale. Thery good. Then the knee. Stretch it out. Grab your band again. So we prepare with a straight leg.
Put it around the toes of the left foot. Extend up, anchor your elbows. Flex the heel of the right foot. The right leg is straight and press just slightly down to stay connected to that hamstring. Okay. Find that hamstring of your left leg and we take it to the outside and one inhale for a quarter. Exhale for three quarters to exhale three and then just reverse it. One, two and number three you tuffle.
We're going to let the band go. Arms at your sides or out to the side. Letter T. Okay. Next to you is a little harder out to the size. A little bit easier. We go to the outside. Inhale. Exhale. One.
Remember to keep pressure down into the floor with the other leg too and out and around. Three cross the pubic bone and exhale on just like that band is still there to inhale and exhale. Three. Exhale. Three. I said that [inaudible] and reach away. Alright everybody. Very good. Roll to your sides.
And now we do the grants went Holly. So that's come to the front of the Mat, make sure everything is off of your mat, out of your way. And do you remember in our last class we did the rolling and we started already down. Okay, so now you're not afraid to fall anymore. So you will start in the up position in the up position. So for the first few I'm going to allow you to have your hands behind.
Okay? So let's come into the round flexed back position balance on your tailbone, pull your shoulder blades down and gaze somewhere here in the little diamond shape you have formed by your legs. Okay, so you feel your shape, you know that you're not going to roll above. This is C7, this big a protruding, a bony landmark here at the top of the upper back. And we're going to go ahead and do this time, uh, double exhale. So we inhale here and we exhale. Exhale, Tuco back in, up ready and one and helps to keep your eyes down in the same shit in the same spot.
Two, three, stop for paying out. Hang out, bring your legs a little closer. You can either hang on one hand on each ankle or you can tighten it up even more. A little more challenge here in cross. Okay. And Go ahead. Here we go. And exhale. Roll, roll, pause. One Nice, nice. And two good is good. Eley exhale. Exhale. 30. Nice tempo here, and Duh, Duh, Duh for last one. But, um, but, um, Ta-da. Stay.
Let go. Open your arms. [inaudible] okay. Thank you.
Progressions: Putting the Fun in Fundamentals

Mention
 |
Cathleen Murakami (Teacher) |
 |
Shannon W |
 |
Dvora C |
|
|
Tova A |
 |
Christine D |
 |
Tammy L |
Comments


@Tammy, beginners can be the the most challenging - happy that you found some insights!


You need to be a subscriber to post a comment.
Please Log In or Create an Account to start your free trial.
