Description
Click here to view Rebekah's video on Osteoporosis Protocols
About This Video
Transcript
Read Full Transcript
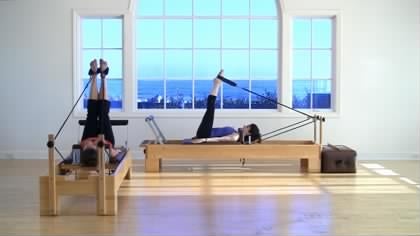
Hello, I'm Rebecca Rotstein and we're going to do a reformer class that is safe for those with low bone mass and osteoporosis. So Meredith is going to join me here and we're going to get down onto our reformers by starting sitting close to the edge, lowering ourselves down onto our side and rolling onto our backs. And actually I'm going to change my foot bar positioning, make it a little bit higher. So we're both going to, all right, so we're going to restart Loring onto our sides and rolling onto our backs. And just to clarify, the reason is we want our knees a little bit closer in toward our hips. Now before we begin, let's organize our bodies, resting the balls of the feet on the foot bar, taking a nice deep breath in through the nose and out through the mouth. Inhale through the nose and out through the mouth.
And we're going to lift our heels. To begin. I'm doing it in a slightly turned out position, not completely parallel, and we're gonna push out. So you can be on either three or three and a half springs, let's say, depending on your reformer and in, and let's inhale as we push out. Exhale, return
Now let's go onto the arches here and let's push out. Again, no, I don't always advocate that everybody do it on the artist. I think it depends on whether your knees tend to roll in. You have more of a knock need position or perhaps if you have very high arches, this is not a very comfortable position for you. I just feel the fluid motion here, trying to rest the thigh bones in the sockets as you return home. So I'm not a big advocate of feeling the abdominals when you're doing footwork because I don't feel that there's a great need for abdominal control here.
And last one, let's come back in. Let's now go onto the heels. And here I'd like you to be parallel and pushing out and coming back in. And especially when we're on the heels. I like the feeling of pushing away and growing to the crown of my head. It feels like there's a direct connection from my head into my heels.
And when I'm on the heels here, I also like that feeling of release through thigh bones and through the quads as well. And let's do two more. Inhale, XLV turn, inhale and exhale. Return. Now let's remove our right foot and we're going to lift our right thigh up into the air here and push away. And now as you come back in, let's straighten that neat and let's do it with a flexed foot. So we're going to push away and straighten. So we're getting a little bit of coordination in here and if you'd like, you can exhale to push. Inhale to return. Exhale, inhale, two more. Exhale. Inhale, last time and return. And let's switch feet. And I'm going to mention also that I have my head rest up.
Most people prefer that, but for some people, because of the shape of their spines, they prefer the headrest down and let's push away. So as we push away, the knee stays in as we return home. The knee extents. Inhale, this is really good for patellar tracking, so tracking of your kneecap and you may start to feel a little work on the inner portion of the quad, which is part of the point. Let's do two more here. Exhale, inhale, exhale. Inhale. Let's return back to the balls of the feet. I call this the rock legs. So you're going to lift your heels up, you're going to remove your right foot and push away.
So it's like you're in high heels pointing the toes and then bend the knee, both knees coming back in and let's exhale, push in, he'll return x help, push in, he'll return. Trying to not flip the pelvis as we do this, and it's more of a motion at the hip joint rather than just the knee straightening. So the actual fiber bone moves in the socket and last one and let's switch legs. So the heel stays high the whole time and push. I have a funny little story about this.
I was teaching in Italy and there were a lot of British people and I called this rock hit legs and they had no idea what I was talking about, but they call it bluebell there. So if you're working with the Brits, it's a different name to more push. And last one, push and return back in. Now we're going to go onto the heels again. This time we're going to do it pigeon toed and we're going to push out and return back in. So you're going to start to feel a little bit of your inner quads and your inner hamstrings, inner thighs, your adductors. I'm pushing and just keep breathing. So what we're doing is we're getting some muscle activation in areas that we might not normally getting some extra pull on the bones.
And last one come back in. Now we're going to do a little windshield wiper action. So we're going to turn out as we push out and we're going to go pigeon toed to return home. Turn out to push pigeon toe home out to push fit into home, out to push pigeon toe home last time and out to push and pigeon toe home. Now let's go back onto the balls of the feet.
We're going to do something called offset feet. So you're going to move your feet all the way to the right side of your foot bar. Now your knees will still be pointing up toward the ceiling, but they're no longer in the center of your body and you're going to push out here and come back in. Now here's the trick with this. As you're doing it, the tendency would be to rotate your hips toward the direction of your knees, but you don't want to do that. You want to ground through the opposing hip, so the hip that is farther away from your feet, you're going to stay nice and long and grounded through,
Now drop your heels, stay here for a moment. Notice if you're holding onto any tension in your body. And now let's lift the heels and lower and lift and lower and lift and lower. Making sure that you're tracking through your ankles so that your ankles don't veer away from each other, that the forest stays through that second toe and last time and lower and stay here and stretch. Or if you'd like, you can bend your knees slightly to get a little bit more solely as stretch here. It's always feels very good for me and let the carriage come all the way home.
Right? We're now going to turn onto our side. So let's turn to our left. We're going to do sleeper here, but before we do, let's sit up for a second to remove a spring. So we're on two springs.
Now the way I'd like you to do this is to make sure your sit bones are wide to begin with and move your right foot back just a little bit so that your heels in line with your sit bones and your heel will be lifted slightly off the foot bar. And I like to also sometimes take my right hand, my top hand and place it on the shoulder rest. And now we're going to push the carriage all the way away so that the heel drops down into the foot bar. Now stay here for a moment. Lift your top arm up overhead and reach the hand over by your ear. So it's going to reach away from your foot. Yes, and now push away with your heel and no, straighten your bottom knee so that both knees are straight and you can really reach your top heel into the foot bar.
Getting a nice length through the waistline. Lengthen, lengthen, lengthen. This is a wonderful stretch through the connective tissue, through your side, around your QL, around your obliques. You can run the hip and no retain that length, but return your hand down to the shoulder rest. Now from here we're going to do the sleeper. So you're going to bend your top knee, letting the carrots come in and the heel will eventually lift and then you're going to push away and touch the heel to the foot bar as soon as you can. Yes, and push.
So that length that we had through the waist continues returning in two more. Push away. Inhale and last time, push away and inhale return. Now at this point, bend your bottom knee in. We're going to turn out the top hip and we're going to place our heel on the foot bar so that the foot is going to go slightly further forward. That's it. And the idea is that you want to turn out from the hip joint rather than moving from the pelvis or rather than moving from the spine. That's it. Great. So now we're going to push out here in a turnout position.
Push and return hip bones, sit bones, stay wide, push out and return and push. That's it. And return and push. And return last time. Push and return. So now we can roll over onto the other side. I'm gonna move my mic just a tiny bit. Okay, so starting off here again, lining the heel up with the sit bone.
Push out all the way and now lift that top arm up overhead and lengthen the heel, pushing into the foot bar, reaching the hand in the opposite direction. Reach retreats. So you feel that nice stretch between the ribs and the hips. Now retain that length as you lower your arm and bend the knee coming back in. So sit bone, stay wide and you stay long through the waistline and now push. So then we can really activate through the hip.
So we're getting some hip strengthening here in this version of sleeper especially, and push and push. Let's do two more. So when you're doing it in this manner, you feel a lot going on with your gluteus media. So you feel a lot going on actually quite a bit with the quadratus for Morris here. And then you also feel a lot through the VML, which is the inner quad. Last time, push out and back in. Now we're going to turn out at the hip, put the heel onto the foot bar and slide that foot slightly forward because again, if it's too far back, if you don't have that ability to turn out in the hip, you're gonna rotate through your lumbar spine and through your pelvis.
So we want to stay stacked up and we're going to push out. And again, we want to avoid that tucking sensation. So sit bone, stay wide out and in and out and in and out. In, out in. Let's do two more. Push and push and come back. And all right, let's help ourselves sit up and make sure that your springs are set up for the proper amount that you'd like to do your leg springs on or your, your leg arcs and circles.
So I'm going to keep it on the tension that I have right now and then we're going to lower ourselves down onto our side. Again, tiller onto our backs and we're going to push out placing a foot in each strap, resting your hands by your sides. You're going to push out through the feet and we're just going to do some arcs up and exhale to lower. Inhale to rise up. Exhale to lower. So again, it's just the thigh bones that are moving in the sockets so that you don't tuck the pelvis here and down or lift it and up. And on this last one, we're going to do an upside down t. So you're going to push down, you're going to separate your feet, return them together and rise up. Let's repeat that. Exhale, lower out return and rise.
Exhale, lower,
So you're going to lower your feet straight down, bend your knees in, staying in parallel, straighten your knees up toward the ceiling, reaching with your feet and again, lower down. Bend your knees, extend them, reaching the feet to the ceiling. Exhale, lower bend, and now we're going to do it a little bit more fluidly and little more quickly. XLR Bend. Inhale, extend. Exhale, lower bend. Inhale, extend last time. And stay right here. Turn out for the frog, bending your knees. Exhale, push. Inhale. Exhale, push anal. So make sure that you're also staying nice and wide through your collar bones.
Relaxed through your chin. Relax to the chest. And last time. Now we're going to do a little stag motion, so you're gonna push out again. This time your right leg is going to go straight out to the side. When your left knee bends, just like it was doing before in the frog. Now you're going to push through the bent knee so that your feet meet back in the center. And we'll do the opposite side. The right knee bends, the left leg extends out to the side, push through the right foot to return the feet together. And again, inhale, exhale, push in, heel alternating sides. Exhale, push. Inhale, exhale, push. Last time. Inhale, exhale, push and lift your feet up and bend your knees in.
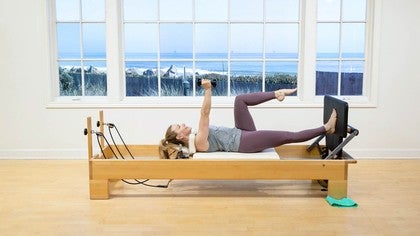
So now we're going to remove our feet. And we're going to place our hands in the straps. If you need to change the spring tension, you can do so now. Otherwise, if your spring tension is all set for your arms, you're good to go. And we're going to lift their feet at straight up into tabletop here. Now I'd like you to bend your elbow straight down cause we're going to start off with some triceps. You're going to exhale and straighten your elbows down.
Inhale, bend, exhale, lower email. So the lowering is of the hands I should state inhale. Exhale. Inhale last time x and I'll straight arms up. Exhale, lower. Inhale up. Exhale, lower. Inhale up, exhale, lower. We're going to go straight into circles, so open your arms out to the sides and rise up. Exhale, push down. Inhale up. Exhale, push down. Inhale up.
Exhale, push down and rise up. Now reverse it. Open out. Exhale together. Inhale, rise with the arms. We're staying nice and soft through the chest wide. The collar bones connected through the low belly and up, and two more. If this is a lot for you, you can also just let your heels hang a little bit and last time and rise up now. Lower both hands down, kinda like we did with the stag a moment ago. Your, your left hand will rise up to the ceiling while your right hand goes out to the side. Inhale, exhale, return to the hips opposite side.
Inhale, exhale. Every time I exhale, I feel that I grew a little bit taller through my spine. I feel as my arms return to the midline. There is a little bit more connection in my low belly and last time and down. Now bend the elbows here, so straight by your side so your elbows are actually gonna widen out to the sides at this point. And then you're going to push down. I call this the hoedown, so bend and Exhale, push, inhale, exhale, push.
And I'm trying to be cautious that my shoulders don't jump forward as my elbows bend two more last time and exhale and lift your hands straight up toward the ceiling and lower the feet down. Now we're going to do a little bit of the Ab series, but on the reformer and we're going to keep our head down for it. So you may want to lift your head rest if you haven't or you can just keep your head rest down. Lower your hands straight down by your hips. So we're going to do the single leg stretch here. Straighten out your right knee. Now you're gonna keep your hands here and you're going to exhale switch XL switch. Exhale, switch XL switch.
Keep going now speed it up,
But I'm going to keep my head down all the way. Now you're going to straighten both knees out, separate your feet. We're going to do a little bit like coordination. Ben are to me, return and bend in and push out and separate. Return and bend. Push out. Separate return. And Ben last time. Push separate. Return Bend, bend the elbows, come back in. Inhale and exhale, straighten the arms.
So it's a lot with the triceps as well. Now push out and straighten both knees. Lower your right foot down to the foot bar. So like scissor, legs, just like single leg. Pull and switch and switch and switch and switch and switch. Switch and relax. Back in. Bend the elbows.
And last time straighten the elbows and we're going to do the double leg pulls. So turning out here, straighten both knees, lower your feet just a little bit. Exhale, pull in. Inhale, lower. Exhale, pull in and it's easy for the shoulder. Sucker forward. Try to avoid that and last time and bend the knees, bend the elbows and lower your feet and we can return our straps to their handles. Reach your arms up to the ceiling here for a minute, cause sometimes that can tighten the pecks a bit. Lift your arms out of the sockets, a little puppet arms and drop them in the sockets and lift and drop.
Once more. Lift and drop. Bring your arms all the way out to the sides. Feel the stretch in your chest, perhaps. Now flip your palms down to the ground. Now reach your middle finger to touch your wrist so that you go like this and you really feel a stretch. Then you're going to flip your palms open to the ceiling. I know. Peel your fingers backward so that your finger is reached down to the ground.
You get a little nerve glide through your wrist. And then we're going to repeat that. So we flipped the palms down and try and touch the wrist. [inaudible] hold it and flip the pumps, the ceiling and the fingers. Reach backward toward the ground and then do little flamenco risks here to return the hands back up to the ceiling and Laurier hands down by your sides. Let's roll over to sit up and let's change our spring here to one spring. So you can either have it on one or a half spring.
At this point we're going to do some reverse knee stretch. So to do this, typically people have their knees all the way up against the shoulder rest. But I'd like you to have your thighs touching the shoulder rest so that your knees are a little bit further back here. Now have your hands directly underneath your shoulders to start. Now we're going to do a little bit first for the lats.
So you're going to pull yourself forward just from your arm. So there's not going to be any change that happens at the hip joint. And return yourself back and pull yourself forward and returned back and pull yourself forward, making sure your head's not dangling and going back and last time forward. So there's a little lift through the heart here and returning back. Now this time we're going to change the motion.
The motion is going to occur here in the pelvis, so the pelvis is going to Tuck just a little bit. So it's a lower ab exercise and return to a neutral position. Exhale,
But I prefer to avoid doing that if possible. So you're going to grab hold of your straps here. The first thing that I want you to do is just another little pelvic tilt, just like we just did. So you're going to exhale and you're just going to Tuck your tail under you slightly and that's going to move the carriage [inaudible] and then returning back up. So you'll notice it's not a whole big spinal curve, it's just the tail tucking under and inhale return. And that's what moves the carriage because I'm not using my biceps at all to pull. And again, exhale, touch, inhale, return, exhale, tuck.
Now we're going to return the straps to their starting position and we're going to do a little diagonal motion. So we're going to lower down with our right strap while the left one rises and we're going to look toward that side and returning to the center. So it's a diagonal line that's created between your arms, so from one arm to the other. And let's exhale as we separate the arms. And let's do one more and last time.
We're going to do it with our hands. Some people will call it shaving slightly behind our heads. Now I love this for the lower traps. As you exhale, I want you to reach your tail behind you as you straighten your arms so there's a slight pitch forward and bring your ribs slightly further back. Yes, there you go. So that our ribs don't pop and inhale, bend, exhale, push. The other tendency I see with people's to dangle the head, so press the head. The head will be pressed back as we straightened our elbows.
Inhale, and when I say that, what I mean is it's more of a reaching back with the throat and last time, push and bend the elbows. Now bring your arms out to the sides. Let's switch the crossing of our legs so that we go the unusual way. We're going to hug a tree here.
And I'd like to think again of relaxing my ribs as my arms come forward and once more
So we're going to stay stable working a little bit more through our obliques so you'll feel a little bit more of your internal obliques on the right side here. Exhale, inhale, open, and exhale. Ha. So it's almost like the left ribs reach back while the left arm comes forward. Let's do one more for good luck and forward and returning. Let's switch arms and exhale.
And again, this time we're trying to avoid rotating our trunk to the right and out. Exhale and let's do two more and I really feel the lifting in and up to my core hair and returning. Nice. So return your straps into their handles and let's grab our long boxes. So in addition to our long box, we're also having the poll just to be ready to use at some future point here.
I'm going to place it and I also have a little sticky mat so that we don't slide
Let's have her chest on the box and our hands will be resting on the flip bar. And rather than just letting our feet dangle, we're going to press our pubic bone into the mat, which is going to bring us into a slight bit of hip extensor activity. Resting your hands here, you're going to exhale and pushed yourself away. And you'll notice it this initiate the activation of the neck muscles so that you don't dangle the head and bend the elbows to return back in. And exhale, push and returning back in last time. Push now with straight arms, you're going to rise up into a little baby swan. Lifting the heart through the arms and lower yourself back down.
And let's inhale for the extension and exhale, lowering back down. Once more. Inhale and you can come up a little high, or I'm even lifting my low belly off the mat here or off the box and Xcel to return back down and bend the elbows. So now I'm going to turn around and now before I get onto the other side, let's remove one spring so that we're on just one red, one regular weight, let's say. And let's lower the foot bar as well cause we're gonna go into pulling straps here. My box isn't in the center, so let me just change that. There we go. Okay.
Now the way I'd like you to do pulling straps here is keep your chest on the box [inaudible] and the reason that I want this is because we're gonna try and focus much more on the upper spine, the upper and the thoracic spine rather than the lumbar spine. And for the extension here, so pressing the pubic bone gently into the mat and grabbing onto your rings. You're going to pull back with your elbows first and we're going to do it as triceps to begin. So the reason for this is it helps I find to align the spine before we start doing this long lever of the arms. So from here you're going to extend your elbows pulling back and bend the elbows here and you can drop your chest just a little bit here.
So we're not really focusing on the back extension yet and straighten and return and straighten and return. And I'm actively lifted through my belly and reaching out through the crown of my head as I continue to look downward. And let's do one more and now this last time. Straight arms, now straight arms, all the way to lower your chest. Just a little bit. Inhale full pulling straps, links and pulling through the pinkies leading the way. And exhale, lowering the full arm down and inhale to rise up. Don't come too high. So low yourself. Yeah, there you go. So that you really focus on the upper back and lowering town.
Let's do one more inhale. So it's more about growing longer rather than growing up higher into the air. Yes. And lower yourself back down. So loosen your, your choke up on the rain. So we can go into pulling straps to bring an arm straight up by the sides for a t position. And now pull back with your pinkies. Grow a little taller and returning and reach. So yes, we're growing taller, but the focus is more on the length through our bodies and last time.
And you get a little bit more through the rotator cuff to here and returning back. So now please both straps into one hand coming off so that we don't feel like a beach toil. And let's actually place our straps down in their handles. We're not going to hold on to them at this point here.
And at this point let's also add um, a spring. I should've done that before we got on. So separate your feet here and we're going to do a little version of what could be teaser if we bring our hands straight in front of us here. So I want you to talk just the tail under [inaudible] and I went to the lean back just a little bit and return forward and again, Tuck the tail and lean back. Now stay here and remove one foot.
Now hold onto the back of the knee, lift the other foot up, hold onto the back of that knee. [inaudible] and now lower one foot down and lifted up low. The other foot down, lifted up. Now see if you can straighten both knees just a little bit and bend. Now hold onto your box. Lean back a little bit more supporting yourself. Because if you go too far back, you're going to walk out your, your spine actually and straighten your knees.
So it's going to be too much load on your psoas muscle, which pulls on your spine. And once more, and now straighten one knee. Keep pulling up through the low belly. There you go. And switch and switch and switch and switch. Switch, switch, switch. Switch and sit. Nice and tall and hinge forward at your hips so that we're not curving our spine, which is hindering forward at the hips, giving ourselves a little pull and set up. And we're going to change over to a short Bach.
Just like a, a fairy, a fairy godmother, you're gonna reach and turn your frog into a prince coming back up. And no other way. So we're doing a little bit of extension as we reach so that there's no risk of compression through the front of the spine and reach and exhale. And last time, inhale, reach and exhale. Now lengthen up. You can even let your shoulders elevate and hinge forward.
If it means that you have to bend your knees, that's fine. Breathe in and now rock your pelvis back just a tiny bit and push through your feet to straighten your knees and grow taller. Let's do that once more hinge separating your feet, bend them, bend your knees slightly. Now tuck your tail just a little bit so you feel the low belly. And now straighten your knees.
Untuck the tail and push out through your feet to grow taller. All right, let's remove our short box and bring it all the way back to its starting position. And by the way, I want to make note a good safe way to lower your box is to hinge here and do a squat so that you don't curve your back to lower it. Alright, let's set ourselves up for the long stretch here. Can you move my, my cords just a little bit and I'm on two springs and lift your headdress.
Think I might actually lower my foot bar just a little bit. Make it a little bit better for my positioning. Nope, I'm going to keep it on higher. Sorry. Alright, so we're going to set ourselves up for the long stretch here. The way that I usually like to get people into it, actually I should say this, is come on to both knees. Then straighten one, shift your weight forward, and then straighten your elbows. [inaudible] and now we're going to push the whole carriage back and then return forward. Making sure ahead isn't dangling. So we start with our shoulders over our wrists.
We push away and we return forward. I also like to have the thumbs on top, just like we're doing and returned forward, making sure that we're not sinking down into the pelvis. We're lifted through the low belly as well as the throat. And let's do one more exhale. Push.
Now as you push out, the forest comes through the wrist, so you're going to push away and grow taller. Inhale and exhale, push.
So the arch occurs through the upper spine and relax. We're going to go into the up stretch. So from here you're going to straighten your knees and you're going to start off in a pike position so that you feel a really good stretch through the arms as well as through the legs. Now push yourself back into a plank, so plank it out. Then we're going to plank it in so that our shoulders return forward over our hands and circling the tailbone back up toward the ceiling into a pike and push out in hill. Pike it in and against. Sit bones up. Exhale, push out plankton and once more pike it up, push out planking in when? Reverse it.
Push it back, pike it in, and shift the weight forward. Push out pike it in and shift forward. And we're making sure that our head does not dangle the whole time the head lowers as we probably could in, but it doesn't mean it's an active and return forward. Now let's lower our feet. Let's do a little bit of elephant, but we're going to do flat back elephant. So you can either have your feet all the way back against the shoulder rests or not. But I want you to lift the toenails.
Every time I tell people to lift the toes, for some reason they lift the heels. So I've started saying, lift your toenails, and it always works. Now where you're going to shift pushing the carriage back just a little bit. Exhale and inhale back Exelon. Inhale back, exhale and inhale back. Exhale.
Now if this is too tight on your hamstrings, you could lift your heels a little bit to do it. Or you could have your feet slightly elevated on something. And we're going to do a single leg. So you're going to take your right hand, place it into the center of the Bar, lift your right foot straight out behind you. This is almost like a warrior three position and yoga. Flex your foot that's in the air. There we go. Push out. Exhale, we turn the carriage. Inhale, push, exhale. Make sure the head isn't dangling, you know, push and exhale, a little more advanced version version.
Take that right leg out to the side and again, push out. Exhale and out. Excellent and excellent him. Switch legs and then switch arms. And now the left hands in the center of the bar in the right hands all the way up to the side. Lifting the toenails, not right foot.
Bring your left foot behind you again, you're, you're in parallel here. So it's a lot harder because we're turning off those rotators that we often rely on and push out. Exhale in and you're relying a lot more on the, the lowest of your rotators, the quadratus from Morris, and push out. Exhale and once more out. Exhale in, no, bring your left foot out to the side and out. Exhale out. Exhale in less time out.
Exhale in and stand up just for a second to return. Then the blood to our head. Shake out your wrist. And we're going to go into arabesque. We're going to do two versions of it. Come back over to the left side of your carriage, come back up onto high heel position, and we're gonna bring our right foot behind. So you're going to push out here. The way when I used to do teacher training, I used to explain the weights do arabesque is that when the butt goes up, the leg goes up. So the butt's down the legs down, or we should say the foot.
So the butt rises and the foot rises, the butt lowers, the foot, lowers. It, makes it really easy that way. And just keep remembering that there's no change in relation from the shoulder to the wrist. All the motions happening at the hip joint and rise up and last time good. And let's switch to the other foot. So now it comes to the other side of the carriage here and push the carriage out. Lower the foot down. So again, we're staying out in this pushed position the whole time with our shoulders in our hands and the carriage comes in, foot rises and foot lowers, but lowers foot rises, butt rises, foot lowers but lowers last time and up and lower down and come back in.
So let's stand up for a second. Shake out your wrists. Yeah. So let's grab a ball.
We're going to be on three springs and I'm going to lower the foot bar to as low as it could possibly go because that will reduce the amount of flection or is at the hip joint here. So I'm going to sit in front of my ball. Okay. So for you it's going to be a little bit better because you're a little taller. So we're going to, yeah.
So we're going to turn out into [inaudible] first here. The idea is I don't want to be tucked under. I want to try and sit as tall as I can. And if this is too tight, you can always lower the spring tension. So bring your hands in front of you. We're just going to do a variation on stomach massage. You're gonna push out, lower the heels, lift the heels, bend the knees, try that once more. It might be a little bit tight for this, but that's okay.
And now we're just going to focus on the knee extension part. So we're gonna extend the knees and arch back and then return and fort. And for myself, I am going to reduce this tension. It's a little bit tight, so I'm on two springs now and inhale and exhale. So you get that really wonderful support at extension. Inhale and exhale. And again, if this ball were a little bit shorter, you'd see better on me, but it works to serve the purpose and return.
Now we're going to do a little bit with some rotation. So we're going to pretend that we're ballet dancers and we're going to start with the left arm. So we're going to inhale and extend back. Yep. And exhale to return in health, extend back, exhale to return alternating. Inhale and exhale last time. Inhale and exhale.
So let's get off. Let's remove our ball as gracefully as we can cause it's a little awkward.
And two options for less. Challenge for a little bit more support. You can have your knees all the way at the front against the shoulder rest. You want to make it a little bit harder. You can tuck your toes back. So I'm going to do it a little bit easier over here.
So let's choke up on the rains. Keep the elbows straight. Inhale to prepare. Tuck the tailbone under just a tiny bit. And I should say it's not that you're trying to flatten out your spine, but if you have a tendency to go into your lumbar spine, then you may want to at least find a little squeezing through the glutes, not necessarily tucking. All right, so let's pull back. Exhale, look to the right, look to the left, look to the center and return. Exhale, pull, look to the left, look to the right, look to the center and return again and pull. The nice thing about this is that we're doing a lot with gaze stabilization so that we're actually getting balanced and we're utilizing a really unique feature of the reformer there you go to the right, left center and return to the, you feel that nice stability and engagement through the shoulder blades. That's it. And to the center and return.
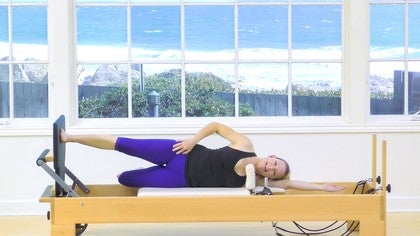
Now we're going to go into some side splits, so we're going to make sure that we have two springs or perhaps you'd like one and a half and Loring the foot bar. And we're going to start off with our right foot on the edge. So I'll have you turn around the other way.
Exhale, push, you know, return last time. Exhale, push. Inhale, return, bend both knees. And now push away just with the left foot. So you're going to push it out. And N let's do three and in and two and in last one and n. Good. Turn around.
So now we'll have the left foot at the bottom of the foot of the carriage, or the foot of the reformer, bringing the arms out to the sides and exhale, push. So we separate both feet. So there's a sense of energetic opposition going down and out and returning back and in. So we pushed down to grow taller out and back in, and two more and back in and push and back in bend both knees. And now we're just going to straighten the foot that's on the carriage or the knee, that's of the foot on the carriage and push out and en out into more out in n out and N. And let's step down and let's have you lift the foot bar. Return it back to the beginning. And we're just gonna do a little stretch here, placing what's actually be on one spring.
Please your one hand on the foot bar and the other hand is going to be on the shoulder rest and you can separate your feet a little bit and you're going to push out and feel the stretch as you flatten your back, cringing at the hips and returning back in. If it feels light, try adding a spring. So maybe one and a half would be a better and push out. So you get a little shoulder stability too. And last time push out and come back in. And let's try the other side and instead of doing it here, I'll help you. So I'll have you do it so that we don't risk running into each other. That's okay. So separate your feet a little bit.
There you go. And now push out. So there's this nice feeling of separation and back in [inaudible] and you push equally through both arms. Good as if you're doing arms splits. I like to call this arm splits and last time good and back in. And let's actually end with a simple quad stretch. So you can either stay where you are or you can put your foot on the foot bar and we're just going to get a stretch.
And thank you for joining our reformer class.
Bone Health: Osteoporosis Safe Workouts
Mention
 |
Rebekah Rotstein (Teacher) |
 |
Susan V |
|
|
Carolina F |
 |
Kathleen Fitzgerald Henry |
 |
Libby B |
|
|
Carole W |
 |
Hayley S |
|
|
Christine T |
|
|
Grace P |
 |
Terrip88* |
|
|
Diana G |
 |
Pamela T |
|
|
Tanya B |
|
|
Denee D |
 |
Sue L |
|
|
Kenden A |
 |
Melissa S |
|
|
Nicole G |
|
|
Ronnie S |
 |
Heather G |
 |
Stephanie H |
 |
Giglia M |
|
|
Jana B |
 |
Jynene H |
|
|
Jessica Y |
|
|
Jenny B |
 |
Patti S |
 |
Stacey S |
 |
Jessica |
 |
Barbara K |
|
|
Anne S |
 |
Jeanne L |
 |
Stephanie B |
 |
Jocelyn N |
 |
NS |
|
|
Monica R |
 |
Jill J |
|
|
Kristen S |
 |
Kathy O |
 |
Arlene S |
 |
Denise M |
 |
Rosanne P |
 |
Paola Maruca |
 |
Judy C |
 |
Wendy C |
 |
Yugonda D |
 |
Susan C |
 |
Jennifer S |
|
|
Leigh C |
 |
Jamie K |
 |
Kristi Cooper |
|
|
Mimi H |
|
|
Heather M |
 |
Pele |
|
|
Yoly N |
Comments


You need to be a subscriber to post a comment.
Please Log In or Create an Account to start your free trial.
