Description
About This Video
Transcript
Read Full Transcript
Hi, I'm Jonathan [inaudible] and I am thrilled to be back at [inaudible] anytime. Today I'm going to talk about the concept of rotation, which is a huge topic, but I think that we often don't introduce rotation to the bodies as soon as they can be introduced. We tend to think of rotation as a more advanced kind of movement. And if you look at the Matte Repertoire for example, there's very little rotation in the, in the basic mat exercises except for the saw. And then we think of things like the twist, um, and other, uh, exercises like the snake on the reformer, um, corkscrew as being more advanced exercises. And, uh, W my aim today is to show you how to simplify rotations so the body will be more prepared for exercises like the corkscrew when it's time.
Ron Fletcher is my primary influence and he noticed too that there was not very much rotation in, um, a lot of the mat work. And what he said is people don't work their middles enough. One thing about rotation is sometimes the body needs to ease into the rotation. So I urge you and invite you to just really listen in to the body as you're going into these movements. And um, just without forcing anything, just see what the body is of what's available and what the body's willing to do at, at this moment. One thing I'm going to talk about something I call the upper and lower oblique lines. So the, we think of the old bleak muscles is just making kind of a s a cross on the body. And so the upper oblique line, I just think of it as here.
And the line follows the line of my fingers. And when we, we think of, uh, controlling the rib roast rib cage, that really activates the upper oblique line. And then the lower oblique line just comes the other way and that that refers more to the internal oblique muscles. And another thing that's really important in rotational motions is to define your axis. So we will define the axis as we move on. So, uh, starting with standing, um, we can just assess rotation defined rotation by doing a simple twist. And so I'm going to just twist my whole body, everything including the pelvis twists and back to center. And then the other side, and in general what we're looking for is that the pelvis and hips are able to go 90 degrees and the thoracic spine is able to rotate about 45 degrees.
And then the head and neck has more rotation to it. So you just, the head and neck will just follow the line of that rotation. And within the trunk or within the spine, ideally, the lumbar spine, uh, creates about 10 to 15 degrees of rotation and the thoracic spine, 30 to 35 degrees of rotation. And what I find is most of us are fairly, uh, restricted in rotation in the thoracic spine. So, so I invite you to just check yourself out and see how you're doing and noticing the asymmetries from right to left. So now I'm going to go to the floor and we're just going to do some basic motions to differentiate and define the, um, the rotational movements in the hip and in, in, in the, in the trunk. So I'm going to start with a basic exercise called the bent knee fallout.
And the Bentley fallout is, uh, considered a, it's a, it's a physical therapy exercise and you'll see it all, all over the place. And this is really an exercise to, to work on control of rotation of the, of the trunk as you're bending or rotating if the at the hip. So it's a simple bend of one knee, the other leg is straight. And I'm going to think about activating my lower oblique line on the left side as I bring the hip to the right and back to center. So this is just differentiating, um, hip rotation without any trunk rotation hopefully.
And it's helpful of course to monitor the pelvis as you're going from side to side. Okay, so that's the bent knee follow and that, that's, that's the beginning of um, looking at rotation, being able to control rotation in the pelvis. From there, I always like to do some kind of sway or tick tock. Um, and there are many different ways to do a sway. One way is just to keep the feet on the floor or when can also, um, uh, working in a tabletop position or with a ball underneath doing, doing a rotation that way. Another aspect that is important to remember when doing rotational movements is that there is a side bend of the spine as we rotate. So working on side bending motions is important in order to fully develop rotational movements. And in osteopathic literature there is a, what we call fiats laws, F, r, y, e, t, t, e.
And it's beyond the scope of what I'm talking about today. But if you're interested in how side banding affects rotation, you can look that up. Fiat slaws moving up the body. I'm going to stabilize my pelvis now and rotate the, the upper body. So this is the spine, this is the spine twist in the mat. So just, um, working with that rotation of the thorax, keeping the pelvis stable. So, um, just to find in differentiating the movements that are available as you go up the chain of the body. Another aspect of rotation, Eh, that is the sideband.
So when the spine actually does sideband, when, um, when we rotate. So, um, it's important to have range inside bending, um, to really fully develop your rotation. So doing some, a simple sideband like this is um, a start towards developing rotation on movements. What I'm going to do now is, um, uh, a series that I learned from Ron that um, it starts with what we call the hemispheres. So you just imagine that the body has a lower hemisphere and an upper hemisphere and we worked them separately and then apart and then it goes into, um, Ron's side leg pattern. So it's going to start, um, supine with my arms out to the side. And what I'm going to do is take my pelvis to the right and take my pelvis to the right, but keep my left shoulder down. So I'm just working my lower hemisphere and I'm keeping my left shoulder down by activating that upper oblique line on the left side.
And then I'm going to come all the way up and over and lie on my side. So, and then I keep my pelvis where it is and open back this way. So I'm asking for as much thoracic rotation as I can get, keeping my pelvis level. Then I come back to center. So I call it finding the barrier. So I'm going to find my barrier going to the left, keeping my right shoulder down by activating my right upper oblique line.
Then I will lie all the way over onto the site and set myself up as straight as I can as the line as I can. And then coming back, I find the barrier of my thoracic spine and shoulder pulling back, striving to keep my pelvis level and stacked and then come back to center. And I like to add a few things with this. So I'm going over to the side and then coming up and over.
And then you can even make a little develop PE just to add more to it. And then you'd come back and center. Okay.
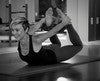
So I'll take the leg as far over as like all the way over to the side. And then I lift the left leg up towards the ceiling, just straight up towards the ceiling so that I can make that position and I'm ready to bring the other leg over. So the two legs meet, then I come all the way up and over onto my side.
So it goes,
Mention
 |
Jonathan Oldham (Teacher) |
 |
Alissa S |
 |
Maggie L |
 |
Sara P |
 |
Irene W |
 |
Kathleen M |
 |
Jitka R |
 |
Yugonda D |
 |
Belinda P |
 |
Lynn P |
 |
Sharon Spaziani, Lmt, NCPT |
Comments


enjoyed the progressions of each of the movements. I like add ons because as you said it helps to see where my limitations may be. I also like that I can use these as a preparation for my movements. It s like what Elizabeth Larkam does.. sequencing for success… I want to be successful :)


JO, Do you have other tips on what one should be thinking about activating anatomically during “sway/tick-tock” “side bending while sitting in diamond” “spine twist” and "side-leg pattern”? You refer to the “upper” and “lower” oblique line but if there’s more you can add in terms of muscular queues that’d be great because this is what helps me visualize what I’m doing. It’d be nice if there was a class (vs. tutorial) with these exercises and side-leg pattern to do on a regular basis.
You need to be a subscriber to post a comment.
Please Log In or Create an Account to start your free trial.
