Description
About This Video
Transcript
Read Full Transcript
Hi Today. I would love to help you feel like there is no reason you can't do the let's get started series on Peloton anytime. Even if you have a weak shoulder, elbow, or wrist, or if your hand has been giving you any grief, you will learn what you should focus on to strengthen your body and what movements you should omit not to aggravate your injury. After watching this tutorial, my goal is for you to know and understand all the exercises you can do in the platas method and how you should modify the others. What do I mean by a weak shoulder, elbow, or wrist?
This is not a class for the person who has just injured themselves that you're seeing or heating your shoulder. This is for someone that has been advised to strengthen their whole bodies, specifically the joint but implies we strengthen the entire body and that in itself takes care of your injury. To start off with, we want to understand how it's all connected. So possibly if you have a shoulder injury, it might be due to your neck and tension that you have in your upper trapezius here or it could be something in your elbow or it could be something in your wrist. They're all really connected and it's super important to pay attention to all of them. But I'm going to give you a side profile. So if I'm hoping to one day have posture like this, then everything will be supported. Lovely.
And this was part of Palladio's genius work of really knowing how to fill up a strong foundation that you'll learn in the let's get started series. However, if you're maybe push your hips forward and hangout or head goes forward, more importantly, if you're an better example would be as if you did this. If any of this is going on, you're going to have some problems with your shoulders when you're really challenging them. Maybe in a tennis match or golf when you're really calling on it first, some strength. If you don't have it in the correct alignment, it's going to cause you problems. It's going to get injured. So we are going to learn in the let's get started series, where is the proper alignment for that shoulder so it can get strong safely and so that you can stretch it safely.
And if that shoulder isn't in the right placement, if it's perhaps a little more added joint than in its correct joint, then it's going to take a toll on your poor elbow so your elbow is going to feel it. So if you play tennis and you do a lot of work, um, you know, overheads and serves, you might start really feeling it in your elbow because you don't have the right range of motion here or you might need to develop more upper arm muscle strength. So then that you have in your elbow another possibility for your elbows. You just might hyperextend a lot. And so instead of using the muscles above the elbow or using the shoulder muscles to help support something that calls for action and strength, you use the joint and that would really hurt. So we are going to try to learn throughout the series of let's get started, how to use your arms properly. Uh, and then that all has a ripple effect.
Again, if you're using the elbow joint, you also might over tense the forearm muscles. And if you do a lot of computer work, it's going to be a combo of your posture with your neck. So the shoulder as well as over flection. And you're gonna want to pay attention to stretching that. But this tutorial is really based, not necessarily on stretching and all kinds of little things for wrist and your hand, but more of how do you do a successful, let's get started series and feel confident and good that you can learn really good pilates work and not aggravate any of these injuries.
So let's get started with an assessment. Very important to take notes of what feels good to your body and what doesn't. So we're going to lie down. You might need a towel so you can grab a towel and uh, like a bath towel and fold it and put it under your head. Okay. And you can just grab that right now, but you might not.
You would just need it if you had those postural things that I was talking about. If you feel like you work at a computer a lot, then you probably are going to have a hard time when you lie down. Getting in the position that I want you to be in and that is I'm going to want your head to be able to look directly up at the ceiling. Or maybe you could see the tops of your knees and that would be great so that the back of your neck is stretched so that all the blood vessels that are going through your spinal column to your brain are not cut off. And I say that kind of funny, but when you are looking behind you, you're really cutting off some, putting some pressure on them, pinching some nerves, lot of pain and discomfort. So we are going to focus on building strength.
So that's when you want your towel there. If you're not able to, you're going to want to have your back of your neck nice and long. Being able to look right up at the ceiling or at the tips of your knees. If you have shoulder pain, you might want to test your neck out in the beginning. So we just went over proper placement. But when we do, our series of five are a lot of the exercises that are going to develop powerhouse strength. It requires your head to be up and it's gonna get tired.
The muscles are going to get taxied and fatigued and you're going to want to put your head down when it does. So let's lift it up and see maybe if we can hold it up for 10 seconds. So I'm going to pull my belly and to support my back. You'll learn how to do that in the let's get series, but for testing range of motion, we're going to bring our head to our chest and then hold it there. Notice that I'm holding it here. I'm counting in my head. We're about four.
I want to illustrate that I'm not holding it here. Were all the way to my eight 10 pound head is, Oh my poor little neck muscles that I'm trying to put that weight into my belly. Okay, that's 10 let's lower down the head where you able to keep your neck, your head up that whole time without it hurting your neck, if not, pay attention to around. When was it at four was it at five was it at eight? Whenever you felt a strain. Think about that so that when you do the stomach exercises, like the series of five, you're going to lower your head down so that it doesn't hurt your neck and then you'll give it a break and lift your head up.
And I'll go over that in more detail in just a moment. So we're gonna start off with checking our shoulder. This is how I always start off the checking the range of motion. So even more important here, I'm going to lift my right arm up to the ceiling. Okay. How does that feel? Most people, this is fine lifting it just up to there, but perhaps if it does cause you a lot of pain just to lift it up to here.
Maybe you might want to wait a little bit before you start the, let's get started. I'm not talking about on a scale of one to 10, you feel it like a one or a two. Um, and the muscles engaged and you haven't worked them in forever and you're feeling I'm a little bit, I mean like it's hurt, hurts you. Maybe like as if I took a knife and stabbed you, that just, that's a big red flag saying no. So we should be able to lift your arm straight up, but maybe you can't take it back any further. And that is okay when you're starting PyLadies maybe you can take it back to here and that's okay. Maybe you can take it back to here or maybe that, that's not nice that you want to hold the arm right here. Okay. So take it to where it's still comfortable.
Maybe it surprises you and it doesn't bother you at all to take it completely overhead. Notice I'm not lying it flat on the Mat. Okay, and now I'm going to bring it back up to the ceiling and then back down. Some people, that's okay, even though they have a weak shoulder, but not any outward motion. So I'm going to lift my arm back up to where I said was pretty safe for most people. And then I'm going to let it fall out to the side. Maybe this bothers it right about here. Maybe it's okay. How about a little further? Having a little further? Ooh, is it starting to, are you feeling it like a strong stretch or you're feeling pain?
You want to differentiate between the two, bringing it down by your side and then reversing it. Same thing. Maybe it hurt in one bay, but it doesn't hurt this way. Or maybe vice versa. And then bring it back here and then back down. One thing you should know in Pilati is that when you begin, we always focus on the alignment of our Palladio's box, and I'm not going to go into more detail about it, just that you want to pay attention to learning. What is your Palladia is box in the let's get started series and what does that mean? But for your comfort and for confidence, I want you to know that when we do arm things, we're pretty much going to stay within this box for our movements and hardly ever are we going to go far like this or like this when we're doing any polites extras.
Maybe when you're doing an advanced mat then we're talking a lot more range of motion, but in the beginning we will be sticking to very limited so you should be fine and safe and happy. Okay, so let's test out our left arm. Our left arm's going to go up to the shoulder. Was that okay? Are we able to take it back another inch or another inch? Find your range of motion. Make sure you feel good about it. Good.
Maybe you can go almost overhead ab a big stretch, wringing it up to the ceiling and then bringing it back down. If that was already painful, maybe you want, don't even want to try taking it out to the side. If it was fine. Let's see. We're going to bring it up to the ceiling. Okay. Taking note of our feedback. What if I go out a little bit, a little further, a little further? See how far you can take it without feeling any pain?
And what about damn by our side. And then the reverse coming up. Maybe the gum, maybe it hurts to go that direction. Back up right above our shoulder and then down. All right, so you want to pay really close attention to where it was that triggered any type of discomfort. Let's look at your hips and your lower back. Even though we're dealing with a weak upper shoulder or elbow or wrist, I still want to check out the rest of your body because I don't want anything else going on that might cause you pain and you weren't aware of. So how about if you bring a need to your chest? Let's bring the right knee in.
Does that bother you at all in your knee or your hip? Find your range of motion and see where it is so that you work comfortably in the series. How about the left leg? Is it feel okay to bring that leg in? Maybe only here and then you'll, you don't want to bring it any further. Maybe it's okay. Maybe it's okay to go further or even further or even hug it.
You want to see. So when I call for these details in the, uh, let's get started, you're gonna be able to challenge yourself appropriately. Let's now add a straight leg. So maybe it was okay to bring your knee in, or maybe it was just here, wherever it was. Let's try to straighten that leg. Who does that hurt your hip? Does that hurt your lower back? Everything feel okay? All right. What happens if I do put my hands down and draw a little circle within my Palladio's box I talked about? Is that okay? What if I go the other way?
Any pain in your hip or knee or any discomfort? And then we're going to bring the knee here good. And bring it down. Let's check out the left leg, pulling in your belly. We're gonna bring the left leg and it feels okay here. Or maybe you could bring it in further, right?
Wherever it was when you brought it in the first time and then we're going to straighten your leg. How's that check your flexibility too. Are you able to hold the leg here straight or is it fighting to be right here? If it's straight, are you able to bring it really far up? You want to find where your flexibility is and range of motion so you can challenge yourself. You're kind of like your own teacher, so you want to make sure you have all the facts down about your body. And what if I drew a little circle? Does it feel okay on my left hip, on my left, back as my getting any messages throughout my body, bend that knee in and bring it down or does everything feel pretty good?
So now we have a good idea of what hurts and what, where our flexibility is and maybe where we should limit our range of motion. Now I like to tell you a little bit about some details are super important, so I'm going to grab my magic circle. I do believe we use it a little bit in class number seven. But what is more importantly is, um, how we use our arm. So I like to use it as an illustration because your shoulder and elbow, they kind of call this a classical arm. I didn't do ballet, so don't quote me on that.
But the point is is that water should be able to trickle down your arm. Okay? It doesn't want to collect in the elbow. So right here, water would stop right there. Instead of continuing down to my wrist, it's really healthy for your shoulder, really healthy for your arm muscles if you're able to rotate your elbow up a little bit and use your arm like that. Notice I haven't gone with my chest and collapsed in my collar bones. I'm still up here. So this is kind of an ideal frame to strengthen your body for your shoulder, for your wrist, for your elbow.
I also will never use a magic circle or the arm weights by gripping. So I want you to pay attention to those details because then that takes a lot of tension in your wrist or your hands and changes the arm work. We're always wanting to incorporate the whole arm as if it's a unit and whenever you use your arms or your legs for that matter, it's always going to first come from your powerhouse. So you'd always pull your belly in and then you would do any work. Whether it's here, here, I still wouldn't let my elbows droop here up here.
I still wouldn't let my elbows drip up here. So you're going to learn how to really hold your arms and work them appropriately and that this is for strengthening rather than just talking about omitting, I want to talk about what we can do, so I'm going to want to see those beautiful arms working like that. Whenever you're doing even single leg stretch and double leg stretch, which are some stomach exercises. So let's take a look at the mat that you're going to be going through. There's a lot of exercises in the beginners series and the let's get started.
But the first one's going to be the hundred. Now if you have a bad shoulder, you might need to do this exercise differently. So the exercise requires your arms to pump up and down. But if that bothers your neck and your shoulders, we're going to change it. So I'm going to go ahead and bring one knee into my chest and the other knee into my chest and I'm going to show it to you how it should be done.
And then you're going to decide what feels good to you and what doesn't and choose the modification that you want. So I'm going to use my belly and my arms a little bit to come up with my head and shoulders. Rounding up, and this is very important that your way is more on the base of your shoulder blades than your shoulder blades being completely flat. So I'm going to try to really come up up, up so that I'm more curled over using my upper belly. I'm going to even press my arms down, maybe slide them closer to the edge of the mat and then use them really strongly to pump. This is great strength and if it doesn't hurt but sand hurts, I'm going to end up pressing them strong and into the mat, lying my head down, pulling my belly in, and I'm going to pump my legs instead for the hundred so I'm going to do this.
Inhaling, two, three, four, five exhale and two, three, four, five. Maybe you can do that with your head up, pulling my belly in. Maybe your arm's going to aggravate your shoulder so you don't want to incorporate the arms, so then you'll end up learning how to lower them and bring them up. That's going to be more advanced. Just a lot of things. I just want to really encourage you and inspire you that there's hardly anything that you can't do in the let's get started series if you have an injury or weak shoulder, elbow or wrist.
So the next exercise that you'll learn is the rollback. So we're going to sit up and just show you that this isn't really you teaching you every exercise. It's more giving you tips on how you can approach tools on how you can listen to all the details and cues that are so important in the let's get started series, but we've adapted them to your body that your needs. So in the roll back, maybe you tends too much here and that hurts your shoulder and you can't seem to shake it. Well then you can just rest your arms here or hold them lower and just wherever it's comfortable.
But it should be okay on your arm and shoulder and elbow and everything. And then when it gets a little bit more advanced, maybe it gets a little tricky here. It's okay when we're pulling in our belly and just sliding our arms for the roll up and you are going to be learning the full roll up in the series, but as you learn the complete roll up and it requires arms, this is where you need to take note. Where did it hurt you? Are you okay here? But you can't do the full roll up that starts back here, right? Maybe you have to start it right here, coming up with the head and then the arms always stay.
I'm trying to get parallel to the mat, so right now they're perpendicular or straight up to the ceiling and now we're going to make them at the same level as the mat with your head diving through. Okay, so that this should all be safe for your wrist, for your elbow, for your shoulder. But again, me, maybe after you roll up and you're rolling back down, maybe the arms have to stop here. Maybe they can go back here. Maybe they can go back a little bit here. You're definitely gonna want to pay attention to the detail of how my spine looks, particularly where my shoulder blade is and my ribs that they're flush with the mat rather than arching and losing contact with the Mat. That's not going to build strength. That's taking your arm out of joint, so you're going to only want to take it to where can you do that?
Where can you keep your powerhouse working? Where are you reaching from your lats and having it in join. So you're going to have to monitor yourself, teach yourself, showed you what not to do. Hopefully that was helpful. Then the next exercise is single leg circle. So you're going to bring one in. The other one will be bent when you're learning it.
And just be gentle and aware like how much can you pull. Maybe it's not much. Maybe it's a lot. And same thing with the other leg. Nothing you need to modify for a bad shoulder, which is just wonderful or bad elbow or bad risks. The next exercise is going to be rolling like a ball. We don't do that in class one, but I just want to point out when you do do it that again, you want to be careful not to. Uh, I guess I should say weed.
I make you, I'm tough. I make you lift your bottom forward. Well that might be a really good indicator of what hurts you. Maybe it really hurts you to put all the weight on your wrist like a pushup would cause this is a tricep dip. So maybe you feel that way in your wrist and you feel the weight in your hand or your elbow when you do that transition, cause I make you work in all the transitions. If that doesn't feel good, leave it out because one day your powerhouse is going to be able to lift you up, lift your weight up, you're going to feel so strong and your bottom is going to help lift your weight. But in the beginning I'm very strict that you can't slide your bottom while you can. If it hurts you, go ahead and slide your bottom forward.
That's your modification. If it doesn't bother you, you're going to keep working on proper shoulder placement and strengthening the back of your arms. See how that's a tricep dip as you bring your bottom forward for any of the rolling exercises and then rolling like a ball. One day we'll be like this, but in the beginning you're going to learn it here and just try to keep a loose hold and work the arm, not the grip, but have that water flowing down till let the elbows drip. Don't throw away an opportunity to strengthen your arms. The next exercise, again, if it hurts your wrist, you can slide your bottom on the mat. If it doesn't, you're always going to work on strengthening the shoulders, the powerhouse and the triceps as you lift back.
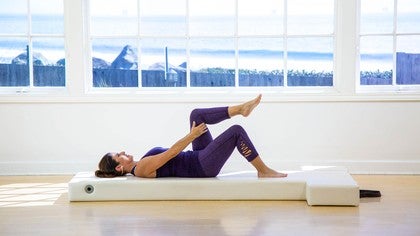
K. All right, so then the series of five and you're going to have the right leg coming in and you're going to either hold under your knee or you're going to learn proper hand placement, which is here. I'm just going to jump right to that. My right hand goes to my ankle and my left arm that crosses the body goes to my knee. I'm not going to teach it again, but I do want you to really pay attention to those elbows. We're not going to drop them. We're not going to throw away an opportunity to strengthen our arms. Maybe you don't have to grip but do work those arms.
So I'm going to show you what single leg stretch looks like when you're working your arms pulling. I'm not pulling with my arm, I'm just stretching, but I'm making sure my arms are in great placement. The double version is the same thing and when you take your arms up overhead, it's very different than if your head was down here and my arms would go back. This might hurt. But when you're up with your head it's a different range of motion.
So here I'm trying to get my years between my knees so when I take my arms up overhead, they're just going to be by my ears, not behind me ears. And then you're going to keep them in your peripheral vision as you come back. Such a good arm strength and are here for your shoulder, elbow, wrist. When you use the Armstrong. And then I like to pretend I'm in a body of water, Nepal and I'm pulling myself through who I felt all those are muscles.
All right. And then you have single straight leg, which should be fine if you don't over tug, but I do want to talk about the next two which are a double straight leg as well as the Chris Cross. Your hands are going to go behind your head. How does that feel for you? Does that bother your wrist? Does that bother your elbow? Is that too much of a stretch on your shoulder? Too much tension. Find what works for you. Maybe you can't have your elbows out to the side.
Maybe it's okay if you do your elbows straight up. Okay, we're going to want to find where is that range of motion. So I'm going to bring my knees up to show you what the exercise would look like and can pull my belly in and come on up and the legs will be straight and you're going to do the double straight leg. But again, maybe it's better here or maybe it's better here and that's a great, you just take the arm out, but you're pressing down and using it for strength. And then there's the crisscross. The hands are here, but maybe this hurts. Maybe that doesn't feel good, so maybe you're going to hug here. I'm thinking that maybe it's just better if we leave out the crisscross completely. If that hurts you to put your hands behind your head. Why? Because if that hurts you.
Another thing you can do is during single leg stretch and double leg stretch, this is sometimes the way I teach it to really make people use their powerhouse is I take out the arms completely. I mentioned earlier that they're meant for a stretch. You're holding your arms nicely, but some people overuse their arms. So I make them put them here, press him down, pull your belly in and then it's your belly that's bringing in that leg, belly belly instead of those arms. And the same thing with the double version.
Holy my belly in pull it in to come home. There is no question about using the powerhouse instead of overworking the arms. So those are some tips and modifications for this series of five and how to help you hold your arms correctly. Let's sit up and do spine stretch forward, spine stretch forward might bother you. Your shoulder, if you are holding up your arms here, okay, might hurt your shoulder, probably not your elbow or your wrist, but maybe your shoulder if so, put your hands right here. Pull your belly in. And just as you peel off that wall, they slide. Nothing should hurt and then willing up, you're doing everything with confidence. Kind of.
Same thing with open leg rocker in the future. This is not an exercise we learned for a while, but put your hands underneath your knees while you're learning it so that you don't take tension in any part. Maybe it's super easy and then you can slide your hands here and you're still not taking it. Or maybe you find that you are, leave it out until you feel really good about it. All right. And then, um, the next exercise that is very concerning, possibly need to omit, but definitely modify is the saw. So here's the saw. We would have our arms straight out to the side and I can see my pinkies in the corners of my eye. The way the sauce should be done is with your belly and Amarie twist, twist, twist as far as we can to the right without moving our hips.
And then we reached the baby, the Pinky to the baby toe as we stretch. And to show it to you one more time on the other side. So I'm going to pull my waist and lift off my seat, twist, twist, twist, and then I'm going to bring my pinky to my baby toe. While this pinky rises up, this movement might bring tears to your eyes just watching me, right? So what can we do differently? Well, if just this hurts the shoulder, then you can, as you twist, drop the arm that you're going towards rotating it.
That should feel okay. All right? And then you're going to roll up. And same thing on this side. You're gonna drop the arm as you twist, Andrew reached down. This is really, really important. So most in any pain that you're feeling should be taken care of. If you drop the arm that you're turning towards and then reach and then you're going to come back up and you're gonna drop the arm and reach.
I hope that's helpful. Now there's a bunch of exercises that are on your stomach. There's neck roll, there's single leg kick and double leg kick. I would say that all of those are gonna probably your shoulder. I can give you a little look at it, but if it hurts you to put way on your wrist, if it hurts you to put weight on your hand, then definitely the neck roll is going to aggravate it.
So either you come up only as high as it feels okay or you leave it out completely. Another exercise after that is single leg kick and you're going to be popped up onto your elbows. May Not hurt anything at all, but it is one to keep an eye out for that you might have to leave out and it never doesn't matter if you have to leave out an exercise because we move quickly and within in when we're learning it. It might take you two minutes sill the next exercise, but after that it's like 30 seconds at the most and we're onto the next one. If you have to admit some omit something. Um, the one after that double leg kicked, that one makes me the most nervous because your hands are behind your back. And if I lie down and show it to you, I'll be screaming in the mix.
I'm going to go ahead and just show it here. So imagine I'm lying down on my stomach. My right facial cheek would be on the mat and your hands are trying to be be hind. You're holding like three fingers and you're trying to bring them up between your shoulder blades. So you end up working your way up. And then instead of the elbows being up there trying to get down to the mat as well, that's all big stretch.
Maybe too much for some of you. So you really want to think about that one. I'll go ahead and show you those three real fast just so you know what to look out for. But this is neck roll where your hands are right here.
The next one is single leg kick. It's taught either this way might feel okay if your arms are parallel and it's also taught where their elbows are, a little out and fist together, open chest, but this might be pulling on your shoulder or your elbow or something. So be aware and you might just have to leave that out. The single leg kick, double leg kick. The one I said I'm really nervous about is with that cheek down and the hands back.
And then after you kick even more nervous for me is when you straighten the arms, are you pulling on that shoulder, joint, elbow or wrist, and are you lifting with your powerhouse? Those are all concerning to me, so I'm going to go ahead and go into child's pose to stretch. And besides that, the rest of the, Oh, let's do the side leg kicks. I'm going to grab a little towel just to show you how not to aggravate that. So we lie on our side as we get towards the end of the series, we introduce the side leg series and you lie in a straight line from elbow to your toe and then you bring your feet forward at a 45 degree angle.
If you're not flexible in your shoulder joint, if you have an injury there that might hurt you, that might hurt you, might be able to just lengths and out a little bit more, but that probably will bother you as well. So I'm just gonna fold this towel length in my arm and put this underneath my head so that now my neck is straight with my spine and I have no pain in my shoulder. This hands gonna rest here and I'm going to do my sidekick series. So you can do your whole sidekick series like this and you won't aggravate your shoulder. So now you have all the tools and tips you need to know to do the let's get started series where you're going to start your polites work, learn it like a whole new language and strengthen your entire body. You also might want to do class number ten six six it is an exercise where I get to teach all my fellow local instructors here, an arm weights series, and it's a fabulous way to develop great supporting muscles for your shoulder, your elbow and your wrist. It's an Oldie but a goodie, and it takes two pound weights. You don't even have to use weights if that, for some reason, aggravates any of your weaknesses, but I hope you feel confident and strong and let's get started building our [inaudible] work.
The Successful Beginner: Beginner Modifications

Mention
 |
Monica Wilson (Teacher) |
 |
Lori B |
|
|
Zhizhin Z |
 |
Heidi VDB |
Comments


You need to be a subscriber to post a comment.
Please Log In or Create an Account to start your free trial.
