Description
About This Video
Transcript
Read Full Transcript
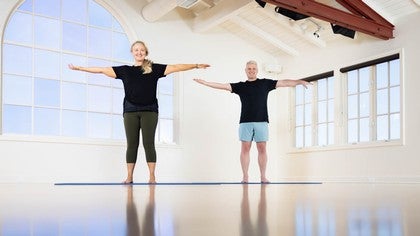
Hello. I'm Sally, and welcome to your daily dose of mobilization. We're doing this on the mat. So Andrew's helping me, we will take our mat. If you'll stand a little to the back of your mat, we're just gonna get started. This is designed to be done every day if you can or as often as you can.
And it's kind of succinct so that you can do it as often as you can. So we are going to start with what I call t rib movers. So the arms are out, I'll face you so you can see one palm is up, one palm is down. Now we're just gonna rotate those arms into opposite directions. So you one palm is always up, one palm is always down, and now we're just gonna get a little loose with it. So think of the upper arms spiraling to move the upper ribs, move the clavicles, and allow that movement to happen.
Then you add the head to turn to the palm that's up. So just keep moving. We've got a gentle pace here, but we might pick it up a little now. Just look. Look. Look. Let the shoulders move.
Let the arms spiral as much as you can. Last 4, 3, 2, 1, come back to the center. We still have one palm up. Now we're going to lift the shoulders and spiral reach as we look, lift spiral reach and lift exhale reach. So both arms are reaching in opposite directions as you exhhale reach and look. So we've got head, neck, shoulders, arms, all just moving our bones, releasing our tissue, and we've got 2 more. 1, 2, back to the center, drop the arms, and we're rolling down.
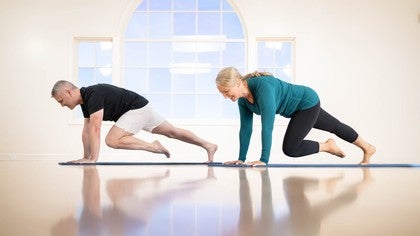
So start from the crown of the head big inhale. And exhale chin to the chest, roll through curling the back. Now when you're down in the roll down, I want you to loosen the arms, loosen the head, Stay connected through hamstrings holding the pelvis, take a breath into your back, and then exhale curl back up when you get to the top big shoulder shrug around as you inhale and exhale rolling down. Curls through let the upper body hang, let the shoulders release, little flippy floppy, exhale rolling up, hamstrings draw the pelvis down stack the spine on top big shoulder shrug, one more, exhale roll, get nice and deep and rounded in the back, let the shoulders upper body hang breathe in, breathe out stacking the spine, one more big shoulder shrug around, And then we're going to roll down the last time, bringing our hands to the floor, walk the hands out, lower the knees to the mat, and just set yourself up hands under shoulders, knees under hips. We're going into a cat stretch. So, ex, how draw the pelvis under and round the back, inhale extend and drop between those arms.
Exhale curl. Inhale release, Exhale, curl, and lengthen release. 1 more. Exhale. And extend.
Good. Now we're going to sit with the cat. So you're going to exh how draw under. Sit back to your heels. Exhale scoop up inhale release, a little faster scoop and sit up and extend. Scoop sit up and now a few more just taking the weight out of the arms so you're scooping.
Let that sit you back up and lengthen 2 more. Round inhale, exhale through with the chest. Last one, and up and through with the chest, then bring it back to a nice long flat back. Now I want you to be a little connected hamstrings to base of the pelvis long flat back, head in line with the spine for happy puppy. So from this long position, look around to the right, lifting your right hip towards the right shoulder, back to center. And to the left, looking around, all the way, opening the ribs on the side that's long, center. Now as you come around, try to look over the back of your pelvis, center, and right up over try to get to the other side of the pelvis, Now we're adding pace.
And look. Look. Still trying to get the eye line right across the back of the pelvis. And we've got 6 5432 1 and coming back to center, and we're ready to roll our ribs. Now the ribs will go up into the cat to a happy puppy, extended cat, happy puppy, and home. So you get the picture.
Now we're gonna do that with haste just rolling through all those ranges, let the head follow the spine. So it drops into flexion, and follows through one more this direction. Hope you're not getting dizzy back to the center reset to the other side. So start from extension. Go happy puppy around and keep rolling those ribs through.
Everything else responds to it. So pelvis, femurs, upper arms, all just get mobilized as you think about the ribs. And last one, and back to the center take a little moment to take a breath in, and just sitting back, we're turning to the side into cross legs. Now we're doing a little side reach with translating ribs, which just means they're shifting side to side or gliding side to side. So let's have arms to a tee So with the side shifting, we're going from just above the pelvis first, send each rib across, shift it to the side, then lower the reach the per arm over and bring it back to the center lifting into the tee. To the other side, shift, lower, lift.
Bring it back to your tee. You've got 2 more each side. Shift think about each rib going separately one on top of the next and up. Shift, chief, chief, chief, and lift the ribs up and over. Back to your tee, we have one more each side.
Out first, then over. Good. And out first reach as far as you can. And coming back up. Good. We're going to lie on our sides, knees bent up. So let's go on to the right side first.
Knees bend up in a 1990 position. So ninety at the hips, ninety at the knees, just more think about having the knees in front of the hips not too far away for a side lying circle. So the top arm is going to reach four draw a big circle all the way around, take it back all the way, and then bring the hand back onto the side of the body. That's one circle. I'll have 3 more.
Think of reaching forward now on the way overhead, see if you can reach past the underneath hand. Open it back up and bring it around 2 more and reach move as much of the body as you can, allowing the drawing of the circle with the fingertips to really guide how far you're going. Reach past the underneath fingers all the way around and back to the side. Now we're going to stay here and send the top leg out with a flexed foot. Top hand down just to give you a little bit of balance, and I want side kicks So it's more of a swing today, though.
So we're going kick forward, swing back, and kick, swing. That's 4. I'll have 4 more kick. And think about being as stable as you can while you're letting the leg swing. Don't lock everything down. Just let it be naturally stable.
And one more, we're gonna let the leg finish back and bent. Just hook it onto the floor. Now take this top hand around in your circle. Take it all the way back so you get extension in that sideline position. Bring the arm all the way back around and onto your side and bring the knees together, and we're going to the other side. So sitting up, just turn yourself over, or you can roll on the mat, Andrew will keep going and on to his side while I do a little sneaky change here.
And start with both knees bent up, 1990, and the top hand will reach forward all the way past the underneath hand and around drawing a big circle and allow the legs as Andrew's legs are going that's perfectly fine. Allow them to go with you. Just get as much mobility out of this as you can by working the circle So that little bit of leg movement in the hip joint is still just giving us a little bit of mobility in the hip. So we're up to circle 3, I do believe, and Circle 4 all the way around. And coming back arm onto the side.
So the top leg then extends down with the flexed foot, so in line with the spine, And then we go into our kicks for 8 and forward swing it back. Leg swings is how I think of them. Inhale, exhale. Last two, and then we have one more where we kick it back and hook it onto the floor. Comes forward for a big circle, takes you all the way back through that extension, keeps drawing you around.
Knee comes in and turning on to our tummy. So lying prone. I'm gonna keep myself nice here, try and keep my clothes on, and hands down just a little diamond position under the forehead. So lower your head into that diamond position of the hands, and I want a little bit of breastbone breathing into a thoracic extension. So start by just taking a breath and opening up the thorax front to back. So think about inhale down into the breastbone up into the thoracic and then exhale let that drop.
Inhale into the upper back, and exhale. Let that drop between the shoulder blades. Inhale again. Now on the exhale here, let the upper back drop between the shoulder blades, but the head comes out and lift into an extension. You can use the arms as little or as much as you want now on the inhale let the breastbone breeding happen. On the exhale, let the head shoulders lengthen forward.
Think of the sternum up the wall ahead of you. You can even stretch the chin in health. Thinking up into the back with the inhale. Exhale. Extend. Let the breath empty.
Take the extension. One more. And it'll extend, and we're going to stay there. Bend the knees to the outsides of the mat, and allow the feet to drop in wherever they go for you. If it's uncomfortable, just take the legs out and make it a bit narrower to work through this.
But if you can take it, I call it a little frog position, so a little frog, let the feet hang. Let the pelvis kind of be heavy. If you don't feel anything up too discomfort or too uncomfortable there, just allow it to hang. Yeah. And we're staying in a little extension just to hold that position before we rotate leg side to side. Yeah. So this is going right up into the hip joints.
It will also have a little rotation component into the lower back, and knees as well, obviously, if it doesn't feel good, take the legs out behind you and just rotate them in and out. Which would be so Andrew keep going with that, which would be just letting that rotate side to side. So that's if it's not fantastic, your knees hips because it's quite a strong position. Otherwise, we'll do the last 4, 3, 2, 1, and hold. Lower the head back down, and we're going to bring the legs in sit ourselves back into a rest position, let the arms stretch. So keep walking them forward as you sit back on your heels, take a big breath in, breathe out, and coming up to sitting, That's your daily dose of mobilization.
So many ways you can mobilize the body, but hopefully doing that over and over again really allows some release through joints, bones, tissues, everything gets nicely circulated and released.
Intermediate Mat Workouts: 20-Minute Classes
Mention
 |
Sally Anderson (Teacher) |
 |
Lisette-Anne V |
 |
Lina S |
 |
Maja Lund |
 |
Julie Lloyd |
 |
Stacey S |
Comments


A couple of years back I started applying all-planes shoulder girdle, rib cage and spinal mobilisation into pretty much every warm up I teach before sessions of all levels. I first did this as a test after playing around with an old video of yours where you use a foam roller to mobilise SH girdle and rib cage. What I have consistently observed since then, is a much more readily available and fluid connection through deep stabilisers and diagonal lines. Clients simply look longer and more stable, and they handle load better throughout the class. It can be short and simple, but it seems to work. If you or anyone here has any nerdy rants or scientific sources to share on this topic then I would be incredibly grateful

Thank you for offering your years of experience and wisdom to us all, you are a gem to our amazing Pilates community


You need to be a subscriber to post a comment.
Please Log In or Create an Account to start your free trial.
