Description
About This Video
Transcript
Read Full Transcript
Welcome to Beginning with Matt. This class is kind of a workshop experience class that is geared toward beginners. But is also could be really useful for those of you that are more experienced and wanna dive a little deeper into the principles and the fundamental concepts of the Pilates work. So in this class, I'm gonna talk a little bit about where we are in space and an ideal pot or in various different things and also give you some really nice opportunities to, understand some common challenges in very basic exercises and identify maybe how you could shift that exercise to suit your body so you can move with ease. So for this class, we will need a towel.
A hand towel will be perfect. So if you don't have one, make sure and go find one because you will use it for various different things. Okay? So let's begin with understanding a neutral spine is a very common concept spoken about. It's fundamental to Pilates repertoire and functional exercise and understanding what neutral spine is or ideal posture is useful for understanding how to shift movements to suit your needs. So when I'm talking about neutral fine.
I'm often talking about your 3 body weights, your head, your rib cage, and your pelvis. So I'll refer to them as your 3 body weight sometimes. So the head, the rib cage, and the pelvis should be aligned on the same plumb line connected by your spine. And it's useful also to understand that your spine has 3 curves, natural curvatures, the the the cervical spine or the neck goes in one direction. And the low back or the lumbar spine has that same curve. The upper back has the reverse curve.
When any of those curves are over accentuated, it can cause stress or challenges throughout the entire body. So it's useful to understand where ideal posture is, where your 3 body weights should be, and then learn how to work with them a little bit. So head should be balancing on your spine, kinda like a baseball on a pencil. So oftentimes our heads are forward. You're gonna wanna feel what it feels like to have your head where it really does belong. Rib cage can oftentimes be a little bit flared or a little bit compressed.
And we wanna know that our ribs are sitting as they should be, which is tricky to understand, but through the process, you'll you'll understand a little bit more, but but settled stacked directly over the pelvis. Pelvis gets a little more attention in Pilates it seems. And so when we're talking about neutral pelvis, we wanna be aware of where our pubic bone is. That's the bony landmark right down down there and your hip bones, your ASIS. And they should be on the same plane.
So when standing, they're on the same vertical plane. When you're lying on your back, they're on the same horizontal plane. And then also there's these elements of rotate or lateral flexion that can affect where your pelvis is. Okay. So we'll learn to identify and work with that when we get down on the mat. Breath. Breath is so very important. And with Pilates, we're endeavoring to do what we call lateral posterior breath, which means breathing side and back.
But what does that actually mean? Let me tell you that this breath idea is a whole workshop. So for now, I'm gonna distill it down to a real simple idea. Your rib cage houses your lungs. Okay? So your lungs are underneath your rib cage. When you inhale, your ribs should expand, laterally, posteriorly.
When you exhale, they'll kind of come back where they were. So as you inhale, the ribs will actually separate and expand when we have pro, good breath mechanics, I should say, ideal breath mechanics. And then when you exhale, they'll come back in. When you inhale, this is interesting. Your diaphragm will pull the air in.
It contracts. And when you exhale, it floats up. Again, we can talk more about that another day, but for the sake of this course, what I'd like you to or this class, I'd like you to really be aware of your ribs endeavoring to open and close this way rather than what often happens is flare the ribs and pull down. And when we breathe like that, which is more of a chest breathing, we stifle part of the diaphragm, and we really only fill this very small part of our of our body, if you will, with air. And so when you can visualize the air going to the lungs, and the ribs opening, you may find that you can find a deeper breath. The most important part about breath though is to remember that the breath should not Stifle the movement. The movement heals. So please remember that when practicing these movements or any movement, you've gotta move mindfully aware of how you feel trying to shape the breath to match whatever it is I'm asking, but if you're not able to shape the breath, It's okay. Just breathe, just move.
And over time, you'll layer the concepts and hopefully understand more and more of the things I'm trying to offer to you, or I'm I'm I'm suggesting, if you will. So here we go. We're going to take these ideas and bring ourselves to the mat. So I would like you to make sure that however you get down on the mat, you do so in a way that suits you. Some people will be comfortable bending with their knees. For some people just standing and taking a roll down might be a good idea bending the knees.
So then put your hands and then your knees down on the mat. And find a way to shift yourself to your bottom. So, again, I'm gonna do things certain ways, but there's it's always important that you listen to your body and you find happy ways to move your body, ways that feel good, let sensation be your guide. So we're going to take this towel. I've got it folded three times, and I'm actually going to kinda roll it up so I can use it as a spacer for my knees first. Okay? So I'm gonna hold the towel in my hand, lie myself on my back, and then settle in for a moment here.
So First and foremost, will you, before you do anything with your towel, will you feel around on your mat and make sure that you feel centered? A lot of Pilates is proprioception and body awareness. So where are you in space? And can you find that you are as straight as you can possibly be as, even as balanced. Yes. So take the, the towel and just place it gently between your legs. Now if you have a wider pelvis, you could squish this towel and make it more like a ball, or you could even use a ball if you wanted to.
I just want a little spacer between the knees. So begin here with your feet all the way together and really feel the bones of your feet. So you have a first metatarsal, which is the ball of the big toe, where sometimes we get that bunion. And I want you to try to really feel that those two bones are tucked on right and left foot. And that will help you know that your legs are even.
Check-in with the amount of knee bend you currently have as well and make sure that your knees feel comfortably bent. If you're too far away, it will be quite challenging to do the pelvic curl. If you're too close, it will be a little restricted on the knee joint. So find that sweet spot where it just feels comfortable and settle in. And then separate your heels and separate your toes so that your legs are separated about the distance of your towel. Again, if you're wishing for a little bit more space, just make a slightly different prop with your towel.
That's how we can do that. Okay. So here, we're going to think about the 3 body weights now. So we've settled our feet and we're ideally in neutral alignment with the legs. Think about your pelvis for a moment and just kinda feel where your pelvis is in space. Pay attention to your bony landmarks. You have your hip bones and your pubic bone.
And in theory, it's resting in a neutral ish position, but without discomfort or pain. Yeah. Now feel your rib cage for a moment. Just sense it and feel where your ribs are. Can you rock and roll your ribs a little bit until you feel like your rib cage is just settled and comfortable. Now feel your head. Notice where your head is in the space just kinda roll around a little bit and feel your head settled.
3 body weights, head, ribs, pelvis, ideally in a neutral position against the mat. That you're lying on. Place your arms down by your side. I see this a lot. With my arms down by my side, my shoulder is rolling a little bit forward.
My shoulder blades are not actually resting on the mat. And in an ideal situation, we wanna find a way to let the shoulders or engage the muscles of the back body to put the shoulders on the mat. So how can we do that? Float your hands up to the ceiling for me. Feel your shoulder blades, lift them up, pull them down, lift them up, pull them down. So when I say pull them down, I'm plugging them to the mat, not away from my ears yet, but to the mat. So try to feel that flat shoulder blade or scapula actually grounded on the mat right now. Mine currently is after I've gone up and down and kinda loosened up some edges there, and now keep the shoulder blade down.
Now feel that arrangement and allow your elbows to bend and see if you can put the back of your upper arm down. Without your shoulder coming forward. So feel shoulder blade back of the upper arm. Lift your arms up, lift your shoulder blades, shoulder blades down, back of the upper arm. Now can you straighten your arms without losing that shoulder position? So you wanna keep that shoulder blade down. Keep the back of the upper arm down.
Lift everything up again. Shoulder blades, back of the arm, relax the hands. Or relax the elbow, I should say. Now can you turn your palms to face down and when you do that, do you feel your shoulder rolling forward, or are you able keep that engagement of or that that connection to the mat with your shoulder blades. In an ideal world, we wanna be able to bring our arms close to our body with our palms facing down without the shoulder ball rolling forward and with the shoulder blades still grounded to the mat.
So if you can do that comfortably, feel free to. Otherwise, feel where you need to be in order to feel that you're grounded. Most of us need to have the palms facing up for a little while, and a little wider with the hands for now is a good choice. So I'm gonna recommend that. Now bring your attention to your head. Will you press with a little bit of intention, the weight of your head, into the mat?
Now for a moment, I need you to not look at me. I want you to look straight up to the ceiling, please. So make sure you're not looking at the camera. Look straight up to the ceiling with your eyes, pressing with your head into the mat, roll your head to one side, and then roll your head to the other side. And do that again. A gentle press.
Use your eyes to look straight to the side. Use your eyes to look straight to the other side and come back up. Now go first. I'm going to the right. It doesn't matter which way you're going, but You might twist so you can see me perhaps. Do you feel your shoulder blades still down? Do you feel that you have rotated your eyes and your head without going down or up.
How can you figure that out? Look down toward your shoulder. Look up away from you. Look down. Look up, find center. That's rotation of your neck and head. Come back to center.
Go the other way. Rotate. And have you rotated evenly here or actually done rotation? Can you look down, see your shoulder, look up? Where your eyes go, your head follows. This is really important. Look up. Look down.
Look straight to the side. So that's ideally where you wanna be when you rotate your head and neck. Come back to center. So let's just settle there with the head grounded. Feel the scapula shoulder blades open, bring our attention now to our pelvis.
Ideally, we're in what feels like a neutral pelvis position, but what is that? Your pubic bone, you can use your hands, touch the pubic bone, and your hip bones are on the same plane. Now Tucked pelvis posterior tilt is when you flatten the low back, your pubic bone will be higher than your hip bones in this relationship. Or, technically, your hip bones are behind your pubic bone, but your pubic bone is the high point. Now when you find relaxed pelvis, it should be flat. If you were to arch your back, dropping your tail down a little bit more and feel how your hip bones rise up in space, We're now in an arch or an anterior tilt.
So we're gonna tuck and we're gonna arch. If you do that without thinking, you're gonna feel your head sliding back and forth. Will you pause for a moment? Have your head stay relaxed? But grounded. So I'm grounding my head to the mat, and I'm gonna try to keep my head somewhat where it is as I tuck flat in the low back.
And specifically, when I find neutral, I wanna keep the energy of length or grounding through the head. So, again, I'm gonna tuck, grounding the low back. And as I find neutral with my pelvis putting the tail down, I wanna also be mindful of my head heavy. So with your arms by your side, let's do that with breath. Exhale to simply gently tuck the pelvis using abdominals.
And then push the tailbone down, keep the head heavy. We're gonna gently tuck the pelvis using the abdominals ideally. And push the tailbone back down. Now when we're tucking the pelvis, we're actually moving the low spine. We're grounding the low fine.
So think more about that than only the pelvis movement and then put your pelvis back where it came from. And one more time like that, we take a little bit of a flexion of the spine or a grounding of the low back, and we return to a settled pelvis. Now side to side movement or rotation of the pelvis without moving the legs. So keep them where they are. We're just going to ground down through one side of the pelvis. The other side will lift a little. That's a rotation.
Ground down through the other side. And the other side will lift. So we're just gonna push down through one side of the pelvis and gently push down through the other side of the pelvis. The movement is quite small, but it's very powerful. We're waking up some deep muscles in the spine that will be really useful for stability.
So I'm just shifting and shifting. And as I do, if you can feel one side of your shoulder, one of your shoulders wanting to ground more, Feel like try to lean into that. So what you'll find is whatever side of the pelvis you're pushing down, the opposing shoulder blade will wanna ground. So lean into that. That diagonal line, lean into the shoulder and arm while moving the pelvis and then settle and relax for a moment.
Please breathe in. And please breathe out. We'll talk a little bit more about specific breath momentarily. So now we're gonna do just a little bit of a pelvis movement in a circle So tailbone goes down. We're gonna circle around to the top of the pelvis to the side and do three circles in one direction. Notice how much movement your spine in your head will want to to make and see if you can keep your spine in your head a little bit more settled.
Go the other way. 3 circles. So my pelvis is moving. Other things are moving, but my legs are staying somewhat where they are. As a result, my hip joints are getting a little a little bit of defuzzing, a little bit of cobweb removal, if you will. Some movement in the hip joints.
So let's settle everything. We feel the head heavy. We feel the shoulder blades heavy. We soften the sternum down a little bit so that the rib cage is settled and you feel your pelvis. Here now, I'd love it if you'd close your eyes for a moment and focus on your breath.
In health for your nose for 54, 321. Exhale through your mouth for 5, 4, 3, 2, and 1. Inhale, 2, And exhale 234 and 5. Ideally, we wanna be able to elongate the inhale to about 5 counts, and we wanna exhale completely. In about 5 counts. Will you think about expanding your rib cage when you inhale breathing into the mat?
And when you exhale, you can use your abdominals a little bit to help force the air out. Pilates breath is usually inhaled through the nose, lateral posterior into the rib cage, exhale through the mouth, which is also a cleansing breath. Anybody who prefers to breathe in and out the nose, I'm always a fan of such endeavors. So feel free to inhale through the nose and exhale through the nose. Most importantly, breathe.
Let's prepare to move into our first actual real movement. If you will, those were just exploratory movements. Pelvic curl. So my head is settled. My arms are by my side. My pelvis is settled.
My feet are grounded and relaxed. In health for your nose. With an exhale, we use our abdominals to flatten the back without using the glutes and hamstrings yet. Put your pelvis back down. Repeat.
Exhale. You're gonna ground your low back. Feel how I'm speaking about the bones to provoke the muscles. Think about that. And lower back down. Pelvic curl comes now. So we use our abdominals to move the spine first.
Then we wanna activate the glutes and the hamstrings as you lift your pelvis up to whatever bridge feels good to you. So a pelvic curl or a pelvic bridge in hell. Exhale to lengthen and lower down one lovely vertebra at a time. Common challenges here, inhale. Exhale.
As you curl up, you wanna feel abs first, backs of the legs, Sometimes when we're a little bit tight or unsure of how to move, we'll sort of open up the body to lift higher. So if you feel tension in your low back, make sure you're keeping the sternum kind of down a little bit or the rib cage connected to the shape of the spine. And you're trying to lift more the pelvis rather than just the ribs. So here, ideally, I'm in this nice straight diagonal line with my body. If it doesn't feel good in your back or in your knees, you might not lift your pelvis as high, and that will help solve the problem a little bit. Take a breath.
And lengthen and lower down one vertebra at a time, inhale. Use the exhale to curl up abs first, backs of the legs, Feel the inner thighs holding the prop that you have between your legs. Find this point where your pubic bone and hip bones are on the same diagonal line upward, ideally in alignment with your thighs, and your sternum is in alignment with that diagonal line inhale, exhale to curl down. Obviously, we stayed there for, hopefully, a breath or 2 inhale to prepare. Use an exhale to curl up. Find the height of your curl.
Don't be shy about using your arms pressing into those strong straight arms. Pressing into the shoulder blades to help open the chest. Gently lower down one vertebra at a time. So my ideal breath pattern here would be an inhale to prepare, an exhale to curl up, finding the height of that curl at the end of the exhale and then take a nice lovely inhale and use your exhale to articulate one vertebra at a time down. And let's just do one more pelvic curl, please inhale.
Exhale. 2 curl up. Nice. Deliberate movement, inhale here, feel backs of the legs, feel abdominals, and exhale to curl down. So the quick recap there is if you feel that you're straining your low back, maybe don't lift as high and soften your sternum, If you feel tension in your knees, you may find that you need a bigger prop between your legs, or you wouldn't lift as high. Let's go ahead and take that towel away from our knees and just put it to the side now.
And we're gonna work a little bit on rotation. I'm actually just gonna back here so it's out of the way. So float your hands up to the ceiling for me. Lift your shoulder blades, put them down. Lift your shoulder blades, put them down. Lift them.
Put them down. Keep them down. Feel your head. Feel your rib cage. Feel your pelvis. Your three body weights. Allow your elbows to go out to the side and see if you can put your entire back of your upper arm down without flaring the ribs too much so you wanna keep the rib cage settled.
And then can you straighten your arms there? And do you feel perhaps a little stretch? Hopefully, you do. Bend your elbows. Lift your arms up. Lift your shoulder blades up. Pull your shoulders down to the mat.
Feel that activity actively putting the shoulders on the mat and feeling the head grounded. Then the elbows try to feel that the back of the shoulder is still on the mat. And then we straighten the arms. Now if this feels too intense for you, simply take your arms a little lower in space, But do take a look out over at one arm and make sure your arms are not too high in space. We wanna endeavor to be about out from the shoulder.
Look out over at your other arm and make sure that you're straight out from the shoulder. It's not wrong to go up more, but it's pretty intense. So let's work with something that's more comfortable. Keep the arms grounded like this. A little activity in the shoulder blades to press the shoulders to the mat, and stretch the arms wider.
Again, if you feel tingling or numbness or uncomfortable feelings in your arms, take your arms a little lower. And it should make it a little better. So let's just go ahead and carefully take our legs to one direction. It doesn't matter which way you go. I'm doing a little spine twist. I've just relaxed my legs over, and then I'm gonna come back to center, and then I'm gonna relax my legs the other way.
Now if your body is working well for you in this. It should feel pretty easy, and it should feel like you can do this without restriction. Oftentimes when people do this very first rotation here, relaxing the legs over, will feel a restriction, maybe in the hip or in the back, and it will feel kind of uncomfortable or sticky. So if that's you or even if it's not you, here's some ways to to work through that. Keep your pelvis kind of relax where it is.
So try not to move the pelvis yet. I'm gonna ask everybody to move in the direction of the right with the legs. So you'll take your left knee Think about which one that is and bring it across midline to the other knee. And then you take that other knee out to the side. So both knees have gone to the right. Okay? Come back to where you came from. Let's practice that again.
The left knee like a domino goes to the right, and then the right one goes out to the side. Now in doing that, I didn't move my pelvis that much. I moved my hips. I moved my legs. Now feel how you have the outside of your right foot and the inside of your left foot on the mat, the other parts are a little bit unweighted. Push into those two edges and twist a little bit more.
So as I twist a little bit more, my knees go in the direction of the floor. If I am arching my back too much. I'm going to feel a pinch maybe in my low back. So think about that and see if you can feel that you're not arching your back too much. You're lengthening your low back.
So here, will you use your breath to pull your rib cage spine to the mat, to drag the pelvis and the legs back to where you came from. That should have made you feel your abdominals. Let's try this on the other side, and then we'll keep practicing. Now we're going in the other direction, right knee to left, and then left knee out to the side. Good. And then we come back.
Let's try it again. Right knee? Left knee. Now I have my outside of my one foot and the inside of my other foot connected. I'm going to push into that, and I'm gonna twist deeper. Here, you'll be able to see on the camera angle. If I were to arch my back, I would maybe feel a little kink in my back.
I would be fueling this with my back. So we wanna do that differently. We wanna think of lengthening through the low back push into the outside of the one foot, the inside of the other foot, and rotate without that extra arch. So the rib cage kinda stays engaged. When we do that, it's going to help you to engage and stretch the obliques a little bit better.
Now pulling back, will you think about pulling the spine to the mat, the backs of the ribs to the mat, to drag the pelvis and the legs back. So my legs and my back are not actually doing this movement. Let's practice. So Domino's, hopefully, that makes sense. Me to one knee, into the side. So we're going the other direction.
Now I'm gonna push into the edges of my feet. I'm gonna rotate a little bit more. My opposing shoulder blade stays down. Lengue through my low back, then I'm gonna pull my rib bones and my spine bones to the mat and feel those abdominals working as I drag the lower half back. Twist the other way.
Domino's first. Push, go a little deeper. So now I'm in a nice twist without arching. Right? And then you're gonna pull back. Let's do breath to movement.
We inhale 2 twists. We exhale to drag it back. This hip sway or spine sway is one of the absolute best ways to reset your body. Exhale to drag back. So I alternated. I know I didn't say that.
Let's inhale to twist. Push a little deeper. Use the exhale to pull the rib cage down and drag the pelvis and the legs back. Inhale to twist. Go a little deeper and exhale to drag it back one more time because it feels so good to me. In how?
I revisit this so often. Yes. I'm an experienced mover. Drag it back with the exhale. But this movement is one of my absolute favorites in health twists. Exhale.
Drag it back. Remember, my friends were breathing and moving. Okay. So float your arms up to the ceiling, get a little blood flow to your arms, and you're gonna need to make your way to a sitting position so we can put our towel where it needs to be. My recommendation is to roll to your side and use your hands to kind of push yourself up. So you're gonna wanna retrieve your towel. And the towel is gonna act as a hammock for our abdominals, especially if you feel neck tension.
So what you'll wanna do is lie it down so that the corners the one edge of of the towel will be about where your head is gonna be. And you wanna make sure some of your towel is underneath your back to make sure that you've got a, an anchor. Okay? So I've put the towel in a place where I think it's gonna be good for me. I'm just gonna lie back down, and then I'm gonna make an adjustment here so that I have about I don't know, 2 inches of space on the back of my, from the towel in my head. And then check-in again and, and be aware of your spatial awareness, where you are in space.
You wanna be kinda centered on your mat, use your hands, settle your body. So for the first part, I'm I'm actually not going to use towel yet because I'd like it if you didn't need to use the prop. But, certainly, if you do need to, it will be available for you. Okay? So let's take the feet together again and make sure that they're aligned. Balls are the big toes connected. Separate your heels.
Separate your toes. Your legs are separated about hip width distance or 3 to 4 inches perhaps. Flow your hands to the ceiling. Let your shoulder blades. Relax down to the mat.
We're gonna think of abdominal work in help. Use an exhale. We're gonna ground the low back. Think about that. Ground the low back to lift the head and chest. Look in the direction of your pelvis.
Where your eyes go, your head will follow. So this is a good place to be lower down. Let's try 2 more before we decide to modify in hell. Exhale. Feel the low back grounding. That's your root. To rise up, head and shoulders, look in the direction of your legs or your pelvis.
And lower down. One more time. Feel yourself grounding the low back to rise up to float the head and shoulders up and lower down. Now check-in. Do you feel more neck tension than abdominal engagement? If that's you and you feel uncomfortable somewhere, whether it be your back or your neck, try the towel modification. So What you'll do is you'll hold the corners of the towel. I think everybody should try it, actually, because it's a nice, modification. It's a nice, variation.
Hold the corners of the towel. And the energy when holding the towels is not to pull forward. I actually would like the energy to be like, as if you're straighten in your elbow. K? Now don't work so hard that your triceps fatigue, but that would maybe be a bonus. So a little bit of tension on the towel outward. A slight lift, so my head is hovering in it.
So my head is off the mat, but resting on the towel. Now inhale, use an exhale to draw the low back to the mat and lift your head and chest looking in the direction of your legs, but your head is resting. On the towel, avoid pulling your elbows forward, feel your head resting, and lower down. I love this variation for people who feel tension for sure, inhale. Use an exhale.
Abdominals engage, head stays heavy, lift, lift, lift, Look in the direction of your legs or your pelvis. Feel your head resting. Maybe roll side to side a little bit. Keep the energy. Of straightening the elbows rather than pulling forward and lower down.
Take another breath. And let's lift one more time. So if this feels like it solves the neck problem issue for you, then you should continue using the towel. If you know you cannot use the towel and just reach with your arms, it means you don't need to use a prop. So feel free to make that choice and gently lower down. Inhale. We're gonna exhale.
I'm not using my towel anymore, and I'm gonna lift my head and chest. My arms come down by my side. The goal is to have a neutral pelvis but it's important first that the low back be grounded so that you're lifted high enough, breathing, and lower down. Let's just do one more. Exhale to lift.
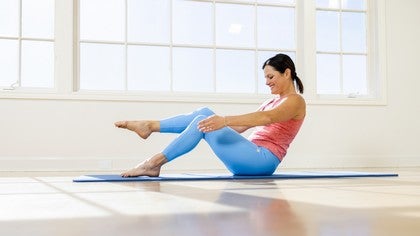
Pelvis is settled. And an exhale here to lower down. Beautiful. So playing with rotation. One way to know whether you're actually rotating your body or just turning your neck and head is to begin with your hands together. Now if you need to use the towel modification, for, the chest lift, you'll use the towel modification also for rotation.
But I'd like to try it first without, and then I'll show it with rotation as well. So my hands are gonna be connected. I'm going to pause, feel the shoulder blades down. We're going to lift the head and chest, and now we're gonna keep the height of the curl. My fingertip are reaching between my legs.
I'm gonna keep my arms straight, look at them, and I'm gonna keep my hands together. Take a breath. And we're gonna twist and reach just beyond one knee. Watch if your elbows are bending. Keep them straight. Come back through center.
Use an inhale. Use an exhale to go the other way. Inhale to center, exhale to go the other way. So we're drawing like a straight line. Inhale to center and exhale to go the other way. Come back to center and lower down. So I find that 2 or 3 is plenty for most of us first time.
After doing that with no towel, did you feel more neck, or did you feel more abs? If you feel more in your neck, you should try the towel. If you feel more in your abs, then you're probably on the right track. So another thing to think about is that we need to make sure we're lifting high enough to feel the center of the low back grounded the whole time. While you're twisting.
So I'm gonna do the second time with the towel. Feel free to give it a go. Either way. Hold the corners of the towel. Give a little energy to straighten your arms. Take a breath. We're gonna lift the head and chest.
Look in the direction of the leg. So you're lifting only as high as feels good, you wanna feel the center. I'm gonna just let go for a moment. The center of the low back is grounded, even if it means you have to tuck the pelvis, but, ideally, the pelvis is in neutral. So now we're gonna take a breath, take your eyes, just beyond your opposing knee, exhale, inhale to center, keeping the lift, Exhale just beyond the opposing me with your eyes and inhale and exhale.
Back to center. Let's just do one more. Exhale. Come back to center and lower down. And I'll tell you I feel a little heat in my abdominals. I hope you do as well.
Let's think a little bit about what we'll call hip disassociation. So when our pelvis is in neutral, ideally, the pubic bone and the hip bones are on a flat line, we wanna keep that. We wanna ground through the pelvis, ground through the head a little bit, ground through the shoulders, soften the rib cage. So you're in your ideal posture. We're gonna keep that arrangement and just lift the right leg up to tabletop. Table top is when the knee is bent at about 90 degrees, and the shin is parallel to the ceiling.
I'm gonna point my foot because it looks nice. I'm gonna take that same foot and tap the foot down and lift up. The goal here is that the pelvis stays completely stable. If you're not sure, if your pelvis is stable, put your hands on it. I am tapping my foot down with breath.
And I am lifting up. When you breathe matters less, the fact that you're breathing is important. Breathe. One more time. Put your foot down.
Now when you did that, did you have any clunking or thudding or snapping? If you did, it's an indication that you're something is not quite doing what it needs to do. So you might need to think about your pieces a little bit more. Second side, Pelvis is a neutral, head is heavy, abs are engaged. Lift the other leg up. Foot is just gently pointed because it looks pretty.
Tap the toe down. And lift up. So if you're hear if hearing, popping, snapping, thudding, try using your abs a little more powerfully by grounding through the pelvis. Perhaps think a little bit about the standing leg and try to engage it a little bit more. Second time around, we'll talk a little more about that. Put your foot down.
K. Release for a moment. In order to stabilize the pelvis adequately, we need to be able to use what we call a forced couple. The abdominals and the hip extensors, which would be the front of the belly and also the back of the leg. So you'll hear me say a lot root to rise. Here, the root is going to be the pelvis and the opposing leg while we rise with the other leg. So let's think about this like marching Okay? So we're gonna ground the pelvis, heavy head, feel the abdominals.
We're gonna ground through one leg, one foot, feel gluten hamstring, if you can. Float the other leg up. Put it down, ground to lift. Put it down, ground to lift. So I'm alternating my legs. I'm actively pushing into my standing leg a little bit to lift the other one. Now if you happen to hear hear popping or snapping before, hopefully you're able to smooth that out now.
If you're not yet able to smooth out any popping or snapping, know that as long as it doesn't hurt, it's okay. And over time, you'll hopefully learn how to stabilize better and glide a little bit more fluidly in your hip joints. Last one, 2 feet or down. Beautiful. Let's go ahead and find our way up to a sitting position. Now one way I like to get up is to hug my knees into my chest. I'll lift my head and chest, and I'll kinda rock and roll to get up.
If that doesn't suit your body, you could go ahead and get up a different way. We are gonna work on some rolling here, but you wanna make sure your body is happy with everything we do. Okay. So first sitting, Many of us have a hard time sitting up straight. Definitely have your towel available, and the harder it is to sit, the higher you want your towel to be. So I'm just gonna put mine over here for now.
So let's take a moment and just put our feet, at the front corners of the mat and sit on your pelvis. So a lot of times you'll hear scoop the flesh out from underneath you. Give that a go because it really helps give you a good pelvis print is what I'm gonna say. I want you to feel your pelvis print when you're sitting. So there is a lot of sitting work in the mat work, but the key is can you first sit comfortably?
If you feel yourself pushed back onto your tailbone, that is a very solid indication that you're gonna need to use a little roll like this, and what you're gonna wanna do is just come right up on top of it and sit on it so that it will sort of send your tailbone back a little bit and will make it a little easier for you to sit up straight. If that is not enough, you could use a block or you could roll up part of your mat and sit on the edge of your mat. I know that I don't need it, so I'm not going to use the towel, but please use it if you need it. Go back to scooping the flesh out and try to feel your sits bone. So you have a bony landmark right here. That needs to be down, and you actually need to feel just a little bit of your pubic bone connected as well on the bottom so that it's not your tail as much as you are forward on the pelvis. So if you need to bend your knees, please bend your knees.
If you need to turn your legs out, turn your legs out. I'd like to do a little not full pilates here because what I'm asking is that your legs are as best as possible, relaxed. So my knees are soft, my feet are soft. I'm thinking about my pelvis, and I'm gonna keep that alignment of my pelvis and try to sit with that. So just being able to sit is challenging and working on it, practice makes better. It's not about being perfect.
So getting better at this means that we can do more. So we're sitting on the pelvis. We're gonna just let the hands on the legs. I'm gonna try to turn my knees to neutral because I can, and my quads are still kind of relaxed. If you feel grippy up here, then let your legs do whatever they need to do.
We're just gonna sit, breathe, roll your head forward first, roll your upper back, and allow your body just to roll forward, letting your hands just gradually slide along your legs. Take a breath. Use an exhale to first engage your abs a little bit and then roll yourself back up until you're sitting tall. Look forward. Oh, yeah. So head goes first.
Roll through your upper back. Your low back. Your arms can just kinda reach. Notice if after the second repetition, maybe you can reach a little further. Try not to lift to the shoulders, but to keep them settled. Roll up.
So notice that your pelvis print stays the same. I have 3 connections. My two sits bones and a little connection to the bottom of my pubic bone. It feels like take a breath. And exhale to curl forward.
Just one more time here. Just an easy little spine stretch. Feel that. Head is relaxed. Notice if your shoulders are up, can you just draw them to your back body and let them relax a little and then sit tall again? So in order to do the sitting exercises in the mat work, we first need to make sure we're sitting up straight.
So practicing sitting up straight makes those exercises so much more delicious. So rolling, there are a lot of exercises in the mat rep far that require you to roll. And rolling should be fun, and it should feel good. So it's important one that you have enough padding. If your mat is thin, you may wanna add a towel or an extra mat so that your your your back feels like it's supported your spine.
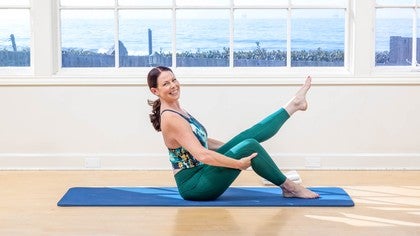
As you get better at rolling, you'll find that you need maybe a little less padding, and that's okay. Although, patting is nice because you want things to feel good. So rolling, we're gonna scoop forward just a bit on the mat. So we have plenty of room to roll back. You wanna be fully committed to the shape of the position before you endeavor to roll. So will you first just sit on your pelvis? Your legs can be wherever. Many of us are gonna need them to be a little out to the side and comfortably bent knees.
But if you're able to try having your legs in neutral alignment, if that works. So just take a breath, hands on the backs of the legs, and roll back a little bit. So I'm gonna lean on to my pelvis. I'm now on my tailbone. I'm rounding my back.
I'm looking at my pelvis. My abdominals are engaged. I'm gonna bring my feet a little closer in, so I feel like I've got a rounded foot. Now we're gonna try letting go with the hands fully committed to this shape. Can you lift one foot up? Put it down.
Can you lift the other foot up? That should be pretty easy to do, and you should be able to keep the shape of the spine the same. So if you feel your body shifting every time you lift the leg up, That is an indication that there is a hiccup that something is not quite doing what it needs to do, and we need to practice that really before we even try to roll. If I'm honest. Let's try it again. So I came up there in case you didn't see. We're gonna sit on both sides of the pelvis.
We're gonna bring the legs in if we can. Arms can reach forward or hold on. You decide. We're gonna tip back. I'm gonna look down at my pelvis now. If I need to hold on, I'm holding on. Otherwise, I'm not. I'm using my abdominals.
I'm touching them so I feel it. My pelvis stays the same. I lift one leg. I put it down. I lift the other leg. I put it down. If here, you can do this pretty comfortably, try lifting one leg.
Now fully commit to the shape and see if you can find your balance lifting the other leg. Hold, breathe in, and breathe out. See if you can bring your knees together. Breathe in, and breathe out. See if you can tighten up the shape of your ball without using your hands. Breathe in. Breathe out. Put your feet down, come out of it, take a break.
So just being able to hold the ball shape with your core muscles is key for safe rolling. So if you're not there yet, hold off on even trying to roll yet, maybe tomorrow, maybe next week. Practice makes better. That's all there is to it. Here we go. So we're gonna try it one more time with the rolling.
Legs are where they can be. Hands are out in front of you if you're able to tip yourself back. Look at your belly. 1 or both legs lift up. Shape stays the same.
Hub those legs in without using your hands, find the tightness of your ball, then put your hands somewhere. Feel your shoulders away from your ears, on your back body, breathe, try rolling, give it a go. Inhale back. Oh, exhale balance. Whoo. Use your feet if you need to, but ideally we don't.
In hell, roll back. Exhale. Use those abs to balance. Let's try 3 more, please. In now. Exhale.
2 more. And one more role, please. And let's rest that. So remember that rolling should be feel feel like a good idea, adhere to the pleasure principle, make sure it feels good hard, not hurting anything. Always adapt when needed. Now we're gonna do some sideline work.
So I'm going to just put my my towel back where my head's gonna be because we will use that for our final exercise. Actually, let's set up for that right now. We don't have to get up again. So if you fold your towel in half in half and then make, like, a little roll, like, a little burrito roll, you'll be ready to go for our back extension. Hopefully, you can make that work. So let's just lie on our side right now.
And, I'm just gonna center myself on the mat a little bit. So here you are on your side. Okay? Many times when we do the sideline work, I find people feel pain in their in their hip on the bottom side. Now I don't have an immediate fix for that, but, with a little bit of finesse in practice, hopefully, you're you can minimize that feeling. Oftentimes, it's just, being a little bit out of alignment and then, some tenderness due to inflammation. So one way to work on that is to take the top foot forward Okay? And know that we're trying to be between two panes of glass, one straight line here.
My top foot is forward, and my foot is where it can be comfortably enough. Rounded somewhere wherever that is. Okay? The pelvis is stacked. Sometimes it rolls back. Sometimes it rolls forward.
See if you can get yours to be stacked. Your shoulders are stacked. Sometimes they're forward. Sometimes they're back. Try to see what it feels like.
I like to work with my bottom leg. My foot flex that helps me to feel what I wanna feel. So feel free to do that or point it. I'm gonna flex my foot. The bottom rib cage is pulling up Okay.
So there's a little mouse hole down here. So I'm using my abdominals right now just to be here. Put your top hand flat on the mat and use that hand a little bit to help you out. Will you think about, actually, take that hand away for a second, will you touch the inside of the leg that is straight? And try to feel your inner thigh when you lift that leg up. So can you feel a little tone in the muscle?
Good. So if you can lift that leg up comfortably and hold it, without feeling pain in your hip, your outer hip, then we're good to go. Okay? If you feel pain, you're gonna wanna try to find a different spot for your leg to be maybe forward. More than likely, it's gonna be back a little bit. That's gonna fix it, but maybe it's gonna be forward a little bit. But we wanna be straight if possible. Now I'm gonna put my hand down so my my hand is flat.
I'm gonna keep the energy of this shape, and I'm gonna see if I can just unweight the foot that's in front. And let it take a ride on top of the other leg. So we're just gonna hold that for a little bit. So we're in a straight line. We're using our abdominals. We're breathing. If you feel like you have this, then you're gonna work on balance. So you might not use the hand that's in front, and perhaps you'll eventually bring that hand up by your side. That's quite a bit more challenging, but worth trying.
Just holding the shape. Whoo. And if you feel yourself swaddling around like me, then that's okay because that's what this is all about. Let's go ahead and give that a rest. Okay. So let's just roll to the other side. So you're just gonna roll over to the other side.
Rest your head in your long straight arm. Look down at your bottom leg and make sure it's straighten alignment with your body, take your top foot forward, resting it down, hips are stacked, shoulders are stacked. Bottom rib is pulling up. Look straight forward as well. That's gonna help your head be in the right position.
Try lifting that bottom leg up. Feel the inner thigh, flex the foot. Feel the shape here, top hand pushing into the mat, and then just lift that leg up and let it take a ride. So I like to flex my ankles here why you say I like to flex the ankles and hold the shape because it's like standing. So I want you to think of this as standing.
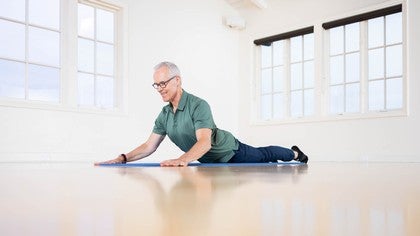
But what you're doing here is you're standing on your side, and so you're challenging your side body. Hopefully, you don't feel any discomfort or pain on that underside hip. If you do, remember, if you can really access the inner thigh and pull the leg up more from the inner thigh, you might find that that helps alleviate that discomfort and your breathing and simply holding this shape long and straight. And let's go ahead and rest that. And so now let's roll around onto our belly and move into back extensions.
So You're gonna wanna take your little burrito roll, and you're gonna put it down, and you're gonna rest your forehead on it. And back extension is probably one of my favorite things to do for sure. But I find that so often we're not aware of where we are or how to use our back body. So will you just put your arms down by your side? And much like when we first started today, you wanna think a lot about what your shoulders are doing. If you just relax, your neck will get kinda compressed with this shape, and your shoulders will flop to the floor.
So we have to be active here, please. So we're going to let the head rest on the towel roll, but you're going to keep your neck long. So there's energy. Yes. I'm touching the towel roll, but I'm not completely resting. And then can you think about where your shoulder balls are? Look down at them and notice that they're probably close to the floor.
So let's open the chest by lifting the shoulder balls away from the floor, and let's feel the shoulder blades on the back body. I've got my first finger or thumb touching the mat, whatever makes sense to you. I'm gonna take my hands a little wider than my mat, and I wanna think of reaching my shoulders First, lift the shoulders away from the floor and then reach the shoulders toward the back pockets. So I'm really energetically reaching my hands in the direction of my feet. So my body is long.
Try tucking your toes under for me, and we're gonna walk those toes in a bit. So I'm gonna really get a good foot stretch. So once I tuck my toes under, I'm pushing into the tops of the feet, and I'm opening across the front of the hip here, grounding through the hip bones and the pubic bones. So again, I'm in neutral pelvis while lying on my tummy. I'm in neutral spine, ultimately.
So here, what are we thinking about? We've got toprance. So the toes are down. The pelvis is down, but the legs are very light and active. My belly is active here. My chest is a little bit heavy.
My shoulders are actively pulling away from the mat and reaching. And then my neck is long. So hover your head, just hover it away from that towel and see if you can hold the shape and breathe. Now if you need to keep your head hovering, please do, but do keep your arms active as you breathe. So first, we wanna be able to be in a more neutral position using the back body before we even move into a full back extension.
If you hold this position long enough, I'm certain you're going to feel some challenges. Reading. And let's go ahead and rest everything. So from here, we're gonna move into a child's pose or a rest pose. Your hands are gonna come underneath your shoulders, and you're gonna figure out a way to push yourself to your hands and your knees, and you're gonna sit back on your feet. And rest.
If this doesn't suit, you roll around onto your back and hug your knees into your chest. So just enjoy this beautiful stretch through your back body. And remember, if you're not able to be in this rest pose with your arms out in front of you, Always feel free to change. You could put your hands down by your side. You could put your hands underneath your bottom, or you even just be in a quadruped position, or you could be on your back.
So always let pleasure principle lead the way the movement. The shape should feel like a good idea. Let's make our way to an upright position here. So you can choose to get up. However, it best suits you. A way to get up is to come to hands and knees, tuck the toes under, perhaps you can push up to those feet or push on to the feet, lifting the hips up, walk your hands back to your legs, let your body dangle, and then roll yourself upright. Now if you need to travel a different path, always feel free to do so.
So let's just stand for a moment with our feet underneath our hips, and just kinda feel how you feel. Can you sense that your head is back where it belongs? Can you sense that your rib cage is stacked over your pelvis? Can you just turn your palms open and notice that that's gonna help you stay open across the collar bones and feel that your shoulder blades are are back on your body a little bit as a to forward. Let's breathe together three times in how through the nose, trying to expand your rib cage, And exhale perhaps through the mouth or through the nose, your choice.
And breathe in. Feel equal weight on your 2 feet, fronts, and backs of your feet. And just one more breath, please. Thank you so very much for exploring the basics of Pilates with me. And I sure hope that you'll consider coming back and revisiting some of these principles layering the concepts and continuing to learn and grow and remember Practice makes better. Thanks for playing.
Beginner Mat Workouts: +50-Minute Classes
Mention
 |
Sarah Bertucelli (Teacher) |
 |
Meira H |
 |
Natalie G |
Comments


You need to be a subscriber to post a comment.
Please Log In or Create an Account to start your free trial.
