Description
About This Video
Transcript
Read Full Transcript
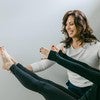
Hi, everybody. It's Amy here for a tower workout with us. You'll need your magic circle. This class has a lot of spinal movement to it. So less leg, little bit of warm up for feet and legs can't help, but but really focus more on lateral flexion and rotation, flexion, and extension. Okay. And also with the circle. I love to use this for warming up how our arms meet the shoulders and meet the back and the trunk of the body. So for this, I'm actually gonna start seated because it will move our way into seated.
So you'll need your circle. And let's start with you can have feet apart heels right underneath your knees. And I like thumbs on the inside of the circle fingers on the outside to start and just settle into a good seated position. Raise your ring off your legs just slightly. It's not chest height.
And let's just take the the the connection of pulling out on the magic circle. As an inhale. Right? So we're expanding the walls inside our ribs wide. That's breathe in. And then the exhale, you can use your fingers and press the circle, but we know it's more about the not just the hands, but upper inner arms, the chest, and the abdominal muscles. So we inhale fill up, spread your walls inside out, and exhale as we press.
So we'll do 8 of those. Breathing in. Trying to grow a little taller within as every inhale exhale. You can anchor your feet a little bit also. Check the collarbone, check your shoulder position.
We're not gripping the scapula. They're just settling on the back. I do want you to feel though relationship of expansion, breathing in. My elbows always like to open up when I cue that and then exhale, I close. It's fine.
Breathing in. Let some expansion take place within and exhale with your inner arms, your chest, your abdominals coming into your midline, inhale, and exhale. And just one more. Alright. And then we'll we'll take our thumbs now to the outside along our fingers and lightly press your palm in against the pads. So we're moving our arms forward. Let's breathe in on this and bring it toward us exhale.
Again, warming up. This is not we're not pressing too hard, but pressing enough that you do feel the muscles in the upper torso arms, shoulders, chest, and how those play and feel along with the abdominals and the back muscles. Inhale and exhale. We'll do 2 more just moving the arms forward. We keep our shoulder blades back. And bring that in.
And then one more I want us to do full forward and back, and then we'll move one more time forward where we'll stay for a bit. Okay. So I'm a believer that the pinky finger has a real relevance to the side of the shoulder girdle. So if we emphasize the pinky finger palm, part of the hand. It puts the upper arm in a slight biased toward external rotation. Can you feel that? So it's a little bit more pinky finger palm. And then if you do thumb, just notice.
I'm gonna just make it noticeable. I don't want us to do so much thumb that the shoulders internally rotate. You can see my form not good Pilates form. So we're gonna bias toward the pinky finger side. Alright? Even when we do the next move.
So I'm rotating the ring I'm gonna go slow. The first one. The bottom arm makes sense because it goes into more external rotation. This top arm, it could get sneaky and wanna come into internal. We're not gonna let it. We're gonna bias that pinky finger side.
Trace it all the way to the side of your shoulder and you'll feel that in your lap, right, and then the other side. We'll just do one slow each size so you can feel it. Each arm is different. So welcome the different sensation. Take a minute. Pink you fingers.
Pink you finger side. And then we'll go into a little more flow. Rotate. Rotate. So the scapula don't go anywhere. They're back on the back. It's the arm bones moving the humeral heads in the shoulder joint.
Now for some people, this ring might feel small, You can always do the movement without the magic circle. You really can. It's just nice to close the chain and hold something. But we're gonna add to this and add trunk movement. So here we go.
I love this warm up. So the ring moved the trunk and the spine moved roll through center and roll to the other side. Right? So lateral flexion. You're gonna be doing this with the rollback bar, in shortly. So inhale exhale.
Linked and up tall through the center inhale exhale to the side. Are you still with pinky finger connection? We are. So let's start thinking about the trunk muscles. We've got the abdominals, of course.
We've got the side abdominals. Obleaks and the transverse muscle. We've got the back. All those playing a role in our trunk movement. Right? We'll do one more each direction, everybody. Stay on this side just see if you can go a little farther into the flexion without that opposite hip leaving focus on the opening side, not the compressing side, lift, and then focus on the opening side Not so much the compression side.
I want you to feel the lift of the other side and then come through center, bring this in, and rest. Those are warmed up. I think, okay, place this down. We'll see that again. We are gonna do a little bit of top loaded red spring And we'll get to our rollback bar shortly, and that's all we're needing for this class.
So we will take the bar down I'd like to start with the feed and prehensile bar at the frame and just settle into long body. You know me well enough. I'm gonna talk about the hamstrings supporting the back of the knee, so we are not locking and dropping. That's something else, and we wanna support the knees. Okay? Pelvis neutral.
We're starting simple. Everybody just let the knees bend. Feel how the foot rolls around the bar. It's so nice. Arches of the feet are active.
You may have to wiggle your toes now. And again, with breath inhale through and to you. Exhale has your stretch. Your pelvis is level, anchored, Spine is long. And, again, it's pretty simple getting the lower body involved.
We'll do one more. And then we start taking some single leg movement. Same idea. So I'm gonna take this leg down first. That happens to be my right leg. Let's do four single leg.
Nice and simple. Monitor that knee though. Palva stays level. You're really isolating hamstrings. On the on the moving leg, supporting the knee, the muscles in the arch of the foot, tracking parallel, Good Pilates. In other words, right, and one more time there, and we'll step this foot back up take the second leg down.
4 repetitions will breathe in. Use the foot. I love the image that the foot is a big suction cup. It always comes to my mind when I do these movements. I don't wanna put, like, a grippy sticky on there because I wanna feel my muscles of my feet in contact with the bar. I don't like that extra surface. I wanna use my foot, and it's like a suction cup. It's stuck there.
Yeah. And that makes my foot really and I I feel it much more than if I just set my foot there. I think that makes sense. Okay. Both feet on. Here's the deal. We're gonna go back into both knees, bend, and stretch.
You guessed it. We're gonna start going into a little bit of spinal articulation much those knees curl your pelvis. You can use the back of the shoulders to press into the mat. I really we're gonna do 3 of these inhale. And just take your time. Get that spine ready.
Meaning, we're gonna do a lot of side bending rotation. So mobilize here. Get those segments to move and come all the way down. 2 more just like that. Inhale, bend. Stretch full breath to roll up.
Tilt. I love to concentrate and tailbone to heels, long low back, sternum through the top of the head, breathe, and roll down. You could always embellish those and add leg lifts if you like to. I do sometimes. Today is not the day.
Feel free to add some leg kicks if you want. Simple is off often quite nice, though, too. Get both sides of that spine ready. Okay? Here we go. So to finish that, I usually go to straight legs there just to kind of put the period on the end of the sentence. But then to dismount, some of you do a roll up I don't.
I usually get a little afraid that I might not make it. That's just the truth. And so I hook a foot, use my hands, and I bring myself up. I'd hate to have that day where my feet slip and I don't make it up. So okay. We're taking that down. We'll see this top loaded a little bit later.
But for now, let's Get it out of the way, maybe over here. And then we'll get our rollback bar mounted from the top. And we're getting ready for some bent knee rolling back. So hands on your bar, usually if you start with the legs, straight, right, and across to the the poles, a little different when you're started seated, so you really have to pick your spine up and not start already in the flexion or the relaxed position. So Get on those sitting bones.
Press down on your bar slightly. Pinky finger activation on the bar. Trace that up to your shoulder. Take a breath. So we are rolling back.
I'm gonna ask us not to move the feet. Don't do it yet. We will in a minute, tree. Keep the feet there. Remember, there's suction cups. Keep them right when they are. Lift the head and neck shoulders.
Flex the spine. When you get off the pelvis, when you pass the pelvis, just think of coming up. So we don't have to, you know, compress into that flexion. Pull back. I wanna get onto my sacrum into a level pelvis which is right about there. Then instead of thinking of smashing my vertebra down on the mat, I wanna go back long. Long, long, and backup, length and strength, Here we go. Up, up, up, getting a little support from the springs.
The last time where we stay down for a bit. There's my pelvis, nice and flat, and then I lengthen all the way through. Don't you feel like moving your feet now? We do. Bring them up. Bring them towards your sitting bones.
So it sets us up for some pelvic curl before we do, check your shoulders, connect the pinky finger side of your arm. Here we go, breathe in, and good old articulation. So I like to use this bar to press my body up to it and my bar to me. I like to connect it to my body. If you get that, fantastic.
If you don't, that's okay. Unroll without lowering the bar anymore or lifting it anymore. It's a lot of control, right, and 2 more there. Press the hips of the bar and unroll. Now I think we can think about the inner legs a little bit. Use them just to hug the midline.
You're not bringing your legs together, but you're hugging the midline. I want you to concentrate on your heels and your big toes also on the mat, not rolling out. Okay. Move the bar now. It's like a shower squeegee. We come up, make sure it's in contact with your body, please. Just feel that today.
3 of these initiate with your shoulder blades, of course, elbows wide and swiggy Keep it close to you. Pull into your center. Length in your arms. We're gonna pause with a breath. And unroll. Keep the bar right where it is.
Articulate. And we do that whole sequence one more time. Check your pinky finger connection. And roll it up. Hips to bar, bar toward hips, squeegee, Pull it up 1.
2 your thighs. 2. Keep those hips up. And 3 and hold at your legs inhale. Exhale. Enroll the spine. Keep your knees bent just where they are.
She would do a roll up. It's going to feel different because we're more We're closer, right, are starting the legs are closer to the torso. Curl and curl and curl. And curl and get up as close as you can. It may not feel super comfortable.
It's okay. Get your chest towards your legs. Keep your back in a relatively round position. Hold on to the core. Take a breath. We are going to roll back to our sacrum and lumbar, bringing the bar with now. Close your ankles and knees, tuck your knees to your chest.
Let me get onto the lower back here, everybody there. Now tuck your knees to your chest. Pull down on the bar and loop your feet through straight up to the ceiling. And we reverse that and bend the knees. You've gotta reach your chest forward, reach the bar forward, and roll up to the top. We do that a couple more times. So for my friends out there who are like me with lumbar flexion, potential.
Right? This is a really challenging and wonderfully fun playful movement, you feel your stomach like crazy, you have to really work on compressing that body into flexion. And roll up. So it's a mobility for a low back as well. Right? One more like this, everybody. So you're tucking. Tuck. Talk. Talk. Talk. Talk.
Lift your legs, but you can press the bar down. Thighs come up and tuck your knees. It's okay if they open a little. And now finally, stretch the legs out. You're gonna do 8.
Pinky finger connection 7. 6. Just isolating, really, that upper abdominal contraction those upper obliques, you know, where you're going. One more now. Old the way up. Let the crown of the head.
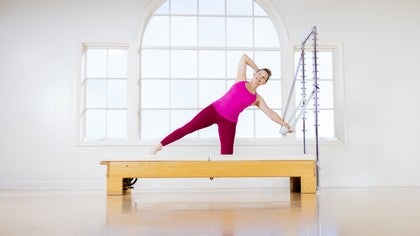
Follow the bar. Take a moment. Let that back open up and stay open and then come to sitting tall. Great. Okay. Now we finally separate the feet. And what I want us to practice, just like we did with the magic circle, the side bending, Get your feet level, get up on the sitting bones, pinky fingers, and let's just play with sitting side vent. I the bar will move.
I learned it Someone taught me a long time ago, get the bar vertical. Well, we can do that without moving the trunk. That's just our arms moving. This should be the trunk moves and the arms follow the trunk. Right? So if you get in your lateral flexion and you're not quite vertical, then you can finish that. That might come from opening that other side body feels fantastic and center.
Least it does for me. Seidman, so I can get my trunk flex, but I wanna fan open the ribs that are facing you. Lift into that openness and center. Hope that makes sense. And we warmed up with it in heal, exhale. Inhale exhale.
And again, inhale exhale. Now let's do one more just that look at your tower frame or your Cadillac frame. Make sure you're not I'm gonna show the, kinda not to do thing. You're not out here. Try to stay inside the walls of it.
And I think you'll feel your trunk muscles a whole lot differently. Stay inside that wall. Right? You have to use your lateral trunk flexors to flex the obliques and the low back. Bend bend vent. Now we add. I think you're getting a message, so we turn to the side.
We roll back inside the wall of this frame. Get to that shoulder blade. Don't worry about your feet. They're gonna pull away from the bar. I just love that sensation and flatten it out.
We get to come up the same side first. So start your chest lift. Start the trunk flexion. Remember, stay inside your frame. Open your other side, and you'll flip that top arm and then center. Other side trunk flexion first.
Stay on that sitting bone. It's really tempting to go out there and pull. Get into those obliques, get into your trunk, get to the shoulder blade, level it out, then come up the left side. Or the side you just went down. Stay inside the frame.
Okay. So the next pattern is around the world. We've all seen it probably in various ways. We start to the first side. Let's inhale. Exhale all the way down.
Level it out. Up the other side. This might be a time to not to stop thinking so much. Let's do the second side. Start the way you just came.
Stay in the walls of your Cadillac, your tower. You've prepped it. Now just flow. Let the body take over. Let the mind quiet down for a sec.
Each side again. It's kinda nice to just listen to your own breath rhythm. The sound of the springs, the sound of the bar, one more. Feel in connection. Check your pinky pink pinky fingers every now and again.
Around the world, rollback side bends. How did that feel? If it's not a sequence, you do very often. Try it. It's really, really nice for your low back. I think a lot of times we do this one roll back with legs crossed. That's also fantastic, but that was a fun one.
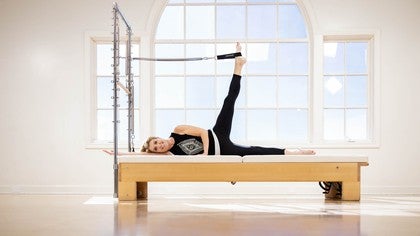
Now we get to do top loaded, lucky us. You'll need to move your springs got top loaded red. Here you are. And we're first going to begin on our back, doing some shoulder openers, and that builds in with some abdominal work and extension. Okay. So have the magic circle also somewhat ready We're gonna bring that in between the knees. Probably be smarter to do that first.
And then get that. Okay. Right. So we adjust the circle. I like to use it, you know, and now it's just holding it there.
So actively hold that circle with your adductors and your hamstrings. Check your pinky finger here. You can Press a little more weight on the outside of that. It's, again, trying to get the external rotation of the upper arm. We're gonna bend the elbows wide. Almost like doing shaving the head on the reformer, that angle of the arms, exhale everybody, and stretch the arms through. I like to let this scapula glide up.
I think it's very important and then to return them gliding down. Alright. Now let's do that again. A little more feeling with the legs. Inhale. Exhale stretch. Inhale bend.
The arms and exhale return the arms once again there. Feel your back. That beautiful strong upper mid back right where those shoulder blades are, how wide your chest is with that engagement of your back. Okay. Similar to the rollback bar sequence, I love to do pelvic curls here into the bridging with arm movement. So squeeze the ring.
Use those legs. Get up in your plank line, your bridge line, bring the bar to you. So this is also instead of the Cadillac trapeze wing, the breathing sequence, we can do it with the magic circle. Breathe in exhale. I'm gonna use those legs.
I'm touching my knees toward my other wall. I'm using that magic circle to open up the back, come to level and return. Just love this and use that circle breathe into pelvic curl into that beautiful plank line inhale bend the elbows Let those upper arms feel the mat behind you. How long can you get fingers to knees to toes? Take that breath.
And our last roll down here. Just let your spine length and reach the bar back a little farther. Max and the muse of the leg. It really is so healthy. And then we're gonna move on, though.
Keep your legs engaged. Should as much as you want or as little as you want. Take one hand. I'm about to take the ham that's closest to the window, my right hand, in an an overhand underhand grip. Okay? And it's still in line with my shoulder, not in the middle. I want you to keep it in line with your shoulder joint. That's where the support's gonna be. This hand comes behind the head.
Alright. I like to keep my elbow a little bit bent. I think it makes my neck feel better. Breathe in. Chest lift. Sticky. So I'm gonna curl here.
Now use the legs. Remember, when we press a circle, we're connecting to our midline orientation. So the adductors, all the obliques, everything. Turn towards the elbow side Try not to let that opposite hip lift, right, where he both sides anchored. We come back to the ring to try to curl a little higher and then down.
You've seen us do this before in the hail versus chest lifts. Let's use the legs. Connect to your midline. Breathe again. Rotate, but you don't go out of your frame. I like to think of curling around myself, rotating around myself.
This side of my rib cage, I've gotta pull it into my mid back, my mid spine, turn to face the leg. So this is rotation, not side bend. 2 more here. It's little. Turn inside yourself.
When does that do? Maybe your eyes are gonna help a little bit. That seemed to help me move a little bit more. One more. In and out. In and out 4 on the other side. Hello, inhale.
The little flexion forward. Use the legs as much or lilies as you want. Pause to inhale. Stable pelvis rotate. You're not flaring that opposite rib side.
Almost pull it into the midline. Send or breathe in. X. They'll take it back. 3 more. So if you wanna flex more into your upper body, you can. Remember, no flaring that rib cage open.
This is rotation and down. Curl. Definitely Connection into the center of the body's exercise sequence. Check your pinky finger on the bars. You're holding. Keeps that upper arm and external rotation, right, as you rotate the opposite hips stays anchored. That's strong work.
Everybody come back to center. Oh my gosh. And take yourself down. Okay. Let's take the ring away. I'm sure you're not gonna argue that. Bring your knees together.
Full length of the legs. Finally, oh gosh. Full setup. Now we know the full setup is a little awkward because that's it. Right? You go to where the spring stop and it were on an angle with the body. It's weird, but it's good. It's control of your back. It's control of your spine.
We'll just do three of them. Just come to level and head, neck, and shoulders flex, spine flex, look straight at that wall, Look up the wall a little bit, and then it'll help you pick up your spine. It's not a rib thrust. It's a lift, and you move the pelvis. Try to keep the bar up while you move the spine back.
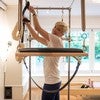
One more here. Pinky finger connection. High chest lift. Get your head through those arms as much as you can, and then crown a head toward the bar. Left, read, and roll back. We're gonna continue with those roll up but we're moving our body back over the edge of the of the tower or your Cadillac.
I love this also. It's a moment of unsupported cervical extension. However, so if you know not to do an a cervical extension to this degree, maybe not do this, where we start shoulder blades right at the edge of the mat, legs together, extend over the edge. Now for a moment, let your ribs arch. Who cares if they're arch right now? I don't I mean, I care, but open. Don't lock this down.
Take a couple breaths here. Let your neck lengthen. Right? Now pinky finger connection as we start to lift ahead, that's where the ribs could come down. You're gonna round forward. It's going to be easy.
Because look where the spring is. It's helping us up. We're gonna take advantage of that and then sit up. Open your chest. Now this is a great stretch for a lot of us through the sideline into the armpit.
I want you to take one hand off, put it on the outside of your outside thigh, and push the bar up and rotate your chest, see if you can get onto your sit bones. This shoulder blade, the bottom of my shoulder blade, I'm kind of pressing it into my back ribs. Upper traps drop down, and I kind of posterior tilt of my rib or my scapula. Okay? It's a lot of words. We're gonna go and do it again.
Inhale and exhale down. Don't worry. You'll get another chance. Open your spine. Pinky finger connection. It's alright if you're arching.
You don't have to. Let's do the second side. Right. So so you can kinda mark it or feel it, and then we'll do each side again. So the challenge to get up on sit bones without thrusting ribs that upper spine take one hand off. It's puts on the outside of the thigh and lift your spine.
I'm thinking of my shoulder blade doing a posterior rotation in my ribs, top of the shoulder drops down, I can use my lumbar muscles to get on my back a little bit, return. Let's do one more. A little more flow. My full breath. And just let him move. You know what it is.
Let your body take it. Quiet your mind. I feel nice just to quiet the mind. One last time. Feeling strong.
You're gonna need it. Come down onto your sake of everybody. Oh, it's not a tower class without a teaser. Get on your sacrum. It's going to feel easy because guess what? We have all the support here.
So we're ready. Start to lift your legs. Bring yourself to your teaser. You can let go. Take your teaser and just hold and hold and hold.
And then that's all. We don't need many. We don't need many twosers. We just got one. Good. Let's move their circle.
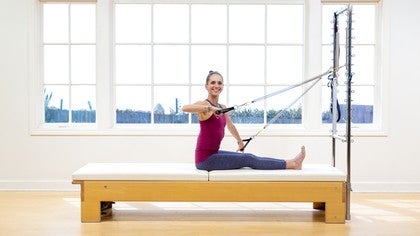
Mermaid time. Love it. This is beautiful because it brings it all in. Right? Bend rotations and extensions and flexion. Today, I am adding the hip move. Okay. So we're gonna roll onto our hip.
Lots of spine. So let yummy. Hand on your bar. I like my hand forward of my shoulder joint much healthier than to the side. Bring it down. Now we've got a red spring.
It's pretty strong. Don't worry. This hand can help. Get your feet anchored. Okay? And then take your opposite hand behind your head, lateral flexion. So we're not gonna do isolated movements.
We're just gonna go through sequencing here. So I want you to breathe. You've been here many times. Turn toward the bar. Let the shoulder blade come back.
This hand has to reach. It's the ribs that reach. Slide your hands across. Now I have my hand shoulder width apart. Try to get on the sit bones evenly.
Lots of details. It's flexion. Flection, rotation. Feel it through your chest wall. Let your chest yield back.
Pinky fingers reach forward. Your scapula should be wide. Okay? Now control to bend through, look at your bar, and lift your chest toward it. So I'm gonna make a judgment call.
I feel like I'm too far away. Completely fine. The reason I fell on is I know myself. I feel I know I can get both sides of my back taller. This feels better.
We always get those choices. Pull it down. We go through flexion. Spend a breath there. Yeah. And then back. Lift the rotated spine up into extension pinky finger connection.
One more and then part 2 of Mermaid. So your inflection with links Right? We haven't collapsed that flexion. Ann up. Look up at your bar. Remember. Look up.
That's where your spine's gonna go. Okay. Now I would like us to bring the bar down. Maybe scoot toward it again a little bit. Your hands are re already where they need to be. Make sure your feet are down.
Here's the deal. I learned this from Madeline Black always think of her when I do this exercise, she would say, listen to the bar. She may have gotten that from Kathy Grant. Kathy did lots of listening. As we side bend more and more and more today, we're gonna lift our feet up off the ground.
Roll onto your hip. We're not pushing our bar away from us. You're in your center. We could, but we're not today. Undo your legs. You switch and you get on that sit bone and you bring yourself back up.
3 totals. We listen. There are the springs. There's our apparatus. We lift. We're in control.
It's our waistline, and we return. One more and we listen. Lift. Get on that hip. Extend your hips.
And return, listen, and lift. Lovely sequence. Other side. Okay. What a gorgeous day. Seidman, we're gonna start with the bard down. Hand behind, head, breathe, lateral flexion.
As you rotate, bring that shoulder blade around the ribs. It's glidy, This hand has room to go, slide this hand around. You should be shoulder width apart. Take a moment. Let your sternum in your upper back. Flex lengthen and reach the pinky fingers of your body forward.
The chest should come back in between the scapular, relatively wide scapular. Okay? Then bending the elbows. Start looking at it. You gotta reach your chest to it. Remember, if you feel like you're too far away, you're gonna know I should have known.
And then reach out. I'm gonna move my thumbs there. See how much more I lift I can get if I put my thumb on my fingers bringing it down, flex again. Let that chest yield back. Let your fingers, pinky fingers reach forward and bend. Start looking at your bar.
Lift your ribs and your planning to ward it, your feet are flat on the floor, everybody. If you're on a Cadillac, your feet should be on a box. One more. Feeling the work in the back, right, those lat muscles, the shoulders really controlling the bar, allowing your spine freely move. Breathe bigger.
1% more. Let's go up. Okay. Now your hands are what they need to be. Turn though so that you're starting all over and you're gonna side bend your neck Listen. Sideman your trunk. Lift your feet. You rock onto that inside hip.
Your now lateral flexion on the ceiling side waist. Flip your fin and sit down on your sit bones. And bring it up twice more. Listen. Her spine starts right there. That's where that flexion begins.
Flip it. Open your hip joints to the wall that's in front of you. And then return, sit on that sit bone. It's a QL stretch. Last one. Let that spine just dance.
Next time, we'll work on the arm extension. Okay. But for now, I think that's plenty. We're gonna do one push through forward just to center things out. Then we have some kneeling side bend. Yes. Take it forward bend.
Everybody's spine stretch forward. Push through forward. Remember, it's about push through forward through. Push through. Pull your waist back.
Let the shoulders drop and bring yourself up. Alrighty. So it really is always a class with me with some kneeling side bend. I think it's just great to stretch the front. Of the hips and, again, orient in balance to the side. We've done this sequence before.
You'll start with your bar down. Again, you might probably have to play with how close or far you are. I'd be closer and farther away, and then this hand behind your head again, lateral flexion. Take a moment here. Enjoy this line.
Enjoy that stretch. Now as we go farther into the lateral flexion, you need to stay in control of that push through bar. And if that doesn't make sense, what I'm saying, we don't wanna go so far that we're pushing it through on this exercise. That that's not safe shoulder work. So I'm pulling it toward me with this lateral side.
All those trunk muscles we've worked. We need those 4. You might have to edge a little farther. Lifting your thigh up, right, and down and lift and lower usually do 5 of them. Why? You could do 6. You could do more.
And let's just say 5. Okay? Flex your foot, little pulses for 5. 4, open your chest, 3, 2, and 1. Then my favorite part hand, hand, let the bar, go up and I'm pulling back away from it. I'm posteriorly rotating my pelvis, and I'm rounding that under. It feels really good in the lower back. Now backup we go Side Bend again.
Bring your leg out. Get into your flexion. Lift your thigh. Let's try front and back. Flex your foot. So just a little front.
And a little back and a little front could delay go higher, maybe try. If it doesn't stay up there. Five times. We have 2 more. So front and back. All the side body muscles very strong and supportive here.
Everybody's got it. Bend their knee in and one more lovely luscious lumbar stretch. Heaven on earth. Other side. And then we have standing, spread eagle, But first, we've got one more lateral flexion. Take a moment to allow your outside body to stretch.
Sidewind even deeper so that your weight shift is easy for your leg to move and a little more. The bar doesn't go through their frame. Trust your pinky finger muscles. Track that all the way to your back. Lift your leg. 5 parallel lift.
4, trying to keep that hip, pelvis in extension, 4, everybody, 5 little pulses for 5, 4, 3. You've got it That's it. Tuck your knee in. Hand on bar. Take your time. Lumbar stretch.
That's just so yummy. And then the front back lateral flexion, get in those trunks, lift your thigh, Remember, it doesn't have to be as high, front front. Work control here, strength, Trust your own strength. 3, you try to get your leg higher, but it's not to sacrifice your balance. One more time.
That's a toughy and tuck your knees in round, round, round. Okay. And, of course, we have some extension to do in the spine. And I love this spread eagle because we get to stand It's a nice kind of commanding exercise, I think. Powerful. You're up in your body.
Walk close to your frame. Some of you know the toe hook. Don't leave it like that. I'm not I don't love it, so I'm not gonna do it. It's just what I am gonna say there. Okay.
So hands close to the hip height. We are gonna drop those shoulders. Trust your grip, everybody. Lean your hips back on the way. The elbow straighten.
You're in a nice flat back. Let's bring our hips down to a squat, bend your elbows a little bit, get close to the frame, and then go back out of that squad. I lead with the sit bones. Now I wanna go through flexion. And tell them about my shoulder girdle.
Then at my shoulder girdle, I bring them down, bend the elbows, and bring the body to center. Elbows are flexed. We start the Swan or the back extension from here. Again, about where the shoulder blades are, then the elbows get to straighten. And we bring the body up all the way to center.
We'll do it again. Lean the hips back. Trust your hands. Squat down. Look straight ahead.
You can pull yourself closer to the frame. It's a nice little hip opener there. Okay? And then reach your hips back. The legs will straighten. Arms are straightened.
So curl flex. I don't want you to pull up yet. I want you to get your shoulder blade area. Then pull down elbows Bend brings you right up to your frame. Keep your elbows bent arch.
You arch so much your breasts are toward the ceiling, men to, and arms go back. To come up, bend the elbows, let the spine follow one more time with a little more flow, reach back, and bend. Reach back into that nice straight leg, straight arm. Start your flexion at your tail. Posterior rotation of pelvis, lumbar flexion, then your scapula come down, all those cues, How high can you reach your sternum everybody?
Lift at sternum. Use your back. Lean, trust. Your hands gotcha. Take a breath.
Your head is the last thing that comes up. So that's our tower class for today. I hope you feel just as fantastic as I do. I feel like I've got this Hi. My spine is really open, strong, and, kinda acrobatic.
Let me know how you like it. See you next time.
Tower & Cadillac Workouts: Intermediate Tower Workouts
Mention
 |
Amy Havens (Teacher) |
 |
Karen |
 |
Elizabeth D |
|
|
IOS C |
 |
Renee S |
 |
Lori M |
 |
Lacey |
|
|
Erin W |
 |
Kimberly R |
|
|
Mark Hamilton |
|
|
Judy G |
|
|
Heather S |
 |
Connie M |
|
|
Sonia T |
|
|
Jennifer S |
 |
Maggie R |
|
|
Claudia C |
 |
Jen B |
|
|
Louise C |
|
|
Shona A |
|
|
Julie F |
|
|
Karen J |
 |
Silke L |
 |
Rosa Reeve |
 |
Summer G |
 |
Amy V |
 |
Bridget Ericsson |
 |
Deanna |
|
|
Mary Ann P |
 |
Robin S |
|
|
Rebecca S |
|
|
Laurie K |
Comments


You need to be a subscriber to post a comment.
Please Log In or Create an Account to start your free trial.
