Description
Muscle Focus: Legs and glutes.
Objective: Strengthening the legs and the glutes.
Reformer Setup: Start with three to four springs depending on the amount of resistance desired. The spring tension should be the same as that used in Footwork. The lighter the spring tension, the more difficult the exercise becomes. The footbar is up and the headrest is up.
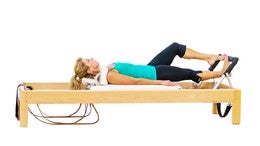
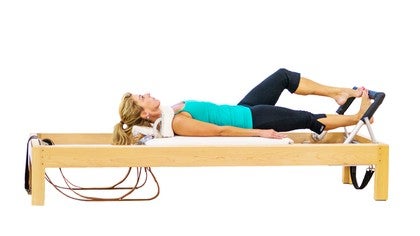
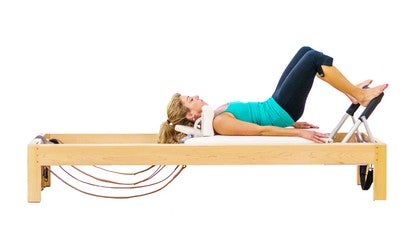
Start Position: Lie supine on the carriage with the head on the headrest, maintaining a neutral pelvis and spine. Place the arches of both feet onto the outside edges of the footbar. Ensure that the knees are pointing in the direction between the big and little toes. Curl the pelvis off of the carriage about three to four inches, keeping as much of the spine pressing down towards the carriage as possible.
Movement: Press the carriage out, keeping the pelvis lifted off of the carriage in the same position as start position. Bend both knees to bring the carriage all the way back in, keeping the pelvis in the same curled under and lifted position. Repeat nine more times, and when the carriage is all the way in, lower the pelvis down to the carriage as you keep the carriage still.
Precautions: Focus on ensuring that the alignment of the knees and ankles are not compromised by rolling out or in with the ankles and knees, and that the spine is not flattened by keeping the pelvis in a posterior tilt.
About This Video
Transcript
Read Full Transcript
Okay, Christie, we are going to go over the pelvic lift. Some people call it the pelvic tilt or the pelvic curl, but it's called the pelvic lift. And this is going to be a tutorial breaking it down completely. So it's not meant to be full hard exercise but more educating us on how does, how do we do it, where are, where's our foot placement, all the good stuff, our goals, all that kind of thing. So spring wise we're going to be working on the same springs that you did in your warmup.
If you start off on four springs and you're going to do four springs for your running and this pelvic lift, if you start on three springs and you're going to be doing three springs, um, I'm going to be working on three springs with Christie. And if you have a balanced body or other maker of your apparatus other than what I'm working on is a grots apparatus, you might have some variation in your springs and we'll try to have something that helps you decipher that, whether it's one and half or colors or what. But I will be working on three springs with Christie. Um, as you get more advanced, you actually want to work on to springs with this exercise because it's almost like a skateboard is getting away from you and you have to use those tiny little muscles to pull yourself back together. So the lighter the spring is on this exercise, the more challenging it is.
So we're going to start with your arch of the foot on the corner of each bar here. Good. And so that naturally makes your feet turn out. So I want to go over briefly the um, how you position your feet. So it is a good rule of thumb if your knees always point between your big toe and your little toe. And that gives you really good, um, healthy hips and knee joints. So if you turn out your feet a little bit in a Palava stance, then I want your outer thighs and your seat in the back of your inner thighs working to also have those knees turn out a little bit so that they're pointing still between your big toe and little toe. This, that might not seem too hard, but if I was just relaxed, my knees would want to just roll in. And so they would be pointing forward while my toes are pointing out.
And that is definitely not healthy for your hips or for your knees. And as we get wider with the toes, the goal would be that your knees would turn out accordingly. So for Christie who isn't a professional dancer, I will have your feet just turned out at this nice angle on your arch. And yet this knee pretty much does point between your big toe and your little toe. But this guy likes to hang in a little bit so it has to work a little harder at opening up your hip.
So it's got to open up a little more and you might need a tell it, talk to it all the time. If you were an advanced or super advanced and really want to work on your turnout or you were professional ballerina and continuously working on that turnout, you would turn your feet out wider in this exercise and then you could even advance it and start sliding down the bar with your feet. So really, really work in challenging those areas. But I want to work on other things that are more important first than just you're turning out of your knees. Okay, so we are going to go ahead and try not to tilt your pelvis towards you yet, but see if you can just engage your bottom, squeezing it good. And then using your abdominals and your bottom start tilting your pelvis towards you, curling that tailbone up. Beautiful needs are always going to want to roll in to help you.
So you have to keep up. Be aware of that. Good. Keep lifting up and, and everyone wonders how high do I lift up my pelvis? So a good rule of thumb here is that you're gonna put your hands together as if you're praying and you're going to put 'em underneath your seat. So the arms are pretty long. [inaudible] it can be straight. So that's a good question. I don't want it to be like hiked up here nice and long and then you're gonna roll down until you do not squash your hands flat.
So you'll always be a little lifted up off of there. Good. So that is the height of your pelvis in this exercise. Okay. So I want you to keep your knees in line with your toes and use the back of your thighs. You could do this exercise all day long with your quotes and you could do it all day long with your feet. That's not what you're here for. Right? I do want you to keep your hands where they were. [inaudible] yeah, and I want you to go out using the back of your thighs and your bottom and hold to right here is when we commonly plaster our hands down.
So you want to keep that nice height and then go ahead and come in. Good. Sometimes we lift up too high the rest of our backs. So a few more vertebra right under here. So right through here may have come up. So as you're coming back in, try to get those vertebra to get back down and just have only the ones needed to be up. Does that make sense? Good. And coming up. Good.
Good, good, good. Go ahead and take away your hands and roll down your seat. Excellent. Cause I don't want to keep you in too much of a work position. So to review, you're gonna want your knees in between your big toe and little toe and your treat. Our turned out, your bottom is lifted that high up off the Mat and your muscles that you're engaging all your back of your legs and your seat and your stomach's always supporting your body. Okay? Really good. So that is what you're trying to do. You're also not letting your knees roll in as you go out.
That is a common tendency that you're going to want to roll your knees into. Always try to help out with the quad. Okay. So sometimes I might start out my client with um, turning and getting into the position and I can tell that they're gonna use their quads a lot. So something to get you out of that habit is go ahead and squeeze your seat and start rolling up your tailbone and we're not gonna move the carriage at all. And you're going to keep rolling up your bottom and the next bone and the next bone and the next phone until the only thing down.
Is your shoulders good at this point? Go ahead and push out a little bit. Most people have pushed out to here. That's a little overkill, maybe like there. So I make them up. Let's use the back of your thighs and your bottom to pull that carriage back home and then hold it home as you roll and length and down one bone at a time. And I'll have them go all the way down and I'll have them repeat that.
So we're going to hold the carriage now. This time we really aren't going to move and we're going to keep those knees turned out and use the back of your legs. And that C to rule your body all the way up, up, pushed out a little bit there so you know it's cold it in and you're going to roll down your sternum or the chest bone in the back of your ribs. Good. Sorry, go into all the way down. I should've stopped you a little bit earlier. So go ahead and come on up all the way and this time when you come down, stop where you would hit your hands. Good. So about right there. Okay. Don't go any lower. And then you're ready.
Using heavy, you've engaged all the right muscles, your foolproof and you can go ahead and go out with those muscles and pulling in. Good, nice out and Huh. And pulling in. Not using the knee joint but the back of the legs in the seat and pulling in and it's really like every time before you push out yet to be like, Huh, let me use the back of the legs and seat. You have to send that message and that use. Otherwise you won't use those muscles last one and coming in good and rolled down good.
So those are pretty much the basics of this exercise. But if you are a little further basic something that I think gets lost and um, you know, some of my instructors have really worked hard on with me is the opposition and the stretch in the lower back that you should be getting on this exercise. Before I say that though, from basic questions that often come up is um, am I a straight line in my back? So is it like a Kinda like that or am I really tilted towards me? So go ahead. As you come in, really tilt your pelvis towards yeah, really, really tilted. So or now go into a straight or pelvis. Yeah. So that is a common question.
Which 1:00 AM I, am I in a full on tilt or am I in a straight line? Okay. And we'll roll on down. Good. So as you're learning this exercise, I want you in a tilt because I want you to feel that bottom and that back of the legs extreme quite a bit. I want you to be aware though, are you pushing? So that's why I gave you all those extra little steps. You don't want your hip flexors to be engaged or be on fire. So they, you gotta be talking to yourself then and say, turn those guys off. Turn these guys on.
It's kind of as simple as that as sending a message to your, to your muscles. And this is a really important fundamental exercise to build for other exercises that you're required to be stable with your bottom and the back of your legs. So you really want to get this one down. But revisiting that mis straight line or am I a tilt in the beginning? I am going to want you to be in a tilt, but then I do, I always want length. I never want compression in that lower back.
So let's think about as if your spine continues all the way down in your tail bum. Really Nice and long. But then it even even have a tail. Your tail, your spine is so long and I've got your tail and I'm pulling it. And so when you curl up your tailbone, I want you to think of still lengthening your tailbone away from your upper body and you're going to go out with the back of your legs and your seat and hold. And as you come in on pulling that tailbone, that's great. And going out and pulling long.
And this time I want you to stay here. You okay good. And I'm going to put my hands on your pelvis and I can always get that much more right on your own. You really can't. And now go out with the back of your legs and your seat and coming back in. But an instructor can help you get that link, that feeling that pull the opposition and go out. Once an instructor or a friend, I guess has been able to help you get that feeling.
Then it's something that you can start engaging and go ahead and roll down. That's all right. So that is would be the next step that I'd want you to try to get. We never want to compress into the back. We're just trying to really engage the right muscles.
And then we don't just engage them, we use them to lengthen in the opposite direction, and that is the pelvic lift.
The Pilates Essentials: Reformer Exercise Breakdowns

Mention
 |
Monica Wilson (Teacher) |
 |
Irene G |
 |
Kristi Cooper |
|
|
Pink |
 |
Alexandra W |
Comments


The closest thing I learned to this exercise in my trainings was called the Pelvic Curl which involved a similar start position, but also curling much higher up in the spine. In that case, the head rest in an elevated position puts more pressure on the cervical spine, which could potentially pose problems for certain pathologies.
Thank you for questioning what you see and hear in our videos. We all benefit from the inquiry!
You need to be a subscriber to post a comment.
Please Log In or Create an Account to start your free trial.
