Description
About This Video
Transcript
Read Full Transcript
Hi there. I'm Julian Hassell and I wanted to talk today about this little book exercise, what it is, what it does. Published back in 1982 by my mentor and Teacher Corolla trior and this was part of a series of books that were written for children. Although I love the verbiage and it's great for adults as well. So in it Corolla talks a lot about how exercise is important and why we do it and I'm going to read you a little bit from here. She says, introduction, you play ball, you jump, you run, you go to the gym, you ride your bicycle, you go to dancing class.
Why should you exercise as well? The answer is to do all these things better. Karola takes you through her posture analysis here in the book and she wanted everything to be anatomically correct in this book. So even though it's illustrated for children and it's kind of fun and it has a little cat in there, everything is very anatomically correct. Here's what she says about the posture analysis.
Your body is like a building. Think of your body as a building. Your feet are the foundation. Your body rests on them. Your legs rise like pillars. Then imagine a platform from hip to hip, your ribcage, shoulders, and head rest on this platform. They are the oppor stories as in a building, all of the parts support one another.
Each part of your body must rest in place. It must be strong. The feet, the foundation, your body rests on your feet. The way you stand is most important. And that's why Corolla did a posture analysis for each and every new client who came in. And she talks a lot about breathing. Corolla always worked on what we call today, the posterial lateral breathing and she calls the breathing the door trick.
Here it is. Think of your shoulder blades as a pair of doors. Breathe in the doors in the back close and the chest opens. Breathe out the back doors open and the chest doors close. Never pushed the doors hard one way or the other. So that's her advice on breathing.
And at the very end she has fun with friends, which is the origin in part of our partner Palase work. And she's got some really fun exercises to do here. So that's Carola's book. It was a lot of fun for me to be around while it was being written. And I talked a little bit about how Karola ran her studio after the workout.
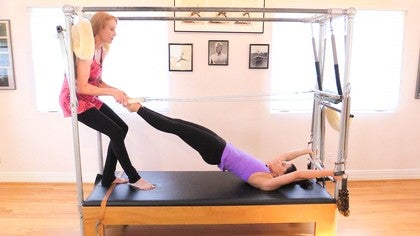
Everyone was required to rest in a lounge chair for 10 minutes and that's when Corolla would give you her scrapbook, all her press clippings and this book to look over and you knew that she really was out there in the world spreading the good word of politeness. Hi everybody. I'm going to teach you today how to assess your posture at home. The way that my mentor Corolla trio taught me, so I'm going to introduce you to Roseanne. She's walking in and she's my client for the day.
Corolla would always roll out a mirror in front of her first time clients, but you are at home are the mirror and you can follow along as we do this assessment together. So the first thing that Corolla would say is place your feet hip width apart. And a lot of ladies would see where their hips ended here and kind of stand like a gunslinger, which isn't where our actual body is. We want to think of our mirror as an x ray mirror. So you're going to find your pelvic bones.
Go ahead and find those front of the pelvic bones and you're going to bring your feet closer together. Right directly vertical under the hips. Grillo is said, the feet are the foundation of the posture. If the body was a building, we've got to have a strong foundation. If the foundation is a little off, the whole body's going to go off. So the first thing that we do is we look at the feet and I'm seeing Roseanne's feet facing straight ahead, which is great. Quite often if you're not thinking about it, you might stand with one foot open, more rotated than the other, or your weight on one leg more than the other. So we really want to stand evenly here and we want to think about that foundation as a tripod of support.
So for the tripod we have the big to the little too and the heel. And I'm going to ask Roseanne to shift her weight back a little bit onto her heels. Lift all five toes of each foot up, spread the toes apart like a fan and let them roll down to the floor and feel that equal weight distribution. Now I'm looking her left foot looks great, her right foot, she's a little smooshed and grabbing the floor. So just relax your toes, right and just shift your weight forward and back, right rocking forward and back a little bit. Good. And then shift a little bit side to side. So I'm always eyeballing to see if there's equal weight distribution on the big toe and the little toe, what we call the transverse arch of the foot.
We've got two arches in the foot. We've got the transverse, which is the knuckles. If you make a fist of the foot, those uh, bones there. And then we've got the longitudinal arch. So if you turn your foot sideways, just turn it out for a second. This, this way. Yup. She's got kind of a dropped longitudinal arch. If you think about when someone walks with wet feet after they've gotten out of the pool, usually we see the big toe to the little toe to the outside of the foot print, but with a dropped arch such as Roseanne has let your foot roll in for a second. You can see that the inner arch of the foot is kind of dropped.
So her work is going to be without lifting the big toe off the floor to lift that medial side, the inner border of her Longitudinal Arch. Okay, so let's go back to parallel there. Good. And that's her work because if she lets her feet roll in, we see the twin columns of our building. Here's the foundation. If she lets her feet rolling, go ahead and drop those arches and she does a knee bend. Think about working on your reformer work. She's doing the Charleston knocked lead, right?
So go ahead and straighten again and lift those inner arches, right. And then track the knees more directly over the center of the foot. And that's going to be the way that you want to walk, the way that you want to bike, the way that you want to do your reformer work. Right? So that the knee joint, which is really just a hinge joint with a very little rotation, is not being torked. Okay. So the next thing that I like to look at, I'm going to have you turn sideways to our mirror so you can turn. Yup.
[inaudible] this way we're looking for the plumb line now or the center of gravity as it drops through her body. The ideal plum line is from the crown of the head through the ears. The lobe of the ear should float vertically over the shoulder joint and the shoulder joints should float over the hip joint. And then all the way down to the center. Remember we talked about that Longitudinal Arch?
That's the center of the arch of the foot. So I always like to do Corollas, quick and dirty posture. Check here to see if the posture is stable. And I take my hands to the shoulders here. So you may need a friend at home to check you out. And I pressed down and see if she's in good, stable alignment. So you ready? I'm going to press down and you notice that she's breaking, she knows what her posture problems are, but she's doing her original posture before she was saved by Palabra is right.
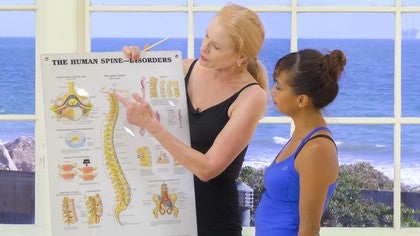
So we know here that she's not in good plum line. All right, so I want to show you how the spine should be. I'm going to get a chart. Here's the spine without the rest of the body. You can relax for a second. We have the curves of the spine are like a meandering river and they're not supposed to be straight. So if your mom ever told you, stand up straight, don't want to completely straighten those curves that we need them there for flexibility, for shock absorption.
So naturally we've got a little bit of a forward facing curve in the seventh cervical or neck vertebra, and we have a backward facing curve in the thoracic. That's where your ribs attach, right? There's 12 of those vertebra and those bow a little bit backwards. And then we've got another forward facing curve in the five lumbar Vertebra. The sacred, where the pelvic bones attach are fused, that that's where your tailbone is. Okay?
So we've got this meandering river effect. Where we run into problems is if we've straightened our spine out too much or in Roseanne's case, if we've got too much curve and there's a picture of this old guy here with a kyphotic pack, which is a completely rounded forward and hyperflex neck, that's not your problem. But all of these things run into pain and we want to move as efficiently as possible with the least amount of stress on the body. One of the images that Corolla used to talk about was the goal. Okay? Bridge with it's guy wires and the structure of the bridge is your bones, but the guidewires or your muscles. And if the guidewires are kind of loose, the bridge is going to sag. And if the guy are too tight, that bridge is not going to move. If there's a mild earthquake, um, cars moving over it. So we want those guy wires, which are your muscles in this case taught enough?
But not too taught and not certainly not totally relaxed. Now here's our plumb line. I like to look at Mr. Perfect here cause he's got skin on. Um, but we've got this plum line dropping down from the top of the head through the curve in the cervical vertebra and well forward of the Thoracic Vertebra, but intersecting again in the lumbar area. So there's kind of an upstairs downstairs relationship. What does that mean? Shoulders should float vertically over the hips.
Then when we dropped down through the hip joint and through the front of the knee joint, we arrive in the front of the ankle and that's where our balance point is. So if we're swaying or moving too much off this idealized line, we're going to be holding our posture out of rigidity, not out of balance. One of our jobs when we do Palase is to try to rebalance our posture. So now I'm going to give Roseanne the image to bring her shoulders, which we already discovered naturally are kind of behind her center, right up into the vertical alignment. So she's going to take one hand to the front of her tummy and you can do this at home. One Hand to her, low back, and she's going to breathe in through her nose as we do with Palabra said as she exhales, draw the front hand to the back hand and do that once again.
Inhale and exhale. And notice if you're looking at this at home, that that has brought her shoulders into a better vertical alignment over her hips. Go ahead and drop your hands, but hold that alignment and notice now when I push down that she doesn't break. So that's already a really good fix and we always have that cue in politesse right? Draw the navel to the spine, so that's going to help right away with some really good alignment. Now because our bodies are operating in three dimensions, we don't just have navel to spine as a cue. I'm going to have you turn your back.
Now we also have a horizontal or side to side Q that we like in the front. It's drawing an imaginary belt from hipbone to hipbone. So that also has to narrow this space in front. In the back. It's the glutes. So we want to put a bolt from one side of the hips to the other and engage these smile muscles. So as she does the front to back, she's also gonna draw this together, right? So we've got front to back, side to side in the back side to side in the front and vertical, top to bottom. And that already looks much better by the way, since you're facing back, let's just show this. If you roll your feet in, look what happens to her Achilles tendon right there, kind of bowing this way. And if she rules her feet too much to the outside, you can see the shape of the tendon is shifting. So what we want, go ahead and readjust your feet to neutral.
We want a straight vertical line in her, in her Achilles. Uh, so another thing that you can do when you're looking in the mirror at home, or if you're doing this with a friend, is assess. Go ahead and face our mirror. Again is assess, and maybe you already know this about yourself, but are the ears level, are the collarbones level? Is one shoulder higher than the other? Um, does the ribcage protrude more on one side than the other? Check out the window between your arm and your torso. Is there more airspace between one arm than the other, uh, between your body and one arm in the other?
Do the hands hang down evenly, um, near the thighs or is if one shoulder is higher, probably that arm is gonna look shorter. Yes. Um, also if there's a rotational aspect to the body, one hand will hang. I'm just going to rotate you one. We'll hang a little bit more forward of the other. And these can all be signs of imbalance, not so physiologically efficient and possible predictors for pain or injury when you start moving. So you really want to kind of know what you're dealing with. Um, the last thing that I like to do, and this you really have to have a partner for, but I'll show is the meltdown.
So I'm gonna have you turn sideways for me. And again, we're assessing this plum line and we want her to do her adjustments that we've just cute, but she's going to bend her knees slightly to take the pressure off of her low back. Make sure the knees attract right over the center of the foot. That would be your third toe, your middle toe. And she's going to slowly do a little meltdown. So nodding the head and I'm checking as she melts. Go ahead. One Vertebrae at a time I'm climbing down to see is one shoulder higher, does one side protrude more and it's great.
You see I'm sort of bending over as she bends over and go ahead. Stay there. I'm seeing just a very slight little, she's thinks she's rolling center, but she's a little off to the left. She's probably right handed. I see a little bit higher on this side of the ribs, but nothing big. Um, and then this is the test now for you at home. Can you restack the Vertebra, like building blocks. Take your time, one vertebrae at a time, knees stay bent. Right.
And we drop the shoulders down into place and bring the head into alignment. The change should be parallel to the floor. We don't want to overarch or Tuck, right? And then holding that alignment, can she rise to the balls of her feet? Not Bad, not bad. Very good. Stay as tall as you are up there and just lower your heels down. Very good. So let's go over what you do again with your knee bend.
Bend your knees right now rather than go ahead and straighten them and lock them right for the folks at home to see. That's a hyper extended over locked knee. And she's overworking her joints. We want to work the muscles, not the joints. So bend your knees right now. What we want to do is push the heels strongly into the floor and engage these smile muscles at the base of the butt. So drive the heels down as you straighten it, but it really engage these, right?
And you'll notice that her knees are straightening without locking cause she's using the muscles to protect the joints. And that corrects the upper body as well. Right? So remember, we start from the foundation. If the knees are going to lock, you're going to have to balance things out by throwing off your, your spine. So everything has to be kind of drawn in as best we can towards the center. Yeah. Thank you so much. I hope you, uh, email me if you have any questions.
Pilates Legacy Project: Carola Trier Methods

Mention
 |
Jillian Hessel (Teacher) |
 |
RANA K |
 |
Cheryl Z |
 |
Bruna H |
 |
Maryam |
 |
Patty Hafen |
 |
Meg Fleming |
 |
Daniela C |
 |
Nicole F |
|
|
Theresa Raess |
 |
Tessa |
|
|
Safiah D |
 |
Erica V |
|
|
Karen F |
|
|
Saleha S |
|
|
Julie R |
 |
Belinda P |
|
|
Kim V |
 |
Lynn P |
Comments


Saleha, the anatomical charts I used are standard ones. You can most definitely buy them online. They are laminated, which makes them very durable, and I do like to use them to demonstrate the basic anatomy to my first time clients, just as Carola Trier did during her Introductory Postural Tutorial.
And Erica, yes, the remaining 2nd hand copies of Carola's book have become very expensive, as it never enjoyed a second printing. This is one reason why I wanted to read from it and share a good bit of it on PA, so people are aware of its' existence, and Carola's huge contribution to the Pilates Industry.
What is the purpose of making the client raise on her toes? Is the purpose to only check her balance?
Thank you.
You need to be a subscriber to post a comment.
Please Log In or Create an Account to start your free trial.
