Description
About This Video
Transcript
Read Full Transcript
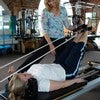
Hello, I'm Alan. We're going to do a short tutorial today on the ability of the thoracic spine so often with too much into flection and what we really need as a lot of extension. Just the idea of lifting your arms up to reach something from a high cupboard. If you don't have this movement in the upper spine, you work the wrong muscles. So I'm going to ask Haley to help you with this. Hello Hailey.
What we need to look at is the position, the area from here to here so that when you bend, you're working this part of the back rather than just the lower back. Haley, I'd just like you to bend backwards, but from just from just break from here as you go back. See what people will do is that when they bend backwards, so they're only breaking from where the lower spine, the lumbar spine joins the thoracic spine, and what we really need is the movement to come from roughly between the shoulder blades. So you get the movement so the scapular can slide back and forward without being tight. So we're just going to start with a very, a nice restful position that you can do at home, which will help to open out this area of the back. Haley, can you lie on your back here and we're just going to place, take a towel and make a role, a role that the size that will suit you. Don't have it too thick to begin with. And if you just lie on your back and place the roll just rough at the lower part of your shoulder blades and lie back on the floor. I think we move this down a little Hayley and have your knees bent.
So the spine is supported and some, sometimes if the spine is very tight, you will need a small pillow under the head. And just by lying in this position and just breathing normally, it will help to open out the, uh, the thoracic spine just without. You can watch television, you can read or just meditate in this position the other way. Once you've got used to that, if you just start moving your arms up. So if we start with the arms here and just very gently take your arms back and forward and you begin to feel the will movement, we'll start from where the towel is in your back. So we're just feeling what's happening with the arms as they move back and forward and just breathe normally in and out.
As you do that, try not to hold your breath as you do it and then we'll rest on and our from there. Take this up and I'm going to ask Haley to lie on her stomach now and she's going to place her hands in a sort of diamond shape with the forehead resting onto the hands. And from here you gently draw the shoulder blades down without forcing it. It's not tight, it's just a gentle drawdown. From here. Now only inward breath.
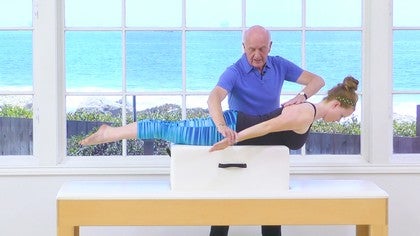
Haley's going to press down into her lower arm, this part of the arm, and just lift her breastbone from the, from the floor or from the bed. And at the same time gently pull down and then done. Now what I'm going to do is take two fingers in, very gently, place them on each side of the spine, roughly in the center of the shoulder blades, and as Haley presses up, I'm going to very gently press down so she gets the feeling of where the movement has to come from and then back down and I'm going to ask you to breathe in when she does that
Can you lie on this box? Now, if you don't have a box, you can do it over the edge of a bed, but this will help just to show the shape of the body as she does it. He lie on the box with your sternum just over the edge.
Now what I'm going to ask her to do is have her arms by her side and just going to bend her upper torso over, but not too much with their head. So just we have a rounded back. So we're going to go from flection into extension. So palms down in just below the box like that. So take a deep breath in. Now as you breathe out, leaving the head where it is, float your arms up so they're level with your hip bones. Then as you breathe in, draw the shoulder blades down and lift your sternum.
And again, I'm going to place my fingers into the area of the back. I need her to work. Then from there she's going to rotate her palms outwards and gently pull down and then relaxed back down, breathing in and the arms go down. Not too low on that, Hailey, just to there. So we breathe out and you adjust your arm.
Read your art and lift your arms. Breathe in, draw the shoulder blades down and lift your stern and your breastbone up. Breathe out and reach your palms away. Stretch your fingers towards your feet. And then Dan, what we have to avoid is too much curve in the lower back. Keep the lower back still. So what I'm going to do here is place the heel of my hand on the pelvis and the other hand on the low rib cage on the rib cage.
The Hailey will do it. As you breathe out, lift your arms up. Now breathe in and lift your sternum and draw the scapular down. Stretch your arms away and rotate. So what I'm doing here with my arms crossed is keeping the lower back. Very Open. Good. Thank you.
And slowly sit up from there and again, stretch your back out and stand up or sit down on the made bed and I'll take this box away. Okay, sitting in that position. Take hold of your knees. Now we sit up to a straight back with the legs at roughly 90 degree bend with the feet firmly on the ground and gently hold on with the hands in front of the knees. Okay? Hey, can you swing around the other way? Now place your hands just in front of your knees.
I sit up very straight. Now as you breathe out, support yourself with your arms and slowly curl the lower back down. So you're in a, you're in a nice seeker now as you breathe in, straighten your back, drawing the shoulder blades down and lift and arch over my fingers. Put your support, the head arch over the fingers and lift your sternum and sit up straight and slowly curl back and sit up straight. You elongate and lift the sternum and just over my fingers. Just peel. That's good. And Ab straight.
And then curve back. So you're supporting your curve with your arms and you felt that through your middle back there. Good. Can you sit around and face this way? Okay, you can do this sitting on a chair. The main thing is to be a stable as possible. Okay.
Now what I'm going to ask Katie to do is just to get a little more Rodeo, some rotation into her back. So she's going to place her fingers, Haley, place your fingers like this all. So the fingers are in this position with the thumb sticking up. And we're going to place the fingers in the center of the breastbone and I have the fingers sticking up. So it's as if your nose is caught between your thumbs. So you, that is your center line.
So we're going to draw down the back now as Hailey breezy and she's going to very gently rotate to the right, but holding the left hip in place. Breathe out to come through center and breathe in and go to the other side. So we're getting the rotation in the thoracic spine and breathe in and then out to the center and read in all the time, keeping your, the three joints of the fingers closely held together. And imagine your nose is in between your thumbs so that the head doesn't go too far over. Now when you get, when you feel comfortable with that, we're gonna double the breath. So you breathe in and turn. Now you pause, they're breathing out and then breathe in and go a little further.
But remember to stabilize in the opposite hips, you feel the weight going down into the hip that you're turning away from and you breathe in to come through center and to the other side. Breathe in, go round out, breathe out, and then breathe in and go a little more all the time keeping the spot in very long.
Now from side to side, if we laterally go to the side, it's very easy just to work the waistline. So you can go over. I'm just going to ask Kelly to curve over to the left. Now she can go there and she can get away without using her upper back by just getting the waistline working. So we want to restrict that movement. So what we're going to do is to place one hand as high up. Just this one's this side one.
Haley as high up under the armpit as possible with the heel of the hand into the center. The other hand goes behind the head with the elbows slightly in front. Now from the Hailey's going to go over to the left side, but she's going to push with her left hand to stop herself going too much. So she's going to go over but pushing. So in fact the art, the curve is coming from the upper back enough from the waistline and she's going to come up with a breathe out on this one. Haley said, breathe in. Now breathe out.
And we get the curb through this part of the spine and this arm is pushing. It's working against the curb so it doesn't go over too far
Back Care: Thoracic Spine Mobility
Mention
 |
Alan Herdman (Teacher) |
 |
Jennifer M |
|
|
Liza P |
 |
Sylvia B |
|
|
Marta M |
|
|
Alissa S |
|
|
Debra H |
 |
Olga S |
|
|
Ashtyn C |
 |
Suk W |
 |
Vanessa C |
 |
Marisa L |
 |
Pinar F |
|
|
Fran S |
|
|
Denee D |
 |
DJ |
 |
Antonio L |
|
|
Elizabeth B |
 |
Janja T |
|
|
Yeongyin J |
 |
Charlotte F |
 |
Jocelyn N |
 |
Jill C |
|
|
Teresa L |
 |
Sherri Betz |
 |
Sandra M |
 |
Heikki L |
|
|
Julie A |
Comments


You need to be a subscriber to post a comment.
Please Log In or Create an Account to start your free trial.
