Tutorial #5487
Connecting the Pelvis
Description
Ready to put what you've learned into practice? Try out Michael and Ton's Pelvis and Hip Joint Mat class here!
About This Video
Transcript
Read Full Transcript
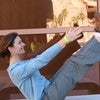
Hi. I'm Tom, and I'm Michael. This tutorial is all about the pelvis, and we're gonna use the concepts and the philosophy from Spinal Dynamics. And if you want more information about that, you should check out our tutorial on the elongation of the spine where we talk more about that. And if you do watch that, you'll realize that the pelvis is the bottom pole of the coordinated unit of the spine. So it's worth checking out.
But now we're going to look at how the pelvis and the leg are related. So in the pelvis, We are we can find movements through all three axis of movement. So of axis of rotation. So the first axis we're going to talk about is the transverse axis, which is the axis from right to left or right there. And it runs in the pelvis right in the center of our acetabulum. So when we rotate around that, we go into a curl and a release. Stiff lumbar spine.
It's a little he needs a little mobility. So from here, we see it this way. And that way. So you could say posterior anterior tilt ish. Right? So then the second axis is going right from the front to the back. So when that is right in the middle, We have this motion. So one goes up and one goes down, or one goes towards the head, and one goes towards defeat kind of motion.
Then we have the longitudinal axis, which basically follows the line of our spine. And when we rotate that way, we move in that motion. One hip goes forward, one hip goes back. When we do all of those together, it creates a spiral. So it goes if you look at the right pelvis, It goes back down and out. This pelvis is doing at that point the opposite And then it goes back down and out on the other side.
So As one pelvis goes into an outward spiral, the other pelvis, the opposite one, goes into an inward spiral because as you might have noticed, they're connected. So if one goes out, the other one has to go in, it does not have much of an option there. Now this motion is very important as that is the motion that the pelvis does when we're walking, or I should say should be doing when we're walking because, unfortunately, it doesn't happen. Oh, jinx. It doesn't happen all the time. So when we are walking, we can do it both together.
So when we are walking and we are standing obviously on one leg, you need to transfer your center of gravity over to that leg in able to stand. So it needs to move around. So it's now above it so that he can stand on one leg. We can do that in many different ways. Unfortunately, there's only one really good way. That we're doing it.
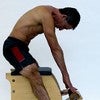
But you will you will see with clients is that they have found all kinds of ways to shift it. And we're going to talk about that now so that we can see why some of them are helpful, and some of them are not. So let me put Humpty dumpty together. There we go. So mistake when somebody is going to stand on one leg. Let's pretend that Michael is going to lift up his left leg. For example, to go and put the foot on the pedal, for example.
So stand again. So what most people do His center of gravity needs to go over to that foot, so he's going to slowly shift his weight over. Now can you stay there for a second? So what we see is that the acetabulum, the socket is not really on top of this femoral head which means there's not a lot of bony structure that creates stability at this moment, and all of the structures, the ligaments, the tendons, the muscles that are in this area, I now have to work super hard to keep this all together. Okay? So that is not comfortable for the joints. It's not comfortable for the capsule of the joint. It's just one hot mess.
So now standing on both feet again. The other way that people cheat is moving the hip forward leaning back with the upper body, and we do the same thing just in a different area. Again, it is not very much covered, and there's a lot of stress on the joint and on the capsules and on the soft tissue. Come back up. Sorry about that.
That must not have been comfortable. Oh, very comfortable. Suffer for your art. So now from here, we're going to do it correctly. So we're gonna do it slow.
So if he curls under slightly, goes into rounded second axis, and then goes around the 3rd axis. The pelvis creates a spiral and we can see how the socket is now right on top of that femoral head. And this bony structure creates a ton of stability now for that leg. And then when it comes down, it is back. It doesn't mean it's easy. We need a lot of muscle control and strength to get that pelvis there.
So it's a lot of work. And as we can see, the pelvis moves into that direction which creates a lot of flexibility that needs to be happening here in the front, like the sew as the hip flexors and all that good stuff. So obviously, anything that is restricting in the front will prevent that pelvis to be able to go up there, and any kind of restriction in strength if that's too weak, it will also not allow that to come up there. Now let's feel that motion all at the same time. So if you have, like, a bench or the if you're sitting at your desk, to stand up and use the seat of your chair. We can just stand with Do you want me on that time? No.
We can be okay. Yeah. This time. No. Downstage. That one. I think that's the clearest. So make sure that the bottom leg is absolutely parallel and that the front leg is parallel too and we just going to pretend to relax.
And now push this leg really as hard as she can into the floor and then push straight down as hard as you can, making sure you have even weight on the heel and the ball of your foot. And then slowly relax. And what you might feel is as you push down, you kind of like feel how that pelvis moves on top of that femoral head, And when you relax, you kind of feel how it rolls away from it. Now if you place one hand, on the ASIS, right in the fronted hip bone, and one hand by your to warch your sits bone. You can hold it this way, or you can do it this way. So now when you start pushing into that leg, you start to feel how this moves into that outward spiral. And the sits bone comes underneath you, and now the pelvis is on top.
And now the pelvis is rolling off. It stands on top. And it rolls off. So when standing, you can feel how That pelvis is moving from this position. Oh, that, still on this leg. In this position, and how when he pushes down, it moves in that position. And that moves this socket right into or above on top of that femoral head, which then creates his stability.
Now, unfortunately, implies we don't do this kind of movement a lot. We do it a little bit with standing in front when the pedal when you push down, or for example, the going up front or anything like that. But primarily what we do implied is keeping the pelvis still and then move the leg inside, like the lecture goes the leg Springs, the footwork, over and over again, but especially when you work with people with hip problems, pelvis problems, knee problems, lumbar spine problems, athletes, they really need to be able to keep the femur still and move that pelvis on top of it. So if you're working with those kind of clients, you might want to make sure that that is integrated in your program or in their workout just to help them out in a little bit more specific way. We hope. Did I miss anything? No. Okay. So we hope That's what's clear.
If you have any comments, write them down. And if you want any ideas about the exercises, you can follow our workshop a workout on the pelvis and the hip joint link is below. And other math classes where we use the concepts of spiral dynamics? There we are. You're listed. Bye.
Mention
 |
Michael Fritzke (Teacher) |
 |
Ton Voogt (Teacher) |
 |
Daniel T |
 |
Karen M |
 |
Maggie R |
|
|
Rebecca M |
Comments


You need to be a subscriber to post a comment.
Please Log In or Create an Account to start your free trial.
