Description
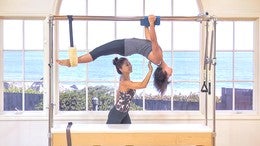
Cathleen starts with Pelvic Press on two red springs as a gentle warm up, then moves on to the rest of the class.
About This Video
Transcript
Read Full Transcript
Okay, thank you very much, I'm Cathie Murakami, and I am totally excited to be back with Pilates Anytime. I am filming a series of progressions on the reformer. So if you are familiar with my mat work progressions, you will see a very common thread. If you have not had a chance to look at something I filmed a while ago, on the trap table, where I use the breathing sling, I'd encourage you to go back and just check that segment out, because you will understand the correlation I'm gonna be doing here on the reformer a little bit more. And this is my super great friend, Manuel Velasquez.
We worked together at Rancho La Puerta, he's cha cha cha, cha cha charming, and here we go. So, I'm going to ask Manuel, first of all, he's going to lie down but, we're going to use this standing platform. The standing platform, you want the edge, do you see, slightly over here, because he's gonna place his feet on top of this platform. It's not anchored in for a reason, because he's gonna really need to use his hamstrings to keep this secure. So we're doing just a super brief warm-up.
Let me move your foot. There ya go. Um, on the reformer, so you won't have to change position too much. Alright, here we are, ready to do pelvic press. And by the way, if you don't have a platform at home, of course you can do this entire little brief sequence on the floor.
We breathe in. We breathe out. We're connecting to everything on the interior. We will start to press into the feet without moving the carriage, so engage your hamstrings, and press your pelvis just straight up. Inhale, inhale, inhale.
Beautiful. Exhale, sustain the position, reaching the knees long over the toes. Take another breath and melt the chest to roll down. So he has to again, really use the back of the legs, so the carriage doesn't wiggle around. Just a couple more.
Inhale, as you rise reach long here. See this beautiful runway. Diagonal line, diagonal neutral. Little breath. Melt the chest, and use the abdominals, walking down the ladder of the spine.
And we'll just do one more. And because the platform is flat, you have a lot of great feedback from the soles of the feet. Oh I see yeah, ah-ha, he felt the movement. And a little more inner thigh. That's it, on the exhale, to count back.
Beautiful. Relax, and then we'll take a small, abdominal curl. Take your breath, same setup. As you exhale you roll the head, neck, shoulders forward, mild curl, tailbone heavy, stretch the arms, breath in, exhale and return. Decelerate, arms come down flat, take a breath, exhale, roll the head, reach the arms.
That's it. Beautiful. Inhale, exhale and return down, and just one more. Arms down, breath in. And here, maybe you wanna stay up for a couple more breaths, so we'll just breath.
(inhales) And out. (exhales) And stay, that's it. Inhale, exhale, stay, and last one. Inhale and exhale, and back to the floor. Alright, beautiful.
Next piece here. This is an option. You can lift the headrest up. It's slightly more comfortable. Bring the hands back.
You can take a hold of the silver pegs, elbows slightly angled. Let's bring the feet and these together. Okay. Putting the mind here at the pelvis. We will rotate on the inhale, exhale to center, and other side, and exhale, pulling the pelvis back.
So one of the words I tend to use a lot more than push is pull. Just a different feel, just a different feel. Push is not wrong. Pull, the muscles actually pulling the body verses push the bones. And coming back.
And of course, if you'd like to make this just slightly more challenging, you could bring the legs up to your table top position, or all the way straight. So those are some options. Okay, so if you don't mind actually rolling to your side and sitting for a moment, so I can create a little different environment. I'm sure you all have a pillow at home. We're going to smoosh it in here.
As I mentioned on the trap table video that I filmed, I used a small bed wedge, and the reason for that is because it creates a little bit of an angle of the upper torso, helping you really feel the deep abdominal wall. Then, what I'm going to do here on this end, is bring the foot bar to the low position. I have the carriage moved out because Manuel is quite tall. And then this type of standing platform, again, this is an option, you put on the foot bar in-- Sorry. This position here.
So the longer, wider side is below the foot. The standing platform is at the same angle as the side bars here, so that when he places the feet-- So he's going to lie down. Like this, you have a lot of feedback from the sole of the foot, all the way up the whole leg chain, so this is really nice, too, if you've had any sort of foot injury; an ankle injury or in the foot or the toes. It just gives a lot of feedback up the entire leg chain. The springs are not heavy, so you actually may drop down.
I have two red springs on, because our goal is not to let this platform move around. What is going to help anchor it here? Your hamstrings. Let's see. (chuckles) Alright, so he's gonna go ahead and take a breath to prepare and anchor in the body.
And then here we go, on the inhale, go ahead and stretch your legs all the way out. Full extension, and return. (exhales) So that you can watch that the feet don't grip, there's no clutching with the toes. Stretch those legs a little further next time. (exhales) And breathe in.
So you feel that elevation through the spine, and even though the carriage descends, imagine your spine is still elevating, creating that internal length. And I'm going to ask Manuel, how are your hamstrings? They are firing. They are firing. Two circles and a snap?
(laughing) Okay. So, of course no more than 10 repetitions. This is just parallel. We can also pivot to the classic Pilates V. The center spring is the center of the carriage.
That's where I see the heels touch together, and we go ahead. We breathe in, stretching the legs long, reaching away, and return. (exhales) So what I'd like you to, perhaps consider, is feeling the inner thighs close half a second before the knees fully straighten, on the extension. That's it. Beautiful.
Then, on the return-- So he's feeling that, right? The inner thigh's closing before the knees? We'll stay here and pause for just a moment. What you can try is bending the knees before you actually feel the carriage come back. Yeah! Because that means he had to keep the carriage out for half a second longer, and you will feel your hamstrings get that much more, (clicking noise) cha cha cha.
(laughing) Alright, beautiful. An image I've been using lately-- We're gonna do just one more after this. Is that the legs are like pencils. And you know pencils have a pencil lead. So the energy, if you wanna feel this more as an energetic movement, verses-- You can rest.
A muscular thing, is your energy is the lead of the pencil and that's what's reaching through as you create your movement, so that you don't just kind of muscle the exterior body, and you will have a greater sense, actually, of the joint spaces opening up, creating a little bit more of a sense of expansion or buoyancy in the joints, okay? I just have 'em a little bit wider. Go ahead. Some of you may have done foot work on a jump board platform before. As you know when the jump board is in, it's completely vertical, which is going to require the ankles to be able to flex a lot more.
That's why this give a little bit more option for those of you that may have a little, a restriction in the ankle. But then of course, you can also watch and feel your feet if they roll out or roll in, so it's just really nice to feel this difference. Okay, so we're gonna be done with that. Alright, I'm taking this off. I'm actually gonna add the spring on here, so that he has three red springs, which would be traditional footwork.
We're going into tendon stretches. So the way I'm gonna teach tendon stretches today to him, we're gonna have the feet a little bit separated. The foot will start here again at that same angle as though the foot plate were there. We're going to go ahead and stretch the legs nice and long. All the way out, all the way out, all the way out, very good.
And then we're gonna reach the heels under the bar exhaling under without clutching and rising up. And rising up. And lower, and rising a little tiny, tiny bit faster. Good. So what I'm seeing what you cannot see from the camera is a little bit of external rotation.
The knee caps are going (mimics stretching), like so. Call it wall-eyed knees. So I'm gonna ask Manuel to slightly roll the left top of the leg, the skin, a little bit in. There, feel different? And then he's gonna feel this difference down here.
Good. One more time. (inhales) And rising up. Alright, very good. So, I'm not sure if you could see this, too.
He's slipping down the bar just a little bit, so the action is the heels reaching maybe more energy this way verses the rise. So, just remember if you feel yourself doing that and you kinda have to replace your feet, you might be disconnecting a little bit from your hamstrings on what's the, called the dorsiflexion, heels under the bar. So just remember, it's not just a, bluh, stretch under the bar. Actually the heel and the back of the leg reaches, but you wanna feel the hamstring still pulling you up in opposition, in opposition. Alright, so here we go for something different.
We're gonna press one of the heels down. I don't care which one. Your choice. There you go. Free your toes.
Bring your foot up, because you're almost touching this. Yeah, alright. Press eight times with one foot. So you, one, and two and three, breathe out, exhale, and six, and seven, and eight. Then both legs rise, switch sides.
And one, and two and three, and four, and five. Make it smaller. And six. Make it smaller down here. Seven and eight.
Rise all the way up. Four on the right. And one, and two, and three, and four. Switch, and one, and two, and a little more weight on the inside of the foot, switch and it's two, and it's two, single. And a one, and a two, and a three, breathing out, and breathe out, and breathe out, and breathe out, and breathe, nice! And then come up, (inhales), and come down, (exhales).
Alright! Awesome. The next pieces is single leg in the footwork series, but I'm gonna bring this standing platform back. Oops, this way. Nope, nope, this way. And then Manuel will have the left foot on.
I'm gonna drop the springs back down to two red. The moving or the gesture leg starts in table top. We'll take it a little bit lower to start. So the in hale will extend out and the gesture leg to the ceiling. Yes.
The exhale one, circle in and around, not too big, because the hips need to stay anchored. And then the inhale comes around here, and the exhale returns back to the starting position, and repeat. Breathe in, exhale one circle around. Inhale the circle all the way around, and then the exhalation returns. Just keep going.
So you might see a little of this. So as, if you have a mirror at home, you're practicing on your own, you may want to check that this actually stays here, which I'm gonna hold this time and it's gonna feel different for him. Oh yeah. And he feels the difference. What sort of difference?
What? It's the hamstring difference. It's the hamstring difference. Ah, yes, good. And you can see I'm kind of working here, so he really wants to just come to this, but we'll change sides, let's see what's happening on this leg.
Okay. So again the spring does not have to be heavy, because there's a lot of work that's going to occur. We're just doing five. And around-- I think we're doing five. And of course, you have a choice yourself, how many you'd like to do, but-- returning, that's the inhale.
So one breath in, exhale around, inhale around, and exhale return. (exhales) This leg is keeping this board a little bit, ah, more stable. (exhales) And coming back. And this is our last one, grand finale. Reach this long, you can reach this a little longer, this leg, this leg, yep.
And sweep again, and bend and return. Very nice. I will remove the standing platform, you hold out your legs, take a little mini, mental break. And we are going to do a quick arms on abs. One red spring.
Manuel will reach back for the straps which are on the silver pegs. Can you find them? Yeah? Perfect. The beauty of this exercise, you don't even have to lift your head in this version.
Table top the legs, table top the legs. Bend your knees a little bit more. Bring your feet a little bit lower. Okay so you can see the arms and the thighs are perpendicular. So the first movement is to inhale and bring only the arms down.
They can actually touch the carriage if you'd like. The exhalation extends the legs any height that you are able to sustain your connection without hurting the back. The inhalation brings the arms back upright. The exhalation bends the knees to the starting position. And repeat, inhaling down.
Exhale stretch those legs. Inhale the arms back. Exhale bend the knees. Aha. Inhale the arms down.
Exhale stretch. Oh, maybe let's have another challenge. We'll just stay here and breathe, out. Now the arms, and now the legs. (exhales) Oh, I'm telling your mother about that.
And then inhale the arms down, and exhale the legs. Extra breath, oh no, extra breath inhale, exhale. Inhale the arms, and exhale. I don't know why you want it to be over. (laughing) And your arms and feet come down.
Okay, very good. May I ask you to stand up and come off carefully? Now we're moving into reverse abdominals. I'm removing the pillow, putting the headrest down. If you have a foot stopper, it might be handy and nice for you because you might be able to rest your head back.
I am going to lower the foot bar down, and we are in this setup here with one red spring. When you sit down, the starting position will be to sit down. Your feet will be on your head rest. You will lie back and stay slightly curled up, okay? Go ahead.
Aha. And you're gonna scoot forward. Then one foot will remain on the head rest. You decide which strap you're going to start with. You actually use the opposite strap.
So this strap is going to go around. The right strap is going to go around the left leg, so the left foot will come in. We're gonna bring that strap all the way to above the knee, okay? Then he will lie back on the foot stopper, but keep scooching your bum really forward, 'cause you want your butt really near the shoulder rests. Yes.
There you go. Yes. Okay. Bring the strapped leg up to table top here. Curl the body forward.
Can you scooch up just a little more with your bottom? There you go. And for this level, you lightly grasp the shoulder rest, bend your elbows and you're folding here. Make sure the tail bone is down in neutral. You inhale and draw the leg towards you, breath in, exhale very slowly, slowly slowly out.
You don't wanna hit the stopper. Inhale. This is iliopsoas eccentric lengthening because you're exhaling. Yeah, so it's very, you see how tiny the movement is. And you better believe he's using the abdominals and you will be too, because you may have a little tremor of truth.
(laughs) Like me. Yes, you will feel it. (laughter) And one more. And exhale. (exhales) Beautiful.
And then you can rest back, and I'm here so I'm gonna give him room service to change sides, and if you're doing this alone you're going to be wishing I was there giving you room service, too, but I'm sorry. I'm only on camera. (laughs) Alright, here we go. There we go. Maybe you wanna scoot down a little bit more again, so your bum's a little closer.
Then we curl forward, we have the second side. Curl forward, elbows are open, drop the tail, bring this a little more in. There you go. So this is a really perfect table top here. The inhalation draws the knee in.
You slightly flex the exhalation a little bit away. Pull. So perhaps you've done this exercise where you focus on pulling a little bit more rapidly which is a great version. This will feel totally different, and I think you might like it. Exhale, exhale, exhale.
And in, and then exhale as you go out. (exhales) One more. (inhales) And exhale as you go out. Very nice. And then you can rest back.
That is how you would start with this exercise; single legs. So remember this strap is crossed over. If you move to both at the same time-- you can bring your feet up and I'll do this for you. You do not cross the straps, okay? And do remember that the strap just barely goes above the knee.
It does not go out to the thigh. Number one. And secondly, when you use both legs, the feet will be together, but the knees stay about a fist's distance apart. No need to use a proper anything, but it forces you to connect to your inner thighs, and remember they're part of this process. Same entry.
He will curl forward and up. Gaze here between the legs. Pull both knees on the inhale. This is the inhale. Exhale, stretch the legs away, away, away.
And then pull. Now I see why the straps should be a little bit shorter, yeah. He doesn't experience any resistance here. I could have shortened the straps. I didn't see that, but be sure you do have resistance through the full range, alright?
Otherwise you won't get the bang for your buck. The knees tend to drift open, just be aware. One more, and exhale. Oh, and head can rest back. Love that exercise.
Very nice. Okay. Let's move on. So I'm going to ask you to stand up, please, carefully. And I'm gonna take the foot stopper off.
We're moving on to a little bit of foot in the strap work to get the hip sockets warmed up. Foot in the strap work can also be done with a little pillow. It's just so comfortable. It feels so nice, so we're going to put this back here. I will make it again, two red springs.
I'm going to ask Manuel to lie down. Such a lying down on the job, I mean really. (chuckles) I will give him room service again, so if you don't mind reaching the carriage out and I'm gonna help you with your feet so that the right foot's in, the left foot's in. Mhm, okay, and extend the legs. So my little pencil lead image for you.
Hopefully you can feel this so the energy just kind of continues beyond the feet. And we'll start with leg arcs. And with leg arcs the hinge point at the hip socket. One thing, or actually three things I'd like to mention here. Something I learned from one of my mentor teachers.
And that is a series of three questions to ask yourself as you're moving. If you can answer them, you will understand the goal and the purpose of whatever it is you are doing. So the first one is, where is this movement initiated? So where is this movement initiated? It's initiated, this one, at the hip socket, alright?
So it's differentiation. You're trying to get the pelvis to remain stable and you're getting the femoral head to roll and sink down and back as the legs move up and down. Then, if I change his variation, just relax, let me move your legs, a small V, same movement coming up, leg arcs, just widening and coming to the heels together. The second question is where is the movement stabilized? Well, the movement is stabilized, of course the pelvis remains anchored, but it's stabilizing through the connection to the deep core, and you dive into the core via the breath.
The third question is, where is the contrast in the movement? Where is the contrast in the movement? So here again, that leg energy reaching out, but also if his body was another pencil, there's also the spinal energy reaching this direction as the leg energy reaches that direction, so there's your contrast. So, sometimes those three will work for you. From here, if you are new at doing the leg circles, like you've, this is um, foot in the strap work is new for you, you can start with little boxes.
One, two, three, four. It's a little Pilates waltz. (inhales) Inhale for one, two, exhale for three, four. Okay, keep it fairly small. (exhales) And he's doing them beautifully, I can feel.
There's not a lot of tension in the legs, so that's really nice. And then what will happen, is you will end up shaving the corners off, and there is your leg circle. Smaller to start, easier to control. So again, if we were starting with the boxes, reversing, one, two, three, four. Because whether you're a teacher teaching a client this as a new exercise, or you are a practitioner and this is something that's new for you, it's generally easier to make a square, than a circle.
And then the shaving off, here. Just allowing that thigh bone just to massage like a ball bearing deep in the socket. (exhales) That's it. And around. Great.
Really nice. Okay, the feet are gonna stay here. I'm going to remove the pillow, now if you don't mind lifting your head, I'm gonna just pull this out. The head rest will go down. And I'd like to do a little breakdown of short spine, okay?
Of short spine. Now this is considered a little bit contraindicated if you have any sort of osteoporosis or a high degree of kyphosis curvature of the upper back, or maybe some sort of a consideration in the neck, so just be aware. The first move is to bend the knees towards you with the knees coming towards the armpit just here. Inhaling. Alright, we're gonna hold and sustain this position.
He's gonna curl the pelvis a little bit towards himself here, this is moving into maybe the 12 o'clock position. He will inhale to roll back down, and exhale to extend the legs all the way straight, mkay? And let's repeat that. We breathe in to bend. (inhales) Exhale to roll, deep abdominals, pulling the knees in just a little bit, give that little back a stretch.
You okay? And then you'll inhale to roll down, and then exhale to reach. That's it. Not too low, not too low, okay? I'm gonna let go.
On your own. Bend the knees, and curl, aha. Beautiful. Come back down, and extend. Taking it a little further, adding on, it's like a recipe.
We inhale to bend. We're going to exhale to keep rolling and the carriage will keep moving, keep moving, keep moving, keep moving, keep moving, keep moving, keep moving. There we go! Alright, you alright? Yeah. Okay, oh yeah, and then?
Inhale here, and start rolling down and stretch out the legs. I helped him a little bit. Legs not too low. And inhale to bend, knees not too wide. Exhale curl, so we want the carriage to keep moving.
Yeah, that's it. All the way until you touch. Inhale, roll down, exhale and extend the legs. Ready to add on? Now we go for the real deal.
(laughs) we're bending the knee slowly, inhaling. Right here we're gonna peel the spine off, exhaling. Here's your first prep right to here. Beautiful. Then we're stretching the legs up in the air, aha, and we keep lifting the hips, yes, so there's that pencil lead energy reaching up.
Beautiful. Then he will bend the knees, inhale, keeping the hips high. I gotcha. Keep your feet together and open the knees. Keep your feet, oh, don't drop your butt yet.
Okay? Then we're gonna watch the feet. See your feet? Keep them there, roll down through your spine. Exhale.
Keep your feet here, roll down through your spine. Then your spine's gonna stop moving. That's the short spine stretch. Then you use your belly strength, bring your feet down to your butt, no no, listen to me, down to your butt, and then reach your legs out. Yes.
Got it? Got it. Got it! Alright. Uno mas. (both laughing) Inhale to bend your knees, please.
Beautiful. Exhale, curl that tail, dive the knees to your shoulders. The carriage stops moving. We stretch the legs up. He's gonna make that waistline really long.
Beautiful, there you do. Here's your challenge: keep your bottom up as the knees bend. Go ahead, bend your knees. So the carriage doesn't move, your bottom stays up, the feet stay together, diamond shape. Aha.
Can you bend your knees this direction? Wait, wait, hold it, hold it. Now roll down. You keep looking at your feet. Roll through your spine.
Breathe out, breathe out, breathe out, breathe out, breathe out, breathe out, breathe out, breathe out. Then bring your feet down toward your hips and then stretch them away. You lived through it! (laughing) That was gorgeous, wouldn't you say? Let's take this, keep your right leg straight. We're gonna bend this left knee and reach to the foot bar.
Up a little higher. There you go. And then slowly come down. Slowly come down. Very nice! Congratulations.
(laughs) Alright, may I ask you to stand, please? Next move, we're going to do a little bit of short box work. So, now's your time to grab the box. We will do this maybe a little differently than what you're used to with the box forward toward the front of the reformer carriage. And, gonna lower this foot bar out of the way.
Going to put a few springs on to secure the carriage, however, you also could actually keep it light, as a little test for yourself, so that when you're seated and your feet are secured in the foot strap, you know if you're starting to push on your feet, because the carriage will move. So, that's another option for you. So, Manuel, please sit down on the front. He's going to put his feet underneath the foot strap really forward so it's on the ankle and then scoot forward 'til you're almost at the front edge. Almost at the front edge.
There you go. Close those legs up. Beautiful. Just cross the arms. Here we go.
And we're just gonna check, he's got that nice, vertical alignment. We'll breathe in as you exhale. Slide the tailbone under. Send the knees the opposite direction. The contrast, leg energy, spine energy.
Just here pause, lower your elbows a little bit and curl, breathe out, and return all the way up. Beautiful. Once again, close those thighs. And on the exhale slide the tail under, roll back. He's going toward the waistband.
Yes, inhale there. And exhale and return. (exhales) So I call this, this is when you go to the waistband of 1975, okay? And one more time breathe in. Some of you may not even know when that is.
Exhale, curve back. So this lengthening in the middle is the same lengthening the middle like short spine. Breathe in, and exhale, and return all the way up. Beautiful. That was just three.
We're gonna rest here, and I'd like to just add on to this series with a tree preparation. So, if you would bring, let's take this leg out and hold it in your hand like single leg stretch. So the outside hand toward the ankle and gently draw the knee in toward you. Okay, beautiful. As you roll back, your leg goes with you, inhale tall, exhale and curl.
Same thing. Keep reaching. Beautiful. Just to here, shoulder blades, inhale, exhale return. Come all the way back up.
Stack up your spine, lift your chest. Yes, again. And rolling back. (exhales) That's it. Breathe in.
Exhale return. And all the way back up, right on top of those sit bumps. So we're just gonna do two. Well switch sides. So I keep him close to this edge with this leg instead of being straight which is a little more traditional.
What happens, you can go ahead and move, is his hip flexor cannot join the party quite as readily. So he has to isolate in the abdominals a little bit more. You can keep moving. (exhales) Beautiful, that's it, breathing out. Inhale, exhale and return.
So I'm sure you can see with his great demo where the movement is initiated. Where is this movement stable, and where is your contrast? And you return. And come all the way back up. So serious! Okay.
We're moving on. May I ask you to stand? I will now put this box here, something like this. Oops, I need to change the springs. We will have on a red and a blue only, box, resting on the down foot bar.
I'm going to ask Manuel to come on to his knees. His forearms will be on the box and his feet will be against the shoulder rests. Yeah, just like that. Okay, so you have the edge to grip onto lightly. We want to extend the spine, we're gonna have a neutral position here.
That's it. And then using the hamstrings. Activate by slightly pressing into the feet. You don't even need to move the carriage yet, and on the inhalation press the carriage back. Go ahead, press back, almost stretching the leg straight.
Maybe to there. And then exhale, pull the knees back underneath you. That's it, and again. Inhale reach, open up the front of the hips, exhale and pull back. (exhales) And let's go a little bit faster.
Breathe in, back, exhale pull, breathe in, back, exhale pull, breathe in back, exhale to pull. Couple more. Inhale back, exhale pull and here's your last one. Inhale back, exhale pull. Great! Adding on to this I have, two tennis balls alright, I'm sure you probably have tennis balls at home as well.
He will come up to standing, so you can come up to standing, keep your forearms down. So standing on the carriage. Aha, we're going to have him put his heel on each. Put your heel down there, yeah. There you go, and your heel down on there.
So sometimes that flat footed elephant position is challenging for those of us that are a little tighter in the back of the calf. So you can put a little tennis ball in there, and actually what happens because the tennis ball reaches, you get a little bit more length, so the contrast here is this energy down, but still, of course, this exercise is activated and initiated from your hamstrings. So we start with the toes really under the navel. He's in the same long spine position. Right from the hamstrings, press the carriage back, inhale, and pull those toes underneath the belly, all the way in.
And inhale. (inhales) And exhale. (exhales) Keeping that sacrum really flat if you can. And pull. And if you happen to need to bend your knees, it's okay.
(laughs) Tremendous amount of challenge anyway. And pulling. Great. And you get to take a little break. Yay! (laughs) Alright.
You ready for more? Yes! (laughs) I'm tired. You're tired! (laughing) Removing the box. I am moving, mm, no I'm gonna keep this bar down. I am going to make this two red springs, and we're going to come into a lunge position.
So I'm going to ask Manuel to come around to the carriage. We're going to put one foot, the forefoot on the foot bar, the heel toward the frame, and the opposite foot against the shoulder rest. Okay, your choice of side.
The forefoot, yeah. And then you want, you maybe, yes, and then step your other foot to the shoulder rest.
Alright, we're gonna have the hands like so. How's this feeling for you? Interesting. Interesting. Bend this knee.
Can you bend this knee forward? That's as far as it will. That's gonna be it. Okay, so from here, I'd like you to press the carriage back with your right leg, inhale, lunge. (inhales) Exhale and pull the carriage forward.
(exhales) There we go. And continue. As you reach the leg back, the chest moves forward, so you can actually gaze out at that beautiful view out there. That's it. Breathe in, breathe in, I would breathe in here.
And exhale. (exhales) And breathe in. Can we hold here? Now from this position, slowly start to stretch the front leg straight. So push back with that left leg, reach, bring your hands to the side of the frame, the metal part.
Yes, make a wish. Ding! And then slowly bend that left knee. Move the hands if you need to. Bring the carriage forward, and again, stretch the right leg first, fully extend the hip. Exhale, start to reach the carriage back by straightening the front leg.
Yawning open the back of the left leg and the front of the right. And slowly forward, and bend your right knee. Change sides. Carefully. We doin' okay?
Yeah. Yes, alright, from here. First the back leg. Inhale, lengthen, lengthen, lengthen. Exhale, pull forward, forward, forward.
And inhaling back. (inhales) And forward, I believe I did three on the first side of the prep. Inhale. (inhales) And exhale, and let's do one more. Breathe in.
(inhales) And forward, so now we're gonna add on. And breathe in. Lengthen that left leg. Organize your interior. Exhale as you start to reach that carriage back.
So remember your first one's always exploring, so you probably are not going to go as far as you can as on your last one. And pull this leg in. Yeah. And left leg. And reach open.
Again, yawning this open, so it's kind of gently, it's like an elastic feel. And front. Now let's just do your last one. Reach back, and lengthen. (exhales) Strong in the center, contrast here.
Hold that position, and then finish as you glide in. Really nice. Gracefully exit from this position. And you can come off of the reformer. And we're on the home stretch.
So, I am now going to use the moon box. So if you have a moon box, it'd be great to use. You know when I didn't have a moon box, when I first started teaching, I used to, remember the yellow pages? (laughs) They used to be thick. I would get two yellow pages books and tape them together and that was my moon box.
Anyway, you will put the box here at the end toward the foot bar. We'll use one red spring. Manuel will sit down and face the back. The feet will be on the headrest. They'll face this direction.
There you go, perfect. And one strap in each hand. So he's going for the ski pull grip. So you saw how he put his hands through and grasped. Then, we're going to exhale and flex over as far as possible here.
So you're not just collapsing. You are actively flexing your body forward, and the arms come out to the side, here. And they will stay slightly below the shoulders. So sustaining the position of the torso, just pull the arms back behind you. Breathe in, pull, pull, pull, pause.
Beautiful. Exhale, and forward. Your challenge is keeping the arms lifted but not higher than the shoulders. Go ahead. Breathe in to pull, breathe in to pull.
Breathe in, in, in, in, in. Resist on the exhale. Arms forward, forward, forward, forward, forward, and again. Inhale to pull. (snapping) And exhale forward, forward, forward.
Arms up a little bit. And inhale to pull. That's it. Exhale and forward. (exhales) Look out Michael Spitz.
(chuckles) And forward, just one more. Feeling the curve shape here, and the curve shape you're making here with the arms. Then, from here, just bring your body upright. Slide the straps to your elbows. That's it.
If you wanna add a spring, you can. You could add a yellow. You don't need a lot. It's actually gonna stay a little bit below the elbow. Right here, yeah.
And the arms will be here, uh-huh, and the shoulders are down, the legs are shut. And we're going to inhale and bloom the chest open, and exhale come forward. And breathe in bloom open. That's nice. Exhale forward.
So what you want to be aware of here is any shearing of the head in your attempt to bring the arms really far back. They actually don't even need to go behind you. They could just come straight up to the side of the torso. Avoid any elevation in the shoulder area, and again the bobbing of the head. (inhales) And forward.
Really nice. And look, the sun's coming out for us. Yay! And last one. Ta-da! Did you see how he remembered his knees? (laughing) Okay, you can bring your arms down.
And my friend, thank you very much. I think we're cooked for this first session. (laughs) So the Cat and Manuel show will continue with part two. The fun gets even more thick, so stay tuned.
Comments


@ Lori, appreciate you taking time to write something. If I can be of help for you PF, please PM me anytime!


@shelda (lovely name!) Thank you for taking the time to write something.....hope you have time check out the other classes I have here on PA


You need to be a subscriber to post a comment.
Please Log In or Create an Account to start your free trial.
