Description
These short videos are great to watch as a newer student of Pilates or as a seasoned Teacher looking for more depth in each exercise.
About This Video
Transcript
Read Full Transcript
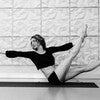
So the roll up. We're going to reach your arms up to the ceiling and to find the position of your arms starting. I want you to press, press into my hands, pressing your ribs down and reach back as far as you can without losing your connection. Great arms come up to the ceiling and without lifting your shoulders, bring your head up through your arms and now we'll up one bone at a time articulating really scooping in and up. Good and stretch forward and you're going to start rolling back, pulling back, lengthening lower back first, middle, upper and reach up. Bam, Bam. Good. All right, let's break it apart.
Now the arms are going to come up to the ceiling and those shoulders are not going to pop up. They're going to stay really nice. Open collar bones can. It's hard. You got to stay anchored in the ribs and with nice open collar bones and try to use your powerhouse to bring your head all the way between your arms. Watch those shoulders good and keep working on your ears. Stay staying between your arms as your arms go parallel to the floor, the belly scooping in up. See how high they are. We're going to bring them here.
Now. Keep diving your head through. Yes. And now we're going to keep air south here with your hip bones directly over those sip phones. But use your scoop to lengthen, lengthen the spine, lengthen, reach it, reach, reach it. That's it. Good. And when we're gonna pull back from here, from your powerhouse, but the legs are laying the knee, you're using the legs to stabilize their wrapping. They're squeezing their reaching. Good. Let's take a pause here and get a little longer than those arms reaching to the ceiling without lifting the shoulders and reaching back. Great.
Let's do one more. Taking it apart. So arms head only. Then you're going to curl up articulating one bone at a time. Very important to lift one bone at a time. Creating space between each vertebra holding. Don't let yourself just flop forward on your thighs and use your belly to lift and lengthen each bone away.
And we're going to roll back pooling. But definitely that bottom is working like crazy to lengthen the legs away. Rolling down in a row. One bone at a time. Good. And reaching back. Great. There we go. Now let's do five to tempo arms head.
Scoop it up. Good. Stay here for a moment and I'm going to slide you all the way down here. All right. And rolling back like you're pulling a great weight back with your stomach and arms. Head. Scoop it in and up. Articulating good stretch and pulling back with your powerhouse.
Back, back and arms. Head in an up stretch. That's it. Keep your bottom. Work in a little more in that direction and reach. And now pull it back. Wrap and squeeze and lengthen. Lengthen and up and back. Good arms head. Good.
And when you're lifting up your neck, keep going. We're going to do two more. Don't flatten out right there. You kind of went. Um, uh Huh. And so I want instead this big lifting up as you stretch forward. Beautiful. And then pulling back with that. Good. Good. Yeah. When you lift your neck, you'd probably get a little benefit if you, let's bring your arms up, push the crown of your head long that way, and then bring your head. Yeah.
Now you're lengthening your neck a lot more before you are kind of crunching on it. And the same thing on the way down, pulling back. Don't forget that you have all these vertebra, so roll those down before you roll down the very top one. Stretching, stretching, stretching. And that's much better as you reach back. Good. Thank you. Enough, arms down. Good. All right, so we've just finished the roll up and we're going to do the single leg circles. Good. And it's really important to work on the flexibility aspect of this because as you get more advanced than we want to do, the roll over and the roll over requires quite a bit of back.
It's definitely, but hamstring flexibility to do, to do it safely and properly. Right? So we're going to bring the right knee into your chest and give it a hug. Go ahead and let's go ahead and bend this knee while we're here. We're just going to, um, oh no, I'm sorry. I want to actually have you do it and then we'll break it down.
So extend that leg up and give yourself a stretch by putting the hands behind the thigh. Good. And if you are flexible enough in grabbed behind the cath, which you are, open the shoulders, good arms now by your side and you're gonna circle across the body. One around and two good. Three, two more last time. And reverse going down around, up. Go around three one more time. And now hug that knee in. Good. We're going to just leave you to super imbalanced today as we break it apart.
Get let's switch legs to do the, we're going to hug in the left, bend this knee for our little breakdown and extend that leg up to the ceiling. Great. So you want to give it a good stretch. So we're going to hold behind the five. Good and the most. Um, if you weren't thinking about Palladio's and you just wanted to stretch your leg, most people will stretch it by just pulling it a like towards you. But your hip bones then are off. And what we do, employees is we keep our, we do. How much can we do? How much of this can we do while maintaining a nice square box, right?
And using our powerhouse. So single leg circles are trying to develop really strong hips and we're trying to really let the blood get into that hip socket and keep it really lubricated as well as healthy and oxygenated. So there's a lot that goes into this exercise and when we just pull that leg towards us, we're kind of just jamming our hip bone into our hip socket. So I'm gonna want you to slightly rotate your knee out and feel the difference in the stretch there. Now when the knee and the toe are pointing more towards your left shoulder rather than towards your nose or your chest, Vaughn, it's a big, it's a difference in that hip. When you stretch it.
Can you feel that difference? Good. Then it also feel what it happens to the hip bone here. Yeah. So when you roll your knee in like towards me, it pops it up and when you put it, turn it out. Then it is now square and even with the other hip bone, super important in this exercise. Now if you're able to keep your shoulders down like you are and grab up onto your calf, excellent.
If you can grab up all the way to your ankle even better, but you want to find where to pull on that leg just to give yourself a light stretch without losing all of your alignment. Exactly. Okay. Cause we're keeping our square box on our map or they've even the ribs. Okay. Now I want you to go ahead and place your hands on your hip bones. Good. And without lift, lifting your cheeks up off the mat. I still want more space here. Yeah. Awesome.
Without lifting up your cheeks or your hip bones, I want you to imagine these muscles getting even longer and that your toes to touch the ceiling. Great. And always really sinking that navel deep into your back. Good. Now I want you to keep lengthening and touching that ceiling and we're going to reach that like down. Good. And we're going to pull our belly in and pull that like up. Very nice.
And do that one more time reaching. And so you feel this great length and when you pull up, you should feel that your stomach and your legs are working nicely together, but you're not gripping. And one more time. Good. And pulling it up. Good. How high can you pull it up with your stomach? Pull it up, pull it up, pull it up. Good. Now Cross. So you're going to be at your nose with that leg. Good. Again, not pointing towards your nose, but the position is down the middle of your body.
Crossing over to this shoulder. Good. And then we're going to go down a little bit as low as you can. Keep your back flat and then pull it up. Now you are super, you're a lot more flexible than this. So we're going to lengthen this leg. And how I know is because you're able to pull it up a little higher than 90 degrees. If you struggling like right here, I would keep that knee bent. But once you can reach the 90 degree point, then let's challenge you and get that leg down the middle of your body.
Also really working, lengthening that hip flexor. So use your powerhouse and you can rest your arms. Now, not rest actually, but use the back of the arms and everything and you're going to pull that leg up to your nose. Cross to your right shoulder. Now with your belly, and we're going to keep that lower back down. And I want you to reach all the way down to this ankle. Beautiful. And now you're only gonna open wider frame as much as you can.
Keep this hipbone there so you can open. But not if this hip's fallen over with it. Great. Now if he did it like that, there's definitely gonna grip in that quad. So you want to do it really quick to tempo and you're going to pull up to your nose and cross around up, cross around up. Good reach for that ankle stretch.
So you get this whole stretch through their reach. Do that waist. Don't get shorten that waist. One more reach and reverse and scoping. And that's the scoop. Yep. It's almost an exhale when you pull up, but you would be kind of panting if you did it every time. So work with it one more time and hugging that knee. Nice.
And now we're going to do the right leg so that we are kinda even, so extending that one. Go ahead and bend this one. Good and arms down. And we, you were able to stretch up higher on the last one, but shoulders right? There we go. Good. Very good. Good. And then you can place your hands on your hip bones. Good. And we're going to keep scooping.
It's now pointing towards your right shoulder and you're gonna reach out and keeping as long as you can through here. Pull up that leg with your powerhouse. Beautiful. Two more. So you really feel good. Lower back stretch as you lengthen and scoop it up. Beautiful Scoop. Love it. One more reaching and pull it up, up, up. And now we're going to, it's down the middle of your body, so it's pointing up to your nose.
It's going to cross over and it's going to good jobs to stretching that leg. Now I want that steps the ankle though. Right? Okay, so we're not reaching all the way down because you can, you can keep your back flat while reaching and that's a gorgeous stretch for you. And then keeping this hip down. How far can you open it? Wherever you want. And then here, arms by your side to tempo crust around up scoop and lengthen that waist. Good and keeping that yes and crusts around. Good. The most important part is when you cross and you're trying to get as high as you can. That leans out the thigh. Last one.
Then we're going to reverse for five as it really leans out, the thighs, the lift. So when you get past that 90 degree, how far you can. One more. I think my mind. Good. Now if you were a ballerina or had extreme flexibility, you would want to imagine that you were doing the splits right now. So the light comes. Yes, the light comes all the way up to
So now we're going to go into rolling like a boss who you're going to straighten this leg on the mat and use your powerhouse to lift your head up. Great. Until you're in a seated position. Wonderful. Now place your hands just by your hips and watch the shoulders and use your triceps instead to lift your light bottom to your heels. There you go. Now keep your weight a little further back onto your hands. Nope, you can keep your bottom forward. Perfect. But just your weight back. So what I'm trying to do right now is instead of your lower back and instantly support you, and then you have to fight that for rolling like a ball.
I want you to keep your weight a little bit more back so it's more a little more natural and feel your stomach scoops, scoops, scoop. Good. And now I want you to use your belly to pull up your legs. Emmy, you can do better. So press into me and scoop. There you go. Yes. And now keep that as you slowly get less dependent on your hands and place your hands on your ankles. Good.
So what you did beautifully on the roll up was you didn't sandwich this space. You didn't get rid of this space. Exactly. You kept a lot of space yet you did a huge lift, like you're really opening and filling your back and you're trying to get your head between your knees. Beautiful. Good. Ideally we want to keep those heels right there. So let's go for a rolling like a ball.
Starting by massaging your lower back down onto the mat. Roll back, and exhale roller. Good. Let's do one more. Inhale, roll back. Exhale, roll up. Great. So that's the roller. Rolling like a ball and we're going to um, detail it now. Okay. Okay. Comfortable. Alright, so ideally you're going to almost do like a rollback. So let's actually s lift your bottom back a little bit. Good.
Hands under the knees and we're going to leave your feet right here. And so you did a roll up just before this and the roll up was detailing how to articulate your spine one bone at a time. So roll down one bone at a time. Your first rolled down your waistband, right? Okay. And then the bottom of your shoulder blades. Okay. And then finally your head. So keep going until your heads down.
That's those three points to come up. You're going to lift your head up first. The next point would be the bottom, your shoulder blades. And then the next point would be your waistband. And ideally you're articulate each bone in between those points. But you'd get the point. Now we're going to scoop in and up and balanced with the feet.
Just a little off the map without losing that control from the powerhouse. Good feet are relaxed, everything's relaxed shoulders and we're going to do the same thing but now the legs are coming with us. So you're going to massage your low waistband first, then your bottom of your shoulder blades and if your head's on the mat that's fine. But I don't want it to be the only thing that's on the mat. So I wouldn't want you to lift everything up and even your upper backs on your head. Neck. Okay. But it is okay to restaurant. Get your head back on the mat. So roll back through those three points. Waistband. Aha. Good. Let's do that one more time. Good. All right.
So you were cautious and you didn't go down to your head, but it also might be limiting with where your hands are. So let's now do it the regular way. That's more of a modified rolling like a ball if you have a very stiff back. So this is much better if you've worked for a while and your true intermediate. So you're scooping in an up really working on that and trying to keep your ears between your knees and your heels glued on your seat.
Starting with rolling back with your waistband. Yeah, well, uh Huh. Good. That was much better. And it's going to be very hard for you to come up if you don't get your head on the mat. And that is because if your head's not on the mat, then your bottom isn't working to lift up over your shoulders. So this beautiful sea curve that you have here, you have your shoulders over your bottom right. Okay. When you roll back, I want your bottom over your shoulders. So I want the reverse c curve. Okay?
So pulling your belly into my hand until you just naturally fall back. Lift that bottom and then come up. You're almost there. Taking the little on your shoulders. Scoop, lift it. There Ya go. Exhale up. So you're going to have a lot easier time if you do the full range of motion.
Never touch, sorry. Never touched the feet when you come up. Balance without the feet touching. Great. How about to tempo? Inhale and exhale and inhale. Roll back. Exhale, roll up. Inhale, roll back. Exhale up. One more. Inhale, roll back. Exhale, roll up. Good. We're just to want to watch those shoulders.
It's hard to lift, but the most important thing is to massage your spine, not to feel like a flat tire. So if you get that gold ball when you're rolling, which you didn't, then you would want to do it with your hands underneath your knees, giving you more space, and it's a lot easier. You're more like a rocking chair. Yeah. Okay. Okay. But once you're truly an intermediate and what we're doing right now, then you're going to want to keep it really tight and advanced as a whole nother story. But this is great for intermediate. All right. Good.
Mention
 |
Monica Wilson (Teacher) |
 |
Helya G |
 |
PilatesPostTransplant |
|
|
Teresa L |
 |
Francisca A B |
 |
Kristi Cooper |
|
|
True beginner |
 |
Gia Calhoun |
 |
Micall W |
 |
Karen R |
|
|
Jo |
|
|
Miranda G |
|
|
Debra B |
|
|
Deborah W |
 |
Hannah M |
|
|
Lisa B |
 |
Patricia V |
|
|
Mat Work |
Comments


You need to be a subscriber to post a comment.
Please Log In or Create an Account to start your free trial.
