Description
About This Video
Transcript
Read Full Transcript
Hi, I'm Joy Puleo. And I am here with Rebecca Phillippo, Kristin Brighty and Tiffany DeMartin. And we are here to address some of the physiological changes to muscle metabolism and connective tissue and blah-blah-blah that happens during menopause. But the reality is, we're really here to give you a bad-ass menopause mat class. So one of the things I want you to remember is we're working on flexibility.
We're also working on muscle strength. And we're also here to remind you that our movement has potential, no matter where we are in the spectrum of aging. So with all of us, by the way, who are either currently menopausal or post-menopausal, we're happy to bring you this bad-ass menopause class. Are you guys ready? Okay, so we'll start in a really lovely stretch position.
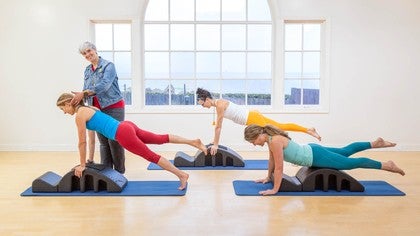
Let's take it into Child's Pose. We're using the arc 'cause I do like the arms to be slightly higher than the floor level. It really allows them to sit back into their hips, and to get into that stretch nicely. Will you rock for me a little bit left and right, and see what you feel in terms of your hips? What feels sticky?
Where do you wanna work today? Also, take it into your side body and see how you feel in terms of the ability to go laterally, yeah? Yeah, and you could play with this. Please don't keep yourself chained to any thought or judgment as to what I am expecting, or what the audience is expecting. You give them what you feel today.
Great, now let's center you a little bit. And let's have you start to come up onto your knees. But I want you to do this a particular way, you're gonna lead with your pelvis. Start to curl your pelvis under. Come up over your thighs.
Let the pelvis move toward the arc. And then let your eye gaze go up the wall into a nice, little extension. To return, let's bring your chin to your chest. Give me a little thoracic flexion. And then send your sit bones back over your heels.
That should just feel really yummy, and a nice opening of the whole front of the body. Starting with the pelvis, curl the pelvis under. Come up onto your knees. Let the pelvis be the driver here as you go toward that arc and let your eye gaze go up to the corner or the crease. Beautiful and really let it go all the way up now, if you can, to the ceiling.
Starting with the crown of your head, chin to your chest. Rolling back, let the thorax round and you sit back. Because that looks amazingly yummy, we're gonna have you do that one more time. Curl the tail under. Drive that pelvis forward toward the arc.
Rise up your spine. Let your eye gaze go all the way up overhead. And then drop your chin to your chest. They're relatively safe here, so I'm allowing them to go wherever they feel they can possibly go in terms of that extension. I'm not overly worried here.
Beautiful, one more time, just rock a little left and right. Now, we'll take you up onto your knees, fully upright. And move your knees really close to the edge of that arc. So we'll take this into a little bit of a thigh stretch. But I don't want you to go all the way back.
I want you just to start to feel your back body moving in space, and the length of the front body from the knees all the way to the crown of the head, yeah? So just small. Good, now, everybody, go back and hold it for a second. Hold, and then rise up and see if you get taller. Good, go back and hold.
See if you can lengthen and get taller as you come up. And one more time and hold and come on up. So what I'm seeing from all of you is as you're starting to feel that, as you're starting to feel the elasticity in the front of the thighs, you're starting to go just naturally a little bit farther. Let's take this one more place, shall we? We're gonna bring it to extension.
So arms are gonna come up. First, hinge back in neutral. And then use the grounding of the legs to lift the sternum up toward the ceiling, reaching up and a little bit behind you. Great, now take the arms forward. Drop your chin to your chest, find the top of your arc.
Here, let's lengthen out into a nice, long spine, sending your sit bones out. Good, and then find your neutral. And one more time, come back up onto your knees. Okay, so I'm going to add a rotation. And I'm smiling because I didn't tell them this in the rehearsal.
So (laughing) arms are going to come up. You're gonna lean back. Rotate, if you wouldn't mind, to your left. Let your left hand find your left heel. Take your right arm up to the ceiling.
Nice, now to come out of this, lift with your right arm and the whole front of your body. Good, bring that left arm in front. Now, dive down to your arc. Send out your sit bones. Good, neutralize your spine, come back up to your upright.
All right, one more time. This time, we're rotating to your right. So arms are going to come up. Rotate off to the right, let that right arm come down. Let it find your right heel.
Look at this lovely line here across that left side of the body. Lift up, get taller and then dive down to your arc. And you get to then sit back into Child's Pose. Okay, so here's a little secret. I know where we're headed with this workout.
We're going into lunges and squats shortly. So I'd like to prep the pelvis and the hips before we do that. Let's have you come up onto your knees. Take your right foot and put it alongside the arc. Now, the arc is here for proprioceptive feedback.
And I just wanna have a little rocking forward and back. So not a full runner's stretch into a hamstring stretch, but I want the pelvis to rock forward and back. And you'll see that this idea of rocking forward and back is gonna come through in our workouts time and time again. Good, so now they're sagittal. But you know, hey, you know, don't be satisfied with sagittal.
That's my little slogan here. So can I have you turn out your back leg, and have you turn out your front leg? Now, when you go, not just forward and back, but you're gonna go side to side on a diagonal. We get into the hip in a very different way. And we might even get into some of that lateral hip as you press back a little bit, which is really hard to find, and really important to start tapping into for our standing balance and certainly for control.
Does that feel all right? Awesome, let's do the other side. Good, so first, let's have you shift forward and back. Forward and back, forward and back. Don't think too much about it.
Don't worry about too many of the other pieces or parts. Just really get that sense of the pelvis, and where the pelvis is driving forward and back, the legs underneath that. Now, let's take you into that turnout, and go on the diagonals. And see if you can go back enough that you feel a nice, little stretch along the lateral side of the hip and the posterior hip, on that, what I will call your standing leg. Good, and here too, you'll start to see, they start to drive a little bit deeper into this.
Could we start to add rotations and arm movements here? We certainly can, we will not for this particular workout, but yes, that's available to you. All right, excellent. Now, if you can bring your knees back in front of the arc, and put your hands on top of the arc. We're going to take this now into a little bit of a piking.
In order to pike and not lose your balance on the arc, you must always keep your shoulders in relative reference to your hands as where they are right now. So basically, your weight is always gonna be through your arms. Let's send your bum up to the ceiling. Great, now, bend your knees and slowly with control, lower yourself down. So it's our first entree into arm work and some core work.
So lift up into your pike. Also gives us some nice length through the back body. And let's bend your knees, with control, lower this down. Nice, last one, you're gonna come on up, and you're gonna hold it out there. Again, so as not to put too much instability into the arc, make sure your hands or your shoulders are pretty much over your hands.
Walk forward if you need to. 'Cause you're gonna send your left leg out, keeping your hips square. Now, it's a little down and up with that leg. Down and up, up, up, up. Three, two and one, come on down.
Good, you're gonna switch legs. Now, you'll notice, all three of them are doing something slightly different with their feet. Now, ready, pulse up. Up, you can point your foot. You can flex your foot.
You can have your foot more relaxed. Totally your call on what you're looking for with your class and with your students. Bring that leg down. Now, bend your knees and let's reset, come all the way down. Great, we'll do this one more time, but we'll add a rotation to the pelvis.
So let's send you back up. Let's start with your left leg going out. Now, turn over that right standing leg. Now, pulse with the emphasis on the up, up, up. We're working into the hip into the rotators a little differently on both legs, the standing leg as well as the moving leg.
Great, bring that leg down and let's do the other leg. And rotate over that standing leg and pulse up. Up, up, up, yeah, three, two and one. Bring that leg down, walk yourself forward. Ah, and now roll up to standing.
I hope that wasn't a surprise to everybody but I was like, "Oh, we had a great transition there, let's use it." One of the really nice things about that particular exercise is there's a challenge in both legs, a challenge both parallel and turned out. But the other really nice thing about it is you feel actually beautiful doing it. You feel long and luxurious. And that's part of what we're celebrating here today is feeling ourselves, expressing ourselves, and being just grateful for these bodies that we have. Now, I think I've stalled enough, we are going into some lunges.
I will ask all three of you to take your left leg and put it on top. Good, and then step back with your right. Now, you need to lift onto the ball of your foot on that back leg, so that you feel this sense of rising up or lifting, right? So again, balance, coordination, control, all here in one exercise. Kristin, I need you to go back a little farther with that back leg, good.
Now, bend the back leg and lower into an essentially 90/90 lunge and then come on up. I love these lunges. You guys keep moving and I'm gonna talk. Look at that front leg for a second, and look at how nice and deep you can get into that front hip crease. It starts to teach deep hip mechanics of getting down to the floor and up.
And this is a range of motion that's unusual for most of our clients. On the back leg, we get some nice eccentric control. I think I've talked enough. Let's have you go down and hold it. Now, it's little pulses here.
It's up and down, pulse, pulse, pulse, pulse. And three, two, one. I hate to do this to you, but now you're gonna shift forward and back. Forward and back, just like we did with that little runner's stretch, but now you're active dynamically. Last one and then stand all the way up.
Excellent, you can say whew, it's okay (laughing). Let's turn you now facing the window. Okay, the other consideration that I have in mind specifically for our aging bodies has to do with pelvic floor health, which is why you'll notice we do several repetitions. We hold, we either dynamically shift as we isometrically hold or we pulse or we might do both, just a forewarning to you guys, as well as working on the mechanics of the hips. So we cover a lot of territory here in this series of exercises.
We're in this position, both legs are a little bit turned out. One leg is on top of the arc. We're gonna go straight down into a squat position. So go down and up. Now, as you watch them from behind, you might be thinking, "Well, the leg that's on the arc, the pelvis might be a little skewed toward that leg." I'm okay, they're in a nice, safe position here.
And what they're getting again is a nice deep crease on that top leg. It's an interesting and very different challenge. Let's just have you do two more and then hold. Now, here as they hold, I think I wanna add a little balance. So can you raise up the heel of the foot that's up?
Listen to me, put your heels down. Raise up the heel of your foot that's on the floor. And then bring it down three times. One, two and three, bring that down. Now, raise up the heel that's on the arc for three, two and one, great.
Now, stay down and shift laterally now. So before, we shifted forward and back, and now we're shifting laterally. Two and one, come to center, and stand all the way up. Great, we're gonna transition now where you're now facing out to the side here. Rebecca, we know has actually broken her foot, and she's just recently out of a boot.
So I'm having her lower her foot on the slope so that it would be more comfortable. And here now, the back leg is lifted. So let's have you go down and up. And the eccentric work on that back leg is what's accentuated in this exercise. That eccentric work is huge for control as we go down stairs, as we're running, as we're hiking downhill.
So this is very, very functional, hugely important. Now, come on down and hold it. And now, shift again forward, and really shift into that back leg if you can. Forward, shift into the back leg. Three more, two and one.
Now, with the pulses, give me a pulse where the adductors are more active. So think of the adductors pulling the legs to the midline. Good, now, stop and now pulse pushing into the abductors. Again, all really important for tapping into the co-contractors of the pelvic floor. So without cuing the pelvic floor, we are actually working the pelvic floor.
And then let's have you stand all the way up. Feet come together. And here, let's switch legs. So we're creating this nice, little dynamic circuit, if you will, for the legs. Let's go down and up again.
Put your thoughts and your emphasis on that back leg. Again, we're looking for that control as they descend down. But the front leg, you wanna sit into that front leg as well. Now, hold it there, shift forward, and make sure you get that shift back onto the back leg. Now, notice as they shift forward, what is that?
That's propulsion and that's something we really need to be working as we age. Good, hold it there, let's again give the pulses. Adductor pulses. Good and abductor pulses. Super, now let's have you turn and face into the room.
And let's change these squats a little bit, and let's integrate upper body. Arms out, as you lower down, rotate toward the arc. As you lower down, rotate toward the arc. As you stand up, rotate in the other direction. As you lower down, rotate toward the arc.
Now, look how beautiful that looks. One of the nice things when you're doing the side to side, they're getting the same squat work, but now you're adding a different dynamic challenge above the pelvis. So feel free to vary the work as you're moving them through the sequence. And I can tell they like this better 'cause every time they rotate toward me, I get a smile (laughing). And last one.
Great, now, if you wouldn't mind going down and holding. Arms open out wide. Great, lift your right heel. Okay, so here now, let's pulse. And also pulse and open the arms.
Pulse, pulse, pulse, pulse, yeah. And adding that arm piece just adds a whole dimension across the upper back. Great, now, let's have you stand up. And turn now to face your arc. So that same foot stays where it is.
Remember, you have to step back with the back leg. And you rise up, rise up onto the ball of your foot. Here, you bend the back leg and you come straight down. And up, straight down and up, there it is. Now, you could add arm movements here as well.
As you go down, bring the arms up, nice. Now, pause down in that moment. Arms come up overhead. Nice, now, with the arms up, can you shift forward and back? This adds a significantly different challenge to doing this with the arms down or the arms around the waist.
Nice, good, now, everyone, hold it. As you pulse, also pulse open the arms a little bit. I'm gonna stay quiet and let them concentrate. Two and one, great. When you stand up, can you stand up on top of the arc?
Stand up and hold it there. Okay, great, this position, just holding in and of itself is lovely. If you notice how their feet are rounding around the arc. You guys can walk forward and back, and you can use this almost as a little mini footwork. You can bend one foot and then drive the other into the arc, and just play with the feeling of the foot on top of the curvature of the arc.
One thing that's really important is that you stay roughly central on the arc. It has these handles on the side. If you get too far to the sides, it will wobble. Now, with your legs together, can we lower you into just a little bit of a knee band? What's really nice is as the feet hug the arc, you can see the dorsiflexion you get here and the length of the achilles.
Now, go down and up and make that dynamic. Good, take the arms straight out as you go down and come up. Good, take the arms out as you go down and up. Now, think of descending your bum and lift. One of my pet peeves with squats is clients like to tip their torso forward.
On top of the arc, they can't do that. They have to stay nice and balanced from the ankles through the knees, through the hips, through the torso, through the head. Super, good. Now, let's turn you to face forward into the room. We're gonna try something a little more dynamic.
So one of the issues with our tissues as we age is we tend to lose collagen and some rebound. And this is a lovely way to just add a little bit of that spice back. It's also a great place to add a little bit of cardiovascular work in. So what I will ask you to do is step down with your left into a lunge, and then rise up and stick the landing. Think Olympics.
Go down, rise up and stick your landing, get nice and tall. Go down, get up, nice and tall. That length is as important as the down is. Ready, down and up, down and up. Last one, down and up, hold (exhales deeply).
Super, now, I'm going to ask you to step off the arc, turn around and let's do the same thing on the other side. So as they come up onto the arc, remember, there's a dynamic nature to this. There's a really sort of propulsive energy that comes from this. It does liven up a room. You will notice the position I have them over the arc is the most stable.
Please do not do this where they are standing too far to one side or the other. So let's do that one more time. Our movements can be now what you feel comfortable doing and adding for your body, but I want you to go down. As soon as you land, you go up and stick it. Go down and land, up.
Down and up, down and up. Down, up, two more. Last one and stick it. Great, so you'll notice, they all chose different arms in order to stay balanced on top of that arc. All are wonderful and valuable.
I have them standing up here. Could you just feel your posture up here for one moment? Being on top of that arc, having the feet around the slope of the arc, and just finding your gentle balance. Just go a little, rock a little side to side. Keep your legs straight, but just feel your weight shift a little right and left.
And then center yourself. Rise up as much as you can comfortably, not on the balls of your feet, but internally through your spine. Allow your shoulders to drape. Allow your neck to lengthen and your head to really settle on top of that cervical spine. Great, when you're ready, you will step off onto your mat.
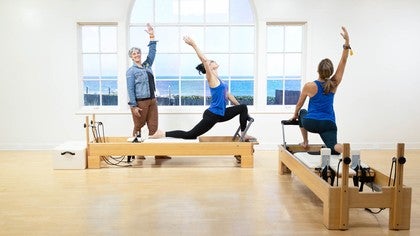
Whew, that was a lot of work. Thank you and what a great way to get the cardiovascular system going, as well as to work that rebounding, and propulsive strength in the lower body. Let me ask if you would all be so kind as to now sit in front of the arc, facing, if you would, me. And Tiffany, we have some three-pound weights behind you. Will you grab those weights?
Rebecca, we have some SmartBells behind you if you wouldn't mind grabbing that. And Kristin is going to take the band, and she's gonna wrap it around her feet. And I just want you to watch how she wraps this. She's gonna come around the bottoms of her feet. Just come around the inside.
And then she's gonna hold the band coming out from around her pinky toes. The reason we're using three different props is 'cause they're gonna affect a slightly different feel and proprioception, as well as working strength of the upper body slightly differently. I welcome you to try all of these props, or none of these props if that works best for you. Starting with the knees in a nice deep bend, if you will, can you round over your thighs? I love this.
It's almost reminiscent of stomach massage on the reformer. As you sit up, start to straighten your legs, and curl back over the arc, bringing the arms up overhead. Circle the arms around, chin to your chest. Reach forward towards your toes and pull those knees in, and end back in that nice tucked position. I love this concept of folding the body and opening the body.
So let's have you go back, arms go up overhead. Now, Tiffany's got heavier weights, circle the arms around. So she's gonna be working her upper body, and her arms a little bit more. Pull those knees in and hug, great. And then one more time with just straight overhead.
Both Kristin and Rebecca are gonna have a different feel from the band which is pulling Kristin back, and from the light weights in Rebecca's hand. Super, you know what, I love that so much, do one more. And let's have you go back. Inhale, big opening the body. And now really pull into yourself and close.
We'll take this into now a rotation. So let's have you sit up nice and straight. We'll rotate first into the room. Now, the knees are still bent. And what I'd like you to do is just lengthen the leg that is the same side you're rotating toward.
So arms out in front, we'll rotate your right arm. So lengthen your right leg, and rotate to the right and reach. Now, sweep the right arm back as you pull the right leg in. Go to the right side again, ready, inhale. And come back and make this a little bit more dynamic.
Out and in, it is a luxurious stretch, but we wanna add more of a dynamic nature into this. Two more, that's it, last one. Super, let's go to the other side. Right into it, go. And back and open and close.
That's it, open and close. Last one, open and close. Great, send your legs forward, and come into a spine stretch forward. Now, we could do this and linger in the stretches. That is your choice and your prerogative.
I do, for this particular workout, wanna add in that dynamic quality to the movement. Sometimes connective tissue, especially as it starts to dry as we age, it needs lubrication through mobility, not just by pulling and stretching. Think of a rubber band. If a rubber band is kind of hanging out in your drawer for too long and it's kind of dry, and you pull on it, what happens? Versus a rubber band that has a nice elasticity to it.
And that's exactly what we're working for here. Okay, so our last one here. I'd like you to take the arms overhead. Legs stay straight out. Just stretch now over that arc.
Keep the arms midline as you roll back up, and reach toward your toes into a spine stretch forward. And now you can drop your prop where you are. Sit up tall, bend your knees, and we'll transition into bridging. Now, this is bridging a little differently than maybe you've seen it in other places with the arc. Let's have you lie back so that roughly your bra strap is on top of that arc, yeah.
And put your hands behind your head so that you're supporting your head in your hands. Now, your feet can be really close together. They can be hip bones apart. If you need to, you can even widen your stance a little bit. I like to work on spinal mobility here.
Starting with articulating through the pelvis, articulate up into your bridge. Right here, this is a lovely moment. The head may or may not be resting on the arc, depending on your client's flexibility and where they are. Let them support themselves with their hands. Reach long out through your thighs so that your knees are really stretching over your toes.
Keep that stretching sensation as you articulate through your spine. So you're using your legs and your pelvis almost as traction for your spine as you roll down. Tiffany's eyes just got really big. She like's that, yeah? So let's curl up.
Reach out long through the legs and then articulate. Let's see if you can really articulate the ribcage, finding the arc. You'll notice, you've got three very different ribcages here and three different mobilities. So I'm gonna have you do that again so that everyone can watch all three of you, and notice the difference in the way in which the ribs and the thoracic spine articulates. Okay, that was beautiful.
But I don't wanna be satisfied in one plane of motion, so let's have you all come on up, and we'll rotate the pelvis toward the room. So just drop the right hip slightly. Hah, whole different challenge in the bridge. Now, articulate down the right side of the spine. As your right cheek touches down, curl yourselves back up.
Awesome, stay to the right, we're gonna do three. Rotate down the right side of your spine. As the right cheek touches, come back up. Good, now, try to keep your knees pointing straight out so that the rotation is really in the pelvis, last time. And up, now, let's transition to the other side.
Rotate down the left side. Tap the tush down and lift the tush up. Nice, stay rotated to the left. And articulate down and up. Last time, down and up, then you're gonna center yourself.
Find your nice, long bridge. Articulate through the spine as you come down. Now, you can do this one side, one side. You could do this multiple reps to each side. That was really well done, thank you all.
Now, I wanna take this, and work a little bit on the external rotators. One of the things that I find, especially for women as we age is those deep hip muscles really go quiet pretty quickly, and we lose lower back stability as a result. So if you wouldn't mind, lift your heels up so you're on your toes. Bring your heels together which is gonna open the knees just maybe the width of either the arc or your mat. I don't want you opening out all the way.
Pressing primarily through the pinky toe side of your foot, let's have you shift up in neutral. And now you should feel that a little more through the back of the pelvis, yes or no? Yeah? Great and lower down in neutral. Shift up and lower down. Shift up now and hold, hold it.
Now, pulse, let's have you pulse open. So I'm having them pulse in external rotation, getting into those deep external rotators, including the piriformis, which shares tendinis connections with the coccyges in through the posterior pelvic wall. Which right about now, they're probably feeling, and hoping I would stop talking. So let's have you stop there. And shift the pelvis down in neutral, super.
Legs are gonna be straight out in front. Arms come up overhead, big inhale. Exhale, let's have you chin to your chest, and roll up again into your spine stretch. And then sit up tall, great. Excellent, now I didn't overly cue the spine stretch because really, I want this to be whatever experience they wanted to have.
But all three of them had a very different version. Rebecca went fully into a full fold. Tiffany went mostly into a forward fold. And Kristin really did the traditional Pilates up and over. Thank you for that for the little demonstration.
Let me ask you now if you would turn, and kneel toward the arc facing me. And, Rebecca, we're gonna into some planking. And what I would like for you to do is pull the arc literally under your thighs, and let's show some off weighting of the upper body. Rebecca has had a double mastectomy and breast cancer. And instead of putting full body weight into her chest and her pecs, we're gonna offset that by having her thighs on top of the arc.
This is also great modifications for anyone who has issues with putting too much weight into their wrists, and their upper body, including for clients potentially with osteoporosis that you want it to be a little more supportive. In the case of osteoporosis, I might actually ask her to create a ball with her hands, and put her knuckles down onto the mat. Here, I think for Rebecca, this is perfect and fine. For both Kristin and for Tiffany, they're gonna lengthen out into a plank. You'll notice that their hands are wrapped around the arc.
It creates a little more of a neutral wrist. The only thing is, it's rather narrow. So instead of going into a pushup here, I wanna play with their plank balance. And we'll have them lengthen out the right leg, and we'll do a leg pull front. And lift up that leg.
Ready, pulsing it up, up, up. For three, two and one. Bring that leg down, now let's do the left side. Really focus on the idea of lengthening out on that left side. Find your pulse.
Lengthen out through the crown of your head. And make sure that the cervical spine is really lengthening out from the thoracic spine. And bring it down and great. What I see a lot with the arc is a loss of the shoulder girdle and a turtling of the neck. You guys are doing great.
Let's do one more time, lengthen out the right leg. I'd like you pulse. And bring it down, good. Lengthen out the left, and see if we can maintain that stability one last time. Nice, and rest.
Super, bend your knees and come on down. And let's have you sit back into Child's Pose. There's so many planking variations that you have here. Like I said, I don't love a full pushup, just because of the narrowness of the arc, but some clients might enjoy that very much. You can play with all sorts of leg positions.
You can certainly play with even mini tricep pushups here. Let's have you send yourself up into a pike. Walk your feet forward and then come up to standing. Nice, okay, now, we get to do some lateral work. So let's have you come to the front of your arc, and sit facing me.
So let's sit facing me, yeah. Which I know is a reversal from how we practiced it. But the reason why I want you to sit facing this way is we're going to do this as a bit of a progression, so that they'll go around the arc, and end facing into the room. Arms are out in front, great. Now, here, we're gonna focus just on a lateral sway or shifting of the ribs.
So into the arc, away from the arc. Into the arc, away from the arc. Into the arc and away from the arc, great. Now, let's take this into some side body work, shall we? As you go into the arc, straighten out that leg, and find your arc and now stretch over that arc.
Big inhale and now let's reverse that. You're gonna come up, bend that back knee and bring it in. Reverse to the other side. Okay, that looks just beautiful. And it's again the same concept of closing the body and opening the body.
First, shift, come down and find that arc. Counterweight is the leg reaching out. Arm goes over. Feel the whole side body stretching over that arc. And then there's a return.
Let the hand, the side body lead and the leg pulls in. Reverse your mermaid. Now, they're making this look really, super simple. Arms are out but if someone has a hard time with that shift and finding the arc, they can just use the tactile feel of the arc as they glide their arm down. It doesn't change anything in any negative way.
Great, and bring the arm back. Bend the top knee and switch to the other side. That little bit of a tactile feel really makes all the difference in having somebody feel successful in this versus feeling clumsy in this. Now, hold it there, rotate toward me. Bring your arms forward, just reach.
And then open out and turn back to the window. Well done, let's have you turn now facing this way. One of the things we haven't done yet is direct ab work, and we'll add that in here. Let's have you lie back. And I do want your tush up there on that lip of your arc.
Super, so when you get into position, hands behind your head. What I do want you to do now is lift up, and move yourself down even a little bit more so that your sacrum, the back of your sacrum is resting on that lip. I should see daylight underneath you, yeah? Okay, now, head is in your hands. Feel the weight of your head in your hands, and stretch back over the arc.
So I don't know about you but this is a moment of awe, so you can let them have it. And now exhale and curl up. What's really nice here is the way the pelvis is on that lip, it gives nice feedback, keeping the pelvis as comfortable and stable as you can. As you arc over, inhale and exhale as you curl back. Notice, I resisted saying neutral because I will be honest with you, for me, neutral is a moment in time, and it's all relative to where you are in time and space.
So I hate to over reference it. Let's do three more. That's a whole other topic for another day. Last one. Super, now, let's have you stay there and let's play.
We can take this in any number of ways. We can add obliques here. Tiffany, I know, I'm moving you, I promise. We can take this in a thousand different ways, but I am gonna move them. And I'm going to move into a little more of the traditional Series of Five.
Let's have you do a knee fold with your right leg. Tap your toe down three times. One, two, three, let's do the other leg. Tap, one, two, three. Okay, you ready, both legs are gonna come up.
Super, let's do a single-leg stretch variation. And switch and switch. Switch, switch, switch. Go faster, switch, switch, switch, switch. And three, two and one.
Feet down, go over. Notice, they all have different timing. Please allow your clients here to have the timing that they need. Curl up, bring the knees all the way into the chest. Take the legs straight up, flex your feet.
Rebecca, keep your knees bent if you will, just slightly, and pull your legs toward you. Rebecca is a mountain biker and has really super strong legs which makes some of this stuff really challenging. Two and one, bend your knees, bring those legs down. Good, now pull the knees into your chest and hug your shins. Okay, where do you think we're gonna go from here?
Double-leg stretch for three, ready? Out and in, it's open and close. I know it's more than three but you're gonna do two more. Last one and hold, excellent. Now, let's do the other side for the side stretch, shall we?
So let's have you sit in the well facing into the room. Arms are out. And first, let's do our little lateral shift, yeah? Shift toward the arc and away. Shift and away, shift and away.
Now, let's find the arc and stretch over the arc. Find the arc, stretch over. Lengthen out that top leg. There's a moment there that's beautiful. Let the stretch of the body return you back up.
It's almost like you're rebounding on that stretch in the opposite moment of awe with your stretch facing the other direction. Arms are out and you can smile for this. Lower down, lengthen out, arms overhead. So I know I just said like this weird like, so we've now stretched you open, now let that be what returns you back up. Ride the stretch if you will.
And then find your awe on the other side. Let's do two more of those. Shift, lengthen, come on down over the arc. Really opening the body and then bring it all back in. Great and then last one.
Shift, lengthen the leg, find the arc. Going all the way over. And since it's the last one, enjoy, luxuriate in it. Big inhale, exhale, come on up. Super, now arms are out.
If you wouldn't mind rotating away from me, and just round the upper back as you bring the arms in front. Open the arms, a little extension. Come back toward the room. Great, turn now and face me. We'll do one, nice, big stretch over that arc, sending your legs out.
You're stretching back. If you can, bridge and lift your pelvis slightly. Circle the arms around, chin to your chest. Rolling forward, put your feet down. Roll your weight into your feet so you can stand.
And up you go. Excellent, so we wanna thank you for joining us for our little menopausal bad-ass class. All of these three ladies did an amazing job. I'm Joy, I'm 55 and I am going through menopause. This is Rebecca, how old are you, Rebecca?
47. Rebecca is 47 and was thrown into menopause thanks to her cancer treatments. Kristin? 55. Kristin is 55 and also thrown into menopause thanks to an ovarian cancer.
58. And Tiffany, 58 (laughing). So you've got four menopausal ladies here, who are very happy to tell you that these are new beginnings and new possibilities. Thanks for joining us.
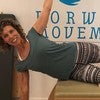
Empowered Aging: Pilates for Menopause
Mention
 |
Joy P (Teacher) |
|
|
Mona H |
|
|
Janette C |
|
|
Meli E |
|
|
Sue D |
 |
Lacey |
|
|
Janie J |
|
|
Kris R |
 |
Angela H |
 |
Kim M |
 |
Patricia F |
 |
Marion Cooper Farrell |
|
|
Cynthia G |
|
|
Debra H |
 |
mbrown |
 |
sandyjgrant |
|
|
Peggy P |
 |
Nicholle H |
|
|
Lani G |
 |
Theresa F |
 |
Goncagül Ö |
 |
Galina D |
 |
Elisabeth Pantelidou |
|
|
Josephine G |
|
|
Janet R |
Comments


You need to be a subscriber to post a comment.
Please Log In or Create an Account to start your free trial.
