Description
About This Video
Transcript
Read Full Transcript
Hi, I'm Claire Dunphy, Amani and this tutorial is about understanding the rib cage and the rib cage placement. And I'm here with Amy haven. She's going to be my, my body. And you know, the rib cage placement is such a fascinating topic and there's so much more to talk about them. What we're going to cover right here, but we're going to just start with some underlying principles and some basics of the rib cage. One of the first things is that the lungs are inside and housed in the rib cage and everybody has probably seen how vast that rib cage is. And when we breathe, we want to expand the ribs into the backs, thanks and into the sides so that you're literally stretching yourself from the inside of the body out. And so often nervous breathing or um, or stressful breathing is often shallow and chest breathing. And um, you know, in PyLadies we're trying to get people, of course, Joe said above all else, learned to breathe correctly, really inhale and exhale.
And I remember Romana sharing with us that Joe would walk around and during some of the breathing exercises like Ennis and the soft for example, and try to get two fingers between each of the ribs. I mean that's how much he wanted the breathing to happen. So we're gonna think about that, um, as a way to increase strength with a movement and mobility of the rib cage and the movement. The next thing is just the general placement. And I know employees, a lot of people say, you know, three ribs in, bring your ribs and bring your ribs in. And it's not exactly that. It's more of the placement of the whole entire rib cage up and over the pelvis.
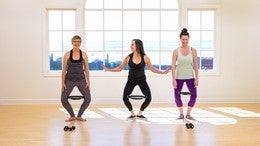
Okay, well we're going to start right at the floor with the fee. So Amy [inaudible] just stand and you can face front, actually, let me have you faced sideways. That'd be better. Okay. So we'll stand in a Pilati stance. So the heels together, toes just slightly apart. And weight placement is really important as we are kind of coming into our standing posture. So first of all, pressed together the heels slightly and transfer your weight so that it's not over the heel, but it's more over the center of the foot and slightly forward so that if you were to just rise up out of your heels, you wouldn't have to go from backwards to forwards to get there. Okay. The inner thighs are active, the back of the knees are easy, the seat is wrapped, so you can just hold that position there.
So we get this wrapping around. So we're building this foundation right from the bottom. Your two legs are like one strong leg, the belly lifts in and up. So it's like pulling up a zipper and the rib cage is placed right up on top. So the back is wide and the sternum is lifting forward and up.
So go, go into my finger, lean into my thing. Yeah. Okay. And the ribs are anchored back here and the hips are underneath, the tail is long underneath. And then the head is just floating up here on top. You see? And it's a very active position. This is not a passive position whatsoever.
So now the arms as we're in motion and moving, bring your arms forward just in front of your chest and you want to think that the arms are connected to the back of your ribs. And at the same time you want your hips to stay right where they were. Okay. So now get, keep your back rib right into my hand and imagine you're lying. I just felt that right. You're, imagine you're lying on the mat and this is like rib cage arms and now take the arms and reach them to the ceiling and keep the back ribs right there. That's it. Right?
Cause so often now can you just show them how, how easy it is to tip back or just small? Just make it just as like slip. Yeah. Not your arms, just your back. So often this is what happens and you see how she's like on a pitch where she's actually behind herself and then there's varying degrees of that until she's forward and up and all this is working. But it's not to shorten her, it's to pull her lifted and long. So we had space and we had space and we had space in the front.
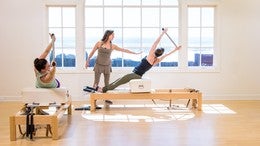
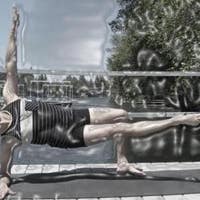
So for you, I've just suggest if you just bring your weight a little more forward. Yeah. And that for her is going to get this all going so that you really have a nice wide open back. Okay. Relax the arms. Now that same exact position is your long stretch series. It's your pushup position. So if you can just go into a pushup position right here on the floor for a moment. Now we could show it also in the long stretch.
We want to stack up the body the exact same way. So we'll build it from the base. We'll work the way up, lengthen the tail down because you want the legs to reach from here down to the heels. She's pushing into the floor so that her ribs are lifted and I could pretty much sit on her right now and she'd be still and then the neck is long out at the top. So yeah, pressing to me. Yeah, and it's solid. You're strong girl. Okay. And then come all the way up so that your work is coming from your powerhouse and the arms are like reaching on the back.
Now it doesn't matter what level we're at. This is one of the weak links in the body. It's Sorta like tendency to have overactive quads and hip flexes and an underactive dairy air. Similar idea. So you know, we just kind of fine tune it and I'll tell you one thing. If you're working with or you are yourself, a person who dances or likes to balance or does anything like that, you can easily find your balance by holding your back up in that manner. It's what helps your terms. It's what helps your lift.
And if you're standing on your feet for long periods of time is going to protect your back. All right, so now let's take this idea and bring it over to the short box as though we're doing the short box series cook. Yeah, we'll just, you can just hold them there. So the idea is that we have equal band of length wrapped around and we can't see ourselves in the back. We look at ourselves in the mirror, we might see ourselves from the front or the side, but we don't see ourselves in the back. And this is a shortened position and we want to have lanes. So visualize where the bottom of your ribs are in back and where the top of your pelvises. And we want space all the way around. Now when we're sitting and we're reaching up, we have to have a way to anchor the lower body. When we're standing, we have the floor, right? So now stretch your arms up.
And now she's really thinking about it. So she's going to have everything pulled together. But I want you to sit up in such a way where you're kind of just over lifting. Yeah. And this is typically, you know how a lot of people stand. There's no, there's no booty action and there's a shortening in the back and there's nothing really going on in the front. So we anchor the pelvis down, we pinch off the seat, wrap it around, pinch off the seat, and then when she goes to lift, you can actually see her, her shirt change. Right? So pinch up off the seat, lift and then relax. And again, pinch up off the seat and lift. Now pull into here more, a little bit more.
Yeah. And grow. Now notice her collarbones are forward of her hips and that's where we want her to be. And sit down and lift again. Now take that back and you try to bring that whole shape with you and bring it up and sit down and pull it all together again. Lift and go back and come up and sit down. Okay. And then we, let's go to a side bend now.
So the arms are up collarbones in front of the hips. Yeah, we gotta get, you know, when we're walking, we're ma, we're walking forward, we're moving forward. We're not walking kind of back this way. Right? So the same thing when you're in an active ready position, we're forward. I need to be able to rise up without thinking. I need to be able to rise up without thinking.
I can't get there from behind myself. I've got to be forward and up. Okay, so that's what you're thinking about. I did a great ski lesson this year and the teacher said, this instructor said, clear, think about what you're thinking about. And I loved it. I'm like, am I love it? I gotta be thinking about what I'm thinking about cross what we're doing here too. So we're going to anchor this there. You go there. And when I'm holding her down and she pulls up, I can feel it in my hands actually. So now we're going to take a side and go towards the ocean there.
Keep that with you. That's it. Come back to center. So she's separating this now. Lift and go. There she is. So she's keeping it back. This stays forward. And then come back to center and said, rest the arms. Okay, so we can take the same idea into twisting. So we're getting some mobility through the rib cage.
So let's show a twist. And as we go through the twists, everything gets harder and harder, right? So wrap that. This is your anchor. There you go. Good. So I could feel that. Pull away. Now, twist towards the ocean. Bring the ribs around. There you go. And get taller. Aha. Good. You found it back to center. It's a little, you know, not so big all the time. Twist, anchor and get that with you. That's it. And back to center and relax and relax the arms. Now with Amy, she's got really good alignment already.
So these tiny little adjustments when you're working at that level have a huge impact. They're just small little adjustments but they, they're like game changers. They're like, oh okay, I can, I can get that. I can understand and breathe with it. So what I find with that idea of the rib cage placement, we just did it in c standing. We did it, showed it in the prone and we just did it sitting is that usually there is an issue with certain exercises on any of the rolling exercises like the roll up, like the teaser, like open, like rocker, any of those movements where you really have to be pulled and placed correctly. So keep the, this idea that you're reaching the arms to lift the back, but that's not only, that's the only part of the story. You can only stretch when you have something in two directions. So the legs are busy reaching in the opposite direction and wherever that imbalances or wherever something's not happening, that's where we work. That's how we cue through all the exercises.
But one of my favorite ones for um, for rib cage things, cause you remind me of me a lot like in, in the way that, cause I, I mean all those years of aerobics, I was the, I was like, I was Miss Ruby and I was, it was unbelievable and I didn't even know, I didn't know how to breathe because when you're jumping like that and you're doing all and your heart rates up, you're breathing like this, you're pulling into your back. And it took me years to figure out what on earth are they talking about, about your ribs? I had no clue until that magic day when I was like, Oh my God, I'm actually behind myself. I had no clue. I was so behind myself. So we're going to go and go over to the one two chair and we're going to practice the teaser there. Now with Amy, if Amy and I were working together more often, I would use the teaser as a must, a barometer, and I would play with it in different ways. And I would have the do the teaser twist. I would, I would challenge it in different ways on the reformer so she could get the reach of the arms it was going to, it's going to show up in all the rowing series, right? All of those where you get anything where you have to push and, and pull back chest expansion, I mean, and on and on.
But we're going to go over to the chair now and see if we can tame those ribs. All right, so we're, we're at the one two chair and, um, what we're going to work on is how it's not just about pushing the pedal down that way. It's going to be about like pulling away nice and long as you go back and it's gonna feel so good. All right, so how Amy's going to sit right in this center? I have us on one spring. And um, you know the way I like to get into the teaser just cause it really sets me up for success and it has me getting on the right proper part of my butt is like grab the front and then kind of rock back like where you would sit for stomach massage series and bring your knees into your chest. Yeah. So already she's holding herself together and she can feel that good feeling.
And then keeping yourself together. Reach your legs out and reach for your teaser. Okay, now see if you can hold yourself up. Okay, now I'm going to try to help her overcome this and get stronger here. So I'm going to hold her feet and I want you to reach up for your toes and I want you to bring your back up through your arms. Can you come with me? Can you there I'll support you. Don't worry. Bring your hands beside you and reach back to the pedal.
There you go. Take your chin to your chest and then go ahead and push the pedal away from you. Push it back in a away, push it back in a way. Go, go, go, go, go, go, go. All the way to the bottom there. You see how flatten long you are, and then bring yourself up. Yep. Let close the spring and go again.
Lift, lift, lift. Bring your knees to your chest and then bring your feet down on the floor. So that's our first set so she can really start to get the feel of it and the feel of really reaching down from there. Okay, so now we're going to do another set. And this time I'm going to bring your legs down. You're going to just push into my hand and the legs will come like teaser too.
Okay. Because part of getting this rib thing is like here, all exaggerated for a second, but you see how I'm doing like this. I need to do like this and I need everything to come more to the center. So it's not just about the ribs, it's about the relationships. It's always about relationships of one to the next. Okay, so the knees come into your chest there. Now reach for your teaser
And now pump the pedal three times. Keep pushing here and two good job and three and come up and everything will come up. That's it. Closest spring all the way. And let's go again. Little pressure and have fun. Just reach and lengthen. Lengthen. See how long? Yeah, push down. There you go and pump. Pump up, feel good. Yeah.
Did you get an adjustment? Almost come up. No extra charge and go one more time. [inaudible] pushed it. There you go. Send your tail to the back of your heels and pump. See how she's getting all that? Nice.
Good. I said three, that's three. And then bring everything up and now she's going to reach for her teaser. I'm on lift. There you go. And then bend your knees in and she's down and she stands up. And boy that's a lot of work there.
So then like how the end result should be that your, the way you stand has all this in this is you know you've got all these opposites happening. This open, right? So let's go to one more standing exercise and we're just going to try standing pumping. So come to the back of the chair. I'll switch your spring to a top and a bottom because we started standing looking at posture. So we'll end with standing. So you stand in your bloody stance, get everything together, your light out of your heels. And let's just take the arms to the side slightly in front of you, pressing down on your ballet bar if you have the idea of a ballet bar, but grow, grow and lift and bring your sternum forward.
All right, so here we go. We've got all this together. Now do your checklist, you know, get the wheat out of the heels. So I think of the center of the hip over the center of the foot lift. Keep the sternum forward and up. Press down on your countertop. Put your hands lower than your shoulders. Yeah, a little lower.
That's beautiful. Yeah. Now there you go. And that's simply all you do is check. Take your right foot and put it on top of the pedal and then bring it back down. So what you want to do in that moment when you're making the weight change, pull up so much that as the foot comes away from the floor, there is no dropping. So just concentrate on that. Everything pulls up, stay there.
He'll halfway up now square off and pump the pedal now and just up and down, controlling the spring and checking, check your weight so that as you go it does. And that's what's so great about the chair. It will throw you back if you kind of get off your center up and the arms a little lower and up and oh this looks so good. And you're pushing, pumping from here. This legs active cause it's your standing leg, outer hip, inner hip. And then finish. Keep your lift and put that foot on the floor. Okay, in here we go. Get the, get this, get the chills. Good. Chest forward a little bit. Yeah, that's it. You're working hard. I know when it's with the slightest adjustment.
Ready and go. So go ahead up. So you're controlling the paddle up in the chair is great for just experimenting with your balance and keeping everything lifted and up. Work in there. Check your weight. You know, ideally you'd be able to rise up and keep pumping that pedal and one size always a little stronger than the other. And then finish there. Take that leg up and put it down and lower the arms. There you go.
Now with Amy and with everybody, as we try to pull this together and we get ourselves in the right position, the interesting piece is what happens to the shoulder and head placement, and that is the subject of our next tutorial. Thank you, Amy.
Comments


side note: love your outfit...famous question - who are you wearing?


it took me many years myself to get the ribs.
You need to be a subscriber to post a comment.
Please Log In or Create an Account to start your free trial.
