Description
About This Video
Transcript
Read Full Transcript
Hi Everyone, I'm Shelly power and really excited to be here at plenty's anytime. Talking about all the different things that happen in a class that can make you more successful. I know sometimes when we're students or when we're watching at home, I'm not quite sure what the teacher means or it goes by too fast a to understand what's happening. So I thought we'd go into some detail today about the different body positions and very common movements that happen in a class so that you can really set yourself up for the best experience, best positions, um, so that your body feels great and there's no strain or anything that we sometimes feel in the classes. So Michelle is going to help me. We also have Aaron who's going to do some of it and so we're going to really break it down so you can see you don't have to go through the class part of it, but just see what's happening everywhere we are in the different positions.
So come on up and we'll have a lie down. We're going to start with the curl up, which is one of the most common things that we do in a class. So go ahead and lie on your back. And this is also a good time too. You can bend your knees and put your feet a little closer. Good time to just know, do you need something under your head when you're lying down or what's the body position supposed to be?
So as long as you feel like your head is in line with the rest of your body, that is good. And we want to, we want to keep that. If you're not so comfortable, you can definitely put a cushion or something under your head and that's going to prop your head up a little bit. And on the reformer, if you were doing a reformer class, you could put the head rest up, but just be mindful of how much it tilts your head so you might feel more comfortable with the head rest flat and just a towel or a cushion or something under your head instead. So you don't have to put the head rest up always. You can use a cushion. So I think you don't need that and we're going to put that back down and we're going to go into the first curl up with the hands behind the head. So really important that you interlace your hands. As I say, they're not, they're not there for decoration, right?
We're not just having them at the sides of the temples. You're going to actually use your hands to push your head back. And one of the things that happens, often, one of the common mistakes is curling up and the teacher will say Chin to chest, which is a good idea of moving your chin towards your chest, but we don't actually want to touch the chin to the chest. So when you start your curl up, right, then curl back down and you can see how Michelle is doing a very nice job of not over tilting her head. The other thing we want to really feel the movement in is the breastbone kind of sinking in and down.
Another way you can put your hands sometimes is to just take the fingers and put them on your breastbone and you actually push, you're going to go this way. So you're gonna turn your hands this way, right? So sideways you got it. And if you push into your own body a little bit and down towards your pelvis, right? And she did a beautiful job of media. I was like, she had her hands in both places the same time. So this is important. Great. And you can rest for a moment. This is important so that when you're doing all of the roll ups in the curl ups and the hundred and single leg stretch, all of those exercises that your head is not hanging backward.
We don't want to have that weight back suspended by the little tiny neck muscles. So you want to be able to get your head up and over your rib cage. And that's one of the reasons why we practice that. So you can look into that for yourself and always put your hands back there. If you ever feel like you're just getting tired. Um, and you need some support, put one hand behind your head. Nothing wrong with that. Yeah, exactly. Helps you have a little bit now even their curl up in your body, a little bit more of a, lay your head come back. Yeah, and lengths.
And right here. Yes, that's lovely. And then come back down. So you could see in the beginning, even even us trained, trained people, the head is sometimes it's difficult to know where to know, where to put it. Beautiful. And then take arrest. Super. The next thing we're going to do is look at curling up from the pelvis. So we would use this in a bridge or even taking it over into a rollover or short spine on the reformer, things like that.
So make sure you position your feet where you feel like they're going to be useful. You can use your legs. Some people take the feet too far or too close and it just doesn't, it doesn't help them. So you'll know where that position is. And then we're going to start the bridge up. Good. And one of the really important things is the journey, how we're getting up and then the top position. So we're going to look at both of those, both of those points.
So peel back down. Good. So there's a little tilt to the pelvis and then as you can, what you want to feel is almost like you're pulling your feet towards you and lengthening. That was lovely. And then the top position we usually describe as a diagonal line. And I know sometimes in Yoga there's a tendency to go into extension, which is fabulous, but you want to get to that neutral kind of neutral position first and then go into the extension. Great. And tilt again, right here is where you want to do that little pull of your feet. Good.
Cause what happens there is sometimes we're so intent on doing what the teacher says, which is pushed the lower back down into the mat. And you probably heard that, um, really, um, imprint your spine and that's a good idea. But it's too much. We can't really push the lower back into the mat and what that would look like is something really over tilt. Yeah, you could see how all her muscles started to get tense, doesn't feel so good. Um, and we lose the mobility. The more we tend to our muscles, the less mobility there are in all of the different joints that we want to be moving in the hip and in that, that was lovely. And in the spine and coming down. Gorgeous.
Beautiful. All right, so the next point is the hundred and it is one of those exercises that people kind of go, ah, I like it but I don't really like it. I don't understand it. It hurts my neck. I'm not sure what to do with the breathing. So I'm going to help you a little bit with that. The first curl up that we did is the curl up part. So again, have your head press back in your hands and really try to move through your rib cage as much as possible. So we've got that part sorted out. Now we can look at the breathing and there are many different schools of thought. Is it a sustained breath? Is it a pulsed breath?
Is it really deep or not so deep? Um, and I'm going to just give you some ideas so that you can do any one of those safely and effectively. So just for fun, and this is actually, you can actually stay down from, oh, we're just gonna practice the breathing part of it. Breathe as if you were expanding the belly. Now I always tell my clients, because we hear the cue breathe into your belly. Okay? The, the air does not go into your belly just to be, just to be extra clear, but because of your diaphragm, that's that muscle that separates your upper part of your trunk from the lower part of your trunk. It moves downward when we inhale. It's what causes us to inhale and we can allow that movement to happen.
So when you breathe in, really let the abdomen expand in all directions. There you go. Good. And then let it go. And even more, even more. I know you're being filmed, but there you go. That's great. And come down something we don't aesthetically we just don't want to let the abdomen out, abdomen move out too much. Um, but it's really important because all of our organs are there and if we hold the abdominal wall really, really tight, if we lose that mobility of the organs and they have to be able to move around. So that's important. Aesthetically we want to pull it in, but for our health we want to be able to let it expand. That's great. Good. So now we can let that part go. Breathe into the ribs.
And so you'll hear teachers say breathe wide to the side and your ribs are breathe into your back and in different positions that's you're able to do that easier, um, than in others. Breathing into your back when you're lying down is kind of hard because the table is behind Michelle or your mat is behind you. You can't really do it, but you can do a little bit to the sides. Right. And then remember, good with each movement out there has to be a movement back towards center. So she's doing a lovely job of letting her ous expand to the side.
Let all of this front part come back in towards you. Yeah, that, ah, that's what I was looking for right there. Right at her collarbone. She did a very nice relaxation. So that's, that's what we want with that, we want to be able to expand everything and let everything come back to center. All right, so what does this have to do with the a hundred so in the hundred we don't just get to lie down with our feet on the mat very often. Sometimes we do, but most of the time the legs are up, the body's curled up and there's a lot of load. You have to suspend your legs and then you have to breathe.
So what we're looking for, so let's leave your feet down. We won't make you do that part of it, but do the curl up and feel free if you want to keep one hand behind your head or you can stay there. What I look for as a teacher is that as she's breathing in and breathing out that there's very little change of the abdominal wall. So you can look at your own body and see is it going up and down a lot or is it mostly staying? That's it. Mostly staying in position. That's great. And a little bit of expansion is okay. It shouldn't be rigid, but we don't want the abdominal wall moving all over the place. Good.
And then take a break and roll down. Very nice and let your arms relax. So hopefully with the curl up with the bridging, which is going to help our spine mobility and with these breathing tips, some of the supine or the exercise is lying on your back are going to be even easier to do. The next thing we're going to go into is some work lying on our front. So we're back with Erin again. We're going to now look at prone or face down exercises.
So go ahead and lie down. All right. And so just starting out in class, the tendency if you didn't have your hands or some teachers will put a towel or something under your head, the head is down low and also the body's kind of at rest. So before you start, this is I call is like the resting starting position. But then we have an active starting position. So Aaron, I want you to just barely lift your head up just a tiny bit. That's great. And then put it back down and you can see how as she lifts her head, do that little bit again. She continues to look down, which is great, which is exactly what we want.
So lift your head this time and look forward to do it wrong. So that's not what we want, cause that's not going to be the starting position that we are gonna use. We want to have the head in line with the body. And so it's almost like you're just hovering your hands either off of your mat or off of your hands. They're good and put that down. Great. So now take your hands to the sides of your rib cage.
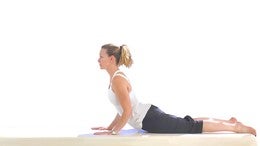
And these are movements that are going to get you ready for the swan, for single leg kick, double leg kicks, swimming, lots of the prone extension or arching exercises that we do. Employees. So you can see she's in the rest position, which is good cause I'm talking, but now we're gonna move. So you're going to lift your head just a tiny bit up and you can see again how she's kept her head right in line. That's really important as a starting position. Now what I want you to do as you start to peel, and this is what we call either prone extension or prone press up.
Some people call it the baby swan is that you leave your lower ribs down and then roll back down. And we've done a tutorial on this on the whole swan. So if you'd like to check that out, there's even more details there. But just as a starting position coming up and then the starting movement, right? And you can see it doesn't go that far and people think it needs to be really high off the table and it doesn't. It's just a small movement. We're going to do one more. So head is lifting good and then come up.
And then when you roll down, you can see how Aaron's gaze stay up for just a second is a little bit forward when she rolls down. And when you practice this at home, start rolling down from the lowest part instead of nodding your head, come back up for a second. Keep looking at whatever you're looking at and let this part come down. That's nice. And that, and then the head is the last part that goes at the end. So sometimes the head is the first thing that wants to come down at the neck moves easily. So we move it, but leave the head where it is and see if you can move in your body even more. That's great.
So come up into position on your forearms like you would do maybe something like single leg kick and you can see how that, when she has this, so start to stretch your breastbone and lengthen how that prone press up can help with this position going into something like the single leg care. So that's great. Very good. All right, going back down and you can again put your head on your hands. The other part of being prone, a lot of times we have to do something with the legs are either kicking the legs or lifting them for something like swimming. And you'll hear sometimes the teachers will talk about tucking the pelvis or posterially tilting the pelvis and that actually doesn't set you up for success if you tilled. So do it wrong and kind of Tuck your bottom under. You can see how her body starts to come up off of the table. Okay.
Don't do that ever again. You don't ever have to do that. Um, you want to just keep the feeling of the pelvis being flat. And I think again, it's the good idea gone bad scenario were to keep the lower back from arching more, which can happen when you move your legs. We started going too far the other direction of talking the Pawas under. So all we want to do is keep the body in this position and let the legs move or do whatever they need to do. So the whole feeling of the front of your pelvis on the mat is really important. And I talk about, I live in Miami, so bikini of course, or speedos. Um, if you guys, so you can wear whatever you like, but that whole area at the front of your pelvis needs to be on the mat, including your pubic bone and you'll feel your pubic bone on the mat when you're there. So just keep it the same.
Don't let it change in either direction and let's just lift one leg a little bit and change and lift the other end. You can see how she's maintaining her body position. So lift your leg this time and let your back arch so we can see the difference. You can see how she collapses there. So that's not what we want. Do it right again and then let that go.
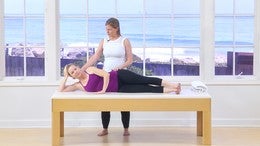
So that's going to help you with all of the face down or prone exercises that you do in your plots class. The next position I want to go into is sidelines. So go ahead and lie on your side and I'm going to get something which we'll have to be creative at home as to what you can use for this, but I'm going to get a board that we often have in the plotty studio and this is going to simulate the wall. Okay, so you can see when I first put this here, her body isn't touching the wall at all. There's nothing of her body except for her pelvis. It's there.
And this is very common when I'm teaching sideline anything in class is that people are kind of collapsed in round it. So now move back and align yourself with the wall that looks great and even move your head back just a tiny bit so you feel like you can get the back of your head there. That's what I want. Now you may not be able to do this exactly, but you want to get as close to this position as you can. So if you have nothing else, you have a wall and you can scoot up against the wall and you can feel what it's like to be in this position. Then your nervous system knows, right? Once you felt something you can't not have felt it. So your nervous system knows what to do. You may need reminding but that's okay.
And now you can lift your leg up and just do a little movement. So this would be something I got very, very simple version of sidekick where now if she was to arch her body or round her body, she could feel it. And so if you have something you can't do it against the wall and move your leg behind, but maybe have something you could put, um, where there's a little bit of space that you could lie against, like maybe even the edge of your couch and that would help you just for the awareness of it. Great. And then let that go and let your leg come down. I'm going to set the board down and now I'm going to have you come up onto your forearm and just scoot a tiny bit forward. I'm just going to leave the board here. All right.
Now we also have done some sideline tutorials for the shoulder. And what do I do with my arm? And do I support my head? All of those things. So if you want more information on the sideline position for sidekick, you can check out that tutorial. But just quickly setting yourself up, you want to make sure that the front of your shoulder, the rounded part, I say it's flush, it's flush with your arm and your chest. So do it carefully. Do it wrong, and let your shoulder, yeah, as a teacher I, oh, this makes me cringe. Okay? So don't do that anymore. You want to push up and you can see what a nice line. And you can also, if you look, okay, I lied. Do it once more, okay.
At the energy or the lack of energy and now come up into the position. All right? So you can see that there's, there's quite a bit of work going on, right? So we want to be active in the upper body to maintain this. All right? The other thing you'll see sometimes if your hand is down in the mat in front of you, is the upper body rolling forward, right? So we don't want to have this position. And sometimes though we can't get up to here cause our hand doesn't touch.
So get a towel rolled up, a yoga block, whatever you can find your water bottle even to put your hand on so you can maintain a nice long position through the upper body. And that'll help you out. The last thing here for the sideline where couldn't stretch your legs out and get comfortable in what we would do for sidekick. Alright? And bring your legs back just a tiny bit. A little bit farther. That's it. And again, if we have the wall, we could bring the wall up and she's got her head on and her ribs coming back and her pelvis on. I'm got that same position. And now what teachers often say in class is don't move your body.
Don't do anything. Hold steady. Really stabilize, which kind of takes away the ability to move in your hip. So if you don't really understand what it means to be stable, move, other teachers are going to say, oh my gosh, this is, you know, you're breaking all the rules of sidekick, but it's okay. Right? So you can, I don't care if you have the leg straight or bend, you can do however you like, but lift the leg up. Yup. And now when you take your leg forward, let your body round a little bit. Okay. And then when you take your leg back, let your body arch a little bit, right? So people would say, this is wrong, you shouldn't do this. But it's just movement, right? We do movements like spine stretch. We get into this position and we do swan and we get into this position. It's just not part of sidekick. So now that she's felt that, now she has a better understanding of now do it without moving, how to move her leg and keep her body still. Right.
You could do that also by rotating. If you rotated your shoulder back a little bit and then forward, you're going to counterbalance the weight of the leg. That's another common thing I see as a teacher. Oh, it's wrong. It's wrong, it's wrong. It's just not part of sidekick. But once you feel that, then you know how to prevent it from happening. So let your body have some experience with all the different so-called mistakes and that'll help you out. Great. And you can rest their super. So I hope that helps with some of the sideline work. It's, it's challenging cause you don't have a very big base of support.
You don't have anything telling you really where you are, there's no help. So hopefully that helps out a little bit. The next part that we're going to look into is sitting and hands and knees. We're going to do both of those and help you with those positions. So now we're going to go on and as I mentioned, we're going to look at some sitting positions that you'll encounter and apply these class and also hands and knees or Quadr pad.
So I'm sure I'm gonna have you sit facing this way with your legs out in front of you. And Michelle has terrific hamstring length. So I wouldn't ever have to give her this modification in a class. You can see how her body's really upright and that's really important because that puts all the bones of the spine in their best position to move. So she could go into a flection or a rounding or side bending or any motion and her spine is aligned beautifully. So reality happens though and kind of tilt back a little bit and this is what we often see in class.
And you never want to be the one in class that the teacher says, oh, you need to sit on a box or you need to do this or that. Um, but it's important and they say that for a reason. So at home you want to make sure that you are also paying attention to this. So if this Michelle was in my class or if doing it at home, we'd want to set up on something, right. And again, it's not just to make you modify it and you know, you can't be like everybody else, but it's really important for your spine to set it up to start in this position. Great. How does that feel? Should feel nice. Little easier for the taller. Okay, great. All right, so come on now and you're going to turn to face the window and we're going to go into what's called the z setting.
And this is the position that we use for mermaid, right, and you can see, again, she has a very nice upright posture, but if you look at her pelvis and she just happened to wear the exact right clothing, you can see how in the blue stripe that her left side is higher and her right side is a little bit lower and you can see how this side of her back is just a little bit shortened. Now it's not, it's nothing really to write home about, but we can improve it and make it better. So let's sit up again and I'm just using a bath towel. If you were in a plotty studio, you might have something like a moon box or you could sit on a yoga block. That would also be fine. Anything that puts you up into the sitting position and now you can see the sides of her body are much more symmetrical.
She's much better aligned and now she could start the mermaid or whatever other exercise we were going to do here. And this is also for the reformer. Anywhere you're sitting like this. This is not just for the mat work. You can use these different modifications to help you out. Okay. And sometimes couldn't come off for just a moment. I've heard teachers say to prop up, oh, your hip is really lifted.
Let's put something under that hip. So exaggerate, lifting your hip up a little bit, right? But if I take the towel and I just put it under her hip, her hip stays lifted. It didn't really solve anything. So yeah, so we want to make sure that you're putting in it or both sides. All right, so now let's go into the hands and knees position. So let's again face this direction and I'm going to get every PyLadies teacher's favorite prop, which is the dowel. And we're going to talk about this. And this is sometimes it's challenging to figure out when you're at home, it's a little bit hard. Um, if you have a broomstick that works or any kind of a long dowel or wooden stick, you can use this.
Sometimes we even use foam rollers if you happen to have one of those at home. But we're going to look at how each part, so the pelvis, her upper back and rib cage and her head are aligned to one another. If I take the dowel and put it up here, you can see how actually to stay in the position you're in. Just for a second, not touching here, it's not touching here. It's like the game and the in the back of the car. I'm not touching you right and she needs to get more contact with the doubt.
So bring the head up and allow your sip ons to open and let your pelvis tilt this way. So open your sit bones wide apart yet. Keep doing that. Keep doing that. Keep doing that. That's it. Keep this where it is and bring this part up to meet the devil. That's it. So we look at the back of the pelvis, the back of the rib cage and the back of the head. And if you think about if we flipped her upside down really quickly, if she was laying back down on the mat again, that's the same position, right?
We wouldn't be lying on the mat in round your body a lot around your go round into um, yeah, this position right? That's doing the hundred but we wouldn't start there, right? We'd come back to the Dell. So lengthen out. You got it. All right, so now you're going to go into that rounded position again. And so a lot of times we'll practice again. It's got a lot of names, the cat and cow and arch and curl and all the different, um, all the different names.
And what I want you to be mindful of is how much you're pushing the body in any of the different positions. So when you're in this rounded position, it's really important to try to round through the lower back more and the upper back a little bit less because we're always texting. We're always in this forward rounded position. Our upper backs don't need any more practice and getting round. There are two round already, but we don't round enough here right now. When you go out into the length and position again, imagine that dowel appeared behind you just for a moment.
Keep going now and change into your arched position. Now this part usually arches too much and we want to get this part to arch more without going too much into the head. Yeah, that's it. So one of the cues I use here is imagine that your breastbone could stretch or lengthen in both directions and that looks good and you can go a little bit more through the pelvis that looks excellent. And then come back to your center position. Good. And then this come down just a little bit.
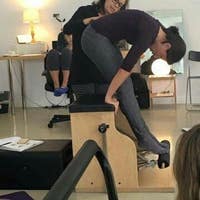
That's it. Yes, she's finding it. That's great. Good. So I hope this helps you in your different positions and sitting and again, that's safety is why you're sitting up on a cushion or a block. And also in quadramed, our last two things that we're going to do are going look at high kneeling, which we often do on the reformer and the trapeze table and standing. All right. So our last two positions that we're going to look at that you'll commonly do and applaud his class. And again, this is not just Matt and as could be on the reformer, on the trapeze table, on the chair, even our high kneeling and then standing.
So Aaron come on up into high kneeling position and we don't do this so much in the Mat classes, but this reminds me a lot of doing chest expansion on the reformer or thigh stretch on the trap table and the common position that people are in often. So kind of stick your bottom out and lift your chest. We tend to live kind of in this position or maybe it's just me cause I live in Miami, but this is a common posture that people are in. And so what we can think about is bringing the ribs back and the common feeling is to Tuck the pelvis under. We don't really want to do that. It's almost like you're going to bring the back of your pelvis forward into my hand. Right. And then can you levitate?
Can you grow taller? Yeah, that looks good. So this helps to give us an open position at the hip and then just do a little bit of a thigh stretch, like you're going to lean back a tiny bit. And that would be that exercise. It's common that we would use that hinges and then come back up. Great. So again, Tuck your pelvis so we can see what that looks like. So that's again, that's not really what we want.
We want to just feel like the whole pelvis is coming forward and the ribs are going back and you're just making that little coop right into line. Super. How's that feel? Good. Okay, great. So have a seat now and let's stand on the floor and we'll finish up on our standing position. And standing is one of the most important positions to look at and I think it gets missed a lot in different [inaudible] sessions, especially in math classes because we do so much on the floor and then people leave. So we need to make sure that we're incorporating standing work. So when they leave, their body is oriented to this position and there's a lot, I don't even have to mention all the different variations of standing positions that there are. If you just go out and look, you know around you, you'll see people in all kinds of different positions.
So one of the things that we can talk about is the same thing we just did in the kneeling. So again, get into the, get into the wrong position. So that's commonly what we see. And so again, the feeling of bringing the ribs back in the pelvis forward, right, that it looks pretty good. Now press the ground down with your feet and grow taller. Yeah. So from my vantage, I could see this, I don't know if you could see this on camera, but there was a little feeling of almost some excess tension in the glute muscles. And this is very common. So almost talk a little bit and almost bend the knees, just the teeniest bit. So that's an exaggeration.
But this is what people do sometimes when they're standing. So if you push down and grow taller, yeah, we get that feeling of the body, you long gating. The other thing that's really important when we're standing, let your weight shift back on your heels is we tend to stand back here, right? It's like you're standing in, you're in the back seat of the car almost, um, with your body over. Your feet are out in front of you. So shift forward just the tiniest bit so you can lift your heels, just barely lift them off the floor and then put them back down. Right now you don't want to go downhill skiing, right?
You don't want to go that far forward, but you just want to get to that point where you feel like you're standing on top of your feet, right over your ankles. All right? And then we can talk about the shoulders. We tend to be, because we're texting all the time, rounded, right? And curl forward. So think about widening the shoulders out to the sides. And the other common thing that we do, the common mistake is to arch. So we don't really want to arch and we don't want to round.
We just want to be wide. Like your shoulders could stretch to the sides of the room and then the head can sit right on top of your body. So let your chin go forward. Okay. Don't do that one again and then come back up. So we get that feeling of length, like you're suspended from the ceiling and coming down. So hopefully this gives you some ideas of not only in the standing, what to do in class, but what do you do when you're standing in line at the grocery store, at the bank. So lots of things that you can practice at home, um, that will help you with your classes, help you make them feel more, more smooth, more coordinated, and hopefully take all the strain away from your classes.
So thank you very much.
Comments


You need to be a subscriber to post a comment.
Please Log In or Create an Account to start your free trial.
