Description
About This Video
Transcript
Read Full Transcript
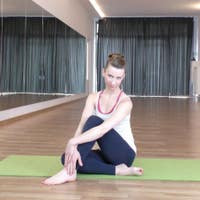
Today we're going to look at killing from the pelvis. We do this all the time. Sometimes maybe a different approach is a new way to go, and sometimes some interesting results can happen. So this is a normal female pelvis. Let's both have a stand up just for a moment.
And when I do basic training and or even a regular mat class, I often will use very simple ways of finding the pelvis and using a cue that I can integrate into more complex movements. So let's do the Basic Triangle Keel. Um, everybody might've seen this before, but let's do it again and again. So you put your hands on top of your pelvic rim. We walked down to the front of the ASI s everybody probably knows where that is. We'll point that out in a minute. And then I would say to people, come down to your pubic synthesis, and then I'd say, take out your magic crayon and connect the dots. And what do you have?
A triangle. You have a triangle. Good. So that's our triangle Keel. What that does is allows us to come to some very simple imagery. The two hsis down to the pubic synthesis and we're actually not quite telling the truth because we're using this as one point, but it's an easy reference for a beginner to start from. And sometimes it's just an easy reference in the middle of any exercise series when we go around to the back then you find you have the psis and the sacrum and a lot of my students, my clients are coming in and they have SEI joint problems and gee, one side hurts or I was told that you know, one side is higher and we all do a lot of queuing in negotiating shall we say around the [inaudible] joints. And of course we know that there's a relationship between the sacred mutating encounter, mutating and the adaptation of the lumbar spine.
And then there's the tailbone. And that's really great and I enjoy teaching that a lot and I'm going to continue to teach that a lot. However, one day I was talking to somebody about this and we were talking about how the half of the pelvis came together and this joint, the pubic synthesis synthesis, this joint is the lease moveable. And I listened to myself say that and I thought, okay, it's the least movable, but it is moveable. Often if you're in a chiropractic office or your your osteopath, you will get a little adjustment of your pubic and Amy and I will show you how to recognize if this has been done to you or if you have ever experienced this. But the point is that the pubic synthesis can actually move forward.
So you could have this, if I were to use my fists here, one could move slightly forward or it could go up or down. Now since this whole system is a closed system, it's a closed chain with joints around that circle of a closed chain. It makes sense that if the sacrum does something, that the [inaudible] joint is going to be relatively quieter. But how could the Sii joint do anything that doesn't affect, or sorry, the pubic symphysis, how could it do anything? And there not be a corresponding motion or adaptation because it's the whole thing is a 10 segregated unit.
So what we're going to do today is we're going to cue from the pubic synthesis. So now we're going to, we're going to zone in on this area of the body and we're going to notice the two little bumps here or what are called tubercles. So I'm going to just color those in. And most of you, I find most Polonius teachers now are highly competent in their anatomy. No, this tubercle as the, which of your abdominal muscles attaches the rectus abdominis. So your rectus abdominis attaches to these two bumps.
So we're going to call these the bumps on the arc. So this is a little arc and we're going to find these bumps. When Amy and I were talking about this, we both wanted to be very clear that this kind of queuing could be, some people might not be comfortable with it. So there's a certain element of you can show that much to some people and that may be enough information for them to assimilate. And for other people they're quite comfortable touching.
So we are going to do some touching, uh, that you may or may not choose to use in your environment or only with certain people. But I think it's important that if you're at home, you try this out for yourself in privacy if you want to or with a couple of your friends and just see how this feels. Would you agree about that? Yeah, yeah. Yeah. So it wasn't uncomfortable? No. Okay. So we're going to sit on the edge of the table here and now we're going to put our fingers right here at the [inaudible] and keeping in mind that we do have a triangle. We're going to go down and we're going to put our fingers right there on those two bumps. It's easier to say bumps on the Ark than the tubercles of your pubic synthesis.
So you know how it is when you're teaching. Quick, short sound bytes. So right there you can feel those and as you're pressing on them, Amy, I'm just noticing, I'm pushing this way in. Okay. Do you, and I'm sitting on my sit bones fairly levelly I didn't say that, but I shouldn't maybe assume that. So you want to check that out with your person. Now as you touch those, do you notice anything different? Is One forward or is the backward, do you have that sense? I do have a slight sense.
One also feels more like tender the tissue around there. Um, yeah, I do notice one offset. Do you have a sense of one is up more than the other? Yes. So which one feels tender? Left your left? Which one? Uh, and, and which one feels forward? Uh, well, not forward today, interestingly, but I notice my left is up, which is, I know that this is my up hip, so can we let them in on a secret that we rehearsed this yesterday? It felt different yesterday. So very different yesterday. So yeah. So that's an important aspect of this. And I wanted to bring that up.
That in working with us, not only were we doing this for the benefit of us being a good team and being able to um, give you the information in a succinct way, it's important for Amy to experience what I've been experiencing in my body because it was my body that led me to do this and also in the bodies of my clients is that it changes and it can for a long time. It can be doing this, um, kind of queuing. You may feel I'm over here now. I'm over there at nine, I'm up front now I'm back here and it may take a while until everything starts to optimize and it's because it's so related to the hip joints of the integrity, the SEI joint and just the whole system and how it is adapting continually. So are we ready to start some exercises? Let's go. Okay. All right Amy. So take a deep breath in and exhale and then put your attention on your ass and you can put your fingers there and then walk your hands down and see if you can find the bumps on the arch. Very good. And we just did this sitting.
One of the things that you and I were sharing yesterday is that you might have the sense that one feels forward when you're seated. Then you go to supine and it changes. So did that happen again? It did happen again. This feels lower today. I'm not going to look at it because I want to do this from a feeling sense, you know? But it does feel like this one's found that way. Okay. So in terms of touching what I'm asking my clients to do, um, I'm not doing it. I might, I may put my fingers here, but I'm not adjusting.
So I don't want to apply pressure because that's out of my scope of practice and it's actually not my intention anyway. What I'd like my clients to feel is to feel that they can sense that a bump and that it is sinking downward this way. Now that may seem obvious, seemed obvious to me until one lady said, so when I go down, I should feel it in my feet. And I thought, oh wow. Once again, I've got to stop. Listen to what I'm saying down doesn't necessarily always mean the same thing to people because they, their sense of their embodiment may, it may be at a different place. So what you're trying to do is get them to put their fingers there and imagine if this pelvis were a little boat and those were two little anchors that they would drop down all the way through the table and provide a solid, sturdy point. And that does level out the triangle.
So you would do this at home with yourself because you have to feel this one. As you open, you're going to keep both bumps equally weighted so that one doesn't come forward or one take over the show. And you're also going to have to watch. Would you show the person who just leg out? Yeah. So some people, even though they may have a lot of control here are so they are so facile, they don't really use muscle to move. And those are people. Um, I'll admit it. I was a dancer, I was one of them and you know, it was more and more and more.
So watch for that and invite them to actually move the legs slowly through space with control, keeping this still and then coming back the center. And I like to tell people, imagine there's a small magic circle and instead of a big one here, there's a very small one here and you're bringing the top of your thigh to the top of your thighs. So you're coming together here, keeping this level. So let's check the other side out. As the teacher, I will keep my hand lightly here and I do that so that when they do the first couple repetitions, they can focus on the opening and closing of the leg and the relative stability of that pubic synthesis. Then I will back away and one of the things she'll notice this would you do that? Um, counterbalance. So the right leg opens and the client will sometimes counter balance by opening the left side up. And you point that out, you'll say, oh, this is really interesting. I notice Amy, when you go over on your right, did you notice that your left leg is going over? And we, we found a little bit of that. Yes, you have just a little bit.
I just pointed it out to you. So you'd notice it to teach, right? So then you might have to say to your client, look, feel the weight of your feet into the table as you open your right leg. Keep the weight of the knee over the foot. And the, just the integrity of this whole leg and over. So you will see that happen. Uh, some people that are very flexible, they're going to counter balance on both sides. So you want to introduce this step-by-step. First, the exercise opening and closing. You controlling the leg, then pointing out to them that they need to be aware of this.
So that's exercise number one. Yeah. Okay. Exercise number two. You would introduce, if this is successful, they, there will be some people you'll know that is enough. And the next step, the next part does not have to be introduced until a session two. So the next one that you're going to do is your right leg is going to open and the pubic bumps stay quiet. That's how I would say it to a client. Keep this client. Now let's join in with this leg.
And as you do, you're going to rotate and you're going to bring those bumps off the table. And we're not looking for an extreme amount of rotation in the thoracic spine. So for me, just to get them off on an angle is enough. And then what I'd like you to do is bring both of your bumps down into the table simultaneously to bring yourself back to center. So the count would be one leg, no bump move.
That's count one, count two, both three and four coming back down to this anchored triangle position. Okay, so sure. One rotate, two coming back, three and four other side one and two. I like what Amy's doing. She's monitoring her ribs, so it's pretty much the same. Got To watch that too. Now the next point I want to make is that I was trained in classical PyLadies, which is flat back. And so did Joe. Joe Taught, taught that too. I know better. I teach all the time how to teach, uh, a neutral curve, the natural curves of the spine. And what I found myself doing, I was having, I've been traveling a lot, having a tight back.
I go over to the side, I do the exercise, I come back over here and suddenly I found myself sinking into my lumbars. Oh, very sneaky. And then coming back on count four. So I wasn't, I was actually compressing my back and then finishing the exercise in the correct place. Um, and so that's one of the things that I thought to myself, my Gosh, I'm, I'm saying these things, but am I actually doing them? Which is again, part of the purpose of this tutorial is you have to do this stuff yourself because that is, that's that is your best teacher is the things that I do wrong.
Teach me what I'm, what I'm about, how my body is changing that that's a normal process and good chances are really good that when I meet Amy, she's going to go, oh wow. Yeah, I noticed that. So do you have anything to add about that? No, I don't. That makes sense. That makes, thank you. Makes Sense. Okay, so the next part of the exercise that we want to do is to work with the hip joint. So we need to show our little pelvis again for a moment. Okay. There is nothing like a visual.
This is so obvious that some of you may wonder why are we even doing this? It's not as her teaching. It's not for you so much, perhaps because we own our great [inaudible] teachers, but sometimes I'm even surprised at how a little extra visual really can make a point. So there's my triangle. Maybe you always have somebody that gets contrary there. There's, there's our triangle. So the triangle that we talk about and we cue, and I'll do that a lot for beginners. However, what's really interesting to notice that the Acetabulum is outside of the triangle. So there's, there's your right Acetabulum and I have a nice left femur here and I just gonna put it in the Acetabulum there.
So you can see that when we as PyLadies teachers or movement educators ask people, Hey, can you stabilize your pelvis and move your leg? That's why that's possible because the Acetabulum, the ball and socket joint is outside of the triangle and the Acetabulum is on the side of the pelvic half. It's not in the sacrum. So now we're going to do some exercises where we're going to relatively, I hate to use the word stabilize because things don't stabilize, but we're going to keep the pelvis relatively quiet, monitor monitoring our movement from the bumps right here and understanding that what we're asking ourselves to do with femur movement, leg and hip joint movement is possible. That it's not just something that we aspire to and we get on Christmas morning in a package. So now we do some polarities. Okay, exercise.
All right, and I'm going to say I would like you to stabilize your pelvis. Okay, Amy, if you could, and let's start first with some simple warmup exercises. So put your hands on your pubic bumps there right there. Good. Now we're going to do this for this tutorial. Obviously you wouldn't do this the whole way through class, so to get warmed up, could you slide your right leg out along the table and what do you feel wants to happen in that area in here?
In other words, they kind of want to follow the, yeah, the, I wanted to lose my leveling and follow my leg. And then when you come back in, what happens? They want to go that way. They want to go. Yeah. Yeah. Okay. So there a little bit of this that wanted to happen. So if you could find the neutral, you have a night, Miss. Nice, neutral spine.
Okay. Now if someone were to say to you, Amy, keep this level and slowly allow your leg to reach out from that place and then come back in. Good. And then let's just check out on the other side
And now you're going to do a single leg circle keeping this quiet. And I'm not going to tell you how big or how fast, all I'm going to ask you to do is to be aware of this as your anchor and then reverse. So again, I'm sensing, um, a much deeper demand than I normally do in my abdominals. No. So, so I'm having to concentrate really heavily on that area. Okay. Which I normally don't think so much about. And then let's change lanes. Okay. While you're, so you don't get lopsided while we have that conversation, that is a of the feedback I've been getting from a lot of people as well is their circle gets smaller. Yes.
Because they become more precise and they're more deliberate about what they're trying to do. Yeah. I'm feeling this very deliberate. It's very anchored and it feels better than normal. But um, you know, it's smaller, but it's, it's very just very different. And then Ben. Okay. And then come all the way down. Now I would not suggest that what you do is that you change your mat work to be in slow motion and you know, drink molasses for breakfast. What I would suggest is that sometimes it's a good idea in, you know, once or twice a week, get in there, go through some of these things, and then the idea would be to have the same kind of precision up to the normal pace of a bat class. Right? That would be what we would be looking for. Okay, so let's take some of these ideas to the reformer.
Sounds good. So in this tutorial, let's apply some of the simple things and take them into some of the more complex things that we do every day in a place reformer class. So your cue would be by now your client knows what to do, you're sinking this down and you have them bring their legs up and then lower and then you're, you're not going to be touching your client list. It's a private. But the whole idea that these are sinking down as the toes are going up. And what we've done by bringing this to the pubic is normally we would say to people, keep the triangle level.
That would be the Asi s then you bring them into the hip joint. Sinking down. Now you bring them in closer. So we're moving. The cuing is actually moving in closer to the midline. So let's go ahead with circles and so down around and remember that the Acetabulum is outside of the triangle and the lower part of the triangle is the pubic synthesis. And then you can reverse. So Amy, do you have any feedback for when you're doing your circles?
Just using that as the cue for the day. How does that feel it for right now? This feels just more a, I feel more spacious actually, right in my hip flexors, my hip joints. It's again, it's just a much deeper connection here and awareness of, and my sacred feels level. The back of me, you and I had talked about this yesterday, um, that sometimes because the sacred and the low back is so painful. I believe in the too many cooks in the kitchen. And so that's another reason I started looking at this. People are getting so much intervention, massage, osteopathy, chiropractic, PT and his plot is teachers. Maybe what we can do is kind of back up.
Give them another approach, give that tissue back there, a little relaxation. Another way to think about it. So now we're going to apply this to the short spine and when you do the short spine, no matter what school of how you do it, what, what's your particular choreography? We all agree that we're rolling down in our back. What I found using this Q is a lot of us, we're not rolling truly all the way down to finish before we extended our legs, let's do a version of the short spine. Okay. I need to shorten my straps from that. It's just going to look a little sloppy, but I think we'll be fine. Okay, that's great. Yeah, completely fine. There we go. Okay. Let me just, I'm just going to put them right in there and out of the tuck them out of the way. Okay, so short's fine.
Up and over and lift and Ben. Good. Now we have this nice curve. We're going to roll down on our back. And because of the appropriate reception of the spinus processes, I think we get distracted and we go there and then we forget there's a finish right here in the front. So would you do one where you kind of just sort of move through it but not quite? Yeah, sure. Yeah. So yeah. Kind of sound like that's a respectable yeah. And keep going. Yeah, that looks good. I mean, that's fine. I'm happy with that.
But could you add the specificity now and just slow that one moment down so our audience can see? It's that awareness and this kind of embodiment awareness is why we have to teach as teachers. Because you can't just tell people to do that. You have to instruct them how their I am. So did that feel different? It feels great. Yes. It feels very supported in my sacral, my SEI joints. Good. Let's take this to, um, the knee stretch. Okay. And we'll do this quickly. Okay. Let's drop those down.
Let's take a look. All right. Okay. Knee stretch round. So Amy and I actually did a tutorial on knees stretch around where we did queuing from the back. In this particular tutorial, we're just going to, we're still gonna use exactly what we did before. So the length of the lower back, the tailbone going under. Now what I'd like you to do is feel like the bumps on your pubic arch are moving toward your tailbone and your tailbone is moving towards you pubic arch and you're going to press back and come in round, good and out. So there's this little movement if I, if these were two little pubic bumps as you go in, they go back.
Now the really fun part about this cue is as you start to do knee stretch arch, they're going to pull back toward the back wall and create a suspension system from the upper part of the rectus and the rib cage and all the way down. So as you come in, you might want to thank my pubic bumps are reaching backward. How does that feel? Great. Good, clear. I like that. I do like that. Yes. So these are just a few little exercises.
The purpose of this tutorial is for some of you to have the same discovery, um, or wow that I had and Amy had with me yesterday. And then you're going to find, oh wow, that works over here on the Cadillac that works over here on the chair. But please enjoy, and it was my pleasure to show this to you. Thank. Thanks, Amy. Thank you.

Comments


You need to be a subscriber to post a comment.
Please Log In or Create an Account to start your free trial.
