What's a Course?

You can now make playlists of select programs into courses!
1. Schedule regular emails to deliver the content direct to you.
2. Watch your assigned videos to focus on the course goals.
To take a course for this program, first select a playlist and then click the "Take as Course" button for that playlist.Description
About This Video
Transcript
Read Full Transcript
Chapter 1
Phase 1 - Weeks 1-2
So, you had the surgery and you replaced that knee. And I have with me a client and a friend who, Ted, recently has had both knees replaced in the last year. And I've had the privilege of helping him with his rehabilitation, both pre and post. So, I thought it'd be appropriate to have Ted with us on this program to be able to help us with the post-rehabilitation phases. So, I wanna introduce you into the post-surgery protocols and I've broken it down into five phases really.
The first one is immediately after surgery, for those first couple weeks. Then phase two, up to three months. And phase three and four, up to six months. And then, I have a little segment where we talk about returning to life, which is obviously a common theme inside of the Pilates industry of how do we get our clients or ourselves back into our normal work recreation routines. So, we're gonna kick off with phase one.
So, I said that I have my friend and colleague Ted with me today to help demonstrate some of these exercises that we're gonna show our home exercises or mat exercises. Again, these could reinforce ones that we might teach pre-surgery. Reinforcing that that's what they're gonna do immediately when they get home and until they can start actually coming in for any kind of rehabilitation or post-rehabilitation. So, I'm gonna have Ted lay on his back. And I'm gonna come around and we're gonna look at knee bends and heel slides.
And so this is a very important part very early on. Sometimes, clients are put into machines that do this for them. I prefer to have them doing the heel slide themselves. Ted, go ahead and bring the hill up towards the bottom and then back out nice and easy. And then, all other leg and just keep going with a heel slide.
So the heel slide actually engages the hamstrings or the knee flexors as they start moving the leg. They need to usually have socks on. The surface, it's slippery. If the bed is real soft, it's actually really hard to do a heel slide. So, you might actually put something slippery and hard underneath it.
That would be like a tablet or a piece of wood and socks on so that they can slide their heels towards the bottom. And I like them to do this periodically throughout the day. Some people ask me how many repetitions. I like to throw out the word like five to seven. And to do it five to seven times a day.
And if they do that as a minimum, I know that they're gonna be restoring and maintaining that knee range of motion. And relax. The next one is looking at clamshells. So, I'm gonna have Ted turn over on his side, facing you. And this one with the knees gently bent.
And again, the key here is making sure that they're comfortable, right? So a lot of times the knees are so tender, you might need to put a little pillow between the knees so that the knees aren't touching. Again, the wound, if you look closer, you can see the scar in the front of the knee that Ted has. The beautiful scars to remind him of how beautiful his knees looked now compared to how he looked prior to surgery with very bowed legs like mine. So, I'm hoping to have legs that look as nice as Ted's in about six months.
So from here, just hinging at the hips and lifting the knee up. And the challenging part is, and repeat that, is the client wants to move the pelvis. And so, we're really trying to teach them how to keep the pelvis still. Now, this is actually strengthening up those hip rotators that I was talking about that are so necessary as we move into phase two in a little bit. Getting them strong and ready for this movement.
And again, all of these exercises in phase one are about helping them objectively with getting in and out of bed, getting in on and off the toilet, getting in and out of the shower, starting to walk every day with their assisted device. And relax. The next exercise is laying on your stomach or your tummy and rolling over. And this is our famous heel kick, right? And this is a very important exercise.
I like this one both for total hips and total knees, because it opens up the front of the hip and the quadriceps. It's a very challenging exercise, but it can, it's completely normal to do at this stage of the game. Just bringing the heel towards the bottom. Maybe a little double pump I like just to give some relaxation. He's using his hamstrings to bring the heel up, which causes a reciprocal inhibition of the muscles in front of the thigh or in front of the knee.
And a great exercise. I also like to do this exercise in standing, which I'll show in a second. And relax. Good. The next exercise we're gonna do is in standing. So, I'm gonna have Ted stand up next to the machine there.
And remembering that all the time, you wanna be safe. So in this case, we're gonna use the trapeze bar, but it could be a countertop. It could be a bed post. It could be the walker. All of those are things that your client can use for safety and security.
And the first exercise is just doing what we call a quarter squat. So, the feet nice and flat about hip width apart and body up nice and tall, and just barely bend the knees down and back up. And this looks like it might be really easy or it looks like it might be hard. It's really neither. It's just sort of in between.
When the knees are... The soft tissue, you're sort of telling the soft tissue that it needs to bend, it needs to move. And you're also telling the client that look what you can do already a day after surgery. You can already start doing some quarter squats. Okay.
And then, relax. Now, the other thing that I like to do here is the heel raise. So this is, and again, sometimes it seems like it's asking a lot. Totally appropriate early on in the rehabilitation phase. And that's just bringing your heels up.
You have something to hold onto there, right? And repeating the heel raise and getting the heels nice and strong. There's a couple really important reasons for this medically. One is after having knee surgery, all the blood starts going down towards the feet. So, they'll often be wearing support hoses to try to keep the blood from pooling.
But the most important way of removing that blood is by using a muscle pump and the muscle pump really helps the most. And relax. So, that sort of concludes the first part of phase one. Very simple. They should be doing these exercises five to seven times a day.
Main purpose and goal, bed mobility, house mobility, toileting, getting in and outta the shower, starting to have some sense of strength and movement in the ankle and the knee, getting ready for phase two. Let's move into phase two
Chapter 2
Phase 2 - Weeks 2-6
of our post-rehabilitation program. A couple of the things I wanna bring up now as we get more advanced in the exercises and the movement, safety becomes more and more important. So a lot of times the clients should be wearing, they're gonna be wearing support hoses. They also should be wearing socks that have non-skid or making sure that your surface on the floor and the equipment is not slippery.
It could be very daunting, even with something simple as footwork, to have socks on or something that would slip that would be potentially a risk of them having unwanted movement. I can think of a couple examples of socks on a reformer, on the foot bar, and the foot slipping down and hitting the foot plate with their heel. And again, when you're coming outta surgery, everything is tender. Everything is sensitive. There seems to be a sense that it's not even your leg at that point in time.
And we're trying to get the sensory back, that they're having these positive movement experiences and it is their leg. So on phase two, we have a number of objectives. Our objectives are to be able to go up and down stairs in two to three weeks, at least starting to with assistive devices. Getting in and out of the car that first week. Driving four to six weeks out.
Possibly, right? Depending if they're right or left footed where the knee replacement is. We look at things like dressing independently. That actually is a big challenge. I remember thinking like, "How on earth am I gonna get my shoe on my foot or my sock on my foot after having the knee, the hip replacement?" And it's even more so with a knee replacement, not being able to have that mobility.
We're also looking at independence and community ambulation. So, things with whether walking with a cane or a walker. They should be walking now. They should be able to go even to a grocery store sometimes, walking around with a cart. Different things that can start increasing their ambulatory activity, even with assistive devices.
So, the exercises we're gonna start with are gonna be on the trapeze table. So, we're now looking at the second to six week postop. And one of my favorite exercises is the 90/90 that we use in pole star curriculum. For knee and hip, and even ankle pathologies. And the idea here is that we're gonna use the full effect of the cage.
And in 90/90, we used the Velcro straps that Balanced Body makes. And we basically hook the leg up into its 90/90 position. I'm using a long purple spring on the thigh and a small or short yellow spring on the ankle. And we can start here just looking at the single leg. What happens is it creates a little bit of distraction.
So, it actually feels good to the client to feel a little bit of space inside there. And we just start with some very simple movement, whether I'm doing it or I get them to start moving a little bit. We can even do a little bit of circles. Getting the hip to mobilize. I call them delicious exercises coming out of a surgery.
They're things where, again, the leg is completely supported. The straps are holding the way to the leg. We don't want the straps too tight. A note is the D-ring, we often put inverted on the ankle so that the corner of the D-ring doesn't dig into the foot. So, we keep that inverted.
Just a great exercise. I can now also start working on Ted working to push the leg down, right? So as we progress from just having a little bit of movement and motion to the knee, we can actually start working on the strength, into the hamstring, into the knee extension. And because of the placement of the spring, it's gonna be the extensor side working. And we find that if we can accent early on the hip extensors and the hamstrings to straighten the leg and the hip is actually better for the knee recovery than always going after the quadriceps to straighten the knee.
And relax. The progression from here is going into a long spring exercise, where I'm just gonna use the long purple springs. I can attach it just to the thigh and have it so that, again, now he has to use sort of the, just the thigh movement. Go straighten the leg out and back down. And that gives him a sense, again, where he has to support the weight of his foot and lower leg.
I can also take this into an, the foot strap, straighten the leg all the way out. And then from here, just push the leg down with a straight leg. So now, without the knee bending. Straight down. And the exercise of course progresses, keep going with exercise, to where we actually have both legs, right?
And from here, we can go into straight legs and just little flutter kicks with straight legs. So, he has to be able to really use that hip extension and the quad extension of the knee. So, this might be more along the lines of the fourth week or fifth week as he's progressing. We can also go into circles with his legs. Really trying to work through the hips.
Push that down. And again, any hip extension, any hip rotation, as I mentioned, many times is going to be to his advantage in speeding up his recovery and his strengthening. We can reverse the circles. Again, five, six repetitions. There's plenty at this stage of the game.
And if you feel like, Ted's nice and strong and he likes a good, hard workout. Even the week after his surgery, we were working pretty hard. But you could also use lighter springs. You could use the long yellows, if you wanted to, or you could lower the crossbar, if that was appropriate. And relax. Bend your knees in.
Notice how I've used the ankle cuff to make sure that it's secure. A lot of times they don't have the security in their foot. Another option is to use the foot loops that actually hook onto the ankles. And I'll give you a demonstration of that as well. Let's come out of these springs.
(metal clanking) Great. And the way this one works... That's the other, right? Oh, here. And then, the gray part slips down around the back of the calf, right?
So here, again, just another nice way of giving some security that he can push down into with his leg. And relax. The next exercise is the breathing exercise on the trapeze table. And again, I love the idea of working all of the extensors of the body. So, I'm gonna have Ted slip one of his legs in at a time and just rest it on the strap.
And I'm gonna secure his legs into the strap. Have him bring his hands down to the side. We're gonna get rid of the headrest. And from here, push the legs into the spring, lifting the bottom up off of the mat. So, it's just like a bridge.
And back down. Now, a lot of times, very early on, they're not gonna get very high. Sometimes, it's just getting the engagement. I've had exam times where patients have gone into some hamstring cramps, some glute cramps following these types of surgeries. So again, to tolerance, even just getting them to engage the muscles in a long leg, this again, prepares them for things like walking independently, having the strength they need to stand up, and working on one leg at a time.
All right, let's now add another component to it. If you bring your hands up to the bar. Arm straight, bring the hands down towards the hips as you lift the hips up off the mat. Now, the nice thing about this is it brings in the lats and the extensors of the upper extremity in the back. That actually make it a little bit easier of getting the bottom up and feeling that full extension along the full back of the body.
And relax. The last exercise on the trapeze table in this section is the tower bar sprung from below. And again, it has some really cool advantages I wanna show it to you. So, I'm gonna have Ted bring his feet up here. And again, I'm gonna make sure we have the safety strap on.
I'm using the long springs because he is not gonna have that range of motion that we're hoping to gain yet. And here, we're focusing on knee extension. So, we wanna really get that extension. As I have Ted push it through, I'm gonna have him reach his heels through the bar. This could be incredibly uncomfortable in the beginning, but the idea is to really focus on getting that extension from the calf.
Remember, we said the gastrocnemius crosses over the knee joint. So if he just keeps his feet pointed up here, we're not really getting a stretch in the calf. And that's a very important component early on because of all the swelling around the ankles, and the stiffness, and the swelling behind the knee. So let's just do a couple of those. Yep, good.
Reach the heels through the bar, through the bar. Good. And then, bend the knees back. And I'm spotting him. I've also asked Ted to take his socks off because I wanna make sure that he really has a good grip with his feet onto the bar and I'm also spotting the bar.
Those who might not be as familiar working with the trapeze table, this is probably one of the most challenging piece of equipment for safety. Along with the safety strap, I'm also not getting my head or my body underneath that bar. So, I'm staying away from it. And I'm guiding Ted to make sure that he's safe with this movement. And again, even if you wanted to sustain a position for a little bit here, just relax and let the feet dorsiflex there.
Get that nice stretch. This is still good for Ted. I can feel that his tissues are like super excited to be in this stretch right now. And relax. Bend the knees in. I'm gonna not let the bar go all the way down as Ted comes out of it, just to make sure that he's safe to get out of it. It doesn't take him into any scary flexion that he might have.
And remember, at this stage of the game, if they're at 90 degrees of flexion, that's pretty good this early on. Our ultimate goal is to get to 125, 130 degrees. As we continue in phase two with the reformer, I've picked a few exercises. Again, the repertoire is expansive and I wanna make it clear that we want a whole body movement experience even this early in the rehabilitation of the knee. And so, this is just a smattering of exercises that I think are really important and also sort of showing some of the accommodations or modifications that we make for individuals that are in their second to six week post-op total knee replacement.
So I've chosen, of course, one of the most common exercise in the reformer, which is footwork. And one of the key things here is making sure that the foot bar is set appropriately, so that there's not too much flexion of the knee. And I can also adjust the reformer. If you don't have infinity foot bar, you can adjust it so that it doesn't allow him to come into too much flexion, right? So from here, I'm gonna start with a nice hip width part.
Have Ted pushing out with his legs and just simply doing footwork. So, just in and out. Let your hands come down to your side, Ted. Good. And keeping his pelvis nice and quiet as he is. Looks great.
And just a nice closed chain activity. No matter how you slice it, footwork should be part of every program. From here, leave the legs out straight, Ted. And just point the feet over the bar and pull the feet back towards you, right? So, just ankle pumps all over the bar.
Yep, keeping the knee nice and straight. Keeping that knee nice and straight. Just the ankles. Yeah, there you go. So again, this is a nice way of working on the ankle mobility. Remember, I've talked about it a couple times.
Especially coming back from the knee surgery. Getting that ankle mobility is crucial. Bringing the carriage on down. We can also bring the feet in nice and close. And that's a little more challenging, pushing out with your legs.
A lot of times, people who have been dealing with knee degeneration either have a compromise into a valgus or a varus position. So for Ted, like myself, a lot of varus, very bow legged. So bringing the feet together and being able to have some resemblance of alignment post-surgery is really a new thing for the leg and the tissues. So, this is a great place for him to work here. And then, we can slide the feet down, same closeness, just like we did on the tower bar of the trapeze table.
Press the legs out, leave the legs straight. Let the heels just drop down and get that nice calf stretch behind. And then, rise up on a heel lift, leg straight. Yep, and back down. And repeat that a couple times, Ted.
And again, working on the muscle pump to get rid of the swelling around the ankles. Working on opening and stretching out the gastrocnemius. Working on the alignment of the legs in their position. All are very important ways to be restoring this. And the beauty of the reformer, of course, is that this is a lot lighter than his body weight against gravity.
So, he can start working on some of these exercises very early. You can add all of the choreography that you like alternating, running, et cetera, with your clients at this stage of the game. And relax. Come on down. The next exercise I wanna show is bridging. So, we're gonna go into a little bit wider stance.
I'm gonna take his headrest down a little bit. I let the headrest down. And here, I don't want the carriage to move. We're just gonna go into segmental bridging. But I'm more interested actually in what's going on with the knees and the lower extremities.
So Ted, as you roll the bottom up and send the knees away, keeping the carriage still. The carriage isn't gonna move. Just a simple bridge. Roll up, up, up to the weights between the shoulder blades. Take a deep breath.
Exhale, drop the chest down first. Keep working the hip extension as you drop that down and then roll all the way down through the pelvis. So, a couple things are happening here and just keep repeating that Ted. One is I really want to keep working on the hip extension. So in this stage of the game, I'm more interested in the hip extension than I am in his spine articulation, even though they are both super important.
In order to get that hip strong, I want the hips to come up even higher, Ted. Higher, higher. Drop the chest down a little bit. There we go. So, I'm looking for this space here. That tells me that Ted's gonna be able to walk with good hip extension and not be stuck in that bent over position that we see so often with people coming at a knee surgery.
If we can get that hip to open up and use those hip extensors, he's going to be able to walk a lot sooner and even be able to participate in stairs, going up and downstairs, et cetera. Last one and relax. Coming all the way down. Very good. And I have three heavy springs on him right now. Again, that's actually nice because that minimizes the amount of work.
If I made it really light and I only put two red springs on, for example, he would have to use a lot more hamstrings than glutes to get up. We're gonna go into feet and straps now. And for that, I will lighten his springs. For Ted, I'm gonna go with two red springs. And again, coming off a knee surgery, I'm thinking of the springs being more important to sustain the weight of his legs.
And that is going to give him a little more security, not feeling like his legs are gonna drop or fall down. So, push out with your legs, Ted, And gimme the right foot here first. And sometimes, Ted is a pro at this, but sometimes I have to provide extra assistance in the beginning. I even might come inside the carriage a little bit. Not the carriage, but the well.
And provide a little security here, so that I'm guiding his feet through space. So, we could just do a simple squat. So the knee's bend in, push back out. And again, mobilizing the knee. We could keep the knee straight, keep the knee straight and let the straps lift his legs up and down, mobilizing the hips in the sagittal plane.
And we can go into circles. Again, mobilizing the hips safely. And again, I'm hanging onto 'em the whole time. And I find that patients that are super afraid of these kind of things very early on, at the third, fourth week, feel better when we're holding their feet and we're guiding them, and we're right there with 'em. So rather than standing to the side, we're actually guiding their movement, making sure that they're comfortable with that.
And I'm assuming Ted is comfortable or he would've complained already. And relax. Let the knees bend in. Take the straps out. Reach that leg down. And again, I'm carrying the weight on that just so you know. When we took his foot out, I'm carrying the weight of that strap to make sure that it doesn't accidentally take his knee into too much flexion.
To continue with the diversity of exercises, I also wanna work on the upper body strength on the Pilates apparatus. So in the reformer, sitting on the box, long box, doing some arm exercises, some upper body work is great for them being able to work and use their cane or their walking assisted device, the walker. Having to use a little more arm strength, this is also a nice thing to be working on pre-surgery to make sure they have enough upper body strength to be able to help them out. So very simply here, just doing some extensions. Reaching the hand straight back.
Working the back of the shoulder blades, the back extensors. Working on being really tall. Having that nice tall posture that often is compromised. Whenever we have surgery, we tend to collapse in deflection. So here, I like to really work on that height and the extension.
Keep the arms down a little closer. And then, let's go right into some bicep curls, Ted. So again, lifting the elbow up a little bit higher. And this also gets us ready. And more than the arms, this is working in the middle of the back.
Trying to stay up nice and tall. Having the flexor strength. Pulling activities. A lot of times the patience when they're coming off of rehabilitating from surgery, some of the hardest things back surgery, knee surgery, hip surgery is pulling doors open, pulling something towards themselves, picking up a suitcase, picking up a bag. They have to be a lot stronger in their arms and in their back extensions than they'd expect.
Let's cross it over and just finish up the arm series with a rowing. So again, thumbs coming towards the armpit. There we go. Good. And again, I'm just picking a few of the exercises, the hundreds of exercises that exist in our repertoire. I know sometimes we get to be a little bit more like a smorgasbord of saying like, well, he has a knee problem, let's just do knee exercises.
Actually probably do about 15, 20% of the exercises are specifically for the knee and the other 80% are gonna be for whole body health and moving in all directions that he or she can do safely. And relax. Great. Let's have you step down from there. And we're gonna finish up on the reformer with seated knee extension, coming back into a knee exercise. I'm gonna have Ted sit on the bar, facing this way.
I have the spring set with a red and a blue, which is appropriate. And I'm gonna take the carriage out a little bit for him. He's gonna hook his heels underneath it. And you feel like your bottom is secure there? Yep. Turn your hands the other way for me, Ted.
And from here, press the carriage out. Yep. And I can spot him as well. And again, Ted's been through this. He's well into his first year after surgeries. But a lot of times you're gonna have to provide the assistance to get past the critical point, right?
And now, what I can do is I can gradually let the carriage come in deeper and deeper, challenging that range of motion in the new knee, right. And I'm sort of helping and assisting with that range of motion. And I'm also making it more about the legs. When I do this exercise in a reformer class, I'm focusing on the balance through the hips. We do upper body work, et cetera, that we will introduce later on when he returns to normal Pilates classes.
And relax. Go ahead and come off of there. I got it. Yep. Good. Good.
As we continue with phase two, we're gonna move on to the chair. And I just have a couple exercises here. One of them is gonna be the seated knee flexion. And we're gonna start with actually helping Ted. I'm gonna bring the foot bar all the way down.
So, you're gonna bring your feet up on top of the bar. Yep. And this is gonna be our starting position. You can use your elbows against the bar here. You can even hold onto the seat here, if you want, but we're gonna keep that position.
Good. Now from here, if I just let go of the foot pedal, it could be a disaster, right? So, the key is I'm gonna keep my foot on the foot pedal. I have the springs, two regular springs on it. I'm gonna allow it to come up.
And again, Ted might feel the restriction very early on here coming in that space. And just as we repeat this motion, we're gonna let it come up a little bit higher and higher, trying to get up into that hundred degrees flexion, 110 degrees flex, which I'll show you what that looks like. This is about a hundred. Can you come up a little bit higher for me? There's about 110.
And that's more than enough at this phase. Our goal is to get to 130. I'm gonna show you what that looks like in a second, with Ted is let it come up as high as you can now. So, let it keep coming up all the way up. And that's about a hundred twenty, a hundred twenty five degrees, right?
So at this phase two, two to six weeks out, we're gonna be happy with 90 to 110 degrees is plenty. But as we get into the next section, we really have to get up into that 130 degree range of motion. And relax. Come on off. The next exercise on the chair is going to be the single leg pump. So facing the chair, feet butt up against the wood here, if your toes there.
Again, I'm going to assist by bringing the bar down. So, I'm gonna have Ted bring his left foot up, both hands are on the bar. And I'm going to use my other foot to help control that. The scary part is the imbalance and the strength that he needs actually on his standing leg. A lot of times we think of this as being the gesture leg or the leg that's moving through space.
So, I'm gonna allow the springs to lift his legs up. And the challenge that I want Ted to think of is if you had to stand just on that right leg and you couldn't use your hands, how would you be able to hold yourself up? So, we're gonna do this on both legs. We would do this first starting with the surgical leg on the pedal. But more challenging is gonna be the surgical leg on the floor.
Let's see if you can find your balance with that too. Go with it just a finger touch. Yep, good. Chest up nice and tall. Good. Now, no fingers.
Excellent. So again, this is a very important goal is to be able to do this without touching with the fingers. Let's switch legs. Hop again. Chest up tall. Use your hands the first time.
And I'm gonna give him a little more responsibility now that he understands this exercise. You feel that responsibility? Yeah. Okay.
And let's go with a finger touch. And just finding that balance. And again, this is the important part. You notice I have Ted leaning forward just a little bit. It's okay if he's straight up and down or about two, three degrees leaning forward.
It just depends on what your objective is. Here, our objective is to get mobility in the knee and to get strength in the standing hip. So, I do wanna have that forward lean in particular here there's times. Where if there's a lot of knee pain, we can bring 'em back onto their heels a little bit more, sort of hanging on the handles. And relax. Beautiful.
Now, we can change the angle of this exercise and I'm gonna lighten the springs a little bit. (metal clanking) And we're gonna go facing forward. And you're gonna put your foot onto the pedal to the side. Yep, you got it. The hand in place.
And turn this foot out a little bit, just sort of matches the other leg. Good. Chest up nice and tall. And let's press this bar down. Yep, good. And again, working now with a little bit of rotation and adduction in the hip to try to maintain strength in that area.
There's no real torque going on in the knee, contrary to what it looks like. He's keeping his alignment between the hip, the knee, and the ankle. If you remember back in the earlier lecture, we talked about some bone rhythms. This is a good place to do some overlay of bone rhythms. And again, we would do the same thing on the other leg going in the other direction.
Beautiful. (metal clanking) Good. Continuing exercises in phase two with the spine corrector, Oov, and mat exercises is really important that the client has things to do at home and it's also important that we look at a whole body workout. So I love the roll down reach, where he's gonna get some thoracic extension. It's gonna feel good if you've been walking with a walker.
We're gonna work on extension through the back and through the hips. A little bit of a heel slides. We're bringing some things together. So, I'm gonna have Ted bring his hands behind his head. And as he rolls down over the spine corrector, he's gonna reach his legs out.
Slide 'em out and let his bottom come up off as he reaches back over, really enjoying and getting an extension in his back, right. Gotta think that after surgery, we're in a lot of flexion now. Bring that back up. Drop the hips down. Slide the heels back in like we practiced on the home exercise. Roll all the way back up.
Let's just do one more of those as a demonstration. Rolling down, reaching the legs out. Hips come up. Soften the hips down. Slide the heels up as you roll back up. So again, it doesn't make it any easier.
This is still a challenging exercise. It's an abdominal exercise. It's a spine articulation exercise. I think giving a patient a sense of like, oh my gosh, I'm human again. I'm working out again.
Especially somebody that is in a age bracket of 40s to 60s that are having these knee replacements now is really giving them a little bit of a challenge, giving them a nice balance to work out like we've been trained to do in Pilates. Another tool or apparatus that I like to use in the Pilates environment, is obviously new to Pilates. It wasn't from Joseph Pilates. It's from Daniel Vladeta in Australia, is the Oov. And I love the Oov because it creates a sense of imbalance and instability that forces the body to find stability very spontaneously.
And so, we're gonna use this with Ted to work a little bit on his trunk awareness, as well as the stability through his lower extremities in particular following a knee replacement. Again, looking for that sort of whole body connectedness very early on in the process of rehabilitating. So, we're still in the two to six week range. So, I'm gonna have Ted sit onto the Oov. And ideally, you wanna sit the tailbone right on the tip of the Oov.
And lay back and his head will go onto the pillow. So, I'm gonna sustain it here. And the hardest part about the Oov typically is just getting on comfortably. Yep, there we go. Ted did that very gracefully.
You'll find that usually somebody's first attempt of this is a little more challenging. How are you doing there? I'm great. And then, I check to see if they can, there should be like about an inch or two clear underneath the sacrum. Can he lift a leg up off of the mat without losing his position?
And the other side. And I'm gonna, again, have you just scoot up just about an inch that way. Yep, that feels good. Good. Try that again with the leg coming up. Yeah, feel a little more stable? Good.
So we're gonna start by bringing both hands up to the ceiling and just try to getting a feel there without the upper extremity and connection what the body has to do to maintain its organization. And I'm gonna try to get Ted to feel a little bit. of the knees being a little bit more vertical on top of the feet. So, he feels grounded into the table. From here, I can have Ted open both arms out to the side and bring them back up to the ceiling.
We could take one arm out to the side, creating a rotational force and bring it back up. We can also go over the head with the arms and come back up. And we can even do scissors with the arms. Again, just creating different challenges, different ways that create force through the body. So, let the hands come down into that scissor position.
And now, we're gonna place another unstable surface underneath his right foot. So, this is a Gertie ball that is half inflated. So in this challenge now, we can do the same thing we did with his arms. He is stable through his left foot on the table. Semi-unstable with his right foot.
His elbows are giving him stability through the upper body. So, let's just try taking one arm up and test what that feels like. Bring it down, try the other arm. Good. Now, bring both hands up over the chest.
Take hands over head and back. Same idea. And again, I can see the wiggles and the challenges. And the idea with the Oov is that the organization is more spontaneous, right? So, he can't control or just hold something to make it work.
Let's try unilateral. Just one arm going out to the side and back. And the other. Great. Okay. So, so far, we have great control of this.
Now bring the hands down into scissor position. Let's bring the left leg up to 90/90, right? So now, there is no fully stable leg. The right leg, semi-stable on the ball. Stability coming through his elbows and his upper body on the machine or on the table.
So now, let's take one of the arms. Reach it up and see how that feels. Good. And bring it back down. Try the other arm and see how that feels.
So, I can see a little bit of wiggling going on. Take one arm back up and take it out to the side. There we go. So now, it's creating a little bit of a demand. Bring it back up and switch arms.
And test the other side. Yeah. And again, this is great going through the hip, through the pelvis. Bring it back up. Good. Take one hand up.
This time, take it overhead. Yeah, good. And what I want you to try this time, bring it back over the chest, is when this arm reaches out, see if you can reach this leg out a little bit at the same time. So, the only real stable place for him is his right elbow, right? And then, like a heel slide, bring it back in.
Bring the elbow down. See what you can do with the right arm coming up, reaching out. And this is a unilateral stability here. And up and relax. Very good.
Now, how do you feel about getting both arms up? I'm gonna hang onto your foot a little bit. Take the arm overhead, right? Good. Bring it back up. Now, your motion going out to the side is gonna be a lot less here, right?
So, don't be too aggressive. Yep, find it. And take the arm out, just one arm out, a little bit to the side. You don't have to go too much. Yep, careful. Bring it back in.
And out to the other side. So, you can see how the challenge gets more and more. I'm giving a little bit of assistance. I can get real picky about him keeping his knee in the right place, but this is continues to progress and gives him a really nice sense of awareness and a sense of stability. That when he is on an unstable surface, his body can react very spontaneously.
He doesn't have to be afraid of uneven surfaces when he is walking. So lastly, let's go into our mat exercises and exercises that Ted can do at home at this stage in phase one. We're gonna start with some bent knee opening. So, I'm gonna have Ted bring his feet nice and close together with knees bent and hands down to the side. And simply looking at what happens if he goes into a butterfly stretch.
I always start my bent knee openings in a butterfly stretch. So, knees open up. Look and see how the adductor tone is, are both sides the same, is one side tighter. A lot of times coming back from a knee replacement, they'll be one side that's a lot shorter than the other. Usually, due to the amount of varus or valgus.
And if they really straighten that knee out all the way and they were in a lot of varus, you'll tend to see some adductor limitations on that side. Ted looks pretty symmetrical on both sides. He could certainly use a little more flexibility, but he's symmetrical, right? So, let the legs come back together again. Now, bend the openings.
Keeping the pelvis quiet. And if you want, you even put your hands on your pelvis just as a check. We're gonna let the right knee open up, without the pelvis tilting. And then, bring the leg back up. And sometimes, what I'll do is give a little bit of resistance to get the stability up in the back on the other side.
So, just keep pushing in me. And you'll notice that that keeps his pelvis a lot more symmetrical and quiet. Now, pretend you're pushing into my finger and you'll have the same sensation of stabilizing in the low back. And then, let's try the same thing on the opposite leg. This one stays still and the left leg opens up.
Imagine the same thing now. Imagine if you're pushing into my finger with a left knee, giving stability on the right side of your back. So, feel that energy there. Yep, there you go. And again, varying the tempo can be very good.
So, let's go a little bit quicker now. Opening right leg and left leg. And again, getting the hip used to the idea of rotation in the hip, the idea of adductor lengthening and shortening, the idea of the pelvis being quiet and stable during this exercise. One more on each side. And then, we're gonna go into knees side to side.
So from here, hands can come down to the side and we're gonna take the knees together and take them over to the side. Let the hip come up off. And starting to introduce rotation up into the torso, bring the ribs down, the pelvis down, the knees back up, and take the knees over to the other side. We can add breath to this as an emphasis. Breathing into the right lung, with the legs over to the left.
As you exhale, sand the ribs down. Bringing the knees back up to the ceiling and over to the right. And again, I love to play with tempo. So if we speed this up a little bit with your breath. Exhaling over to the left, take a breath in.
Exhale over to the right. And getting used to the idea of rotation. Again, think about the common posture of coming off of a surgery like this is being hunched over, sagittal plane, lack of extension, lack of rotation. These are all things we can be introducing to them while their knee is healing from the surgery. And relax.
From here, we can go into our supine knee extension. And this is just a basic therapeutic exercise. So if I let him just straighten his knee out here, I'm gonna have him trying to lift his heel up off the table, pushing into the ball. And this is an exercise that he should be doing every day, five times a day, multiple repetitions. Working on getting that last little bit of extension or maintaining that extension.
You can do anything. A rolled up pillow, a blanket, a towel underneath the knee. A foam roller works great. But really getting that nice activation of the quadriceps, getting the heel to come off. Sometimes people think of this as a leg lift and it's not a leg lift.
We're not trying to lift the leg up in the air like that. Really almost the opposite. Feeling like you're pushing the femur down so the heel can come up. And you would do this again with the leg that's affected, multiple repetitions a day. Getting it nice and strong and used to being straight.
So, this is our goal to get that extension. Another little piece that we can do with a knee extension exercise is work on dorsiflexion. So as he reaches it up, it's almost like he's reaching the heel for the wall and his toes back towards his nose. And that's gonna have, get that last couple degrees of extension. And we do want somewhere around one degree of extension to negative one, two degrees of extension.
Getting that range of motion in there so he has good strength in his standing position. And relax. As I've mentioned before, one of the most important exercises in knee rehabilitation, any knee rehabilitation, is strengthening the hip rotators and the hip abductors. And so, the exercise that I've showed before, and that I really like is the what I call my tai chi exercise. I am not a tai chi professor, but I did learn it from a tai chi professor.
And that was just to come into that quarter squat that we've already done in the pre. And just lifting that foot up a little bit and opening it out to the side. And then, bringing it back in. And then, lifting the other foot up and taking out to the side. This is a very challenging exercise.
So, I'm going to assist Ted with it. I'm gonna actually be holding his hands while he does that to take off some of the weight. But I want him to start working on, working that strength in the glutes. His knee's gonna be gently bent. And the goal is to keep that knee really sagittal.
We don't want the knee to collapse or go out at this stage of the game. So Ted, let's have you come up. And facing the camera there, feet together, gentle squat down. And from here, you're just going to open up to the right. Now, the tendency, you can see already how that knee wants to go around, is that the knee has to stay here, right?
That weight needs to stay right through that second toe. So now, lift that foot up and rotate the pelvis around, right? So, you feel how that muscle's working? Yep, bring it back. Try it again.
Good. Now, see if you can keep the knee there on your own. There it is. Good. And a nice way to do this is even with the walker. So if they have the walker, they can be doing this exercise with a walker very early on.
Working on side to side transfers. If I was the walker, putting the weight into it and careful not to let the knee rotate it. Yep, try the other leg. There you go. So, his right surgery is more recent than his left.
There you go. Now, go side to side. Let the chest follow it around. Chest follows it around. Yes, there you go. Chest follow. There we go.
Now, we got our tai chi master here. That's it. One more time. And relax. Now, this is a great exercise to just, I tell people at the kitchen counter. They can do it in the kitchen counter.
They can do it in the bathroom counter. But really starting to wake up these rotators and abductors in their hips. So, this concludes phase two of the exercises for post total knee replacement. Again, our primary objectives are being able to get our clients independent in the community, independent in dressing, independent in driving, independent in walking in a store, and being able to get out and about. Start returning them to life, as we've say, that they can do their activities.
Again, sort of a disclaimer, is that every person is different and you need to take a look at each individual. There are also some precautions that come from surgeons that are unique to that individual. We need to respect those precautions and contraindications for each person. Another good disclaimer to make it this time is that every person comes to us at different levels. And so, the intensity often will depend on what they were doing prior to surgery versus just the nature of the surgery.
So, we don't say everybody that has a total knee replacement needs to do this protocol. Everybody has a knee replacement can be completely different. You can see how fit Ted is compared to maybe somebody who has been deconditioned for many years and is in their 70s or 80s having a knee replacement might look very different than the protocol that we're using for Ted or for myself. So, every individual you must assess. You need to get clearance from the physician.
You need to work with them and understand what their activity levels are
Chapter 3
Phase 3 - Weeks 6-12
before you proceed with this program. Welcome to phase three of the total knee replacement rehabilitation program. And now, we're actually getting more into post-rehabilitation. So, depending on how you classify yourself, as a therapist, or a post-rehabilitation Pilates teacher, or Pilate teacher, we're getting into that area of six to 12 months. And this is an area where we're really expecting them to be doing almost all of their activities.
There's very little contraindications or precautions at this time. I often tell my clients that are coming back from a total joint replacement that it takes about three months to get back to function, which is about where we're going right now. It takes six months to basically forget that you had the surgery or that you're full function. And a year you just, you forget all that you even had it. So now, Ted's about a year out and all he does is complain about his neck and his back.
His knees are fine. He's out there working and doing his thing. So, that's what I'm looking forward to in the next year is to be able to be doing all my other things and just complain about my neck, one part of the body to complain about. So as we move into this phase, what I want to do is, again, the library of exercises gets expansive. We can do so much.
And I wanna focus a little bit on what we can do on the trapeze table for whole body movement. And I'll transition that a little bit into the mat work and some home exercises that really are about restoring function. And some of the function things we're looking at now is squatting. So, how do we prepare them to have the squat, good hip mobility, good knee and ankle mobility. They're getting stronger.
How can they put on their shoes and socks, pulling and pushing things to get stronger with their body, to be able to navigate the community. And really, depending on their activities now, we can go from there. So, I have Ted with me again on this one and we're going to start on the trapeze table with push through on the tower bar. So join me. Ted, I'm gonna have you sitting close to here and you're gonna have your feet up against the bar.
(metal clanking) And your hands on the bar here, yep. And let's hit the knee straight as you can, right? So here, you can lean back a little bit like as if you were a wind surfing, not slouching, of course. And in this position, what I'm looking for is the idea of pushing and pulling, right? So, we're doing the push through with the tower bar and I'm gonna have Ted just sort of articulate his spine, pushing the bar down with straight arms, all the way through as far as he can.
Hang onto that bar. Again, remember the safety features on this bar. Very important. I want you to pull back a little bit, straight legs, and lift the chest up. As you pull back, lean back from the hips, lean back all the way back, all the way back, whole body.
Shoulders down. All the way back. And then, push the bar up to the ceiling from the head and the chest. So, the head has to be back on my hand. Yep, good.
Lean back and push through. Let's do that a couple times and pull back and push up. Yep, head back. Where's that head? Get it up tall. Eyes down.
Yes, good. And back and pushing through. So starting to just get some full movement now. And again, having that restoration of some hamstring length, some spine mobility. One of our key concepts with mobility is distribution of movement equals distribution of force.
So the more movement he has in his hips, his shoulders, his neck included, the better off he's gonna be with his knee. We're taking stress away from the knee. Now, stay in the back position. We're gonna go into circumduction with the tower bar. And I want you to just release this hand.
Keep this hand on firmly. And we're gonna sweep that hand back and follow it with your eyes, pushing through that left leg. So, you're really looking and reaching for that bar. Good. And then, sweep that arm back up and switching with the left hand, reaching down and back.
And feel that extension through the chest as well. Yes, good. Pushing through that leg. Good. Bring it back up. Let's do that a couple times a little more fluidly.
So really reaching back, arching that back into extension. Gimme the head tube, head back. Head back. There you go, good. And then, bring it back up.
One more time to the left and back up. Now this time, same thing with this arm. You're gonna reach it back. We're gonna go into full circumduction. So bring the arm all the way around, touch down onto that hand.
Reach the hand back all the way. And this time, we're gonna reach this arm up. Reach this arm up, yeah, this one here, and this hand through. There we go. That's the whole motion. So sweep that hand back, reach it around, all the way around and touch.
Sweep back around. This hand reaches up. This hand reaches through. Look at me. Smile. There you go.
And let's switch sides. So now, left hand on is freed. Sweep it back around, so they can see the back side of this. Touch down. Reach around again.
The right hand's gonna push up as the left hand reaches through to the leg. So again, rotation, extension. One more time, sweeping around. Integrated movement. Ted's breath pattern is happening naturally.
So, I can hear him breathing. I don't have to cue him. He's not holding his breath and just getting that motion. And then, relax. Beautiful. So from here, I wanna go into the parakeet. Now, Ted has not done the parakeet yet so we're gonna introduce it to him.
I'm gonna have you lay on your back. And here is your head piece. And hands are gonna go onto the bars overhead. Now, this is similar to what we've done with the breathing exercise. And as far as getting that extension, except now, we're gonna be on the moving tower bar.
So from a queuing standpoint and a safety, I'm gonna keep my hand on the bar and I'm also gonna keep my hands on Ted's feet. So, let's have your feet come up here on the bar and this one as well. And what I want you to do at the beginning is just sort of push the bar up. Lift your bottom up. Push it up, up, up, up, up.
And then, roll back down through your spine. Bend your knees and push the bar through. Good. Bend the knees back in. Bring the bar through. Reach the legs up.
Good. And roll back down through the spine. Bend the knees and press, so that's the first part of it. The next part, we're gonna do the same thing to come up. Roll up and stay up.
This time, stay up. I'm gonna assist him, but I'm gonna have him bend his knees and bring the bar underneath him a little bit. Good. Nice. And bring it back underneath and up. So, this is an intermediate exercise on the trapeze table.
Again, we're at that three to four months. Ted's got plenty of strength to do it. And last one, push it through. Pull up. Roll down through your spine. And relax.
Very well done. First time parakeet, not bad. Bring the feet off the bar. I never took my hand off the bar. This is, again, a safety feature we always want to be careful with.
All right. So we're gonna move into some assisted squats. So, we've done some intermediate exercises on the trapeze table, from push through, circumduction, parakeet even. And I really wanna get into the squatting exercises and what he is gonna be doing at home. And I know that Ted happens to love squatting.
He loved to squat before he injured his knees. And I'm gonna have him use some purple springs, so some medium load long springs. Grab this with your hand, Ted. Palms up on the edge. Yep.
And we go back till there's just enough tension on the springs. That as long as he keeps his arms up, he's going to have a nice sense of assistance in his arms. And I'm gonna stand behind him just to make sure that he's safe. And I got my leg in a good place. He's gonna sit back and until he touches my knee, and then comes back up.
So very simple in the beginning. Just as simple half squat coming down. Ted can go a little bit deeper, I know. Yep. Good. And again, let's say that he didn't have the ankle dorsiflexion.
One of the things we can do is put something underneath his heels. So if I put that underneath his heels, yep, there we go, it's gonna get rid of the ankle dorsiflexion limitation and allow him to go into a full depth squat with the assistance that sort of brings him back up out of it. So, this is a nice progression from a half squat. We could also put a stool, a chair underneath him so that he feels very comfortable doing his sit to stand at this stage of the game. But I'm really trying to get it so that he feels comfortable with if he wanted to go gardening, if he wants to work with his animals, if he wants to be able to pick things up off the ground with good posture.
That he feels comfortable with his butt strength and leg strength to be able to do the squats. And relax. Now that being done, we can get rid of the springs and the progression for him is to do the same thing. I still like to have the heels up because it sort of makes the pressure less on the knees. And let's see what happens when you do a half squat.
Arms in front. Chest nice and tall. Beautiful. And this is more than enough. Just keep going with that level of just a simple, really disassociating the hip. We can come in and practice some bone rhythms if we needed to.
Remember the femur spirals out. Coming down. And again, even though that doesn't really apply with a total knee prosthesis, it totally applies with the ankle and with the hip. And so if we're applying those normal mechanics in his hip and his ankles, it's gonna decrease a lot of the stress in his knee. And you can see that here's somebody that's had bilateral knee replacements that has been well trained in his squat and doing quite well. And relaxed. Beautiful.
The last thing that I want to introduce to Ted is single leg balance at this stage of the game. And again, this is something that we can do with a touch, or we can go into the actual exercise that Joe did of bringing the leg up, straightening it out, and bringing it back in. So, I'm gonna have Ted stand up and we'll start just with the touch balance. And again, remember balance is one of the toughest things to restore because we don't have that proprioception anymore on that joint. So to go back to our basic anatomy, the capsule, the ligaments are filled with mechanical receptors that tell our brain where our body is in space.
And when those have been taken away, it's a little daunting to try to restore that body awareness and that balance. So we have to use our feet, our ankles, our hips, the muscles around the joint to be able to do that. So, let's give that a try. Let's try just doing a touch to the ankle with the right foot, and seeing how long we can hold that position. And goal is to try to get to at least 10 seconds, with eyes open.
And then, try it to the other side. And notice if there's a difference between right and left. And I can see you're working a little bit more on the right side than the left side. Looks great. Yep.
And relax. This time, we're gonna try with a knee coming up. Grabbing underneath the knee. And I push into my hands a little bit to get the stability standing on the left foot and just see if you can hold that position now for 10 seconds. Or if you can straighten the leg and bend the leg, creating challenge to the balance.
Great. And let's try the other side. Looking good. Yeah. And again, you could advance this exercise.
The next thing that I wanna do is try him with his eyes closed. So bringing the leg down. We're gonna do the touch weight bearing, right? So, just touch it single legged and eyes closed. And this is where it gets tough 'cause Ted was using his eyes to maintain his balance.
I'm gonna give him a sense of touch when he starts to lose his balance. But again, as I said, there's a lot of proprioception loss in a total joint replacement. Let's try the other side. That actually was very good. And you can be trying this with us right now at the same time.
Just make sure that you are not close to any real sharp objects and maybe you have somebody spotting you so that you're safe with it. Very good. And relax. Now, what happens if you have bad balance or if you're really challenged with it, right? One of the first places that I would go to is your feet.
So, foot intrinsic exercises. Moving your toes, typewriter, curl under, extend, arch lift. Those are all things that bring more proprioception to your body when you have a joint that might not be giving all of the proprioception that you need. So, these are just a couple ideas that I shared on the trapeze table and the mat to show you the level or intensity that they're able to do often in the sixth to 12th week of progress. Again, with the objective of them being able to squat them, being able to push and pull things, fully integrated movements, starting to reach.
And we're just getting ready that they could feel comfortable in the post 12 weeks or the next phase of going into recreational activities. So, I'll see you in phase four.
Chapter 4
Phase 4 - 6 Months Post Op
So, here we are in phase four. So we're really looking at things after 12 weeks. People are pretty much returned to most of their activities, all of their daily activities, their work activities.
And we're really getting ready to feel like they are powerful. That they can return to their recreation. And just getting 'em ready to get that six month point, where they're like, "Yes, I'm doing great." That's our goal and our objective. So, I wanna do a primary focus on the reformer and maybe a little bit of chair in phase four that we're gonna be focusing on. And I am going to also add a couple exercises that you could even be done in phase three that I'm gonna start off with.
So, let's get started with the scooter. So, this first exercise scooter, I mentioned, I even do this one in phase three. But I'm gonna put it together with my reformer series in phase four. But I wanna really focus... And let's bring this foot further forward.
Yeah, there we go. Good. And our goal and our intention here is to be able to get the extension in the hip. So, let the bottom stick out a little bit and scoop back there. There we go. Good.
Now, push the carriage back with the right leg. Good. And really focusing on this strength here, the extension coming from there. Yes, very good. Can you maintain that without me holding you there?
Good. There it is. So, we're also using that left leg. And you can even push back a little bit more with that left leg. Drop down to a little bit deeper. There we go.
There we go. Now, I know you're working. I can see the shaking going on. Working the rest of the body being in a good position. And again, we're gonna be progressing in phase four into things like the knee stretch series.
And I wanna make sure that he really understands disassociation in his hip, how to in incorporate the ankle, knee foot, whole body kind of strength. Excellent. And relax. And again, we would do that to the other side as well. Another really cool exercise that I like at sort of the phase three before we go into phase four in the reformer is taking all of the springs off of the reformer and bringing it back. And I'm gonna have Ted sit here with his feet in the well.
And this is just a nice exercise. You could also use a stool with wheels and just sort to pull and walk yourself forward and back with your feet. And again, it seems like it's not much, but it's the pushing and pulling back and forth, just back and forth in the well, getting used to that pulling sensation in the hamstrings and the pushing with the quadriceps. And so, the knee really is the primary focus of the movement in this exercise. So, it's just a nice thing to do.
And I often have 'em doing this with a stool at home or moving around. That way, they can also rotate and spin and start getting some rotational forces inside the movement. Good. Let's push back. And then, I'll hold the carriage. Come on out.
Very good. All right, so we're gonna move into that phase four I was talking about and we're gonna start off with knee stretch. And to do that, I'm going to get some knee pads. So with the knee pad, what I want to do is be able to take some of the pressure off of the prosthetic. So, I'm gonna place it here just about where the tibial tuberosity is gonna be.
And I want Ted to come into a kneeling position, feet against the shoulder pads, hands against the bar. And let's see where we fall with that right there. And again, the idea is to get comfort for Ted. How's that feel on the hands, okay?
Yeah. And I'm gonna have you sit the bottom back. And we sit the bottom back as far as you can. That's about it, right? Yep.
So, let's keep going. Push with your arms a little bit. Shoulder's rounded. Good. So, this is gonna become our starting position here. And I have him now at about 120, maybe even 130 degrees.
So, I'm at the end of his range with the knee. And from here, the body's gonna stay where it is. I like the arms to be at about a 45 degree angle and have him push the legs out. I have a red and a blue spring on, and then let the lakes come back in. Just hinging it to hips.
And again, repeat. And in. And let's go a little bit quicker with knee stretch. Yeah. And again, there's a whole series of quadruped exercises here that you could work with, as long as he's comfortable with the pressure on the front of his knees.
And I typically don't have anybody on a knee exercise till after the four to six months sort of timeframe. Feeling okay?
So, accent the knees coming in. So, it's gonna sound. Push out. Exhale and in. (Brent breath heavily) There you go. And in.
So now, we're really starting to challenge that range of motion in the knee. We're challenging the eccentric load of the hips. Great exercise to gets started. From here now, press the legs out. Let the chest come up and just continue to come forward, like you're in the front of a ship.
So, there we go. Here we go. Chest up, good. Now from here, let's just make it about your arms. So keeping the body in this position, push the whole carriage out and then allow the chest to come up. And push it out.
So here, feeling that open space be around the ears and the shoulders. That's better. The crown of the head reaching up tall for that length. One more time. Great.
Now from here, let's shift gears a little bit. I'm gonna let you have the carriage come in and you're gonna stand up on the carriage. And you're gonna have your heels down back here against the shoulder pads. Good. That's right. Good.
This is the elephants, right? So, the head down. And again, this is sort of like the challenge that we have in push through on the trapeze table of having the hamstrings long. And he is just gonna push the carriage out a little bit and pull the carriage back in a little bit, right? And I'm gonna give him a little resistance on the carriage for him to feel.
Pull in, pull, pull, pull. Yep. And another little hint is if Ted lifts his toes up, when he is pulling in, he's creating his own resistance. That's right. And feel the knees pushing back, the heels pushing down, the toes lifting up. That's it. Great.
That's the exercise. Good. Now, let the heels come up onto the shoulder pads. And we're getting into the exercise Ted likes 'cause they have to do with strength. Straighten the legs. We're gonna just pipe.
And push out into the push up position, so right there. So from here, let the carriage come in. Let the hips pike up and push back out into a pushup position. And up and press out. And up and press out. One more time.
This time, leave the body in plank position. Shoot forward, lift your head up a little bit. Go through your arms. Yep. So, we get to work the upper body as well.
So giving a chance to. Yep, good. One more time. Good and relax. Come on in. Bend your knees down. And I'm gonna have you sit on the bar.
Now, we've already done knee extension. So from here, I wanna go into a reverse abdominal. So again, it involves a kneeling position. So, I'm going to use the pad. I'm gonna put this time the pad closer to the shoulder pads.
And I'm gonna have you come down, Ted, where your knees will be here. Yep. In kneeling. You okay there? And the hands are gonna come down onto the wood.
I'm gonna lighten the spring just to a blue. I'm not interested in a whole lot of power. But from here, leave your arms right underneath you. And then, just lean forward over the hands. Don't remove the carriage.
Nope, straight arms. Just like you leave the carriage where it is. And just lean forward over the straight arms. There you go. Straight elbows. Leave the hands where I had him. Good.
So you're a parallelogram. And you're gonna bring the knees towards the hands. That's the only movement that's gonna happen. Right there, that's it. And back. So it's a really nice, lower abdominal exercise.
It's a great disassociation exercise. At the same time, he's not thinking about it, but he's getting nice knee flexion in it. At least I don't think he's thinking about it. He's probably thinking more about his hands and his abdominals and his body position. Last one.
And relax. And of course, there's lots of variations to that with hands to one side, one leg off, that he could be advanced based on those needs. Next, we're gonna go into some standing variations. So, come off of the reformer. So, I'm gonna have Ted come around and I'm gonna put a couple heavy springs on just to get started.
And I want you to stand up onto the board. Come from over here or on the side. Left foot on the board. Good and up you go. And you're gonna have your right foot on the carriage.
Good. So, this is your starting position. Okay. And I'm gonna take him down to one red spring. I'm gonna give him some security. And the other thing that we're gonna do is turn his knees and feet out just a little bit.
Just not quite that much. Just a little bit. And that helped protects any sheer force in the knee. So from here, making sure your feet are equal. You're standing nice and tall.
Open the legs equally Ted, so pushing both legs. Yep. And then, letting it come back in with control, right? So, a red spring is relatively neutral. If I wanted to really work his inner thigh muscles, I would go down to a blue spring or a yellow spring, or maybe even no springs.
If we wanted to work even more abductors, we could go with heavier springs. So we're just introducing him now to some standing work. Stay nice and tall. Head back against my hand. Chest up tall. Shoulders down. Good.
And feel a little bit of an anterior lean at your ankles. There it is. Good. And again, just giving him the impression of that stability there. Now from here, go down into that quarter squat. Just a little bit of a squat down.
A little bit more than that. That's about an eighth. There you go, right there. Now, keep that depth and that both knee come in and go out. So, come back in. Stay at that height.
So if I had something on your head or a string, you wouldn't push past it. That's right. And now from here, we're gonna make it a little more challenging. So, I'm gonna have Ted stay down on that left hip and just skate out the right hip. Again, I'm strengthening the lateral forces.
Again, check with your clients to see if they're tolerating this. Okay, now stay on top of this leg and push out with this one. That's it. Again, restoring that stability, single leg balance. And then if you wanted to, we could go into skating where you're gonna push out the left leg, push out the right leg, bend in the left leg, bend in the right leg.
So, we're basically as if you were skating and controlling it. No noise. Oh, no noise. There it is. Did you ever skate before?
No. No? No, I've roller skate though. This is roller skating. Maybe not the way you roller skate.
Yeah, I'm much sloppy. Okay, and relax. Very good. Wait for me. We're gonna step down. Step on to here. Yep.
And then, we're gonna step down. There you go. Perfect. Okay. That concludes some of the reformer work. Again, the repertoire is expansive, but I want you to see the intensity level that we're doing.
I do wanna show you a couple exercises on the chair at this level, and then we'll conclude phase four. So, the last piece of apparatus I want to do in phase four is the chair. And I basically wanna go into a full lunge with Ted. So, I'm gonna have him step up onto the reformer. I've placed a box here to make it a little bit easier.
And once he's up, he's gonna turn around and step down. Now, I like to be in front of him on this. Your foot's gonna be flat on the box here. So, bring that foot all the way forward. Yep, very good.
And I have the spring set relatively heavy to be able to assist him with that. And I'm just gonna have you go down and up and I'm gonna control the knee. So, the hip stay square, chest is tall, arms are sort of out of it. And think of coming forward as you come up, right? Can you come up and straighten that knee and stand up on top of there?
There you go. Good. Okay. Now from here, let's stop at this height here. Square those hips off, so that they're not dropping down. That the right one wants to drop down, right?
So, put the weight into the spring. Yep, good. And bring your hands forward. And I'll be your assistance here. But think of chest coming to me to come up.
Can you feel that energy line from the springs? That's why I want you to feel that. The tendency is to stay back. I want you to feel that deep power coming up through that knee. And we're gonna go all the way up now.
All the way up into standing. Good. One more time. All the way up into standing. Beautiful. Switch legs. Ah, you thought that right leg was gonna get out of it.
And up. Chest up tall. You can push down it. Here you go. Keep the chest tall. You don't have to go down far. You have to come up high. There you go.
It's not about how far down you go. There it is. That's what I was looking for. Again. And up. Good.
That's it. Fill that power. Chest up tall. Last one, come all the way up. Step on the carriage, turn around, and step down.
So again, the progression on that is to actually lighten the springs and get it so that he's carrying more and more of that weight. So, Ted works in heavy work. He has to lift heavy things. He has to squat. He has to get down on the ground and climb ladders and get up. So, he really does need to have that kind of strength for him to be able to perform his work that he does.
And we want to be able to restore him to those levels of function like that he feels confident. He feels strong. The equipment is wonderful because we can grade the load. So, I can use heavy springs in the beginning. And that still is challenging.
It's challenging for me. It's challenging for most of us. But the idea is to get to the point that we could do it with a lighter weight. That if I had to go up a big step, or I had to carry something, or bring something down, or I'm in the mountains doing things, climbing rocks, that I would have that flexibility and that kind of strength. The last little bit that I want to do is on the mat. So, let me get ready for a mat station to show you a couple things you can do at phase four on the mat.
So, we know that often the mat work was and is the most challenging of Joseph Pilates' work. And so, it is also what we can do on a daily basis in our own homes. Joseph said if we could practice contrology every day, every day, every day, every day, not just two Pilates sessions a week, but if we could do the homework, the things on the mat, that we wouldn't have need for hospitals, insane asylums, or prisons. And he also said that we'd have world peace. I just was talking to Ken Endelman and he corrected me on that quote and said that Joe also said we'd have world peace.
So, we know we need all those things. So we always have to think whatever we're teaching our clients, we always end up teaching things that are the mat work and the mat exercises that they could do at home. And I wanted to look at four exercises particular to the stability of the knee that are needed. So, we're gonna look at side lift. We're gonna look at advanced sidekick.
And we're gonna look at leg pull and leg pull front. So, I'm gonna have you lay down Ted on your side, facing them. Head down this side. And you're gonna be up on your left arm actually. So, you're gonna be, we're gonna be in this position here, just like this.
Yep. Okay. So from there, we're just gonna come up into a side lift position. And I think we've done this in our mat class before and come down. And let's try to get both legs nice and straight. Just hook in the toes there.
Yep, good. And sometimes, people prefer to have the top leg in front. Sometimes they prefer to have the lower leg in front. I sort of go back and forth. What do you feel with that?
I got pressure on the kneecaps. Okay, so let's try again. Let me see what you got. Switch legs. Put down in front and see if that feels any better.
Is that better? Little bit. That's how I prefer it. Okay, so from here, all we're doing is just lifting up and reaching, working the side muscles of the hip and the leg. And then, come back down into a seated position.
Let's do two more. Up and down. Up and down and relax. Very good. Now from here, you can go down under your arm.
I'm not gonna take him into an advanced sidekick. I'm gonna keep him on a regular sidekick and straighten the legs out. Legs stacked. Hip is stacked. I'm gonna have him dorsiflex both feet. And you're gonna push the lower leg into the ground while you lift this leg up.
Yep. And down. And up and down. And let's make it a little more advanced by bringing this behind the head for some balance. Yep. And then, let's go into some circles, little tiny circles here.
And again, our goal is just to keep pounding the strength of that lateral hip. I feel we can't get enough of that in our sedentary lifestyle. Super important. Reverse the direction of the circle. And let's go right into a side kick.
So, bring that leg straight forward, forward and back. Yep. And we're gonna change the foot position. We're gonna point the foot when you go back and flex. Trying to keep that knee straight.
Get used to that knee being straight. That's it. And we can add the breath pattern to it. We inhale forward and exhale back. And inhale and exhale back.
Last one and relax. And of course, we would do that on the other side as well. From here, I want you to roll over onto your belly, like a pushup position. So, up in a pushup position. And this is quite challenging on the knees actually and the hips.
So, I'm gonna have him in his position. He's gonna lift one of his legs in leg pull front and try to keep the knee straight. So, the hip flexors and I have this challenge as well, the hip flexors pull that thigh down. So, it's hard to keep that knee straight. Bring this leg down and then switch.
And reach the other leg. Very nice, actually better than mine. And switch. And see if you can get the hips down a little bit lower and still get that leg off. There you go. Beautiful.
And down. And up and down. And up and down. You don't even have to go that high. Just barely off the ground. Like right here, come on up.
It's right there is good. And down and up. That's it, good. And relax. Come on down to your knees and relax.
Now, we're gonna go into leg pull. And you're gonna turn over into a seated position, Ted, the easiest way. Yep. Hands behind your back. And you have a choice.
The original way is having the hands where the fingers are pointing forward. You can put your hands any way you want. I would say just probably not a fist, but you could turn 'em out like this 'cause you want that. Yep. And we're just gonna do it with bent knees.
And take your hands back a little bit further. Yeah, a little bit more. There you go. And let's get the feet planted on there. Let's just leave the knees bent and lift the bottom up. So, this is a modified leg pull and let's see how high you can get the bottom.
Can you get the bottom up higher and think of getting this flat? So, this is opening up the front, strengthening the back. Great exercise. And then, as we progress this one, how you doing? Where are you feeling in the shoulders, in the arms?
And I just want you to feel the difference here is what happens if you lifted the bottom off of the ground from here. Can you lift it up? What do you feel in the back? How's that feel in the knees? The knees is okay?
Okay, so from there, so this time keep the bottom up. Can you lift one of the feet barely off the ground? Perfect and switch. Good. So again, starting to build that strength in the posterior chain. Come back down. Bend the knees in.
Tell me what the difference is. Come up again. And now March with the feet. Just a little bit, but trying to really keep the bottom up. So it's almost like the bent knee one is a little more challenging for you than a straight one, right?
Pretty much. So again, exploring and seeing now that's the one that I would want to do more of because I know that having that strain on the hip, on the quads and the hip extensors being stretched is more challenging for Ted. So these are just a couple examples of some of the mat exercises that can be used at the advanced level, with people who are very well conditioned, very strong. But getting them so that now they have a balance. And again, I've emphasized it a lot.
I can't tell you how important it is. Whatever the knee pathology is, if we can get strong hips, strong external rotators, strong abductors, we're gonna be in a much better place in the long-term. So, this concludes the four phases of post-rehabilitation for a total knee. Super excited about the potential of the number of exercises that we have in our repertoire. And don't be shy in introducing exercises.
We want to create whole body exercises. I hope that the guidelines that I provided gave you an idea of what you could expect at the certain phases, the different phases of rehabilitation and time. I do wanna reiterate in the disclaimer that everybody's different. So we have to be sensitive to the individual, to the surgery, to the surgeon's desires, the physical therapist's ideas, and be able to work with them all as a team to be able to create the most successful outcome. The beauty of our work is that it allows us the diversity and the flexibility to be able to use different apparati, to be able to use different levels of assistance and resistance, challenges to make the work more beneficial and match it exactly to what that client needs that day.
I hope this has been helpful. I'll be back to conclude these classes talking about returning to life.
Knee Health: The Injured Knee and its Recovery


Comments
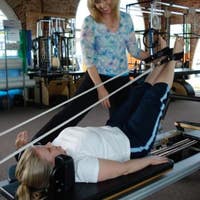


You need to be a subscriber to post a comment.
Please Log In or Create an Account to start your free trial.
