Description
About This Video
Transcript
Read Full Transcript
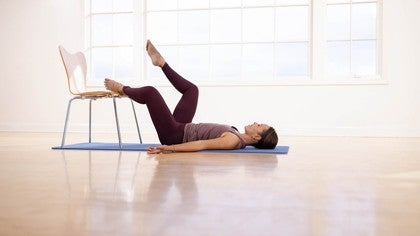
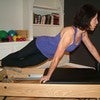
Hi, I'm Misty Lynne Cauthen. Welcome to Bottoms Up. A beginner level Pilates class with a focus on lower body strength and mobility. We're using a chair and one or two hand towels if needed. We are gonna start this session with our chair, and please remember, you should always have at least two legs of the chair on the mat, that keeps the chair from skittering away if you're on a slick floor.
Really important for safety. Also, if you need a towel because your legs are delicate, you can lay it across your chair this way. We'll start on our backs for bridging. And today, we're gonna put the legs on top of the chair, and we won't be using the feet as much as we have in other bridges, so let your thighs relax. I've got more space in the front of my hip than fold at my hip because I wanna be able to slide forward and back and my bridge is needed.
So starting from here, we're going to press the hips up into a bridge, keeping it neutral. And as I'm rolling up or pressing up, I'm feeling this engage in the back of my legs all the way up to my glutes. I'm going to sit down to the mat. And this time, I'm going to scoop roll up, because they both feel good, so we might as well do both of them. And roll back down.
One more each way. Standing up, think of standing on your feet to lift your hips up into your bridge, and sitting back down, keeping your spine angle long. And this time scoop, roll up, articulate up into your bridge. Hold and roll back down. Hold and roll back down.
Now, adjust your legs as you might need to. I'm gonna take mine a little bit wider here. Next is hula hoop. So you'll roll your hips up and stay. So you'll roll your hips up and stay.
I'm pressing my legs away lightly, and I'm going to circle my hips as if I'm hula hooping. And what this does for me is it allows me to stretch my flanks in the back, and hold reverse. And it also kind of turns my body on, so to speak, makes my front body and my back body correspond with my side body as I'm engaging. So I know what parts maybe aren't working as well as they should be. Rolling down through the spine here, hold this position, and readjust your legs.
Now this is a great place to grab your towel for ab curls. You can also use your hands, but when you use the towel, you get bonus arm work. Everyone likes a bonus, it's like a freebie. So your hands are behind your head, actually beside your head, and your armpits are rotated forward. So the armpits aren't there.
They're gonna be here. And let your head be dead weight into the towel. So your neck does no work here. Take a big breath. And then when you exhale, let your arms do the work to gently lift your head up and off of the mat.
Hold and look at your pelvis. Take a big breath in, and exhale, roll back down. And again, your head weight is supported by the towel, so your neck is doing no work. This is great preparation for being able to do these ab curls or these head nods without stressing the neck, or chest, or jaw muscles. Lowering back down.
We'll do two more. Think of lifting a little bit higher this time. So you'll curl up. And then add a little bonus inch at the top. Woo, belly is on fire.
Rolling back down. Can we do one more here? Big breath in. Exhale, arms do the work. Your triceps should be turned on here.
And now, just extend your legs along the chair. Feel the length in your legs. Keep your pelvis balanced, front to back, top to bottom. Hold it here, let's add a little bit of rotation. We'll turn toward the corner of the room, but we're fickle.
So we're just gonna turn back. Let's go to the other side. Rotate, twist, and turn. And coming back to the center. One more each way.
Think of turning on your own spine, not leaning to the side. There's a big difference between a rotation and a lean. So check that out in your own body. How does that feel for you? Return back to the center, curl up a little bit more hold.
And roll back down, let the legs relax, release your arms. They're probably ready for a break. Bring the arms back. Let your ribs lift. Take a stretch here, big breath.
And then start to let the breast bone melt down into the mat. Let the arms float up and hold. We'll go into the roll up here. Think about this armpit rotation here. My armpits are pointing forward, not out to the side.
So I'm holding here, and as we roll up, it's gonna be a little bit more challenging than usual, because our legs are up on top of the chair. You'll curl, you'll roll all the way up, reach for your ankles, sit up tall. And now scoop and roll back down. Three more like this. Nodding, curling, reaching.
Nodding, curling, reaching. Can you keep your calves on the chair? Stretch, sit tall, scoop, and roll back down. Stretch, sit tall, scoop, and roll back down. I'm gonna show a modification if you're struggling with this.
Big breath in, curling. Now, if you get stuck here, climb your legs. They're yours. So it's okay if you grab them,, come all the way up, really work on lengthening the low back here, scooping and rolling back down. And you can use your arms as brakes to get down.
Let's do one more. Nodding, curling, and we'll modify it again just in case you didn't get it the first time. Use your arms to walk up, but you're still pressing into your legs. So you're getting the support of your legs the whole way up. Big breath in at the top.
Exhale scoop, rolling back down, sliding down like you're sliding down a pole. And then relax. So now, we're ready for half moon. You'll bend both knees and press the inner heels and the bottom of the heels together, and let your knees turn out. They're not asleep though.
We've got energy on the inner thighs as if they're hugging together. And your under butts are turned on too. It's a twofer. Place your arms someplace comfortable, and turn the palms up just so you get a nice stretch across the clavicles here. Now, starting with the right leg, we'll go into half moon.
I'm gliding my thigh bone in the hip joint to bring my leg up. And notice I said I'm gliding my bone into the joint. What I'm not doing is moving my pelvis to make this happen. So I'm isolating the leg, and I'm really taking the stretch as far as my body will allow without changing the angle of my knee. One more on each leg.
And last one. Now we'll go to a full moon. Ha, ha, ha. From here, as you exhale, the pelvis stays neutral. The legs are moving in the hip joint.
Barely tap the chair and come back up. Remember, if you have any pain in your back at all, you wanna shorten your range of motion to protect your spine. Two more. Then once you're used to working in the short range of motion, you can make it bigger. But safety first.
We're here maintaining the inner thigh connection, we'll extend the right leg out to the side like Peter Pan. So we're stretching the leg long, keeping the hips balanced. As I bring the leg in, I connect my heels, and then the other leg goes. And I bring it in. Pay close attention to where you are feeling the work happen.
If you're feeling it in your legs, great. If you're feeling it in your neck, let's find another way. Can you let the neck be free? Can you let the shoulders relax? We'll do one more on each leg.
Stretch and hold. You can even flex an ankle if you'd like. Point and pull it in. Last side, let's go away. Flex, point, and pull it in.
Flex, point, and pull it in. Now, for leg circles, we'll let the knees come together and relax the back of the heels or ankles on the chair, stabilizing through one side. We'll bring the other knee in and up and hold. I'm thinking of my pelvis being planted into the mat. It's not gonna go with me.
And as I circle my leg, I'm thinking of making small circles, not on the ceiling. That's the easy part. I'm making circles on the floor, and that's going to allow me to really be aware of what my thigh bone is doing in the hip joint. Reverse. Five circles, really thinking about keeping the pelvis rooted.
It's not rocking even though it wants to. And let's do one more. Big circle ish. Bend the knee in, rest it down, and here's the second side. Knee comes in, knee comes up.
Make sure your pelvis is balanced, and then circle. And again, you may notice a difference from one side to the other. Guess what? It's okay, but be aware of it, so that you can work to find balance between the two sides. Five more in the opposite direction.
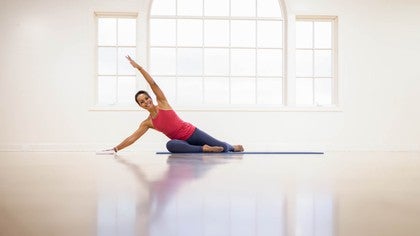
Four. And two more here. My circles are a very different shape on this leg, so it's something that I keep in mind as I move along. Just to let that go, we'll let the knees swish side to side releasing any tension that may have happened in the hips or in the lower back. Next we're gonna lay on our sides.
So come up safely, of course. So come up safely, of course. You have a few options here in our sideline position. If you would like to use a towel for your neck placement, you'll roll it long ways, and then start with a single fold this way. As you lay down on your sides, I'd like your legs to be inside of the chair legs.
Come down onto your side. And if you're using the towel, it can go between your neck and the shoulder. This helps you stabilize your head and neck, so that you're not taking a lot of stress into your neck. If you need another fold, feel free. But you'll note that this is too high for me, so I'm gonna unfurl it again.
So I'm on my side, my body is nice and straight. Fingertips pointing toward you. Other hand is pointing up, and I'm thinking of standing on my feet. So I'm going to flex my ankles and hold here, and bend my bottom leg under. Starting with hip hikes, as I hike my hip toward my ear, I'm being very aware of shortening the space here, lengthening the space on the bottom side.
Then I'm gonna push my hip away to stretch, and really feel that lower back and the lower front, getting a good oppositional pull. So again, hike and stretch. So again, hike and stretch. We'll do three more like this. Hiking, stretching.
Hiking, stretching. And two more, really be aware of when you hike, not collapsing into the floor. You still need to maintain the energy in the bottom side, so it doesn't press down, it more slides away. And hold, now, keep reaching. Keep reaching until the leg floats up, and let it tap slowly.
Four. And you'll note my calf is tracking up the chair leg here. And that's allowing me to maintain my body alignment, my frame. If my leg is too far behind me, my hips aren't going to be aligned as they should be. Good.
Back to that long position, we'll return to neutral. Bend the knee in to release the hip, just lightly. And then we will keep going here. Top hand is gonna come down. I'm gonna slide the leg away again, reaching through the hip and lifting up.
And now we're just gonna take a kick forward until we come to the edge of the chair, and then bring it back. We're using the chair here to keep our frame, so that we're not rocking forward and back with our hips. And we've already established where center is through the hip hiking. So we should be pretty balanced here. You can do all kinds of things with this hand as long as you're not falling down.
Good. Now, we'll come down and we're going to transition. Since we have our pillow here, I mean, towel. We're gonna place that underneath our foreheads. Come down to the mat.
Arms are gonna come here to the cactus position, and we'll lift our legs barely off of the floor. It's a small hover. Now from here, tap the legs out to the chair, find the edges of the chair, and then we're going to press out. So this is, think of it as clapping wide. We're gonna tap out one, and two, and three, and four, five, six, seven.
Each time, give the chair legs a little bit of a press. Five, four, three, two, one. Five, four, three, two, one. Hold that width, feel the length and the strength happening in the outer leg, because this is where we need strength. So really focus on this, not on squeezing your glutes.
Now we're gonna clap in 10 times. One, and two, three, four, five. Are you clapping in the middle of your body or your legs rocking to one side? Lowering down. Second side.
Very gently, you're flipping over. Take this moment to look at your leg alignment. Your heels are gonna be in line with the center of your hips. You'll come all the way down onto your side. And again, use your towel for good and not for evil.
Put it in a place where your neck can release and relax, so you don't feel any tension on either side of the neck. This top arm for now is gonna press down for stability, but keep your chest open, bend your bottom leg under you, top leg is down. And we'll start with the hip hikes again. So as we're hiking the hip, keep the leg heavy on the floor, and let it drag up and down, hiking the pelvis, and let it drag up and down, hiking the pelvis, not the ribcage, so the ribs are only moving, 'cause they're along for the ride. They're not making the leg or hip move.
Two more like this. And one more, now as we stretch away, let that stretch keep going. Think of painting the far wall with the sole of the foot. And come back down. And we're inside of the chair, so the seat of the chair is going to stop our range of motion, which is good.
It'll help us keep control of our frame. One more. Lift and lower the leg, and bring the hips back to neutral. And the leg will come up. Again, it's floating hip height, and will kick forward, tap the leg in front of you, and then sweep it back.
Using the chair legs to frame your movement. Three. And are your hips staying level? Are they staying balanced? Front to back and top to bottom.
Last one. And bring the leg back to the center, and lower it down. And now we'll flip over onto our stomachs one more time. We're coming back to the cactus arms just to find our frame. And then we'll slide our arms forward.
Think of the arms being in the letter Y shape. Rotate your armpits forward, so that the armpit is pointing down. From here, let your head tilt up, let your gaze go away. From here, let your head tilt up, let your gaze go away. And as your gaze goes up the wall, you're going to use that to bring your chest up as well.
Now here, make sure those armpits are rotating forward. And check in with your glutes. Are you squeezing them to death? If so, I want you to shake 'em out just a little bit. Free your glutes.
From here, think of the bottom of your breastbone coming forward, and the bottom of the breastbone is what leads you down. And when you come down to the bottom, check in with the armpits, the rotation. Let's do it again. Head tilt, gaze goes up the wall, you climb up, hold, and slowly lower back down. hold, and slowly lower back down.
On this one, we're gonna come up and stay. Lengthen, lift, come up, hold it right here. Lengthen, lift, come up, hold it right here. My hands are spread wide, 'cause I wanna feel like I'm suction cups to the floor. Rotating my armpits forward.
And now, I'm pulling my shoulder blades together, and I'm pressing them apart. So, it's as if somebody's behind me and they're poking me with a pen, and I'm using my shoulder blades to snap the tip of that pen off, because it's so rude. So squeeze and widen your back here. So squeeze and widen your back here. Keep energy through your little finger, energy through your fingertips as you go through and spread.
We'll do one more here. And spread, wide, wide. How wide can your spine go now? As if there's a hook under your breast bone. Let that hook draw you forward.
Keep your chest up as long as you can, and then eventually, your head comes down. One more thing to do here, guys. We're gonna bring the elbows in a little bit more. Keep the energy in your legs. Try not to let your legs go to sleep.
We'll start with the head tilt. Looking up, lifting up, coming up. Our elbows are a little bit farther back. You can turn your fingers out a little, just a little though. Now we'll bend the elbows.
Tap. And lift. Tricep love. Everyone's gotta enjoy this, right? And if you don't, just remember, sometimes, the things that we do not like are the things that we really need to do.
So think of this as just a fun way to add tricep work into your life. Come up here, rotate a little bit extra, bend the elbows to come down. Forehead to the mat, and release. Thank you so much for joining me today, and we'll see you next time on Pilates Anytime.
Active Aging: Back to Basics and Beyond
Mention
 |
Misty Lynne Cauthen (Teacher) |
 |
Joan F |
 |
Lisette-Anne V |
 |
Anne P. |
 |
Colette C |
 |
Beverly L |
 |
Deborah Wasko |
 |
Dr. Marsha M |
 |
Lina S |
 |
Jennifer E |
Comments


You need to be a subscriber to post a comment.
Please Log In or Create an Account to start your free trial.
