Description
About This Video
Transcript
Read Full Transcript
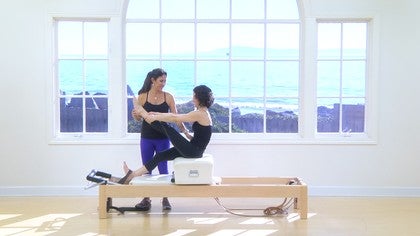
All right. So today we are going to do a reformer for very basic reformer for somebody who has a bad back. And when I say a bad back, I don't mean someone who is having acute pain or really their back is really hurting them and giving them a lot of problems. But someone who has already gone through some rehab or so it's been a long time and their back has given them issues. It's more of a tight in a week situation rather than acute uh, situations. So we'll be going through the reformer and we'll put in any omissions that we need to do. All right? So Rebecca, when you lie down on the reformer, if you had a bad back or back that gave you a little bit of problems and you were lying in bed, usually will roll over to your side to get up.
You won't just like sit up out of bed. So I want you to think about this as if it was your bed. So I want you to sit down right here pretty close to the bar. Good. And you can use your hands as you need to. But you kind of want to roll onto your side knowing that your head is going to go there and your shoulders and then start lifting your feet and use your hands normally and get yourself in a nice situation and you're going to kind of get on and off that way. So, um, you can, when you get off, you can roll over to your side if your back would hurt, if it doesn't bother you to that degree, you can just get on and off, whatever's comfortable.
But the most beautiful thing about Peloton is it's, it's about your powerhouse. So it is about this four inch band and muscles like a weightlifting belt around your center, so around the front of your stomach and around your lower back. And that means that the lower back and your stomach work together to support each other. Kinda like a Corset, like really nice and tight and supporting each other. And it's gonna work in every single exercise. Whether you're doing legwork or whether you're doing arm work, you're always initiating first from your powerhouse, from your stomach.
And that means that your back is going to be a lot happier too. So we start off warming the body up on footwork. I'm going to have your hips come over just like a half an inch. Good, very nice cause I want a straight line from your nose to your belly button to where your heels meet. And sometimes if you're working with someone and they align you and you feel like they've just made you crooked, right? So I've made it. That's what it feels like. So if you're working on your own, you could use your hands and slide them from side to side to see if your hips are in the center. You can use your, your shoulder pads to see if your neck is in the middle.
So carefully look over your right shoulder and see how much space you have between your nose and your right shoulder pad. And then carefully look over on your left. So you're very centered. You were very centered. Some people might hit their nose or their cheek instantly and have a ton of room on the other side. So you want to gauge that. And then if you were working with someone like me and I just sent her you and you're like, Oh, I'm off center now.
And that happens a lot because there's three ways of centering yourself or balancing yourself. And that is, one is your inner ear. So when you have a cold, you feel really off balance. If you have an ear infection or any fluid in your ears, right? Another is your muscle memory. So if you always stand on one leg and then I ask you to stand on both, well that doesn't feel centered anymore cause this is center. You've retrained all your muscles to feel that this is where center is.
So that happens a lot when you align yourself here. Then you feel off center because they're being put in a position where they're not usually during the day. The other is eyesight. But so if you close your eyes, obviously it's harder to stay balanced, right? So those are the three. So using that eyesight, that helps to confirm that you're straight and centered, so carefully, lift your head up and now you can look nose, naval, and heels. Do they look aligned. So even though your body, your muscles might be telling you I'm not straight, your eyes just confirmed it. So we're good to go now. All right, so your heels are nice and centered and I want you to pull your belly in like you are and just pull the carriage out with your stomach until your legs are straight and bend in. Good. We're going to do this nine more times. Good.
All the way out to straight legs. Good cause you want to take the energy of those springs and pull it into your belly. Make those springs really strengthen your stomach to more pooling it in one more colon out and come in. Good. So we started off on our toes and they were a little bit about four inches apart and now we're going to go to the arch of the foot. But now everything's together. Our inner thighs, the knees, the feet, ankles, no more little turnout in the foot and you're putting your rounding your toes over and you're pulling your heels underneath.
Super important because when we have a weak back, we usually have really strong quads or front of the thighs and not very strong back of the thighs, the hamstrings, and definitely not strong bottom. So when your arches are on the bar and when your heels are on the bar, you can activate the hamstrings and the bottom, the glutes a lot easier. So I want you to think about those muscles and use them with your stomach to go out and pull in with those muscles. So pull the spring out and pull it in. By the way, I'm on three springs with you. I should have mentioned that before, but we always start the foot work on three or four springs because we're working more basic and with the weak. Then we're going to do three springs, two very nice back of the thighs and bottom last one pulling in with those bezels holds it in.
Now we're going to go up to the heel of the foot. Also work on pressure points, but that's another class. So we're going to pull back the toes and every little to all the baby toes. Good, nice and aligned and use the back of the thighs and your bottom with your stomach and pool. Good. Pull back all the toes. Even even you're being Ketos your baby toes. Good ant reach all the way along. I want you to get all the way long.
Good. Try to get one more inch cause you're using the attention of those springs to pull into that back and almost massage it into the map. One more time. Great. And stay here and we're going to go down to the toes, not quite as wide as we started. So in the beginning we start off with three springs and we have not changed them yet or still here. All right, so we're pulling into our powerhouse using it and we're going to keep our toes just one inch apart as we pull the carriage out this time. Stay out. Great. So again, all the energy of these three springs are pulled into your powerhouse.
And now I want you to add your seat, try to squeeze your bottom and pull up another half an inch. And now push your heels under the bar. Oh, I'm going to keep your leg straight actually. Voila. And then down to three. Good. Good, good, good. Hold them up for me. I love you to imagine that your spine can all the way down to your tailbone. And imagine that you're pushing your tailbone under the bar as your heels go down and then use from the neat up to pull your heels up.
What does that means? You're stretching your tailbone under. Now use your outer thighs and your seat. Good. And stretch down to three. Don't use your cath to pull your heel up down to three. You can stretch the calf, but let's use the back of the legs and seat. Good.
And three, two, three and the back of the thighs and the bottom and down to three. And one more time. Really imagining your whole spine stretching and then pull up with those muscles and bend in and come home. Good job. Give yourself about two inches between the shoulder pads and the um, your shoulders. Okay, so we're going to keep the springs where they are. You could make them down to two if you have maybe some added shoulder or neck issues. But if it's really just trying to strengthen your back, you're okay on three springs. Okay.
And I want you to think about your powerhouse and take a breath. And as you exhale, let's go ahead and bring in your right knee and give it a hug. Give it a good stretch. Well, how does your lower back feel right now? Does it feel like it's nice and flat on the Mat and stretching? Good. And then put that foot down, taking a breath. And then exhale. Same thing here.
You feel how connected are onto the map. That's great. And then put the foot down and we're going to bring in the right foot knee again. So now we're going to keep that and keep that connection and add the left knee. Good. So in the hundred you're going to re keep your lower back anchor like that and your energy pulled in and reach your arms long by your side.
Great shoulders are reaching away from your ears. So if you had your hands on the map, could you slide your arms even longer on the mat? Nice. Keep that length. And now lift up to about hip level. Good. And I want you to pump your arms up and down just like that. And I want you to take a big breath for me and take a big exhale.
That's right. And you inhale, two, three, four, five. Exhale, two, three, four, five. Nice. Inhale, two, three, four, five. Exhale, two, three, four, five. Great. I'm going to have you keep doing that, but your knees just over your hip bones and your legs more to table top. Little easier, but still pulling in one more like this. And as you exhale, feel like deflating a balloon. As you pull in. Good. And Hug the knees back into your chest. We're gonna add your straps now to make it on the reformer. What does that do?
So you can rest your feet on that bar and I'm going to hand you two handles still on three springs. So now we'll bring those knees and feet right back up. Good. I don't want you to lift up your head right now. Okay? I want you to keep it down. If it's too easy for you and you don't have neck issues, you later on we can bring it up.
But I want you to use your stomach to pull on those straps and bring those arms longer, longer, longer by your side and pump them up and exhale. And the goal is to not let the carriage move back and forth. You only want to pull it out and hold it out. That's better. Big breaths and pull in, in, in, in good. So if this was feeling too easy, you could lift your head up and look at your stomach.
Exhaling one more with me like this. Exhaling, pulling in all about strengthening. Let's go ahead and keep pumping, but lower your neck and head. Pull in, in in a way from me and last one. Keep reaching long with your arms by your side, pulling in and relax your arms and rest your feet down on this bar. God, good. Generally that bar goes down when we do, before we do the hundred, but we're going to use it as an aid to help hold up our legs in between exercises. So, um, we're going to drop one spring, so I'm working on a grots and we only have four springs are all equal tension and then I only have two on right now. All right? And I'm now going to our reformer by lowering the hardware and then, but he my hand through the strap and handle same thing on the other side, sliding the hardware down.
And now I'm going to put the straps through one at a time through the leather and the handle. If you have a different type of reformer, you can make your own adjustments and I'll show you where the length should be, right? So I've clipped them on and when they're fully long, they should be about what your elbow is. Sounds good. Okay, so make them that long. The hardware needs to be on the outside. All right, we're going to draw your belly in and bring one knee into your chest and hug it. Good. And we're going to bring the other knee. Good. Alright. I want you to go ahead and I'm going to take your legs and we're gonna put them into the straps. Good.
And then once they're in the straps, you're gonna bend your knees and with your bottom down, bring your heels down to your C. Great. You did a great job. Now that you're pretty flexible, so I'm gonna Redo that. Okay. So I just wanted to show what the, what you're working towards or what the goal, if you can't do that, do not fret. Go ahead and put your feet back on the [inaudible]. And so you would have, I'm going to go ahead and let you do this. You would have the straps hanging on these little eye hooks by your ears. And I want you to reach back and grab your right one with both hands or whatever. Yeah.
And then hold it so it's not going to hit you in the face and bring just one knee in and then put your foot in there and then you want to hold it kind of tight so it doesn't again hit you and grab the left one and then bring the left foot in and then you can put the left foot on. So that might be a way that you have to get on. If you're not as flexible where your leg can go straight back. Sometimes you can push out the carriage as well to get back there. But um, I, that one is probably more than fine. All right. How do you feel? Good. All right. I am going to lower this bar now.
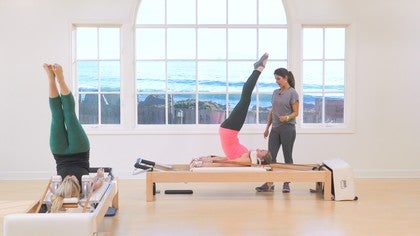
So the best way to protect your back is for it. Your stomach be pulling into it, supporting it, and you can feel whether your back is flat or arched off the Mat. And I want it flat today. So with your belly pulling in, I want you to reach your legs straight. This is called frog and then bend back in. So right now you're warming up your body and teaching it how to reach out away from your center while keeping your center engaged. So two more.
So your belly is really pulled in no matter what your legs are doing. Last one, hold it here. Now you're going to say, can do a leg circle while my back is flat. So I want your legs to come up, maybe just an inch. And then we're going to open about the width of the reformer. Circle down and squeeze together and then come back up. So really important safeties here are that we don't want the legs to come all the way up to a 90 degree because when you open and pull down, then you're actually gonna use those back muscles to do it.
And we're trying to avoid that. So I want you to bend the knees again for a moment. Good. And then go forward again to my hand. Good. And so when you come up, we're not going to go up quite to a 90 degree. Um, good. And then we're going to open, we're going to keep it relatively controlled and not too big. Again, because that would strain the back too. So as we get stronger and more flexible, you can make a bigger, but now we're going to keep it about this wide go down and again, not too low. Squeeze your inner thighs together. Find those muscles and come back up. Good. And one more with me.
Open about the width of the carriage. Reaching down just like a half foot. Squeeze those inner thighs together and come up. I'm gonna let go for three. Open and reach and circle. Good. So always with that powerhouse working good. Trying to find your outer thighs and inner thighs. One more.
I love how you maintain the Pilati stance throughout coming up just to here. We're going to reverse. When you keep that, that means you're keeping all your outer thighs and inner thighs working. If you were just using your quads, you would see that your feet go parallel and your toes are can touch. So we're going to use again the back of the thighs now and your seat to reverse it. We're going to go down not too far open around and up, and I'm going to let go your new form more on your own. I love this exercise.
It's really like a massage for your lower back. Your legs are doing the massage, almost like a mortar in pestel. You're massaging your lower back into the mat as the legs. Make that do the motion. One more for me. Work in the back of the thighs and the inner thighs and that's enough.
Now a little added. Everyone could use more flexibility in Nice stretch when you have a stiff week back. So put your hands in these handles and I want you to keep your spine flat. I want you to keep your shoulders like they are nice and open and if you can your tailbone on the mat, but just bend your elbows and pull those legs as close to you as you can. And you can go wherever you your capability is, but you don't try to avoid bending the knees or rounding that upper body or hiking the neck or lifting the tailbone. Just a nice, good stretch all around.
Good. Alright, I'm going to slip them off for you. There we go. Good. And Go ahead and lower your feet down. There's a bar is down lower now because I've lowered it and we're going to step off to the side. So again, however is comfortable for you. That's great. Rolling off to the side. All Right Rebecca. So we're going to do stomach massage next. Another one of my favorites, but certainly not other people's favorites.
The bar comes up again and we're going to add this pad. So it's a non-slip pad so that it holds you in place. I'm gonna add one more spring. All right, so in [inaudible] I'm going to use your body for a moment. We always have our shoulders straight across and the hip bone from one hip bone to the other hip bone straight across. And we complete our box. When we get into our, um, stomach massage position.
We're still gonna want the shoulders directly over the hip bones, but we're gonna create a letter c with our back. We're going to want a really round back, so I want you to go ahead and sit down right there. Good. And actually I'm glad you are getting on like that. And I want you to put your hands behind you as you turn [inaudible] and put your feet up here so your hands are going to really kind of help you. Cause if you have a really tight, weak back, you're going to not enjoy getting into this position.
I want you to scoot back a little bit more. Great toes are three to four inches apart. Good. And now one hand at a time. I want you to put on the front of this map. Okay. So how close you sit to the front edge of this reformer?
Depends on your ability to go ahead and bend your elbows. Yeah. To have your shoulders directly over your hip bones. So if the closest you can get is here, that means your bottom has to scoop back further. So you would move that pad further. Does that make sense? Alright, so we're gonna use the stomach always good. And we're going to have the shoulders directly over the hip bones.
Really easy around that upper back. But where we want to stretch is the lower back. So can you kind of pull your tailbone under you a little bit more? Yes, that was really beautiful and really open up this lower back and pull into it with your belly. And now you're gonna pretend your legs are just along for the ride and that your stomach is so strong that it can pull out the carriage use. Again, all that tension of the springs to put in here.
Now we're going to bend right back in and we're going to do two more like that before we add our stretch. That is nice. Elbows are bent, shoulders can stay a little more fold forward over the hip bones. That's it. Let's stay out this time. Pull out and now gonna add a lower the heels, lift them up and bend back in. And same kind of concept as earlier as if you're stretching your tailbone underneath and then use your hamstrings and bottom and then bend it. So powerhouse pulls out, stretch under, pull up with muscles. Good. Give me two more.
Try not to have much tension in your shoulders or neck. Just really strengthening that stomach. One more stomachs in and hold it here. All right. Now one at a time. I want you to put your hands on the shoulder pads behind you.
So put one and the other. Sometimes any Archie in the back really hurts somebody's back. So this is an exercise that you might have to omit all together if it feels okay, go for it. You'll know in one second, but the 90% of the time rounding your back feels great. Arching your back feels bad. There are 10% of the time that it's the reverse, so you have to gauge it. Maybe the first exercise is the one that you have to leave out.
And this one feels great for you. So women especially love to hyperextend. So I'm going to turn your hands so that your fingers face you and that helps with hyperextending the elbows. Good. And if you can even put your hands up here cause you're too stiff in your upper body, you can make fist and [inaudible] and put it down right in front of the Pat. But does that better for you? And that's better for Rebecca. All right, so I want you to really use that powerhouse and let use your belly to lift your chest up.
You're really trying to learn how can I not compress into my lower back over and over again? So this is the exercise you're going to go out and come back in. Great. Sorry. I'm going to drop one spring. So we're going to go out and pulling in. Good. Now we're going to add an extra stretch hold and a challenge.
As your heels go down, your chest almost comes up higher and then lift your heels and come in. So as you lower the heels, it's not an opportunity to lose your posture and it's an opportunity to really work on that waist lifting. Good. And two more. Pulling out. Press down. But I want even more lift. Thank you. Give me two more. Now actually am, let me feel your head in my hand. Yes. I want energy a little more. Pushing your head into my hand.
From your powerhouse. All right. And coming in a hold it in and you want our Mehta time reach back to me. Good. Nice, good. All right. And now you're going to stay on two springs and go out to straight legs and just come in and that this should be pretty easy now. Good and two more, but sometimes this is another one that you might like.
You have to admit one more time on this last one, we're going to add advance to our stretch. So you're going to keep your powerhouse in and reach and your lovely, keeping your shoulders. Try to not val your head down but keep it up. Gaze up. Yes. Reaching the spine, stretching up out of the lower back. And then since we can't always get that stretch on our own, we are going to add a little land. Yap stretches, I would call it. So you're going to grab onto that bar and go ahead and straight in your legs and just feel your belly pull into here and you should be getting a stretch anywhere that you need it. Relax your neck or head might be on your calf, might be your hamstrings, might be your lower back, might be your upper back or shoulders.
And Go ahead and bend your knees and come in, but it always feels pretty delightful. All right, go ahead and step off to the side. Good and stand up. And we're going to grab our short box and it's super important. I'm going to get rid of this path for now and I'm going to lower this farce. We're ready. But suit and PR are important. How we lift our box. So in life we're going to be, um, while you're doing your daily activities, you're gonna be reaching and grabbing and lifting things normally.
And that's a easy time to hurt your back, whether you're reaching for something high in the cupboard or whether you're traveling and lifting up your suitcase. So we actually add this in our reformer routine to make sure we're watching our clients to know how they're lifting something. Okay? So you don't want to lift up something with one arm and throw off your old body. You want to lift it with two arms and you don't want to stick out your bottom and arch your back to pick something up. You want to have a little bend in your knee.
And always use your powerhouse when picking up something. And lastly, you don't want to hold something heavy way away from you because that pulls all of your powerhouse and energy out. You want to hold something heavy into you as close to your powerhouse as you can. So come on over here. Okay. And Bend your knees to pick up that bar and just kind of put it up on top here. I love how you almost picked it up with one hand. Then you went for both hands. That was awesome. And I want you to just grab the, keep your knees a little more bent and get closer to it. There you go.
And then use your stomach to pick it up. Awesome. Walk over here and you're going to put it down on the side like that. So face the, Yep. Good. And then you're going to lie flat. Good. And turn it to, we're going to do short box actually. So you're just going to slide it around. Yep. Good.
And now lift it over the, um, shoulder pads, right? Exactly. Yes. Put the headpiece down. Yes. And then good. [inaudible] and put the bar right in front of the box. So that's pretty good. The only other thing that I would have said is when it was right in front, um, you could've put your bar down and then just kind of tilt it if it was too heavy and slide it so you don't have to lift the entire box. Okay.
If that would aggravate your back. But very important when you're watching, um, your clients, cause you're an instructor if they're picking it up with one harm and you know the [inaudible]. But that's just another part of keeping the rhythm and keeping all of your muscles engaged from start to finish. So we're going to go ahead and sit down on the box and I'm going to have these straps. We're still on two springs and I want you to sit just a hands with distance from the back edge. Good. Some people like working by sitting on a pad here.
You had a slide back quite a bit. All right. What was that? Oh, you're going to lose your toes. You certainly are. Hmm. Hmm. I might make a little extension here. So I'm gonna use my straps for my tall friend. I'm going to make a little extension strap.
You could put the box in front of the shoulder pads, but I feel like then the angle of your body ends up becoming higher. So because you're closer, uh, and then that changes the way you melt into your lower back. So I'm gonna drop the, and I'm going to take off one real fast and if you're too tall or not too tall, but if you're [inaudible], you can also put the carriage in second year and slide that out. And that doesn't have as much of an effect of what I was just saying. Those are good little adjustments. So always good to know. All right, so I'm still in east. Suppose straps or I'm going to get rid of that one.
So I've made you a little longer stats. I feel better. All right. Okay. So make your hand into, just put your hand like that. Okay. So the width of your hand from your pinkie to your thumb is exactly the width of your lower back. Okay. And I could put my hand, but you really want your own measurement. So you're going to place it down flat so that your bottom is against your pinky and your thumb is still on the box. But on the back edge of that box looks pretty good to me.
So right now we're going to keep this very small and simple and you're just going to roll back a little bit and come forward. But you have that measurement because one day when you're strong enough and flexible enough in your back, you're going to be able to roll all the way back into a backbend. And you want that supporting your back. And if you had too little space, it would not feel supportive. And if you had too much, it would jab you in the middle back and it wouldn't like open up. So we're going to open your legs, at least hip with part. Good. Awesome. And if you can use your outer thighs to push open on those straps, that's even better. And now I want you to wrap your arms, especially around your lower stomach. Yeah, good.
So those arms are there to make sure when we come up, when we are coming forward, and our stomach usually likes to push out. So our arms are there to hug our belly back in. Okay? So I want you to round your back like you did in stomach massage. So you did great about moving this part back, but this part again is really straight and almost arched. So I want you to school easier bottom, and then use your lower abdominals to curl your tailbone towards you and lift up off that seat.
You're doing really good and I want you to think about these two bones that are the front of your box. Okay? And you're going to start by rolling them up to the ceiling. So I want them instead of facing forward, they need to face up to the ceiling. So use your powerhouse to roll them back towards the ceiling. Just to there an exhale. Come forward as your arms hug into your body.
That's great. Lift up off your seat and go back. Rolling those bones, the sit bones. Push your heels away and now come forward. Powerhouse. Great. Two more. And the sit bones go that way and your hipbones look up and then use your powerhouse to come forward. And one more time.
Rolling back. Good. And curling up. Great job. Go ahead and sit up and show me the best posture you can show me. So maybe slide back a little bit. Good. And so we have our box and it needs to be directly over those hipbones.
Yeah, very, very nice. We're gonna pull this bar out and hold it shoulder width apart when we lift it up. Nothing should change in our frame. Our shoulders shouldn't come up. Our back in Allston arch. Just because we're moving our arms, you're going to initiate and hold everything from your powerhouse. I also want you to squeeze up and lift. Yes. And now lift your arms up to almost straight up to the ceiling.
Just about in your peripheral vision. So without turning your head, you could see your both arms out of the corner of your eyes. Yeah. Okay. So now you're back. Is this straight and I want it to go back a few inches. So we're going to hinge back from our tailbone. Pull your belly in and come forward. That was definitely enough. Again, lift up off the seat and use your stomach like a course it and go back.
Yes and come forward. Great. And this last two, I want you to think not just about tightening, but maybe growing an inch taller and stay tall as you go back and pull forward, relax the height and then pull in and lift up again. Tall and go back. Go back. Yes, coming forward. Rebecca, that was great. Rest your arms down. I really liked that. Good. So we are working the spine. The first one was around back and now we're working a straight back, but not just straight, but like I said, lift an inch.
So we're trying to create maybe a little space between each vertebra so the fluid can get in there and lubricate your spine and keep it really healthy and flexible and young. So now we're adding some side bending in here, a different movement of the spine. Okay. So we're gonna keep nice and tall and again, lift the arms up without altering anything. In your box. Good. But now I'm asking you to lean your shoulders just a couple inches in front of your hip bones. Two and three. Great. With that tall spine, lift up off your seat and see if you can start with the Vertebra, right between your ears years and reach over to the right. No twisting, actually just a side bend. Yes, reaching over and then the next bone in the next bone and the next until you feel like you're going to lose one of the hips. So then you'd pull back center and stack up your spine.
We're going to go the other side. Lift up off your bottom and starting from between your ears. Reach over to the left, the next bone, the next. You're doing this side Ben, and use those obliques, those waist muscles to stack your spine up really good. We started, we started to get a little straight up tall, so come forward. There you go. And up and over, kind of like a palm tree waving in the wind and pull it up.
You want your back to have that range of motion and to the side. Reaching a nice side stretch and you want the waist to pull yourself back up. One more time, pulling in and each vertebras should be able to move and bend to the side and then pull back up. And one more time. Lifting up off your seat and reaching good hole. Pulling on this right side. Yes. And stacking up and rest your arms down.
Good job. We're done with the bar because we're not going to be doing twisting today. That would aggravate people's backs. So we're going to leave that out and we're going to work on tree. So I want you to with your box staying nice and square.
See if you can not lean to a side or alter anything as you. Just pull your belly in and slip the right foot onto the mat. Great. And now hold underneath your knee and pull in and stay as tall as you can and see if you can straighten that leg without lowering your knee and bend it. And two more. So you hold that leg right in place. Don't lower that sire or knee one more. Hold it up. Good.
And hold it all the way up this time. And now walk hand over, hand up to your ankle. Okay. And now I ask you, how are your hip bones? Are they square? Let's look down at them. So we're gonna bring one forward. There you go. And with square, I want you to keep your belly in and reach. Stretch your spine all the way forward. Try to reach your lower back long and then the middle back and your head a good.
Awesome. And now I want you to sit up tall again, but bend your knee. Give me a little more heightened your spine. Yeah. And grab your toes. [inaudible] don't lose your beautiful posture. I'd rather your back be tall than your legs straight. And then I want you to straighten your leg as much as you can opening the knee.
Now if you have really bad Sciatica, this, this is an excellent stretch for you, but it might not be the right time. So depending on whether that works, okay, we're going to switch. Let's, as we get stronger and more stable, we'll end up, let's actually put the foot back under, cause I loved how you did the other side. But we'll add a set up later on to complete the tree. That's why we have our perfect box. And I want you to use your stomach to just easily bring that left foot onto the mat and nothing changes. And then hold underneath the knee with your hands. And then as you straighten the leg, the knee is not going to go down.
It's just going to stay there as you straightened. Ooh. Yeah. A little more flexible on that left leg, Huh? And stretch or maybe not. And hold that leg up and walk hand over hand. Hmm. She kept her hip a lot more square. Maybe just a teeny bit off. Yeah, but that was really mindful this time, right? That was great. And now reach forward, stretch forward.
Really maybe have just a tiny more weight on the right. Good. Good. Really reaching. So I want you to imagine like your stomach is on your thigh, your chest can touch your knee and your head to your toe. Good. And now sit up tall as you bend your knee and grab your toes. And again, this is a fantastic Sadeka nerve stretch, but if it is inflamed, not a good idea. So go ahead and straighten your leg, lifting your chest and bring the leg down. Okay, it's time to show me how to return your box. So we're going to step carefully off to the side and generally grab the bar with in one hand and you can grab, still grab the um, uh, handle, or you could tilt it, which is probably safer for the back. So why don't we do that for the bat.
So the bar was there and you probably wanna roll the bar a little bit away so it gives you some room and then tilt the Bach good. So that it's all on this edge, just all the way while Ah, good. And now turn it towards you.
Turn back around and then bend your knees as, use your powerhouse. Fantastic. And then you can put the bar all the way down. Good. Unfortunately, when we move and we protect our back, it seems very robotic. So it's kind of finding that happy medium of moving like that and more naturally without it seeming so contrived. Right? But if you are just doing things one arm at a time and not really being conscious. Sure. Way To hurt our back. So I'm going to lift up our head piece and then I'm going to lift up the bar and we're going to stay still two springs.
We're going to do elephant knee stretch, any stretches. Okay, so elephant, you're going to be on all four, so literally your hands and your feet. So I want you to first to put your hands on the bar. Good. And remember if you're working on your own that this carriage can slide out. So we don't want to push out with our legs as we get up on it cause it will scare us and that this bar can hold like 700 pounds pushing on it. But if you pull up on it, go ahead and pull up. It will.
This far can slip out and then it can fall down. Yeah, right. Just kidding. So only pushed down. Never pull up. All right, so your hands are, they're pushing down and I want you to step up with one foot, like literally stand on your feet. Huh? Good. And your heels are going to be all the way back against the shoulder pets. So that is for somebody in the range of like five, let's say between five, eight and six feet tall that easily could reach their heels and get what we want out of the body. But your heightened, my height requires something different. Okay.
So I want you to bring your heels about two inches in front of the shoulder patches too. Yeah, there you go. Good. Yet I still want your shoulders over the bar that holds the springs. Excellent. Nah, I'll just let perfect right there. Now I want, here's your box, which you've done a great job. We want to do the ultimate, um, protecting that back. So I want you to round your back up to the ceiling. Good. So I love how your ears went between your arms and your head. Chin went to your chest so everyone can see what a great round upper back you created. But the lower back is still straight. Huh?
So now we've engaged the lower abdominals. You can always tilt your pelvis and do it incorrectly, but you just used your lower abdominals to pull up into this area. And that's the most important thing in this exercise. It is really a hard exercise. Um, it is basic in the sense that you can't really hurt yourself, but to get it is really hard and more advanced. So for today, I want you to look at your knees and tell them not to work. So I want you to soften him up just to half an inch. Excellent.
Because if they push back to a straight knee like the wire, then you'll use your quads and your back. So I want you to tell him not to work and I want you to keep this nice and, and mightn't imagine that your back continues to a tail, not just a tailbone, but all the way down to a tail. And that you're pulling your tail through your legs. And we're going to continue that theme in another exercise. So I want you to push the carriage out just a few inches. Hold that.
Use your stomach to pull your tail, the tail through your legs. Excellent. Try to keep your upper body right where it is and then pull under good. Go out. Yeah, pulling good job. Telling your knees not to work. Go out and stretch that lower back and bring that whole bottom under you and in. And we're just going to do one more and in, I love how you never go ahead and tilt your pelvis the other way too.
You never went to that to pull it in because that would hurt the back. All right? So we're gonna do another exercise meal, Dan, that is same kind of body mechanics, but a lot easier because you're kneeling and those knee joints are now taken out of the equation. Put your feet against the shoulder pads with your toes pointing towards your knees. So you're going to flex your foot, your toes underneath, like so. Uh, so the ball, the foot's almost on the mat. There you go. And put it all the way against the shoulder pad. Good. The knees stretches are kind of footwork as well.
So you're going to round your back. Good. And you're going to keep those shoulders nice and square and those hips. Nice and square and knees. Just shoulder with a part. Great, beautiful. So great round upper body. But again, I want more out of this. So I want you to use your lower belly to pull that tail through your legs. Excellent. Nothing in your opera body is going to move.
And I want you to push out the legs just a little, a little further, a little further. And now pull back in. We're still on two springs. Go out and pull in. Go out and scoop in and out and scoop it and three and scoop in. So we're really trying to work our stomach to pull those legs in one more and hold. Great job, Rebecca. So the next exercise is an arch back.
So this is called the round back knee stretches. And the next one is the arched back. So I want you to lift your head up. Good and open your chest and stick out your bottom. We are going to leave this one out today though. Okay. But that would be the next one. And then we would do knees off.
But I wanted to just show where we were going. So I want you to just pull up again, protect that back and step off carefully. Good in one day will feel fantastic to like reach your chest away from your center and stretch your tailbone away. But right now it might feel just like a compression into your lower back. And so cause we're not there yet.
So I want you now to carefully and add one more spring back to do our cool down. And I want you to carefully lie back down so that we can do our running and our pelvic tilt. Love it. And we're going to need to make sure we're centered again. So good shoulders, just a teeny bit over. Excellent. But yeah, you're really, really nice and centered now, which is always the goal that maybe when we start we're not centered, but when we finish we are. That is definitely a plus. Right? Okay. So I love this exercise to think about it as how I'm going to walk away for the rest of the day.
So when I'm walking around or holding myself, I would love for everything to be fighting gravity and be pulled up and supporting my, my bones in my skeleton and my body and not just giving into gravity and practicing bad alignment and in space. Right? So that's why I love really taking a moment to focus on this exercise. So you're going to use your powerhouse and the tension of those springs are going to pull into that Paris and straight and your legs. We're going to go out and hold it here. And I love an image of a barbershop hole. So from this hip bone, I want you to imagine a red and white stripes and those are your muscles swirling all the way down to your ankle. And then both sides.
And we're going to start off with the tendon stretch where you push both heels under good and we're gonna use those swirling stripes to pull up. Good. So even though we're going to do running, go ahead and go down. It's kind of the harder version of the tendon stretch. So pulling back up so our boxes aligned and everything's pulled up. So pull everything back up. Hold.
And now I want you to bend one knee and lower one heel. Good. But not out to the side. Just straight up and pull all the way back up to straight legs and switch. Good. And pulling up. So this stays square and anchored. Nice and pulling up. And one more time bending the other leg. Yes, pulling up. Now see if you can do that with the legs passing each other.
Yeah, very nice. Keep it going. What you do well is you do not roll your knees in and that's very hard. As you push your heel down, your knee stays in correct alignment. And usually we roll it in two and one and hold. Good correction. You really use all those barbershop pulled muscles.
We're wrapping in squeezing and come back and good. One last exercise, the pelvic lift. Okay. This is another exercise though that sometimes if you have too bad of a back, it might feel like you're compressing more than stretching, but it is the ultimate in, um, really making sure that you're working the correct muscles to support your back. So if you're there where you could do this exercise, it's a big help.
So we're going to put the arches on the bar and then we're going to slide them out to the corners. And then here you want your knees to be pointing in the same direction as your toes and directly between your big toe and your baby toe. All right? So finally I want to use that image again of your spine, not stopping at your tailbone, but continuing to a tail. Okay? And I want you to imagine that I'm pulling on your Dale. Oh, that's awesome. You like, like slim down and got like that much longer and we're gonna tilt your pelvis towards you, but by curl using your stomach to curl your tailbone good and coming up and your carriage isn't moving, which I love. And you're gonna stay right there.
I want a little more of the back of the ribs down. Good. So it's really like a tilt and a slope. Okay. And I want you to use the hamstrings, the back of your thighs and your seat to squeeze out, straightening your legs. And as you come in, I want you to imagine I'm pulling your tail out. Good and going out. Good and pulling in. So like I've said, all session, when you have a weak back, you usually you really overuse your quads and you could do this exercise all day long using your quad.
So every time you come on hold and say engage my back and my legs and seat and then go out cause it's going to take you sending that message each time. So hold, use those muscles and go out and use them to really link them to come in and give me two more and we'll be all done out and pulling long your spine, like have your tail and one more back those legs and seat and then pull long. Now keep that length as you melt down one bone and the next bone and the next all the way down to your tailbone. And you slide your feet together and then you get to hug them into your chest and you are all finished. Great job, Rebecca. Thank you. Thanks.
Pilates with Monica Wilson: Reformer Workouts
Mention
 |
Monica Wilson (Teacher) |
 |
Yvonne C |
 |
Gia Calhoun |
|
|
Dawn G |
|
|
Patricia J |
 |
Lynn P |
|
|
Kinney F |
 |
Vanessa C |
Comments


You need to be a subscriber to post a comment.
Please Log In or Create an Account to start your free trial.
