Description
This is Part 1 of his progression showing how to decode the Mat work so you can "Own your own workout."
About This Video
Transcript
Read Full Transcript
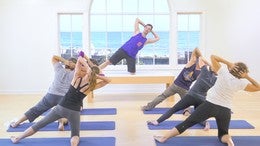
Hi everybody, I'm Benjamin Dagenhart. I'm here with a wonderful group of Pilates enthusiasts from all walks of life and fitness levels, really, and we're here to film a progressive series of mat workouts that really try to decode the traditional work performed on the mat. We will probably, that said, not go through all 34 exercises, but rather start to explore some of the basic concepts and movements that reappear in a lot of the mat work here. Giving us a little bit of a spectrum of how to approach certain movements and exercises within the work. For this very first one, we'll specifically focus on some of the more basic concepts, such as lifting your head, neck and shoulders off the mat, lifting your legs off the mat, really owning the weight of your body, as well as the concept of unweighting and unloading your spine against gravity, which is one of the first things we do, both in every day life, right, when we get out of bed, it's something that we do in our life generally, as babies when we start to learn how to move.
So that is one of the first things we're gonna look at. Coming up to standing so we can start exploring some of those ideas. Just come to the middle of your mat, and stand with your heels together and your toes apart. This is the first exercise or movement that we're going to be looking at. A lot of times, we refer to this as the Pilates stance or Pilates V.
Back in the days, this was called the military position, and I would like to propose that this is not just a stance, but actually movement in and of itself, so go ahead and stand with your heels together and your toes apart. This is a position that we find ourselves in a lot when we're on the back, when we're on the stomach, as well as here standing up. There's a reason for that. With the heels together, you find a really nice connection to your central line, the middle of you, them with your toes apart, you still maintain a wide base of support, which we're going to need in a second. Alright, so I just want you to stand up nice and straight here, feel the length of your torso, stamp your heels down into the floor, and just feel like the roof of your head is lifting up towards the ceiling.
One of the main goals of Pilates mat work, well, Pilates in general, is we need to create space and support for your spine, your joints, and your vital organs, right, throughout any kind of movement challenge that we throw at it, so we start with that right here, where all of that is taken care of, you lift your rib cage up and away from your hips, you feel your heels nice and heavy, crown of the head is lengthening up. With that, find your breath. We try to foster a good movement patterns that never steal your breath in your everyday life as well, right, so take a nice deep breath in, and a full exhale, really enjoy this breath, there's no technique to it yet, there's no shape to it yet, you just let the air come in through your nose, and out through your nose as well. Alright, we're gonna start adding on to that, instead of just standing here with the heels together, toes apart, see if you can push your heels into one another, so that you feel more of a connection between your heels, and it feels like your inner thighs are starting to rotate forward. You might start to find some activity in your hips there, maybe all the way up into your abdominals, does that happen for you guys?
Feel a little stronger of a connection there, right, that's a little harder to feel once you're on your back and you have your legs in the same position, so we'll learn it up here. Take your hands behind your head to create even more space in your spine, you push your head back into your hands and you pull your head up towards the ceiling. Take your breath here, and exhale fully. Now, start to wake up your feet by pushing the ground away with all ten toes, starting to let the heels come off the ground ever so slightly. Just a sliver of space under your heels, and you pause with that.
Check in, did that change your breath? Or any space along your spine, from head to tail. Take one more breath here at the top. And then slowly release the heels back down. We'll do that a couple more times, super simple, right, it looks like there's not much happening on the outside, but internally, hopefully, we'll find a connection into our legs, into our hips, into our stomach, into the length of our spine, lift the heels up again.
Press the ground away with all ten toes, your big, your second, your third, your fourth, and yes, your pinky toes as well. Hold yourself there, can you push your heels more into one another? Like they could push forward if they weren't in each other's way. Give me one more breath here at the top, easy shoulders, wide through the elbows, and then lower your heels all the way back down. Alright, let your arms come down by your sides.
Remember this traction that you felt in your legs, every time went down on the back and I asked you to bring your heels together, toes apart, it might just give you that connection to your stomach that we'll need in order to move through the exercise later on, alright? Next up, head, neck and shoulder curl. Right, often, we find ourselves bringing our chin to our chest when we're down on the ground, and how many of us experience neck discomfort every now and then? So that's something we can look at here, in the upright position as well, actually, I want you to make a fist, right now, take it to the top of your sternum, your breastbone, and bring your chin down against the chest. Until the two of them meet, so your chin is up against the pinky finger side of your fist, your shoulders are relaxed here, again, there's no technique to this right now, we just wanna feel length through the back of the neck.
So take a nice, deep breath in. Start to press your chin down ever so slightly, but not to lock up the front of you, but rather to expand and lengthen through the back of your neck. And do that again. The chin is pressing down, but the back of your neck is really lengthening and that's the more important portion. Hold that position and find how free your breath is, right, the whole goal of this is to create a passageway for your breath that is not locked up, so that when you do your hundred, your one leg spread, your double leg stretch later on, your breath doesn't get choppy.
Do we all get something out of this, do we feel a lengthening through the back of the neck? Once you have that, take the other hand to your lower back. Place it so that the heel of your hand is against your bottom most rib, and place your fingertips down against the top of your sacrum towards your tailbone. Now, we're gonna simulate lifting your head, neck, and shoulders off the mat. Take a nice, deep breath in, imagine you're on the floor.
Bring your chin over your chest until it meets your pinky finger side, make the back of your neck long, and then start to roll your head, neck and shoulders down and forward, until you start to feel a lengthening between your back heel of the hand, and back fingers. Down into the ground, see if you can keep your lower back lifted right above the hips, and then roll yourself slowly back up. Deep inhale. If you wanna change your hands, at the top, you can go for that, just for a change of sensation, take a deep breath in, imagine you're lying on your back. And then chin over chest, roll yourself down, it's like you're peeling yourself away from a wall, keeping your lower back pulling back into your hands.
Only until you find a lengthening between the back heel of the hand and the back fingers pointing down. And then roll yourself all the way back up, we'll just do one more of those. So this is a simulation of your head, neck and shoulder curl, roll down one more time with the exhale, chin over chest, chin against pinky finger, back of the neck lengthening, abdominals pulling in so that your ribs don't tilt forward all that much, make space and support for your spine, your organs, and your joints, roll yourself all the way back up to standing, and then let your arms come down by your sides. Nice work, you guys, we're gonna put a few of those things together now, lying down on our backs, so go ahead and bring your feet to the middle of your mat and lie down on your backs with your heads away from each other. Good, later on, we'll talk a little bit about how to get down and up from the ground, for right now, we'll just re-explore everything we just did standing, lying down.
Right, so now, we no longer need a fist, between chin and chest, you just try to think about bringing the front of your chin down to lengthen out the back of your neck, not to lock up your passageway for your breath. Alright, so now that we're down here, the first exercise we will tackle is the hundred. Traditional exercise, it's a warmup, it's really meant to stir up the sludge inside our body, get our systems going, using our full body in one instant, by unweighting ourselves against the ground. We're gonna use a lot of those concepts that we just explored standing here. Start by lifting your arms up towards the ceiling, and feel the back of your ribcage settle down into the ground, right.
When you were standing up, you were sort of imagining standing against a wall. Well, now you have one right there behind you. Find that breath again. Find that stance between your legs again, so your heels are pressing into one another, your inner thighs spiral open towards the ceiling for good support through the hips and your legs. Take a nice, deep breath in from here on your next exhale, let's add that head, neck and shoulder curl again.
No fist against your neck, this time, but feel the same, exact concept of chin towards chest, in an effort to lengthen out the back of your neck. Stretch your arms forward, and then press your heels together again, see if your whole body is shaking a little bit. If so, you're doing it right. Release your legs down, release your head down, stretch your arms up and over your heads, so within one instant, just trying to unweight yourself that little off the ground, should get your whole body on fire. Let's do that again, arms up and forward, chin over chest, back of your neck long, curl yourself up high enough, your lower back starts to lengthen out again.
Remember when you had that hand against your lower back in standing? Use that here, and then press your legs so far out of your body, they get just a little big lighter off the ground, and just hold it there for a moment. Can you find your breath here? Did you just start holding it? Release your legs down, release your head down, stretch your arms up and over your head, let's do it one more like that.
Arms up and forward, chin over chest. Reach the legs out of your body. Keep the fronts of your hips open and we're just gonna stay with this here for our first lesson, we're not gonna add the pumps in, that's the good news. And there is no bad news. Deep breath in, keep reaching through your arms, reaching through your legs, maybe they come up a millimeter more, just because you make them longer.
And release everything down, head goes down, arms reach back over your head, do you feel warm? Good. So, it looks, again, it looks like nothing on the outside, right, but just that tiny movement against gravity is what really warms you up. Bend your knees into your chest, hold on behind them, and gently rock yourself up to a seated position. The next exercise we're gonna tackle is the roll up, we can start with a roll down, in fact.
Alright? So sit yourself up. With your feet head distance apart and right in front of you, you hold on behind your thighs, and you just use the hands behind you to pull yourself forward a little bit. You might start to detect the bony part of your seat as you pull yourself forward a little bit. Try to be right on top of your sit bones, alright?
You look straight ahead for a nice, deep breath in. The spine is lifted, maybe you find your ribcage lift up and away from the hips. On the exhale, start to curl your hips under, think about that hand that you had on your back earlier, make that space in the back of you, and start to roll yourself back, as if you're trying to touch the back of your belt down towards the mat until your arms are fully extended. And just hold yourself there for a second, take an inhale here, widen your ribs. On the exhale, just get more hollow through the front of you, puff out the back of you more, with no tension in your neck, the breath flows freely.
Let one more time, inhale. And then exhale, pull yourself all the way forward and up, so we just build strength in that little hundred lift, right now, we start to look for some ability to the back. Let's do that again. Curl the hips under, roll yourself back down, the hands support you here, we're looking for the biggest curve possible, head to tail. No flat bits left in your spine, instead of just moving one part of your spine a lot, try to move each one a tiny little bit.
Hold it for a breath. Nice, you guys, exhale, puff the lower back out, and then gently pull yourself all the way back up. If you're feeling that this is within your control, stretch your arms out in front of you, let's just do it two more times. Again, super basic, make it about finding lift through your back first, oh, there we go, and then exhale, start to roll yourself down. You have somebody right in front of you, right, so give them a wink and a smile, it shouldn't really steal your peace or your breath.
Hold it for a second. Good, you guys. Six takers, hands of the legs, that's great. Can you stay here, make your feet heavy, and while you're maintaining your breath, but holding the shape, can you find more depth in the curl? Roll yourself all the way back up.
Sit yourself up nice and tall, and then roll all the way down onto your back. So, so hard, right, to get control over your spine there, that was great though, none of you lost any space in your back, none of you held the breath. Now we're gonna work on not looking so sad while doing it. That's the next step, really. The next thing we actually learn in life, right, as babies, after we learn how to lift up our head, after we learn how to control the weight of our limbs, is to roll ourselves around, and in the traditional mat work, the exercise that replicates that is the one leg circle.
Which is not really that much of a stirring motion of the leg, but really, a spinal rotation, traditionally, right, so we're gonna explore that with a very basic variation of it to start. Bring both legs down onto the ground. Just bring your right knee up again, into a tabletop position, so your knee floats right above the hip, your shin bone is parallel to the ceiling. All of us probably know the stretch where you take the knee across and you give yourself that big spiraling stretch, so we're gonna do that right now, you take your left hand to the knee, and you bring it right out to the side. Straight out to the side, so you ride across the chest from your left shoulder to your right fingertips.
Now, from here, you just pull the knee across to the left, until your hip starts to lift. That's the stretch that we all love, 'cause it feels so great on the outer hip, right. You can bring your right arm all the way out to the side there. Exactly, towards her. You might just touch her, we're all friends, that's fine.
And then come all the way back to center. Alright. So what happened here, is you pulled the leg across the middle, and then the hip started lifting, right, this time, I want you to do it again, but very differently. Instead of letting the leg go across the middle, keep the knee right in front of your hip, and move your spine, meaning, your hip starts to lift up right away, and you take the knee with you as opposed to letting it cross the midline first. Did that change anything?
Do you feel more of a stretch and a spiral through your spine? That's what we're looking for right now for the next exercise. Does that make sense to you guys? Come back through center, let's do one more time. So instead of pulling the knee across the midline, you lift the hip up, and you keep the knee forward, relative to the hip.
One more time. What that does, it gives you a bigger rotation to your ribcage, which is really where we want most of the rotation to come from. At the same time, though, see if you can counter rotate the leg that's on the ground, which makes it a little bit gut-wrenching, I admit. But that's by design. Slowly come back through center.
We still have the other side to do, right, bring the right leg down. Bring the left knee in, give yourself the stretch you want first, the easy one, where you just pull the leg across to get that stretch on the outer side of the hip. Now, did any of that steal your breath? Right, it's so nice to fall into a deep stretch that gives you a lot of sensation, then it's so easy to just hold your breath, right? Nothing good can happen when you're holding your breath, I'll tell you this much.
Let's do that again, now this time, the knee stays in front of the hip. Take it across, spiral through your ribcage. Check in with what your left hand is up to right now, did your wrist just start to lift, did contact seize through the arm, the back of the arm is still pushing back, so your chest can open, which gives you even more real estate for your breath. You guys are so lucky, come right back through center. Take the leg down, that's all just the prep for one leg circle.
Bring the leg down, shake out your legs for a second, shake out your knees, remind yourself your legs can also feel very soft, and not just heavy. Bring your arms down by your side. Let's take it all the way up now, the right leg goes straight up to the ceiling. Try to start the exact same way, meaning you're not letting the leg cross the midline, you're actually lifting your hip up, to take the leg across until it point to the left at about 45 degrees, and then circle the leg down till it brushes past the other foot, bring it out to the side with the hip steady, take it back through center. We'll just do it two more times, try to start the exact same way, hip lifts, to take the leg across, circle it down around and up.
How big is the circle? Well, as big as you can keep your shoulders open and as big as you can keep breathing. Down, around, and up. Then reverse it, keep the hips steady, open the leg to the right. Circle it down, as you take it across the middle, the hip is allowed to peel off the ground and back up two more times.
I see we're making different decisions as to where the arms are right now, I think that's okay. Right, the wider your arms, the more of a stable base you give yourself to move from, the closer your arms are to your body, the more tricky it gets to maintain your balance, so you choose something that's right for you. Bring the right leg down, that's through the other side. This looks great you guys, bring the left leg up. And doing it this slow makes it really torturous too.
So actually, as you progress, it'll get a little bit easier. Alright. Left leg up, take it across to the right. Down around and up. Two more times, take it over, down around and up.
One thing we didn't talk about a lot yet is, this is not about your leg moving in space, it's about your whole body, at all times. How does the rest of your body relate to this challenge? Your arms, your neck, your shoulders, the other leg. Your breath. After three reverse it, open, down, across, and up.
And two, down, across, and up. And if you're ever in doubt as to what to focus on first, always go right back to your breath. Last one. Over, down, across and up. And lower the leg all the way down, shake them loose.
Nice work, you guys. We're gonna go back to something that we've already done. Reach your arms up and over your head. Just think it's another day, same class, we start again with that head neck and shoulder lift, arms reaching forward, legs lifting just a smidge off the ground. Chin over chest, lifted up.
Seat belt around the waist, can you stretch your legs out of your body till they lift up? Now from here, let's take it up a notch. Can you sit yourself up bending your knees into your chest, balancing on your hips, and puling your knees towards you, holding on to your shins, right by your ankles, and if the answer is no, that's great. Hug your knees into your chest here, for a second. We'll try it a couple more times, right, so if this doesn't go very well the first time around, that just means you're human.
Hold it there for a second, now reverse the actions that got you up here. Stretch your arms and legs forward, melt your spine back down like that, roll back, we did, until your whole body is down again, stretch your arms over your head. It's like one of those old fashioned situps at the gym, just much slower. Lift your arms up and forward, chin over your chest, reach your legs out of your body, try it again, bend you knees up into your chest, good. Lift yourself up, grab a hold of your shins, right around the ankles, if you haven't exhaled in a while, I highly recommend it.
Good. And then slowly come all the way back down, stretch your arms and legs towards your neighbor in front of you, melt the spin down with control, and release. I'll let you do a couple more in your own timing right now, this is your practice at this point, right, just try to get a little better at it each time. That's all I want. Lift yourself back up, chin over chest, bend your knees, come up to the highest point possible, wherever that is for you, right now.
Hug it in. Yes, there we go. Deep breath in at the top, checking at the top here, is there any tension you can strip away from, eyebrows, teeth, shoulders, neck. Good, put it where you need it, arms, legs, spine, and come back down with control. So you see, we're passing all these moments of strength that we've been building from the start, reach your arms over your head, that was your prettiest one so far.
But let's do one more. Lift yourself just to the top, again, the good news is you don't have to come down from this one. Bend your knees up and into your chest, hold it at the top, good. Now again, find a sustainable position here, one that doesn't make you hold you breath. Heels to seat, that is tight.
Elbows out, that is tight, this tension in your arms and legs, so that your spine can be loose in between your limbs. The next exercise is called rolling like a ball, I call it rolling like a kid. Just imagine your little kid playing around right now, roll to your shoulders, lift your bottoms up towards the ceiling, maintain the shape you're in, and come right back up. Nice. Do that again, roll yourself back to the shoulders, lift your bottoms up, and come back to the center.
Did that steal your breath at any point? Try it again, without letting it steal your breath. And you start to notice, I'm not incredibly specific as to when I want you to breathe, I'm really just interested in you not holding your breath. Try that again, roll yourself back and lift yourself back up. Did you change the shape anywhere along the way?
You still wanna be like a ball, right, so your spine is round and let's do it a couple more time, rolling back and lifting yourself back up, and let's do one more of these, rolling back, lifting yourself up. Why do we do it? Because it's fun, because it inverts us for just a brief little moment, and it puts a smile on your face, doesn't it? Well, most of us, anyway. Slowly come back down the way that you went up, stretch your arms and legs away from you.
Roll yourself onto your back, stretch your arms back over your head, all the way away from your toes, and then shake out your legs again. Bend your knees up into your chest, give yourself a rock up to a seated position, try to come back up to standing. Which, any way you like, again, there's no technique, shape or form, to this yet. We'll get to that in an upcoming lesson. Just finish up here with your heels together, your toes apart again.
Remind yourself, this is not just an empty shape you're making, you're pressing the heels into one another to stand taller, you stamp your heels down, the roof of your head is lifting up, towards the ceiling, your arms are relaxed down by your sides. Check in with your own body, close your eyes for a moment, this might be the last time today that you get to think about nothing other than yourself and your breath, so indulge in that. Did anything change in the last 30 minutes? Is there more space for your breath, maybe more length in your body, maybe you just feel incredibly sore. All of that is good, don't judge, don't fix, just observe, and then take one more breath with your eyes open, from the soles of your feet into the crown of your head.
Exhale it all out. Alright. And that'll be your first lesson into our little tutorial on the traditional mat work. We're gonna come back, and add in new skills working on continuing right where we just left off. Adding in new stuff.
Great work you guys.
Comments


You need to be a subscriber to post a comment.
Please Log In or Create an Account to start your free trial.
