Read Full Transcript
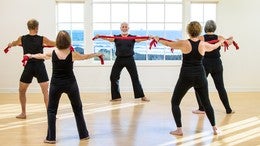
I'm Ken Gilbert here at Polaris any time. And over the last few years I've been playing with the idea of what happens if somebody has a limitation. And one of my students came in with issues around a knee and she found herself getting tired during the standing PyLadies classes and I said, well borrow with stool. So they have stools where I work at Santa Barbara Dance Arts, which she was working on a stool sitting seated and all of a sudden I got this idea, let's play with it. And we found for the last year that this is a great tool to play with.
This is called a national public stool, is adjustable at the bottom with the legs. You can find them online, different distributors. The Mason is what I'll refer to. So the front edge of the Mason Knight here is like the lip of a spine corrector. So play with that as we work through the stool class. So I'm calling the stool polities and it's an, it's part, a part of my program for toilet training is you'll find out later sitting up upright on your sits bones at the front edge of the Mason site. So sitting upright with the sits bones. Take hold of the a thighs.
Put your hands to cap the kneecaps sitting upright. So you want your Shins upright in this space, from your ankles to the knees. So pull your feet a little bit more forward. George. See you're a little bit more on the base of your feet. Feel the base of your big toe, little toe, middle of the heel.
Lengthen up through the spine. Spin the elbows out a levels the clavicle and makes the uh, shoulder grill a little bit more level. Lengthen up and then pubis to navel moving only from the lower back and right [inaudible] for more credit in linkedin. The lumbar length and width in the lumbar. One more. This time the arms release roll back a little bit for the, so you're sensing the back of your pelvis. Keep your eyes level to the floor. Keep your feet glued to the floor, you give them a little weight through the heel, the base of the big toe and the middle of the heel. Big Toe, little toe.
Then coming up and rolling back pubis enable and coming up. Two more and one more coming up this time. So we take a little bit of break to create an arm pattern and then we integrate the coordinate the arm pattern to the the contraction arms. So start here with the arms and then reach out from the shoulder girdle. Right arm left. Both left, right both, no out to the side, straight off to the side, right. Not the shoulder blade, just the upper arm bone and left getting a sternum wide back, sitting up on your sits bones. And now down [inaudible] she left.
No, we integrate that with the rollback. So we return the arms to the position here on the inhale. So inhale up, exhale and right arm goes up. [inaudible] return to the sitz bones each time. Now out to the side, right [inaudible] and now down [inaudible], [inaudible], [inaudible], [inaudible], [inaudible], [inaudible] turn and arms, hands to the knees. So that stimulates coordination through the spine. Remember, this is mostly about, as we discovered over this last year, it's mostly about getting the sitz bones down into the the stool, a very functional position for many of us, sit seated at a workstations or at a table for whatever purpose and sitting just sitting up, just the sitting up. We'll allow that to be important.
So you're working from the lower back up into the mid, back into the upper back. So let's change the leg position. So put your feet so the coming straight out from where the legs would be. If you had a mirror in front of you would see that your legs are right in front of the stool legs. So lake to lake, like the up and pubis naval. Yep, sure. And your relationship with the spine. [inaudible] one more [inaudible] I'm a reaching outboard on the exhale. Now pull yourself upright, pull yourself upright.
She a little bit of a lower back extension one more and stay arms come up up her head. Now we do the first full reflection of the spine from seated rounding over head, neck, shoulders, and arms. Then rounding over thoracic ribcage, rounding over stretching to the Lumbar, you're still lifted through the lumbar sitting on your sitz bones. Now tip the pelvis over. Pubis goes toward the floor, crown of the head to the space between here and let the arms reach wide. Imagine you're hugging your legs and or the soles of your feet.
So you're letting the lower back lengthen and you're letting the upper back, mid back widen from here. It's the seated washer woman. Inhale, pull up and keep the chin toward the chest. So you're opening up the back of the neck and relationship to the back of the lumbar. Two more and one. Now rolling up. Set your payables and pelvis first and then lumbar over the pelvis.
Sit on your sit bones, arms there, hanging then lumbar into the thoracic than the neck and the head. And as Laura, as Leslie is going through something right now, you might find yourself getting very stimulated up into the intercostals and through the, the thoracic or the, uh, the trans versus. So you might notice that there's some stimulation that will tighten up. We call it the stitch. We used to call it a stitch. I got a stitch in my side. That's what that will happen. We're here head, neck, shoulders and arms and thoracic rib cage and then lumbar lengthens. Tip the pelvis over, running over all the way, but the arms hang down and roll up. Pelvis sits bones and then lumbar, lower back and then thoracic ribcage. Then the neck and the head were changed. The dynamics of this now reached the arms overhead and then hinge forward flat back forward. You're still aware of where your sitz bones are.
Now you're on the front part of your sits bones returned to the bottom of the sitz bones and then teaching the spine to stabilize the extension of upright. Four more [inaudible] getting sense of competence, appropriate reception, moving through space and time here, keeping the feet on the floor, the sit bones are rolling forward. Stay there in the hinge. Now let yourself round over. Crown of the head, neck, shoulders, arms, thoracic into the lumbar and Lynn, let's roll up from here, the pelvis and then chest, the neck and head. We'll do that one more time to get the dynamic of the extension or the flat back hinge and then we'll play with it differently here. Flat, back and forward. And let's stay here for a second. Come up right and then hinge back.
[inaudible] hinge upright, hinge forward. Find your feet, plant your feet into the floor. And [inaudible]. He'll basically the big toe, little toe and [inaudible]. [inaudible] one more [inaudible] and forward. We've done this before. Now rounding over crown of the head and then thoracic and lumbar rounding over. Here's the new dynamic from the arms reaching alongside the face. The fingertips is still toward the floor. Extend the crown of the head from the middle back and then extend into the thoracic.
We're recreating the hinge, then extend into the lumbar. We're now on the flat back hands as we were earlier coming into upright hinge, forward rounding over shh. Arms come to alongside the face and then start from the crown of the head. Shoot, thoracic, lumbar, and then sitting up and arms down. So we get the dynamic of the flat back going, let's go the of that. So that is a directional piece. So we're rounding over first and then we'll grow from the, the uh, the tailbone.
So we're rounding over head, neck, shoulders and arms, and then thoracic rib cage, and then lumbar. And then rounding over from here. Reach the arms. So they're alongside the face, but you still stay contracted over. Stick the tailbone out so you're rolling forward on the sitz bones. Then roll up into the lumbar. Let's keep the arms hanging down and then roll up into the thoracic and then into the neck and the head.
So we're in a seated forward hinge and then round over crown of the head. Okay. Pulling it up on the lower belly and the thoracic lengthens and rouse and then the lumbar rounds and go over and let's do that again. Stick the tailbone out behind you, press into your feet and then roll up into the lumbar where we, you creating that forward hinge and thoracic and then the neck and the head. Bring the arms to alongside the face, come up, right. Sit and then arms down. So that's about extension. A lot of extension work.
We get to that very differently on the stool. Then we do another apparatus, so we're here lower belly pulls in an app. Let's go to get the towels and rounding over and thoracic, lumbar and then the sacrum. Take call of the middle of the towel and then bring it up. Pelvis first and lumbar and thoracic. Neck and head. Find The d, the length of the towel. I do appreciate having this little nod at the end as I find myself pulling out on that different than the green strap when you have the loops to put your hands into wide back and widen the spine. Lengthen the spines. We're doing two things at once. It's Nice George sitting up, up, up.
It feels different. This, this is new to Georgia. The other three have done this class with me before, so this is new for George. To see somebody new with it is always interesting to see what's understood intrinsically from their experience side. Bending to the right [inaudible] stay on this side. Lift more on the right side and then further over. Lift more on the right side. Bend further over now one more time and reach more with the left arm.
Drop in to the left. Sit Bone as you're there and then coming up right into the upright shit. And then lift on the left. Rights the left side. Lengthen on the right side. Lift and lengthen. One more there. Lift and lengthen. Lift and now reach with the left arm drop and to the left.
Sit Bone and then coming to upright. Let's do it in two breaths. Lift on the right and lengthen. Lift on the right and [inaudible]. She come in center. Lift on the left and Lincoln on the right. Lift on the left and [inaudible] coming. Center one breath.
[inaudible] lift to reach. Sure. Clavicle stays. Level two, the shoulder blades. Four more. This is our seated Koombaya moments. Last two and one. Let me Upright and arms down. Let's play with this another way.
Arms up first to set the shoulder blades and then we rotate this. We'll play with the sits bones here. This is quite interesting, a different different sensibility of sitting up, up and rotating to the right center for more center and arms up and [inaudible]. You can read on all of these. Thank you. One more and [inaudible] been there on center and down. So let's go ahead to the open. So in relationship, if you were to, to go into the forward flection of your spine, you can see your big toe. That's the definition that I learned of a good plea.
A is that on the inside of your knees you would see your big toe if you went into a deeper play that you don't lose connection with that if you stay aware of the opening of your thighs. So play with that as we go here, stabilizing that wide back. Let's do the side bend here. [inaudible] different center of gravity and good to me. One more on each side. Then I want to do something with the sit bone. Let's go to the right, lift the left foot bone and then pull it down. Let the sit bone and pull it down with the sit bone and pull it down. Check in with your head, neck and shoulders.
Be sure that everything is in alignment to that arrangement of the side. Bend Coming Upright and then side bend to the left and left the right sit bone and down. So we're playing with a lumbar asymmetrically. You're playing with the lumbar and the sow as one more and coming center. [inaudible] Lyft. Go a little further over. Then pulled down and coming center in sigh, bend, lift. Go further over and then pull the sit bone down.
Good. And lift the sit bone. Go a little further. Pull the fit bone down and one more time and let the sit bone go a little further. Pull the sit bone down and [inaudible] arms down. Getting deeper up into the rib cage. Yeah, we're finding a, I love this, this integration of the trans versus coming up underneath the diaphragm. That's what it feels like to me, where we're getting the sense of an Arrow going up. So we're getting this, this lift up out of the lumbar. Decompressing. Yeah. Making sense to you? Yeah. George happens to love the spine corrector.
So this is an adaptation in a way that is unique. Why back? We're here. So let's play with the upper back extension. Now it feels different when we're here in the wide stance. Okay. And Upright for reflection releases any tension that may have been built up in the lumbar coming up, right for breast to go over for upper back extension.
Nothing happened in the lower back. You're lifted up the rib cage off of the Lumbar and [inaudible] can we do upright and forward? Flection? Come to upright. Let's do a swing through. So we go to the extension center and forward flection of breath for each one. Got It. And Center Center.
Nothing is happening in the pelvis and the lumbar. It's stable and seated. Last time [inaudible] and arms down for a moment. Let the shoulders lift up and lower down and just lifting lower and alternate. Hmm. Teaching a coordination skill. Now we've pulse it [inaudible] now this is one of those things. I don't know if it does any good, but it's just cute to watch you do it and reach out. I can't wait to see what it looks like from behind Lod grade wide back. Remember the arm flights that we do from other classes?
[inaudible] you're reaching out. [inaudible] reaching out and four and three stabilize the shoulder girdle from any rotation at all. Last one. Now we do the a side bend. [inaudible] start with the right arm and say lifting out of the the lumbar. Huh? Lifting out of the lumbar. Be Sure your feet are planted, your knees are over.
Your ankles. Last two. Okay. [inaudible] proprioception. Where am I in space and time? Last one. [inaudible] coming upright and side. Ben Star with the left and [inaudible] lift up out of the lumbar and teaching the body how to decompress those disks. And one more and [inaudible] put it upright. And down here it gets a little complicated cause we're in.
It starts changing the plane in which we're relating to our body and space. Be Sure you have your feet firmly on the floor so they're anchoring you. So it goes from the feet through the joints of the ankle, knee and hip. Then into the pelvis and then the Lumbar, the thoracic, the cervical or the neck, and then into the shoulder girdle. So we're here rotate first. Now side bend.
The right elbow goes to the right knee coming to upright and then center. It actually won't touch or it may. The point is to find that connection rotate first left elbow toward the left knee coming to upright and center and [inaudible]. [inaudible]. Yeah, playing with the range of motion. Yeah, and then coming down here, let's just do the rotation.
[inaudible] one more [inaudible] then overhead rotate first and then forward flection. So your sternum is going towards your thigh. [inaudible] coming up on their rotation center and rotate [inaudible]. All of this is functional stuff that you do at a workstation. I had a student say, what's so functional about this? I don't do this.
Let's see. Yeah, you do all day long. Now that you know how to do it right and [inaudible] when you learn your resources of something that the body can do with efficiency, it will do that first rather than something that's inefficient. That's my cooking show tip [inaudible] and watching the food star show, they ask you to do a tip to offer a tip. So I give tips now like it's a cooking show. So that's a tip for better life. You're learning functional movement to Change Your Life. So we put the two together, so don't think about it. Just follow the cues.
That will make sense. We do the rotation side, Ben knee, and then we do the rotation into the, that's a circumduction into the sideband had come up on the rotation and center. We'll do it slow. Just stay with it. So rotate first side bend [inaudible] now rotate. So the sternum comes over the thigh. [inaudible] rotate back to the side bend and then come up on the rotation center and rotate. [inaudible] hi Ben [inaudible] rotate now for the sternum to the thigh. Rotate to the sideband. Come up on the rotation.
[inaudible] we have that. Yeah, let's do four in a row. Yeah, don't think about, I will queue it. It's just easier that way. You don't have to think and I have to for you. You're welcome. You are welcome. And [inaudible]. [inaudible] rotate to the sternum. Thigh side bend. Come up on the rotation. Yeah. Okay. It's okay Jane. You'll get it next time. And rotate side bend, rotate. Circumduct actually to the sternum to the thigh. Inhale side, then come up on the rotation side. Bend, rotate side Bend, come up on the rotation and center and rotate. Side Bend.
Oh, I jumped ahead didn't I? And then rotate during them to the thigh. I do that sometime. Side Bend, come up on the rotation and center. Okay, let's play. Okay, so let's add the arm. So as we go into the side bend rotation, bring the arm here. So we're blending three different things. You're rotating sideband and you're bringing the arm with you. Yeah, we've done them all. Let's see if we can play with that. So let's, let's mark it through. I learned that from my dancer wife. Let's mark it through and then we'll give it full, full focus.
Rotate slice though, right arm and then return. Rotate. Slice the arm, rotate, slice the arm, rotate. Slice the arm. We have it, yes and yes. Sure. Now we're moving it one more time. Each side. Last time I don't understand [inaudible] and so we began again this time adding a detail. We're going into an extension upper back, so arms overhead and one more.
This time go into the rotation, arms overhead and the arms slices. It's your right arm slices. Now let's, let's go into the upper back extension. So you bring your back arm back up over here, head in the upper back extension slice again and come out of it to center. Rotate first life going to the upper back, extension at the top comes up overhead. Return the arm to that place and then rotate to center. Okay.
[inaudible] do we have it? It's complicated. Let's play it again and rotate arm [inaudible] and do the extension and arm and rotate. Center and rotate. Arm reach and overhead and arm returns and center. Did we have that? Yeah. We have a willing enough to look good to me. So we're here. Aren't polls both left in both. It's just releases with neck a little bit. Yeah, and here we go.
For the big one, put the feet together, so is similar to a wide turnout. Fletcher taught us a lot. The white turnout on a reformer and it just makes sense. Find your sits bones on the front edge of the Mason right there and that you can bring the feet to touch that ring, that bottom ring of a stool. Remember that these are variable in height.
Jane is on the shortest one cause she's tiny and we found experimenting with them. They're more challenging for longer lake people to have the short stool. This is a little bit more moderate for all of us. So you're having your heels together. Find the base of the big toe, little toe, middle of the heel, and then you also have that place of the stool. Put your hands on the inside of the thighs. Lift your sternum, widen your back. You're sitting up on your sitz bones.
You want to learn this thing about dropping the pubis down at the same time, pulling it in and up. So it's a little bit of an oxymoron, but it teaches you how to engage the lower back, lower belly connection. So we're here pulsive legs out to the side. Go ahead and use your hands to remind you in proprioception. [inaudible] now do this from the hip, not the knee. She reaching up underneath into the buttocks. Hamstring, external rotators.
Eight more. Keep the heels together. That's your pivot point. And bring the knees in slightly but not together cause that were tweaked the ankle. Bring it in and again, setting up and in and out. So just reminding the nfis that they are there. Two more and one more arms over head. So since we just did that pattern of the rotation side, Ben, let's go to it again. Everything is very different. Let's do it sideways. First lateral and then we'll go into the rotation. So four and four lengthen up, wide back. Remember, life is a pull up and side bend. Okay, coming up, coming up, coming up. Now let's add the rotation. So we do a rotation and side. Ben, come up on the rotation and center rotate side Bend.
You'll notice that your knees want to come in. Allow that to not happen. Rotate and keep the knees opening wide coming up and center, rotate knees stay wide coming up and central. Let's do that one more time. So new connection to the serratus. Anterior and posterior working and rotate side bend coming up and center, rotate side bend coming up and center. This is easy now and rotate side bend, we make it familiar and then arms down.
We play differently now so when you reach the lake out and pull it in, reach the lake out and pull in. Stay lifted here. So we're teaching, the extension of the leg is coming from the the pelvis being rooted into the stool. We have it ready. And so there is no weight shifts with the lower back. You're staying lifted here centered. So it's about balance and centering it also you for Russian dancing and for three you also theory. If that didn't get him to smile and one and now we have the rotation.
Oh No, we have the rotation. Let's rotate to the leg that's moving out. Teaching our coordination skill for more. Sure. Remember, we want to make something new. Familiar. There's another tipsy and one more. Now let's confuse the nervous system and rotate the other way.
Yes, you're welcome. Rotating to the left. As we reach out with the right and stand your sits bones, you start to notice the QL last two and one and arms down. Yeah, we have some rudimentary skills to play with. This is constantly confusing in class, so let's play with this as best we can. So we have the arms down. You inhale on the bath, the inhale, exhale, rotate, side bend, inhale, come up, exhale, return. The legs come in. So with [inaudible], that's what the pattern is. Yeah, I just cleaned it up. Yep. Ready. Inhale. The leg extends and you wait for the exhale, the leg to bring the leg in.
Ready and [inaudible] four more. [inaudible] start going into the limbic brain more. When we were getting out of the having to think, we're now into the movement pattern as it becomes efficient. Wow. [inaudible] it's sitting up on the sits bones. Let's play with the contraction. We haven't done any for reflection for a little bit in the lower back.
So let's release that off the sitz bones just for a bit. We could chat if we want to open the legs. So the knees, these go back and let's do the pulse again. Eight more, four, three, two coming up. [inaudible] okay. I just got what we're doing next, last two and one. This will challenge the lower back.
Okay. Up Right now to do a flat back hinge forward. So you're rolling. Yeah. So plant yourself into your feet. Lower belly pulls it up. We have practices where you can actually stand up. I'm not going to do that today, but we can actually stand up in this position and then sit back down and we'll do something of a variation later. Come to upright. Yeah, we have it.
And I'll do rear rear lift the back rear extension or back extension, lifting back and that center and forward. Sure was asking a lot from the center of the body. I call the bottom of the sternum, the center core. So we're working from the center of the spine lift, no folding, no collapsing, and lift and extend. One more lift and extent here. The degree of the, the flection of the hip isn't matter, doesn't matter at all. That's not what's important at arms down. That's not what's important. What is important is that you learn to use the erectors.
We're in a culture that is going to sleep right in through here. And that's why people are slumping and rounding over. So we've got to learn to stimulate those so that when we're at rest, they just know how to work. Another cooking show, tip, lower belly. Are we done with this one for today? This, this position? This is exhausting. Yeah. Oh, let's return the feet in front of the legs.
So the last step of this class that I'm having fun with is, I call it toilet training. So women do this more during the day than men do. Well, some men don't. Most women are doing this more than men and that is to get up and down from a toilet or down and up from a toilet. So what we do is we find the range of the arms. We're, we'll just go to the chest here and then down. So what we invite now is chest come up, open the front of the hips, and then down and return.
So your appropriate section tells you where the s the stool is. [inaudible] keep the knees over the ankles. Do not let the knees go forward. You're keeping your legs upright. Perpendicular from the ankle to the knee. Sure. One more. Keep the towel, Todd. Yeah, we start here.
We're going into the full star. So your arms come up over here. So open the front of your shoulders and the front of your hips. Ready. And so we're learning to activate the appropriate reception from behind and underneath and [inaudible] the next time you get up from a toilet, you know that you do not need to compromise your body in any way. You can take time to do this. So you have to have a towel or a braid with you at all times, or you can just learn to do it. Let's put the towels down off to the side. And now let's just make this functional.
So we're doing our business and it's time to get up. We can get up, up and down, and you get up and down there. You can make that very presentational as you get up and down and get up and down. Last time, get up and let's do our final salute. Thank you.