Description
About This Video
Transcript
Read Full Transcript
Hi, everybody. I'm Tom McCook. I'm back here at Pilates Anytime, very excited to be back. I'm here with Amy and Sara. I'm teaching a Reformer class, and it's gonna have an integration of some functional stuff in regards to the hips and the spine and the feet that I think you'll find really useful and interesting.
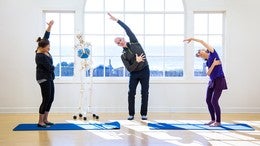
But the first thing I want to teach you is just the simple movement and concept in relationship to what's called Anatomy in Motion, a course by Gary Ward, on how the spine moves in a particular way when you're walking. So, what I want us all to do together is we're gonna put our hand on our abdomen which is basically where the lumbar spine is, and our hand on our chest which is the thoracic spine. So, general rule when you're walking is the lumbar spine and the thoracic spine flex or extend at the same time, and they actually move in the same way in all three planes. But, the first thing is just to understand that's happening, and the neck is going to be doing the opposite. So, just hold that.
Now, take your hands to your pelvis. And the first thing we want to do is just we're gonna let the pelvis tip anterior which is to let the pubic bone drop down the front and then we're gonna tip it back. This is just to give you a simple feeling, okay, now I'm letting my pelvis tip over my legs to the front and to the back. And so now when we tip it forward, I'm gonna have you guys bring your hands back to your abdomen. As you tip it forward and your chest, imagine that the breast bone and the top of the breast bone and the pubic bone are moving away from each other, that your lengthening up and now up the back of your neck.
That's it. And that's what we're gonna work on. And now do the reverse where you draw the pubic bone and the breast bone towards one another. So, you're moving into flexion, but keep the eyes on the horizon where you're letting the neck extend. That's it.
Your six gun posture. And now we're gonna reverse this, and now tip the pubic bone forward, go up the front all the way to the top of your breast bone, then up the back of your neck. Now notice when you do that, the shoulder girdle naturally comes back. Let it. And now let yourself reverse and let the pubic bone and breast bone come closer, and let the neck extend and let the shoulders come forward.
That's just a simple feeling what we're gonna do. Now we're gonna do it in a flat back hinge. These guys are gonna come on over to the Reformers, and they're gonna face each Reformer and put their hands on the Long Box with their arms straight and come into a flat-back hinge. Now with the flat back, I recommend you guys all keep your knees bent. So, this actually makes it easier to be there.
Now sense that same feeling of being long up the front of the spine, from the pubic bone to the breast bone, then up the back of the neck. Then let the shoulder girdle slide down the back a little bit and notice when you do that that the feet are flattening a little more. They're going into what's called pronation. Now as you exhale, narrow the sit bones to the bottom of the pelvis and round the spine where you feel the ribs lift and now reverse. Send the tail back, pubic bone pulls away from the breast bone, you lengthen up the front of the spine up the back of the neck.
And reverse and curl. Just take it nice and slow. We're gonna do four or five more where you just feel the movement of the pelvis, spine, head, shoulder girdle. Those are the primary things we're focusing on, and then we'll curl again. Now we're gonna add the feet.
So as you go down again, as you send the tail back, see the arch becoming close to the floor and the front of the foot swiping out a little bit so the foot is widening. Now as you round the spine, the ribs lift, feel the arch lift and feel the weight shift a little more to the lateral heel. And just do two more. Now you're allowing movement to happen in the feet which is creating movement in the legs and following the movement of the pelvis and spine. Just do two more.
So we're getting mobility in all the joints up the chain now. We're gonna do two more. Gotta watch my counting. It's a little bit off. That's it and then round again.
Feel the ribs lift, sit bones narrow and one last time. Sit bones widen, come up the front, that's it, up the back of the neck. Now hold the flat-back position. Now we're gonna add a rotation and a hip shift. So, as you slowly shift your hips to the left, let your left leg straighten, reach more out of that left arm so you feel the left side of the body lengthen.
Now let go of the right arm and reach underneath where you're adding a spine twist and feel the weight go into the lateral left heel and the big toe. So now you're loading and stretching your glute on the left side and rotating the spine. Then slowly come back. Find that middle again. Shift the hips to the right and let the right leg straighten.
Reach more out of the right arm so you feel that right side actually lengthens. That's it. Now release with the left arm, reach under. Feel that spiral and that loading of the lateral hip. That's it.
And come back to the center. We're just gonna do one more each side. Just take it nice and slow. You're getting a nice stretch in the hips. You're feeling the action of the feet.
Let the pelvis tip anterior and feel that reach. Think more forward opposed to low with the body. There you go and then back to center. And last time now, shift to your right, let the right leg lengthen, then the left. Reach more out of the right side and then spiral to the right.
And slowly back to center. And then gently help yourself up. Very nice. Nice little warm up. Now we're gonna take the Long Boxes off preparing for our next exercise.
So, we're gonna do what's called a kneeling flat-back hinge which will help you integrate the shoulders and the pelvis and get a little more full range out of the hips. So, for this one I recommend one red spring. Gonna come into a kneeling position with the hands on the wooden platform, feet against the shoulder box. And so now the first thing, we're gonna practice that same spinal movement. So the arms will be straight.
There you go. And start with the hips right over your knees. Now think up the front of the spine, up the back of the neck and let the shoulder girdle come in slightly. So, there's a little bit of retraction. Now as you exhale, slowly send the knees all the way out to full hip extension, see your hip bones narrow.
Now from the bottom of the shoulder blades, reach away. Now keep your arms where they are and pull the knees in widening the back of the pelvis, feel the front of the spine lengthen and the back of the neck lengthening. Now push the legs all the way back again, now for the rest of the movement, the arms stay in the same place. And just get a sense of that, that you're getting a nice sense of deep hip flexion, you're feeling the front of the spine lengthen when the legs come in and the back of the neck stays long. Arms are plugged in down your back.
Let's just do two more, you guys. Sit bones widen on the end. Sit bones narrow when you're pushing out. That's it. And then bring it all the way in.
Now help yourself all the way up from there. We're gonna do a glute loading exercise. Let's add a red and a yellow so we have on two springs. And let's put your bar on high bar. (bar clicks) That's it.
So, for this particular exercise, you have to stand inside the Reformer so when you do one side, you might need to shift the spring after you do one side just so you can get your foot in there and you're not tweaking your body because of where the spring is attached. So, we have on one red, one yellow. Now you're gonna put the cart out, stepping, kneeling and then put your foot on the floor and inside the Reformer. That's it. Now let the cart come in as far as you can and let the standing leg be relatively straight as best you can.
There'll be a little bit of a bend in it. Now think of the arms and the bar as just for balance, and we're working on the glute. The glute attaches to the bottom outer part of the thigh and the sit bone area and the top back of the pelvis. It's really on the side of your hips, not just in the back. And we're gonna lengthen the standing glute and load it.
So, first thing, just bend your standing leg a little bit, but keep your head right over the pelvis. Now tip the pelvis over the leg as you straighten the back leg and keep bending your front knee just a little bit more. That's it. Now you're loading your front leg, and your arms aren't taking any weight at all. Now help yourself all the way up and in and just visualize your taking, your loading your glute on the weightbearing leg as it lengthens.
Now do that a few more times. Just take it slow before we introduce another plane into the exercise. Tip forward and then come right back up. So, resist the temptation of overarching the back. So, like you're gonna let it go in a little bit of extension, but you're really trying to load the back of the hip.
That's it. Now we got it. There you go. Now from there, so right now what they're doing is they're tipping it in the sagittal plane, this way. Now we're gonna introduce, they're gonna bend a little bit, now they're gonna let the hip hike slightly on the weightbearing side and the knee come in into what's called adduction.
Now it's gonna load the hip more. Now keep tipping over it as you do that and now let it shorten to come back up. I think we find a little love there. And just do one more before we add even another plane. We are on a tour.
Let the hip come up, knee come in and then tip over the leg. And then come right back up. Now the final piece, we're gonna add a rotation which will load the glute more from the back leg side. So, first thing will be bend first, feel the load, let the hip lift a little bit on the weightbearing side, and let the knee come in slightly. Now tip over it and with the back side arm reach across towards the front knee.
That's it. Feel that bigger load now. Now come all the way back up nice and smooth. And just do two more at your own pace like that. First, you're loading, you're letting a little hike happen, and adduction, a tip and then a reach across.
Smooth breathing all the way through. That's it. One more, you guys. Last one. First, feel like you first load by doing a small bend, let the hip hike slightly on the weightbearing side, let the knee come in slightly, tip over the leg and reach across.
Beautiful work. Then come all the way. And if you need to change the springs to the other side to switch your legs, please do. And we're gonna go right into side two. So, when you load your glutes and lengthen them like this, you just made them functionally more available for you when you do any bridging which we will do after this exercise.
So, first thing is just get a sense of your starting position. You're as upright as you can be, and just bend the front leg just a little bit so you can feel okay, I'm loading my glute on the front leg because I'm putting weight on it, and I'm letting my pelvis tip slightly anterior. And as you let your pelvis continue to tip anterior, reach into the back leg and just use the arms for balance. Now let the back of your standing hip bring you back. See the muscles sliding together.
Imagine your absorbing the weightbearing leg into your hip joint. And again, tip over it, feel the sit bones are widening on that front side, and then bring it right back up. Nice and smooth. Now you can include the foot too. The foot is widening as you bend so your foot is moving into pronation which assists in the muscles in the back of the hip lengthening.
And bring it all the way up. Great for your lower back to get this to happen better. Now, we're gonna add the height. So first thing, just load by shifting a little bit forward. Now let the weightbearing hip come up slightly on that side and let the knee come in slightly towards the midline.
Now hinge over it feeling that little bit of a shift. It's really small, but it's a pretty big feeling change. And then come all the way back up. Just do one more before we add the rotation. That's it.
So, it's a load, a hike, adduction and then hinge. There we go. Now, we're gonna add the rotation of the torso towards the front knee side from the back leg side. So, first load, let the hip hike slightly, let the knee come in slightly. Now hinge over, final piece is to reach across.
That's it. Beautiful, you guys. And then come all the way back up. Beautiful. The key part is that loading.
Do two more. That's it. And then let the hip hike, let the knee come towards the midline, hinge and reach across. And then gently help yourself all the way up. One more.
If you're wondering how to work your back side, you just found it. (laughter) That's it. And now hinge and reach across. And bring it all the way back up. And then gently help yourself back out.
And now from there we're gonna go to middle bar because we're gonna come onto our back the way we would for foot work. Middle bar with three springs. I recommend two reds and a blue or some variation of that. Whatever works for you. And then we'll come down onto the back with the heels on the bar inline with the sit bone.
So roughly about six inches apart. And make sure the head rest is down. So the position of the head is not compromised. That's it. So, now the first movement is gonna be a bridge so we're gonna move into a posteriorly tipped pelvis.
And when we do that, the ribs will come down. So, I'll talk them through. Take a breath. Now on the exhale as you sink, right above the pubic bone, curl the tail and feel the ribs sink as the lumbar lengthens, like your tail is being tractioned to the back of your knees. And come right up into a bridge.
That's it. Now take a breath in the bridge. Now right below the breast bone, think of your abdominal muscles. Use them, sink there, to traction your back back down into the mat. There you go.
We're just gonna do two more before we add something. Take it nice and slow. As you curl, the sit bones narrow. Neck and shoulders can stay easeful. Take a breath.
Now use the abdominal wall to lengthen the back out. And let the sit bones stay narrow until the very bottom where you're releasing the pelvis out of a curled spine. That's it. And again, narrow and curl. Take a breath at the top.
And then starting from below the breast bone, sink. So, now you're using the abdominal wall, but you're keeping the sit bones narrow so the lower back can stay long. Now, we're gonna add a march and a press. So, take a breath and again exhale, curl. Now, imagine your keeping the sit bones lifted and you're in the back of your legs but sense more your glutes than just the hamstrings.
And on the exhales, you stand into your legs, float one knee like you're marching. Inhale back to the bar. Imagine the lifting leg is light and hollow. Easeful. That's it.
One more each side. That's it. As it comes back to the bar, take a breath. Now sequence back down. The final set, when we do the next round, you'll come up, you'll reach one leg out in line with the other knee.
Then as you push the bar away, you'll lift that leg towards your head. Focus more on the down leg opposed to high you get the leg. So, curl up again. Hold position. Now slowly reach one leg out in line with the other knee.
Now as you push away, lift that leg towards your head, as you come back in, let it reach over your knee. Just do that for four. Nice and smooth. Feel like you're using the back of the standing hip. Keeping your body nice and well aligned and fluid.
Breathing is smooth. One more. And as you come in, let your foot come back to the bar, take a breath, then sequence back down through the spine. Take a breath at the bottom. And initiating from the narrowing of the sit bones and the tail, curl into a bridge.
Hold that connection and reach your second leg out in line with the other knee. Now as you press away, lift and feel like the hinge now is in your hip joints on both sides. That's it. Nice and fluid. And one more, everybody.
Back in, foot back to the bar. Take a breath. Now roll back down through the spine. Nice and smooth. Now reach back and put your headrest up.
Now we're gonna into roll throughs for the feet. So, we're gonna include thinking that the ankle, knee and hip all move at the same time. So, come onto the balls of your feet. And a little different. For today, what I'd like you to play with is being up high enough on the bar that the bone behind your little toe, your 5th metatarsal, is on the bar.
And the toes are long. No grippy toes today. That's it. Now as you press away, press into those five metatarsal bones. Now stay there for a moment.
Now just let your heels drop under the bar and now rise back up. Now bend your knees, ankles and hips all at the same time and arrive back where you started. And again, press long, lower, lift, bend and come in. There you go. Now, we're gonna add something, just a little awareness piece.
So, now when you lower, lower and allow your pelvis to tip slightly anterior, and let the thighs roll in a little bit. Let the inner heel drop more. Now as you rise up, let your tail lift slightly, and feel the inner arch lift, but you still keep your big toe. Now do that a few times but just lower and lift like that, where you feel you're letting there be foot, hip, pelvis and thigh movement while the feet move. So, on the lifting phase, think of you're going into supination.
On the lowering phase, you're going a little more into pronation. Take it nice and slow. The spine is at its longest, when you're at a high point because the tail is lifted a little more towards the ceiling. Now just do three more. Nice and fluid.
So, here's a good learning movement where you're letting more bones move than we typically do. Good idea. I like that. One more. (laughs) Now from there go right into running. Now when you run, lower one and hold it for a moment.
Now imagine your pelvis is always rotating towards the downside leg, horizontally. So, think of your hip as getting heavy on the side of the dropping heel. And then alternate like that. So feel a little bit of this rotation of your pelvis in the transverse plane towards the heel that's dropping. And go really slow.
Try to take the bounce out of it. Nice and smooth. There you go. And then let the toes be long. Smooth breathing.
You just have a hint of a smile, nothing major. (laughing) Nothing too conspicuous, just feeling good. Here you go. One more each side like that and then just drop one. Take a few breaths.
(inhaling and exhaling) And then we'll take side two. That's it. Feel that weighted hip on the down side. That's it. And then bend and come all the way.
Now we're gonna come up and we're gonna turn around. We're gonna put on one blue spring. We're gonna take it into roll downs. You're gonna put your headrest down. And, I recommend you put your foot bar down to low bar so it's out of your way.
(clunking) That's it. Now with one blue, put your feet on the headrest. Then, make sure you have about a foot behind you for your spine to land. So that way when you roll back, we're gonna back into full spine extension, but you're gonna actually want the middle of your back to arrive on the edge of the cart. So hold the straps in your hands, and hold them like in an underhand grip like you're about to do a bicep curl.
Now as you inhale, bend the elbows halfway. Now initiate by narrowing the sit bones and start to curl back. Curl as far as you can. And as you start to look at the ceiling as your back comes all the way down, let your shoulders retract, now extend into the well and reach your arms overhead. And then bend at the elbows and reverse the movement.
Flex to come back up. Nice and fluid like that. That's it. And again, curl back, feel how the spine is lengthening into the mat. As you reach overhead, feel the shoulders are sliding down the back.
As you bend, nod the chin first. Now slide the breast bone away, feel the shoulders slide wide and low. And again, curl. Now your abs are eccentrically lengthening, controlling the movement. Reach overhead.
Bend at the elbows and peel back up. Feel that nice fluid motion. One more, you guys. Nice and fluid. Sit bones narrow to help your lower back lengthen.
And reach from the underside of the scapula. Bend at the elbows and peel all the way up. Okay, you guys, so the next exercise is oblique twists. So, reach through the straps so you can hold the strap in a way that it has a little bit of tension on it, and have your palms facing down. So, the movement, I'll show you guys, this way would be your knees and hips will turn one way as your upper body turns the other.
But, I'll talk you through. So, first as you inhale, take your arms and torso to your right, let your knees sway to your left. Now, curl down in rotation, like that. At the bottom, keeping the sit bones narrow. Reverse, upper body other side, knees other way, now curl up through the spine.
Nice and fluid. And arrive back at the center. Now go to the same side. Go to your left again, left upper, knees right. Peel down.
That's it. Now switch at the bottom. Curl up keeping the shoulders low, sit bones narrow so you have to use your abs. Then rock up onto the sit bones. One more.
Second side, curl back. At the bottom, rotate towards your second side. Peel up in rotation and arrive at the center. Now we're gonna take that directly into rowing. So for rowing, let your legs straighten out and hold the end of the strap.
We're gonna do rowing back. Are we excited? (laughter) I think we are. Now hold it in your hands. Now the first thing, the movement where your arms will be straight out in front of you.
And as you inhale, draw your hands to the center of your chest. From your pelvis, pelvic bow to the back. Curl as far as you can, where you're feeling that you're keeping your lumbar long. Now hold the shape. Inhale, open the arms out to the side.
Start to press back and let your head follow forward fold. Reach the arms all the way back. Now start to lift the arms up just slightly to shoulder height. Now sweep them forward like a butterfly stroke. Slowly roll up through the spine.
And again, inhale, draw the arms in. Exhale, curl back. Feel the sit bones narrow so your lower back lengthens. Also feel your inner thighs. Open, start to press back from the back of your shoulders.
Forward fold. Use your abdominal wall to take you forward. Lift the arms. Circle them forward. Feel the shoulders slide down your back.
That's what you're trying to achieve. And do two more. Draw in, curl back, feel that lengthening of the spine. Open, start to press back. Find your abdominal wall.
Curl forward. Lift the arms up and forward. Shoulders slide down as the arms go forward. That's the skill that you want to develop. One more.
Draw in, curl back, open, start to press back, curl up and over. That's it. Circle them forward and slowly roll up through the spine. Beautiful work, everybody. Now we're gonna go into kneeling side arms because we're gonna load your lats.
Say what? (laughter) Say what? So, we're gonna go down to one blue. That's it. So, for one blue, we're already there.
So, you guys are gonna kneel facing in this way with your knees up against the shoulder blocks on its side position. So, I'll show you guys from the front. So, what we want to do is we want to load our lat while the arm goes up, but I don't want my shoulder to go up. So, when I'm doing this movement, as my arm comes overhead, I'm stalling it with my side body. And you'll see loading your lats before we do pulling straps will make your lats a little more functional.
You might find that. So take hold of the strap with the hand that's closest to the foot bar and then slide your hips about three inches away from the block. So, the movement will look like this. You guys will take your-- Actually it's gonna be different. It's gonna be an easier version so instead of up there.
Instead of your arm being up like this, it's gonna be here. Just like that. There you go. So, it looks very official. Now push down into the shoulder block and open your hips to the front.
The movement will be, just reach it straight out to shoulder level. Now let the arm slowly go up overhead without the shoulder going with it. And now bend at the elbow and come back to your starting place. And again, reach out. As the arm goes up, the shoulder stays low so you feel like you're stalling it from your side body and then bend and reach again.
Now as the arm goes up, keep standing into the shoulder block. Feel the shoulder goes away from the ear opposed to towards. That's the hard part. One more. Reach.
Imagine the shoulder blade goes down for the arm to go up. And, we'll take side two. That's a little bit of love. Of the side body kind. So now you'll take the strap with the hand closest to the foot bar.
Come up to tall kneeling and have your hand on the block with your knees about three inches away from the block. Now side bend, but open your hips to the front. Looking down on the exhale, slide that arm out to straight level with your shoulder. Now as the arm comes up overhead, sense your shoulder blade is coming down, as the arm goes up. And again, reach out.
As the arm goes up, the shoulder stays low. And do your best to keep your center of gravity nice and low. Now let's do three more. Think of the shoulder blade upwardly rotates as the arm goes up so that inner border comes down your back, as the outer border sweeps towards the armpit. There you go.
That's working. One more. That's it. Great work for your shoulder girdle. Very nice, you guys.
As you finish, gently help yourself off, and we're gonna set up for pulling straps. We're gonna put the Long Box on, and we're gonna want our foot bars all the way down so they're out of your way for your legs. We'll keep the weight the same, just one blue, relatively light. There we go. So we'll have the box right up against the shoulder box.
And then when you're ready, you're gonna come down onto your belly facing the straps. Have your chest just over the edge. Now reach through the strap and hold the bottom of the rope where the straps become the rope. Now take your hands outside the rails. So the difference here is gonna be what we did standing where we lengthen up the front of the spine all the way to the top of the breast bone and up the back of the neck.
So, first thing, just bring your head up in line with the spine and let your shoulders retract a little bit, just slightly. Now imagine you're gonna start tractioning your pubic bone and your breast bone away from each other. Like your pubic bone is gonna go towards your feet. You're lengthening up to the top of your breast bone and up the back of your neck. And as you start to feel the middle of your back, drag your arms back to your sides.
Pull them all the way back. Take control of the return. You might notice that it's easier to keep your shoulders back when you do that little bit of spinal movement first. Back of the neck stays long the whole time. So you're doing a little bit of neck flexion with lumbar, thoracic extension.
The scapula naturally retract. Let's do two more. So no need to worry too much about neutral here. One more. Not that you were.
(laughing) Now as you come down, go to the lightest part of the strap. Take your hands all the way to the very end of the strap. Now we're gonna do T-press, but you're gonna get into it the same way you did the last exercise. So with your arms long, close to the carriage, again slide up the front of your spine, up the back of your neck, shoulders retract slightly. Now pull the arms all the way back to your sides.
Now rotate your palms toward the floor. Let the arms externally rotate. Hold that. Open your arms just halfway out to the side. Still below the shoulders.
From the bottom of your scapula, pull your arms to your waist. Keep sensing that the front of your spine is long all the way up to the bottom of your neck, on top of your breast bone and up the back of your neck. Pull them down your back. Shoulder blades down your back. The energy out the top of your head.
Three more. Smooth breathing is a good idea. Nice and fluid. Good, you guys. One more.
And lengthen all the way down. Beautiful work. When you're ready, help yourself slowly off the box and have a seat on the box facing the straps for a version of a roll down that's a single leg teaser. So now take hold of the straps in your hands again. So now we're reversing the movement of the spine.
And what I'd like you to do is just start with a little bit of tension on the straps where you can reach through and hold either the bottom of the rope or the top of the strap. And just practice doing a posterior tip of your pelvis, and as you that, the ribs come in. And when you get about halfway, reach one leg out in line with the other knee and keep curling back now until you touch the bottom of your lumbar. Take a short breath. Now curl right back up.
And then let that foot come down. We're gonna alternate three times on each side. Take it slow. There you go. That's it.
Feel the reach of the leg. Feel the zipped up feeling on the inseams and then curl back up. So, now you're reversing. You're getting all that length in your lower back after you just worked your back muscles, and you're working your pelvic muscles too, your inner thighs. And peel it right back up.
Nice and fluid. Let's do one more each side. Feel the narrowing of the sit bones. The shoulder blades are wide and low and then peel right back up. Now let's do one more.
Nice and fluid. That's it. And then peel right back up, you guys. Now from there, let's place the straps back on the pulls. Short and sweet.
We're gonna help ourselves off and take the boxes off, preparing for the long stretch. So, for the long stretch, I recommend middle bar, one red and one yellow. (clunking) And then when you're ready, come to standing up on the machine itself and put your hands on the foot bar with your feet like in the middle, and actually before we do that, let's put the headrest up because you're feet are going to go into the crease of the headrest. That's it. And you can just start standing up on the machine itself so it's an easy transition.
Now just step one foot back, the ball of your feet in the crease of the headrest. And then your second leg. Now bring your heels right together and when you lower your pelvis, I want you to slightly posteriorly tip it. Now widen and lower your scapula and now feel like you're gonna reach out from the bottom of your scapula, keeping that slight flexion in the spine. That's it.
And now feel, there you go. That's it. And then pull yourself right back in and really feel that you're keeping that sense of length in the back body, and the sit bones are narrow. Do two more. That's it.
One more, everybody. Now as you come up, step forward. We're gonna go into flat back elephant. So, for flat back elephant, have your feet just in front of the shoulder box. If it feels too far away, we can have you walk a little further forward.
It's all good. Now first thing, bend your knees enough to tip the pelvis over the legs and lift the top of the spine through your arms. Lift the front of your spine forward. Now lengthen the back of the neck. The concept we've been working on today.
Now get that sense that you've got a nice deep hip crease. Now notice, can I let my feet widen and flatten a little bit more. Now press back, small movement to press back through the heels. Now deepen your hip crease to come in and feel the sit bones widen but stay long up the front of the spine, up the back of the neck. Now do that for five.
Now feel how you're opening the back of the hips. Nice fluid motion. (exhales) So in your own practice, know that the legs don't need to straighten. You're focusing more on what am I doing with my pelvis and my spine. That's it.
One more. Now hold the position. Now to go into a round back, narrow the sit bones and lift the ribs. Let the legs lengthen and feel your lateral heel. That's it.
Now push back really small and keep that sense of heavy outer heel, narrow sit bones. Do three more. Nice and fluid. That's it. One more, everybody.
And then gently step off as you complete. We're gonna put the foot bar down. We're gonna go into standing. That was really good, you guys. It was awfully good.
We'll take it all the way down. And then make sure the steel bar is out of the way because we're gonna do standing. That's it. So, we're gonna go with one red and one yellow. If this feels too heavy, go lighter.
And the key thing when you do any standing work, you step onto the dock before you step onto the boat. (laughing) That's it. That wouldn't be good. That's it. Now, we're gonna work with the feet a little bit differently.
So, when you stand, I want you to practice-- Just notice what happens to your legs when you let your feet roll in and then when you let your feet roll out. Just do that a little bit. So, you're letting your ankles roll in and roll out. And notice that when you do that, that the legs turn in and turn out. Now notice if you let them roll out a little bit without losing the contact of the mound of your big toe and without gripping with the toes, you can narrow the sit bones a little bit more, and you can feel the outer hips and the lower back is a little longer.
Now press out maintaining that outer contact of the outer foot. So you feel like you got weight a little more on that lateral side of the foot so the arch is slightly lifted. There you go. (laughing) I'm feeling it. (laughter) This is how you can work with getting a little more lift in your arch and connecting it to your hips. Now add letting the arms go out as the legs go out.
That's it. Now really get that-- think of your outer heel, big toe. You're feeling both of those like a strap across your foot from the outer heel to the big toe are staying down. That's it. Beautiful.
One more. There we go. Now from there, we're gonna go into just bending your legs. So when you bend them really small, keep your head over your pelvis and just sense that when you bend them, you can feel a deep hip crease without leaning forward really and let the arch drop. You feel like the front of the foot is swiping up a little bit.
Now from your outer hips, press the knees apart. Actually, that's it. That's it. And then, actually do that one side. That wasn't a clear cue on my part.
These guys knew better than I did. (laughter) Now start to feel when you're pushing the leg out, that you're weight is going onto the leg that's on the platform. So, you're letting yourself shift a little bit towards the platform, opposed to going towards the moving leg. That's it. Now we're gonna add to that so as you push out, reach your moving side arm forward, the other arm back.
So, you start to add a little bit of a rotation of the spine with the movement of the pelvis and the legs. That's it. Jazz hands. (laughter) You can add a little jazz hands. It's all good.
There you go. (laughter) That's it. (laughter) Now, we're gonna add a rotation that will finish the movement. So, press out. Now as you come in slowly, straighten both legs.
Now fully lengthen the standing leg and turn the pelvis towards the standing leg and let the cart side heel lift and turn your pelvis in, similar to the way you would finish a golf swing. Now feel your lateral heel on the weightbearing leg but still keep your big toe. Now that's your moment of full supination. Now again, press out, bend your standing leg, reach the arm forward on the slide side. That's it. (laughing) Come up and in.
Fully lengthen your standing leg and spiral into it feeling the lateral heel. Fully extend the hip. The default will be to stick your butt out on the standing leg. We're not gonna do that. That's it.
And again. Press it out. That's it. Up and in. Now you're working with your feet, your spine, your pelvis.
You're feeling the love. That's it. Uh-huh (affirmative). And one more time. Press and then all the way up and in and spiral into it.
(exhaling) And gently release. Now take your-- Carefully step off and we'll take side two. Come back around. Again, step onto the dock before you step onto the boat. And the first one is just simple side abduction side splits, but you wanna sense the feet.
So, first get that feeling that you're feeling the lateral heel and the big toe so the arch is lifted. Notice how that narrows the sit bones and lengthens the lower back slightly. So, feel that. Then, go right into abduction where you push out and then come up and in. You can add the arms with it.
Get that feeling of staying long in the lumbar, even press into both legs. Easeful on the neck. That's it. Nice and fluid. Now two more, you guys.
Looking really good. Notice you can leave the toes long all the way through. Very nice. Now from there, we're gonna go into the bending of the platform leg as you press the other leg out and let your weight shift towards the platform side. And feel that you're keeping your head right over your pelvis.
Your platform side foot is going into pronation so you're feeling a little more of your inner heel and your little toe side of your foot. Now add the arms reaching forward on the slide side, back on the bending side. You're introducing a little bit of spinal rotation that's counter to the pelvis. Two more. And one more, everybody.
Nice and fluid. Now let's add the rotational finishing movement. So, go into the same exercise, same movement, but as you come in, lengthen both legs and spiral into the weightbearing leg. Let the other heel lift and let the pelvis turn towards it. That's it.
There you go. And then slowly come back. Now you're finishing the movement each time. Full hip extension, full pronation. Spiral in, and you can even let that heel lift.
That's it. Open the hip to the front on the standing side. Fully extend the knee. Do two more. Up and in.
There you go. (laughing) That's it. That's good. (laughter) One more. One more. (laughing) That's it.
All the way up and in. It's all good. You guys are doing great. And as you finish, gently step off. Now we're just gonna finish with a standing roll down.
So first when you're ready, wherever you are, have your feet right under the hip joints. Just notice can you sense now more the lateral heel, the big toe and fully open the front of your hips. Notice how that affects your posture. Now bend the legs and let the arch come down. Feel like the foot is swiped out, and you're right on top of your legs.
Now starting from the top of your spine, peel down, nice and fluid. Let yourself articulate down through the spine, allow the pelvis to roll over the top of your legs. And here you are at the bottom. Just nod your head, yes a few times. Feel the weight of it.
That's it. And then rotate it no. Take a nice fluid breath. Now feel your sit bones start to narrow. As the arch starts to lift, slowly roll up through the spine.
Let your head be the last thing up into aligned posture. As you get to the top, just close your eyes for a moment. Center the weight on the feet. Let the breathing drop a little lower. Relax behind the eyes and acknowledge yourself and your efforts today, you guys.
Great to be with you all. Good work, ladies. Thanks, Tom. And I hope to see you again at Pilates Anytime. Thank you.
(applause)
Comments


Wow, again, amazing. Thank you so much for sharing your knowledge with us.
You need to be a subscriber to post a comment.
Please Log In or Create an Account to start your free trial.
