Description
About This Video
Transcript
Read Full Transcript
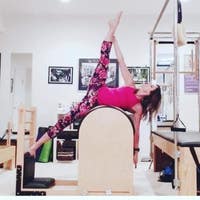
Hi Guys. Courtney here. I am so excited to be back on Pele's anytime I am filming a new workout for you, this reformer workout will incorporate three props that I have been using in my own personal practice. So here's what I'm going to do. The first third of the workout will be using the foam roller. Then I'll transition into using the Bosu ball. And then the last portion of this class we'll be using the resistance band.
So you can take the whole workout with me from beginning to end. Take time to switch out your props. Um, but you can also use each 20 minute segment in conjunction with your favorite PyLadies anytime reformer class. So you can do it in the middle or at the end or at the beginning. And if you're an instructor looking for some inspiration of how you can incorporate props onto the reformer, this class might be helpful to you as well. Let's get started.
I have my spring set up for my single leg footwork. That's not happening yet, but that's prepared. So I've got my foot bar, two red springs. You could do two reds and a blue. If you're feeling a little zesty, I've got the foam roller on the rails. Now, if you're someone who likes to keep a really short rope, so if your reformer looks more like this, you might want to just throw those guys onto the floor so that this roller can move along the rails without the ropes getting in the way. Come to a kneeling position facing towards your shoulder blocks. We're going to begin with placing the hands onto the foam roller and now there will be a few little adjustments as we go.
Start with your pelvis right over your knees and your risks under your shoulders and just begin to mobilize the spine with some breath. So exhale into your round, back position, drawing belly button in and inhale through, neutral into extension. And we'll do that two more times. So it's exhale to push down into the foam roller and up with the belly. And inhale, shoulders move away from the ears and the neck gets longer. As we move through that extension. Exhale to flex and inhale to lengthen from year.
Find a neutral spine, pushed the foam roller away from you a little bit so it's more on your fingertips. Now keeping the hands about the width of the shoulders. Inhale, push the foam roller away from you, allowing your chest to drop down. Think about keeping your thighs vertical. Neck is still long. Now if your shoulders are feeling a little pinchy here, play with rotating pinkies down, but for me, this feels amazing. I'm opening up through my chest on an exhale. Flex the spine and come back into the cat.
Inhale, push away, moving through neutral, and you can pick. If you want to stop in neutral or lift the sternum into extension, just try to get that even extension throughout each segment of the spine versus just in the neck. Exhale, pull yourself home and you may have to readjust where the foam roller is on the fingertips. That's okay. Inhale, push away. It doesn't really matter where the roller hits you on your forearm. You just don't want it in your elbow joint. Got It. Think about lengthening and exhale.
Flexing the spine. Good. Keep one hand on the roller. I bring it closer to center. Please. The other hand on to the rails moved from your cat position. Again, play with pinky down or palm down and go into an amazing single arm stretch. Exhale, return home. I sorta think of saw when I do this one. Push away, opening up through those lats and flex.
One more time push and you can even stay here a little bit and just sort of work that forward and back. If this feels good to you, which it should feel pretty amazing. Come on in. Let's see how we do on the other side. So place one hand on the foam, roller the other hand comfortably on the rail and then on an exhale, push out on an inhale, sit into it and you can stay here. Think about ear connecting to the arm, but shoulders away from the ear lobes and flex the spine. Push away, rotate. I also think about lifting my sit bones up here.
I think about pulling my pubic phone and my sake room away from each other when I'm in this position, not unlike being in a squat position. This is a great time to cue and feel the pelvic floor getting longer. Think of it as a long and taught muscle versus a domed muscle in this position. See if you can feel that in your body. Good and come on up and if that's all you want to do for an hour then go ahead because it's amazing, but I'm going to transition to footwork here.
I'm using the foam roller on the foot bar for my footwork, which is why I have a slightly reduced setting so I'm not in my bilateral foot work setting. I'm in my single leg foot work. For me, that's two reds. Sometimes it's two reds and a blue get cozy. All you need to do is push the foam roller app so that it's about level and it's going to be pushing against the foot bar rail, so hopefully you can see that I don't have it any higher than the top of the foot bar. It's just right towards the top and it is going to move a little bit. That's part of the beauty of using it. Begin with your feet hip distance apart, parallel position, and you can really allow the feet to wrap around the foam roller. Good. Take a second to find your pelvis, your rib cage
Perhaps somebody is having a difficult time finding the position of where the foot needs to be on the foot bar. This gives you a nice big base. I can really feel my arches here and think about lifting them away from the foam roller and as soon as I do that, as soon as I think about lifting my arches, my inner thighs, and my abdominals and pelvic floor co contract, let's try a single leg version. So simply pressing out with one leg and resisting to come home. So the weight, it feels more appropriate for the single leg work. That's what I set up for, but now I have to work a little bit harder in the pelvis and and my core stabilizers so that there's no twisting or wiggling in the hips or pelvis. I feel more feedback in my foot when I'm on this single leg setting and I have to work harder again, not to collapse into the arch of the foot. You can add some zest here by going into your bicycle.
I also liked this series because it allows me to get a little bit deeper into my Ben. So right about here, I'm pulling myself a little closer into the stopper than I would feel if my foot was against the foot bar. It's because the foam roller is thicker, right? So after work, those posts steer your muscles to pull me back home. Let's do two more here.
And of course you can adopt the breath pattern that works best for you going into that other side. Just take your time, feel the setup. I want to encourage you to push all the way back. So drawing up through the quadriceps, feeling the Patella move. Take a moment there and then resist as you come home. Notice that sensation of being able to pull a little bit deeper into that hip flection. As you come home, I like to exhale to push out and inhale, resist to come home.
Here's your bicycle variation, pushing out and pressing, keeping the movements sharp and both legs. I often cue a bow and Arrow when I teach bicycle, so it's a sharp pull and press. Not sure if those hand gestures are helpful for us and resist two more here, tabletop position and come all the way in. Now we've got a big base of support. Something that's always available to you when you have a nice wide base of support is working weight transfer. So let's play with that.
I've got two feet on and I'm going to press out twice. This is a bilateral press, two feet pressing. I come a little bit more than halfway and take one foot off and I press out twice. So I've transferred from two feet to one as I come in, I switch. So now I'm pressing twice on the other leg and the whole thing starts again. So I'm pushing back for two, working to pull my sip phones under my heels, single leg for two switching.
Finding that placement on the foam roller and one more round like this. Doing sets of two all the way out, two times single leg twice and [inaudible] other leg. Now as we increase the challenge, I'm going to do single sets so I press at once and go right into that single leg. By reducing the amount of repetitions I've actually increased the coordination level, I've made it more difficult and I have to work a little bit harder and stay into my body to find the alignment and stay on track here and press. We'll do one more set like this, both legs, single and single.
Come all the way in. Awesome. Just allow the foam roller to slide or fall down. Let the legs rest over the foot bar and just let them feel heavy. For a moment, we're just going to do a rollup transition. I'd like to take the arms out to a tee to start on an inhale. I'll draw my arms in towards my body.
Thinking about the Pinky side of my fingers, squeezing into my thighs that fires into my lats. It tells me, okay, I can use those muscles to help curl and flex the spine. Head lifts and I go up and over the thighs. Inhale, roll halfway back. I'm thinking about pulling my sit bones under me and into the foam roller. And then exhale the rest of the way down. So draw the arms in and nod the chin. Exhale, heavy legs.
So what I'm trying to do is keep the back of my body active as I roll up and as I roll down, let me show you what it would look like if I didn't keep the back of my body active. The front of my body would try to take over and those hips would say, hey, I'll help. Uh, and they will be working later. So they don't need to work right now. But what I want to do is create
You'll need to feel for that foam roller. Now it's not completely on the carriage. I'm using my arms to keep it here. Okay, so if I were to let go, it's going to roll away. So go ahead and activate through those arms, pushing down onto the foam roller. Nod Your Chin, curl back,
We're gonna push out to two straight legs. Now right away you see what happens. Do you see how the foam roller pushes against my femurs? We're actually gonna use this to teach our body pelvic stabilization during a jump. Check it out. As I jump, the foam roller is stopping my thighs from dropping. It's keeping my thigh bones up. So what I have to do to get that full extension with my knee is straightened my thighs using my quadriceps.
For people who have lower back concerns and who find that jumping gets into the lower back. This might be a really helpful tool. So the foam roller is helping to hold up the weight of my legs. Let's separate the legs, just hip distance. Being an flection gives you an awesome vantage point so you can see what's happening with the feet with the abdominals. Let's add a little coordination legs together for one legs apart for one.
Now if you're starting to get tired in your upper body, go ahead. Lower the head down. But personally I find it's easier to be up so I can see that foot bar two more
But most of the foam rollers that I have tried, the strap will fit around him and just want to roll it
If you find that the lower back is art gene or perhaps the abdominals are not staying compressed, work on a higher diagonal as you press inhale, bend and exhale press. Here's the reason why I love this so I can instantly feel in my own body or I can observe in the body that I'm working with if there's a muscle asymmetry. So you can see that little wiggle wall wobble and a little bit of wiggling is totally expected. But if you see some major movements, perhaps it's a lateral tilt like this, or you can see clearly one leg is pushing quicker or stronger than the other. This is a great time to bring attention to that and try to feel that movement coming from the center and pushing evenly through both sides.
Let's take it into a lift and lower. Now, just like the Dowel, we have to work the mobility of the ankle, so when the legs go up, I'm in Plantar flection. As the legs go down, the foam roller will roll on the foot a little and I can move into Dorsey flection. Inhale up tailbone stain heavy. Exhale down. Inhale and exhale down. We'll do one more like this. As the legs go up, I think of the femur sitting deeper into the hip joint. Feel that resistance coming down into the carriage and exhale I think of pushing away and creating length. Let's put the two together. I'll bend the knees, push shot, and press down. Think of Dorsey flection as the knees bend and plant our flection in the ankle.
As you push down up in and the reverse looks like this, straight up first toes are pointed. Pull the heels towards the seat and push away. You're lifting up, you're pulling down and you can see I've got one hamstring that's a little bit more active than the others I pull. I have to think Courtney both at the same time and last time like this up pull. It helps to give yourself a little tactile cue.
That's why I'm poking myself in the sit bones. Then the knees in. Take your foam roller and put it behind your knees. So this is another series that I've done before with the Dow. However, this foam roller gives you a good surface to squeeze those heels down in two to help activate through your hip extensors. I've put my head rest down because I'm going to be going into an aversion and I also moved down away from the shoulder blocks. The arms have to be present here, so engage them on an inhale. I'll roll my knees towards my nose and I am coming into a posterior pelvis, kind of like rolling like a ball. On an exhale I press down to come up.
Now think of this as your airplane prep. Inhale, I just work the rassic mobility and exhale. I try not to curb flop as I open up the hips. So inhale knees to chest. Exhale up. Inhale as I try to mobilize my t spine and exhale down. Now if you feel like you're somebody who's going into your pex as you do this, try playing with the pinky placement like we did in the beginning of class.
Pinkies down might be helpful to you.
Now if you have a hankering to do some of your favorite exercises here, like tricep work, the hundred or lift and lower, this would be a nice time to include that. I'm going to move onto some seed work though, so I'll slide these out and come on up to a seated position. I'm now going to place my foam roller on lengthwise on the carriage. I still have that one red spring on from before and I can continue with that. Um, but I'm actually going to reduce it to a blue and I'll tell you why when we get there and why you might want to use a red notice that a lot of the foam roller is hanging off the headrest. You're gonna want to do that too.
Coming into a seated low squat position. This is what I would call a low seated or low squat position.
Now if you're somebody who has a knee discomfort in this position, you may find that using the foam roller actually helps to alleviate some of that discomfort cause you can see my hips are elevated so I'm not sitting bottom onto the carriage and stretch. So you might find this. They'll give you a little bit of freedom of movement. Additionally, you can continue with the same series I just did. If your knees are feeling a little on the sensitive side, I'm going to take this all the way back into a cobbler's pose. So I just widened my feet a little bit.
I think about my pelvis moving back in a post here, your direction, and I start to walk my hands back and you might find that this is a great stopping place for you. If you think about squeezing your glutes and almost lifting them off the foam roller, you get that five stretch feeling and that's what we're going for. So if you have that sensation in your thighs right now, then this is where you need to stay. If you'd like to continue, bend your elbows, take the whole shape down, and if the foam roller happened to be in the right position, your head will be supported. Trust me, I've had to readjust it several times. So if you need to bump it forward or bump it back, now is your time. Here's the thing guys, I want you to think about drawing your knees down.
So think of your kneecaps pushing into the carriage your tailbone curls under. So even though you see this lordotic curve, I'm actually trying to do the opposite. I'm trying to pull my sacred under me and push my frontal hip bones up, ribs closing in to the foam roller. And this is the place where I'll often just stay and breathe. Taking my hands back onto the rails.
I'll sometimes work a little bit of chest opening here by drawing my elbows into me and sliding the arms away. And for those of us who sit a lot, this might be a great exercise to incorporate into a daily routine. Remember you can start with the first option and then move into the full expression when you're ready. Okay, so do you remember when I said you could be on a rat or a blue? The reason I'm on a blue is all be doing some single work.
So that's one way you can change this up. However, I need to get out of this cobbler position and I can relatively easily just slide my feet forward to come out and here I am. Okay. Reach back and grab a strap. You just need one. Hopefully I can find it. There it is. And because my shoulders are behind the shoulder blocks instead of holding onto the lip like I normally would, I'm actually going to hold on to the rope so I have a range of motion that's a little bit more similar to the traditional work. Keeping the feet anchored pelvis in your neutral position.
Push your gesture arm down as you begin an exhale, pulling your arm down. Inhale up. If you'd like more attention, simply choke up on the rope. If you'd like to reduce tension, then go ahead and hold onto the loop.
Now this is a really cool option guys, because we can go into our mid back or arms pulling strap series without having to draw our legs and tabletop and there are certainly times or populations where tabletop is not the best option. Let's play with a little bit of choreography here. I'll turn my palm and on my gesture arm and as the strap arm pulls down, the gesture arm will lift up and again, I'm working to stay stable two more here and last one. Now there's always a way to make things harder, so if you'd like to increase the challenge, nod your chin, exhale, curl up. Does you pull the arm down? Now personally, I like to take that non-working arm behind the head and create a little cradle of support in this lifted position. I can see if my pelvis is in fact staying stable.
And if you'd like to continue to build, I take my stabilizing leg a little closer to my center line so that I can add some gesture leg work. Inhale to bend the elbow. Exhale to extend adding a reach with your bicycle leg. We'll do three more.
Okay. Not Grip strength in that strap hand. Let's try the other side. See how we do. I might drop that on the floor. I know that's a no, no, but
If you're going to add the opposite leg lift, you might want to just walk the stabilizing leg a little closer to your midline. Increasing the challenge by adding a longer lever. And I can feel how my sacrum is pushing down into the foam roller. It's giving me a nice reminder to stay in a neutral pelvis and take it all the way down. Hook your strap up or drop it.
And I haven't come up with a really graceful way to get off. So I just slither. What about rehearse looking? I slither off. All right guys, there's one more exercise that I want to do here. I'm going to place the foam roller onto the carriage. I'll leave my blue spring on and I'll be using the foam roller to allow for some spinal mobilization. So what I need to do is make sure that this guy's not going to roll off the carriage.
I look to make sure I've got about a five finger space between that roller and the edge of the carriage. And
I've got one strap and my feet anchored. I hold onto the strap with both hands. I allow my spine to arch back over the foam roller as I reach on a diagonal nodding the channel x healing to come back up. So inhaling, this is all about spinal mobility and exhaling. One more time like this. Inhaling, just allowing my body to waterfall over the foam roller and exhaling up. I'm going to continue to challenge as the body goes back, I find center and come back up.
I lean on a diagonal and pole. I find center and come back up two more. That's pretty good. Yeah. Stretch and come all the way up. There you go. Can you do the other direction? Absolutely.
You lean straight back. You roll to the side and you come back up. You know, to reminds me of corkscrew with this, uh, upper spine. So imagine your arms are your legs in the cork. Screw exercise, filling back and center and coming up. That's it. Okay, so that feels delicious. Let's see how we do on the other side.
Just hold that foam roller in place as you grab the opposite strap. If you're not sure where on the spine, your foam roller should be hitting you, then play with it and you'll find the spot that feels good but bad and you're like, that's it. That's where I need to work. Uh, arms are long. Hold on to the loop with both hands and let's just practice that diagonal pole. Exhale. I sometimes get a little thoracic adjustment here and just go as far back as feels right for.
So I'm pulling my arms back with me because they're actually supporting the weight of my upper body. So when I'm back here I think of the arms framing the face cause it helps to hold my upper body. So I don't feel like I'm just dangling. Come to center and up, go back on the diagonal, come through center and close the ribs to come up.
So it's a lot of work too. And app, here's your reverse. So the arms go straight up. I turned to the side that the strap is coming from and I circle the body back up. I've been over two more. I've been over here and last one and you're up. Awesome. Think of that exercise as a preparatory. For the next flow, I am going to take these straps off. I'll place the foam roller on just as it was in the beginning and I'll be putting the long box on
I have to say this is one of my current favorite exercises because I am feeling a little bit tight in my pax and upper body and this allows me a really big range of mobilization in my spine, both inflection and in extension. I like to move forward so my belly button is off the box. Asi is on the box. You'll adjust a little forward or a little back depending on what feels comfortable for you. You'll begin in a flexed position. But let me show you something here.
So this is what I would call it collapsed position, and that's not where you want to go. And this is what I would call a flexed position and that's what I am trying to do. So round your spine up and over a beach ball and you probably will want the headrest up too. Okay, good. Inhale, slide the shoulders into a strong neutral position as you walk that foam roller towards you coming to your swan position, wherever that might be for you. Exhale, instead of collapsing in the belly, flex the spine and roll the foam roller away from you and it ends up somewhere on the forearms. Again, inhale up. Exhale, push it away. Flex and dome. Inhale, trying to go for that even extension through each segment of the spine and last time like this, pushing down to rise up. Exhale, great. If you'd like to continue to add on slide forward a little bit more, Asi is still on the box, but at the very edge.
This is a nice preparatory exercise for movements like grasshopper and the full swan dive. Come into that intentional flex position. Again, skipping the belly in and up. Now before I begin to lift my chest, I'm going to turn on those hip extensors. Turn on the quadriceps and think about lifting my femurs off the box. Okay. And I have to to counter that push down into my arms. As my chest comes up, the legs will naturally go down, but not all the way, not to a break. And then as my chest goes down, the legs will come up.
And if you feel like the box is hitting you in an uncomfortable place, but you're probably doing it right, it's not the most comfortable position for the box on the pelvis. But, uh, you can inch forward an inch back and try a pad under the hips too. If it feels a little phone and uncomfortable. I feel like I'm pushing my hips into the box right here. So I'm trying to almost push my pelvis into the box, reaching my toes back and up without collapsing in the shoulders. We'll do one more pushing out legs coming up, up, up, up, up and lengthening all the way up.
Now you can continue to build my audience from your favorite hip extension extensors series. So let me give you an example here. As the legs lift up, foam roller moves away. Hold your position. You've got your beats, your circles, you're swimming and you can continue to play. I want to leave the foam roller there. Take a seat onto the box if you need to stretch your back now, it'd be a good time. Hey guys, thoughts? Our foam roller section. We're going to move to the both sue next. So I have my Bosu on the carriage.
You might want to play with where it needs to be. It sort of has to do with the length of your torso and the length of your legs. Mine's kind of smack Dab in the middle and I have one red spring on. I'll push the carriage out as I come into a sideline position. Now I have the Bose two positioned dome side up.
So this squishy side is what's pushing into my hips. I'm going to lower my bottom shoulder down and grip the head rest. My feet are in a staggered position onto the platform. We're going to be working our way up shortly here and I'm allowing my bodies to take the shape of the Bosu. The beauty of the dome is it really encourages that lateral flection of the spine before we even begin. Push down into your stabilizing elbow.
Think about lifting your hips up even if you don't feel them come completely off the Bosu. Think about creating that lateral flection, that dome shape with your body. Resting the hips back on the hand goes towards the foot bar, the opposite arm reaches long and I push into my feet as I exhale left. So go to your Cadillac side, Ben Series where you're short box, Boho and Arrow.
We'll do five licks to 34 going right through the shoulder blocks each time. Five one more side plank here, up, up, up, up, up, and rest onto the Bosu. You'll notice that I'm taking time to find my hip position on the Bosu. The higher up my pelvis is onto this dome onto the apex. The harder it is for me to lift, so I'm trying to find that place where I feel stable.
Let's walk the feet up onto the foot bar. Things just got a little more intense. So now that I have the feet up onto the foot bar, I have to work harder to stabilize in the side bend position. Little lifts here, there's not going to be a full range. Two, three, four and that's five. The elbow goes down. Now what you might find is in this position, you can get a little bit more of that. Our core of that lift, placing the hips down.
Now you may find that crossing an ankle is more comfortable for you, so play with your feet position five times two, three, four, five elbow goes down. Find that stability in the shoulder before you lift off, placing the pelvis down. Good. Bend the knees. We will do the other side, but before we do flip, so your pelvis is on the Bosu. Now the spine is nice and warmed up from the long box position that we are just in on that foam roller and we're going to go into a swan dive position. Miss is a great alternative to using the long box cause it is a little bit more cushy. Fits a little nicer. Heels are together, toes her onto the platform. Again, I come into that intentional flex position, reaching the arms back, squeezing the heels together, pushing out to straight legs, zipping up the inner thighs, lengthening and reached the arms long. So here I think of a torpedo, bending the knees and flexing just a prep. First two
I go back to my torpedo with the tone bys and I come in for a break. Three more long line. The knees bend, my knees are to the inside of the rails. As I lift the heart, come back. And Ben, one more. Reach. Bending the knees. Hips go under you arms go long. Close the ribs and bend. Great job on the pose. Say Right, let's do our side bends on the other side. So take your time, pivot, turn, place the feet onto the platform.
Adjust where the pelvis is. Remember, the higher your hips are on that dome, the harder the side Benz will be. So I'm just gonna split the difference right about there. Take your elbow down, take your arm overhead, and before you lift the hips, feel stability in that bottom shoulder. The hips come up, and even if it's just a smidge off the Bosu, the hips go down. I reached to the foot bar, the other reaches long and I exhale. Now I'm going to get more range of motion. When my feet are lower, that's two,
Last time here.
Take your time. He like you're pushing your feet against a wall. Take top hand overhead and exhale. Lift the hips up. So this is as much about shoulder strength and stability as it is core strength, keeping the feet pressing into the bar. Lower side sinch five times
I'm just going to do a few bend and straighten it. That foot bars in your way, you can put it down. It's a reminder for me not to drop my head. Inhale and exhale. Now if you're feeling like this is an exercise that is a piece of cake for you, then you can increase level of difficulty by taking one hand slightly closer to center and trying a single arm press. I'm still on that red spring trying to keep my ribs lifted. Yeah, and you will feel how one side is not the same as the other.
As I bend my elbow, I think about bending it towards the wooden rail.
Scooch your Bosu towards the back of your carriage, even if it hangs off a little bit. That's totally okay. All right. It's nice and heavy. It's not gonna go anywhere. Take a seat towards the front of the dome. So when I'm in this position, I want my mid back. That same place, the foam roller was hitting me pretty much at the top of that dome, so you will have to adjust a little forward, a little back. That's all great.
I still have a blue spring. It's nice and latent heels are, the feet are on. I'll roll back to my c curve and if this feels like it's not the right position, just push down. Give yourself a little adjustment guy. Maintaining my c curve. I'll go to a bicep, curl for my bicep curl, reach the arms up and back turning Palm Zinn. Come back through and extend the arms.
This is really supportive versus like a ball or the foam roller. I feel like I could stay here for like a long time and just hang out, but we have to keep going. Circle the arms around and come back to your seat curve. I moved through a bicep curl. As the arms reached back, I allow the front body to open. Don't forget to nod the chin to come back two more times.
Lie back into your soundbite, comfortable position and as you exhale and you pull the knee to you, rotate towards that bent knee. Inhale, extend the leg. We'll do six of these. That's two.
Straight leg kicks. That's one. That's too, yeah, I count when it's these three and up and over for real life. Five should I have to do another one because of that? Six. Okay. Okay. One more lucky number seven and up and over seven. All right. There it is.
Let's get rid of this and let's scrub the other. So that's a perfect example guys. The Bosu is supposed to take you outside of your comfort. The wiggly and the wobbly is teaching you. Recovery recoveries are really important thing in life.
You are going to fall at one point or step off the curb, the one way, the wrong way. So to know that your body is able to recover relatively quickly is a very functional thing. Up and over. Adding a twist
The Bose series is going to be placed dome side down onto the floor. Perfect transition into this concept of recovery. Okay. So when it's done side down, it's very unstable. It can rock side to side, front to back. In order to get on here, you want to take one foot onto the Bosu and you do want to rock it to its side. Okay? So it'll rock to the side.
You can place your hands onto the carriage for stability and then you'll take that other foot on and you're in this sort of surfing position, right? And what you might want to do here is play a little bit. So just feel what it feels like to go side to side. Make it quick, make it slow, maybe lean your weight to your toes, back to your heels. This is great work. Sounds like I'm tooting. I'm not. It's the boast to cross my heart. Okay. Once you feel pretty stable up here, then we're going to grab our strap.
Remember I have a yellow one. It's nice and light come into a squat position. This is really good athletic training guys, especially with people who don't want to do their external rotation, their rotator cuff work. So they're doing something that they're happy about doing, which is the Bosu work and you have them doing something that you want them to do. So external rotation, two more
Okay? You can play with internal rotation
So it's about centered with the peg. That's a good position for you. Um, take a foot on. Feel free to use the frame to come into your balanced position. Okay. So just to reiterate, I'm not trying to keep this Bosu from moving. In fact, playing with movement, teaching recovery and anticipating what it's going to feel like when it moves and how I have to engage to stabilize and stay vertical is a great and very functional learning tool. When you're ready to add the resistance, we are down into our play a hand on hip. We did x ternal rotation
Hook your strap off and you can use the rail or the reformer to help yourself come off. All right guys, some great Bosu work. Let's move to the band. All right guys. So I've switched out my prop and I now have a band. I'm remember that the bands all have different resistance. So I would say that this is a medium to light ish resistance. Um, and then the length of your band will also change your range of motion.
So you might want to kind of play with what you got, um, and feel free to, you know, throughout the class, switch out a band for a different band. You might have a light one that you like for upper body. And then a heavier one that you'd like for lower body. I'm just gonna use the one to keep it simple. I have a my bridge setting on which is for me a red and a blue headrest is down and I'm going to be placing the band around the heels of my feet nice and wide, like so.
Then I'll simultaneously push the carriage back, lower my hips down and reach my arms up. As the elbows come down, the hips left [inaudible] position so the pelvis will drop. So I can maintain that plank, like alignment, shoulders through ribs, through hips, through your knees, and reset. Push up when the carriage is out, pull down when the carriage is home. Let's add some fun. So I'll press out this time is they carriage comes home.
I'll open the arms to a t. As I push out, I'll lift them back up and then I get that chance to reset. Whenever my elbows are down, it gives me a little bit more incentive to lift. Let's do that again for so come home for, so pull down one more time. Hips will drop, hips will lift, hips will lower. Elbows down, massage the spine down, pulling your sit bones towards your heels. Let's continue to add some opera body movement this time a little bit more dynamic with the circle. Exhale, flex the spine to roll up.
Press out as you reach the arms up. As you come home, circle the arms around and as you press back, reach the arms back. So I'm drawing a circle with the arms, with my bridge. So I would say this is high level coordination all around the reverse looks like this. Now the great thing about this series is you can feel how the band is rubbing on the outside of your thighs, right? Gives you a nice little reminder of tracking your knees over your toes. If I were to open my knees too wide, I could feel the difference, right? Lower the elbows, lift the hips and massage the spine all the way down. Nice work from here. Help yourself come up.
Now there's actually a class and workshop that I did for plays anytime where I did a whole series on here. This is not the same. This is think of it as that adaptation or evolution on that. Instead of facing side for this series, I'm going to be facing back. I angle my back foot inwards so that my big toe can hook on for stability. My front foot points directly towards the shoulder blocks.
The more range of motion I'm going for, the more I'd step that foot forward. So you might want to start with it towards the back edge of the carriage and then you can continue to evolve as you go. I just grabbed the band so the tail is through the Pinky side of my hands and I brought my hands over my shoulders just like a, so as I bend into the front knee, I push the carriage out with my back leg and come into a lunge position. I like to look forward towards the headrest. Think about leaning forward, closing the ribs, and practice your upper body movement first. So I'm exhaling in my tricep extension.
When I'm ready to add my carriage kicks, I drive my heel down and I simultaneously push the carriage away as like send at the elbows, keeps squeezing your seat on your back leg and see if you can get a little deeper into that position. One more time and rise up. Changing the arm position. I now hold the band so that the tail comes for the thumb side. Legs are still in the same position. Arms come out like a letter t, a lot of upper body to keep this here. Same as before.
I bend into the front knee and push the carriage out with that back leg. Practicing my hug a tree.
Bring the feet as close to underneath the hips as you can toes pointing forward and you want the band to be wide behind. The Fi's crossed the band so it makes an x in front of you and hold it so that the tail is coming through the thumb side. Come into a deep squat, not unlike where we were on that both too. And stabilize the elbows into your sides. Practice your skaters here. You've got this awesome resistance from the band.
Good. Why don't you feel like this is a challenge, but you want to add on. Then we add by either ex terminally rotating up the humerus or externally rotating and reaching. And if you're not low enough in your squat, that will happen. So that's a reminder for you to sink down and get a little deeper. The closer your thighs are to parallel to the ground, the less likely the band will slide up and come all the way in. But you're not done yet.
We're also gonna thread this fan under the rail, so it looks like this k slides all the way forward towards you. This is yet another opportunity to do some of the lunge work without connecting the band to the foot bar. So if your foot bar doesn't lock, no excuse not to do, the flow tail is coming through the thumb side of the hand.
So I get to a point where sometimes to get a little bit more range I might dump forward into those hips. So that keeps me honest. Exhale, depress up with the arms. Oh is the legs two more?
I'm going to go into the other side. So come on down, wrap your band over. And then this time when you come up, you'll have the opposite foot onto the platform like a so and step onto your carriage. If you remember, we started facing back internal rotation with your back leg, toes pointing forward. Increased challenge would be walk forward. I grab a hold of the band, I bring it up overhead. The tail is coming through the Pinky side of my hand, squaring off my hips and pushing with my back leg as I bend into that front knee. Slight diagonal forward here just like I'm on the long box. Just the arms to start.
So I feel that feedback from the band, I feel like I have almost a little helping hand keeping me up here. Keep toning that back leg.
That push and resisting back in the feedback of the band is reminding me to push into the pinky edge side of my foot and to go that extra little inch to go into that straight knee, adding your reach and then two more and come in. All right guys, we have our star presses. So just feed that band underneath the frame or better yet, if you have a instructor there to help you and you're going into your side splits. So pushing out, find the range of motion that works for you, like a wider stance to start. And Addie, my upper body integration arms come down as you come up,
And there is one final exercise for this series. Okay? So we were using the band in the long form. I'm going to have you make it a circle tie, not as if you're going to do some of your favorite, a doctor, an ab doctor kind of work, right? So there it is right there. And then you're going to take this loop and you're going to wrap it like this around your shoulder blocks. Okay?
And it looks like it would be like a nice little neck support, but I tried it. It's actually not that comfortable. That's not what we're doing. Instead I'm reducing the tension to a yellow. That's like guys, that's like a quarter spring and I'm going to stand in here in the, wow. Okay. I've got my risers available for balance. I like to begin with my toes pretty far forward with the length of your machine will change how you experienced this.
And I take a foot back and it hooks on. Okay, so now I get to pull in this lunge instead of just push begin by squaring at the hips, standing tall on your standing leg and drawing the carriage towards you. So here's my start position. Let's keep hands on hips for now. As the carriage moves away, I'm going to bend into my front knee, pitch forward and exhale back to standing. Inhale
Let's add the arms. As the carriage reaches away, the arms reach forward and off position two more. It's mega gluten. It's a ton of gluten. Stay down. Just pull your back leg again. If you just happened to have a perfectly placed short box that worked out well, we'll pretend like that was intentional. Then you have options to continue to play here. Hands Down, for example, pakes and reverse knee stretches. Stepping in the opposite foot out, rising up to standing, and don't be afraid to use those risers to help you come to vertical square the hips. Draw up through the seat, heap the hands on the hips.
You will pitch forward as you slide back
Let's do three pikes
I said was around 20 minutes. It's not, it's longer, but great stuff to incorporate into your reformer workouts or to do as a whole. Thanks for joining me. Bye.
Comments


You need to be a subscriber to post a comment.
Please Log In or Create an Account to start your free trial.
