Description
About This Video
Transcript
Read Full Transcript
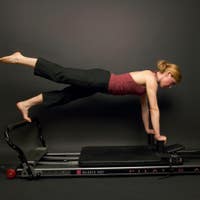
Today's class is a class on the standing reformer. I'm joined today by Christie and Joseph and I wanted to let you know the class has been developed through classical exercises in the standing program as well as innovations that have been developed over the years. I like the standing work because it really shows that you need a lot of balance and a lot of core work to do the exercises. One of the principles with the standing reformer work is that in general, less spraying is going to make your carriage less stable, which means that the work is going to come more from your core. So real really be working on the core muscles all the way through the programming. And so in general we'll work with medium spring, but remember the less stable your carriage, especially when you're standing on it, the more work comes from the body.
So let's begin and we're going to place the bar down and what we want to do in this first one is have the platform on the end free of any bars. So however you would like to to get that up and over. We will use our medium to light spring. Remembering as you stand on this, that less spring is going to make you less stable. So generally I like to start with pop, probably one red, one blue, so one and a half springs, one full spring, one half spring and that needs to come up. Yeah, Andover. Cool, perfect. Good setup.
So you're going to start by standing on the center of the carriage facing the end facing foot bar.
We are in a neutral pelvis so that as we do this movement, we maintain neutral pelvis. Take a nice inhalation and we're going to exhale and bend both knees and take an inhalation. Exhale, and as you go out, both legs will say band. And as you come in, straighten both legs. Remember that the torso doesn't change its position and bend and at Perez out, both legs are bent and both like straight and to come in. And again, let's bend Perez out length in the tour, seven straight into command. Keep breathing. We're going to bend.
Exhale out and inhale nice and long and straight. And to come in now we're going to bend the front leg. Only the back leg is going to stay absolutely straight. Don't lean the body forward. Don't change the hip position and back like say straight.
Just press back and pull back in and inhale back and exhale in and inhale back. We maintain that alignment throughout your body. Very nice and press it out and pull back in. Now the next one, straighten the front leg, bend the back knee. The back leg is going to stay bent through the movement.
Keep the front leg straight and press back with that legs and bend and pull it under beautiful and press it back and pull it under. Let's do two more. Maintain your alignment through your core. Keep breathing and come back last time out and come back again. Let's change legs. Lay comes front, realign the body from the core.
Maintain the alignment of shoulder and hip. Take a nice deep breath. Inhale up. Exhale, bend the knee, knees, and for us out. Now as we come in both legs, straighten en lift and again bend. And if you would like to add a little more challenge to it, raise your hands behind your head and bend and push and lengthen and come in one more time. Bend it and press and length into command. Now it's front leg only.
Bend the front leg and worked for the leg on the carriage and keep the body line. Press it back beautiful. And pull in. Watch the rib cage and press it back. Front. Knee stays bent through out the movement. Pullback in two more times. Press it back and pull it in. And for us again and pull. And the last one, bend your back leg, straighten the front leg, maintain the alignment, and let's begin back. Leg stays, bend, pull in from underneath the buttocks and again, presence out.
Pull back in two more times. Keep it bent, which will minimize the range of motion on the movement and take it out and work from underneath the gluteus and come in now because that was fun. We'll do it to the side. Turn the torso, let's repeat the same exercises facing to the side. It's not a wide stance. It's a nice comfortable stance. And once again, the first movement is done by bending both knees. So we began to go out maintaining the core alignment, straighten the legs to go out and pull under to come in and Ben to go out for RF and the length and the torso two more times and then the knees and exhale and inhale. Exhale en and inhale down for arrest to go out and a full breath lengthenings and pulls us back in are four distinct movements.
The carriage doesn't move on the first. Now the carriage moves, the carriage doesn't move and now we come in very, very nice. So we'll do one more time. Bend it, lengthen it, hold the carriage steel now pull from the inner thigh Aes, and now we come in. Now it gets to even be more fun than front leg. The leg. This is standing on the end of the reformer bins and the other leg only. So we're going to go out, keep it straight and pull it under to come in. This one stays bent, prs it out and pull it under to come in and you got it two more times.
Press out towards us. Nice and long. Keep breathing. And of course you can once again, place the hands behind the head and fully under to come in. Let's do the reverse of that. So now be working. They gone, the carriage, the moving leg begins to go out and stays bent to come under you. That's it. And Bend it. Precedent it staying bent the whole time. Then to push you got it.
Axial back and bend and push and exhale to come back. You look great. Very nice. Getting a workout. All right, we have another leg. Aren't you sad? You have to have them now or lucky you just have to. All right. Once again, remember, this is not a full, a full turned out position from the hips is a light turned out with the heel to hip position in alignment, shoulders over the hips and our first movement Benz both legs and we press out four movements. Straighten the legs and come and pull back in. Now remember, the carriage does not move on the first, so we bend. Now the carriage moves. Carriage doesn't move. As you pull, stabilize that carriage and pull back in two more times. That's bend. Breathe. Press it out. Keep it long as you linked it up, up, up, up, up, and pull it under an end.
Last time, inhale to actual out. Inhale, lengthen the legs and exhale and come on in. We're going to bend the front leg. The leg that's over the stabilized leg, other lake on the carriage is going to stay straight and it goes out in in four times and press exhale in lengthen, stretch, exhale. Pull yourself in. Lengthen, stretch as hell. Pull yourself and and last time and pull in. Last one. We reverse it.
So we're going to bend the leg on the carriage and it stays bent. It presses out bent and it comes back in bent. There you go. And presses out bend and it pulls back in bend because it stays bent. It's going to minimize your range of motion. Remember, you can place your hands behind your head if you had like caress it out and pull back. Now lengthen both legs.
Come on up and step onto the center of the carriage. And we're going to now have you just kneel on the carriage and we need change to flip. Our foot bar is going to be up. We were on a medium spring with a red and a blue or a full and a half and you want this to be down into the second position, so that's a little too vertical. Perfect. And now we're going to stand at the front end of the carriage. What we want to do here is we're going to take the feet hip distance apart and the feet are going to be so that the metatarsal is are on the very, very end so the toes are released and relaxed off the front.
Now the next thing we're going to do is we're going to bring the shoulders forward so that the shoulder to wrist position is in a nice straight line, but there's no tension in the wrist what so ever. We're going to start with the back rounded, so we're going to pull in from the abdominals. We're going to drop the tailbone bone down. We're going to relax the shoulders. We're going to draw the ribs in. We're going to now bring the toes up and press the carriage back, lower the toes as the carriage comes back in.
Now what we want to see here is the movement of the stabilized hips, but a hinge position coming out so that the legs go back and under you come back out, that's it and come back under Indian and come back out. It's an awful lot of work, isn't it? Andy and I teach this before I teach any of the standing exercises in the traditional series, the elephant, the up stretch, or even in the kneeling series because this is the contraction that you need before you do any the advanced exercises. This is a contraction that you need for hamstring stretch for the pike on the wonder chair as well. Now we have another position here and that is we're going to bring hips over the heels and length in the spine to a back flat. Close those ribs in.
We Xcel back in. Inhale front and exhale, press beautiful and inhale in. Good and exhale back. I'm going to have Joseph show us just one where you can tell if you're cheating. If you are cheating, the movement looks like this. Just push straight back so it'll just, your thighs go back as well.
So that's in, that means you're using your arms and you're using your quads and instead of using the contraction from the lower abdominals, thank you Joseph, and let's go back to just do a few more with the back flat. Lengthen it out and in and lengthen. Go to a back flat, stretch it long, stretch it, head in line with the spine two more times and back end in beautiful and back and and so that. Now when you do your elephant, lets step back, heels against the shoulder rest toes up as well. Place the heels flat round the back. Now this is the same movement that comes from deep core muscles, not by pushing with the thighs or with the arms.
The hands should be relaxed and open so that we really do not have any pressure into the reformer whatsoever. And we just go back and we pull it in and go back and pull in. Now let's flatten the back into a long back flat position and let the heels come up. So now we are with the, we're on the metatarsal arch, the heels are against the shoulder rest and from this position let's begin to just go back and forth a little bit. These are all the preparation exercises for the next exercise that I was taught and it comes in this series and what I liked so much about this next one is the full body movement. And articulation of the spine as we go. So you're going to pull yourself in and it begins now with the back flat.
So let's length in the back, bring hold the carriage in length in the back and pull back into the tailbone. Spine is long and flat head is in line with the spine. From this position we are going to think about rounding down from the tailbone and bend the knees. The carriage doesn't move. This may be the hardest part of the exercise. The knees hover one inch over the carriage.
Now keeping the background and the legs out from underneath you and wearing a long arc position all the way through. Now we come in bringing the tailbone up as the highest point, lengthening into a back flat position to more of these round and press it down. Push and break it out. Arc the body now come from the tailbone, tailbone, tailbone, and come. Beautiful. One more time around to come down and extend. She run a very long arc over the reformer lift from the tailbone and pull back to come all the way in.
Let's reverse that movement now, which means you go out with the tailbone high and from here you round and pull the knees underneath. You do come in now hold the carriage, still round the back and straighten your leg length into a back flat position for acid back. Round your back and roll yourself in. Round it, round it, round it under you. Very nice. Hold the carriage deal in Lincoln it up one more time and for us it out. This is one of the traditional and classic exercises is taught by Mr [inaudible] and I love the transitions of holding and stabilizing your carriage as you have to work from deep within your core muscles. All right, and just kneel down for one moment and relax all the way down.
Okay, how are you doing? All right, let's now go into some arm work. We do the standing arm series, so you're going to drop down to this spring. You want a fairly light spring, but you also want to remember that with the light spring as you're standing and turning, you have a lot of instability so you cannot pull with the strap or you will fly off the end. I know cause I've done that. So you want to make sure that that you have the correct spring and you're going to stand with one foot at the back shoulder rest and hold the front strap. Stand in a nice comfortable position. And the first movement is going to work with the arm at furthest away. So from this position you're gonna turn and lightly face the well.
Now the gaze is going to come with it, the arm is going to turn, the body is going to turn and we're going to open to the side and we're going to round and take it down and we're going to pull and stretch it out beautiful and round to take it over and pull to stretch out. Exhale and a full breath back and a full breath out. Inhale, use your exhale to help the power of the movement and take it back. Now let's just change arms. So now the arm closest to the end will work this time. However, I want you to stabilize the shoulder and the arm. So the arm is just going to come around as if it is coming into a circle and going back and into the circle.
Beautiful and back and into your circle and back. Good. The excalation comes as you pull to the circle. Inhale, lengthen the torso and back one more time and you get front and take it back. Now turn the torso and hold the strap in both of the arms. And now this time rather than it being an arm movement, keep the strap really centered in front of the chest and turn the torso around to the opposite side and turn it back. So I do this sometimes with the magic circle in your arms as well.
So you know not to move the arms, but this is a rotation of full road twisting rotation. Beautiful. And we'll do two more and again, we'll use the full breath. Inhale to exhale around and inhale and exhale to go back and release the strap down. Soften the knees, make sure you're stable before you release your strap. And let's turn around to do the other arm. Remember the foot goes to the back and we hold the strap in the front.
And the first one is with the urn furthest away. Stabilize the core muscles and let's begin stretching long on that diagonal and really sit to come back and stretch it long on the diagonal. And there is a slight rotation as you're working through the movement two more times. Is it full breast? It goes out and back. Remember, we can't pull it because if we pull it, we're going to kind of jerk this spring and we'll not have as much stabilization through our core as we definitely need to complete the movements. And now we take it in the opposite hand. And remember this is like, um, as if you're hugging a giant ball to the variation on hug the tree coming around to the front and open it out and exhale and inhale two more times and really work with that stabilization of the core muscles and upper back. Relax the shoulders in the neck.
And one more time. And now with both arms together, we turn and we face the end or the reformer. We keep the hand centered in front of the chest. And let's begin. Turn the torso and turn it to come back.
Um, if you would like to, um, take the two, that will have more challenge, less spring on this will be a little less challenging. So now we're going to place the foot onto the shoulder, wrist bending the knee and the knee. It's going to once again be hovering, so it's parallel to the carriage. Now we are going to bend the other knee, so the knee to knee matches, so you'll need to move your standing foot. So you'll begin and end your movement with both knees bent. We'll round the back and we'll take the outside hand off. So that will help. That will help us to level the shoulders and keep the back round.
We have a nice contraction in the lowest part of the abdomen, the tailbone rounding down. And from there it's a small movement. So we're going to just press the knee back and pull it front and press it too and pull it front. Exhale and take it back and take it front and take it back. Now let's add a nice extension.
So the standing leg has been stabilized and bent all the way through. This time. As we extend the leg on the carriage, we're also going to extend and straighten the front leg. Again, straightened the spine, and now everything is going around to come in and again, length in straight and straight and straight and beautiful and round to come in and lengthen it out. Straighten now from there, bring a tailbone under it around the back of level, his hips to come in and one more time. Reach it long, stretch it out. Beautiful and bend it to come in. Let's straighten the standing leg and take the other leg and lift it up so that it is parallel. Oh over the carriage and I want it absolutely parallel to the, to the floor.
Now all we're going to do is to straighten and bend the leg from the knee, so unbended and folded back and unbend it and folded back. Unbended folded back and unbend fold it back and take the leg down and place it on the reformer. Other leg comes on as well. That's all there was to that. That's rounding your back. We're going to keep doing the same contraction that we were doing. Now press from here. I take the legs out and pull them underneath you.
So you see how we've really trained the body so that that we can create the body design and we can have the input of the exercise coming from the same place even though the exercise is different. And in let's go to the other side. So we're going to step off, place the foot back, round your back, knee to knee and let's begin just back and forth, back and in and two and in three and in an exhale and in and lengthen it out and reach and stretch with the spine as well and pull and and exhale, lengthen it out and pool and round him. And now this is again a preparation for a little bit more advanced exercise. We're going to do standing on the reformer called the Jack Rabbit and a little bit, but we want to make sure that we're cutting, the movement is coming from the right place and that we really have the control all the way through. Now we're going to straighten this standing leg. Lift the leg up, arm out to the side, and extended straight out, folded back. Beautiful, straight out. Remember, it's not going up or down.
It is absolutely parallel to the floor, extending from the hip. Press it out and pull it back. One more good work, and then and come down, placed both legs on knees, then round the back knee stretch and press it back. And then keep the back. Round it all the way through and back. Exhale in two more times.
Press back and in and back and come and just relax your back. Okay, we're going to come around when we're going to take the bar down because now we're going to stand at the end of the reformer. So once again, we have a little bit of a turnout in this position. I'm going to take the leg and place it on to the carriage. So the legacy of Nice and open from the inner thigh.
Your foot wants to be on fully on. You'll see why later. So the first one, arms can be out, or again, let's linkedin up behind the head. And the first, the first movement is simply straightened than that and unvented then straighten it out and pull it under you. Can you what? You can put your arms down if you want. Oh yes. She may like it if you'd like and press to do. Would you like to lighten too? Are you okay? Okay.
And for us it out and pull it in. Now it gets a little fancy. Press it out and hold it. Still stretched to the toe and come back up. Bend it in. Four movements out on one. Stretch on two, lift on three and bend on four. Remember, the carriage doesn't move.
Press it out now stabilize the carriage as you stretch over. Keep it stable as you come up. Fold the knee under you and Ben did in last one out. Stretch over.
We're going to repeat that, but while the leg is out and while the carriage is stable, we're going to not only go over, but you're going to round the back
I know it's not easy. And again, press it out and stretch, rounding down, lengthen it through. And we have one more only and bend it in per resit. Back out. Stretch it over, round it down. [inaudible] breathe. Use your breath to cake it and stabilize the carriage and now bend to come in.
Very nice. You did it well other side. So if you want to lighten a spring, um, go right ahead. I saw, I noticed. That's absolutely fine. We want to remember that this program is for you. So you want to use the correct amount of spring so that you're getting the right amount of work for the body. Once again, we keep the alignment here so that we have that alignment across the hips.
We're going to just bend and straighten the legs and start with it bent without leaning. Close the ribs in and nothing changes. The leg is just going to go out
I didn't see that happening. And Bend in and press it out.
Reverse scooter. Now the bar is going to come up and you'll probably want to stay on a medium spring. A full and a half is probably good for you. So on the reverse scooter, this time we're going to kneel and we're going to place the lineal in the center. He's hip distance apart, but we're going to come down onto the elbows with the hands relaxed onto the headrest place. One foot on the foot bar and Joseph for you if you would. Um, if this is too close, I can move the bar away. Are you okay in this position? Okay. But you can remember for, for taller people if they need to have the foot bar down into the low bar position, that will work as well. And that's the position. So now we lengthen it out and as we come in, we round the back and bend the knee underneath us and lengthen it out and pool and round to come in. Inhale, lengthen all the way through.
Beautiful and exhale to round the back. One more time. Shake it out, stretch it, and now band to come in. Now we're going to straighten the arms in, place the arms onto the shoulder rest and move the thigh up to the shoulder rest. And now this room we're going to lengthen that back leg and keep the back leg long and straight and we're just going to roll through the foot. So bring the heel over the bar and then roll it and take it over and roll. Jacob over. Beautiful and roll. Get a nice long stretch and take it over and roll.
Now we're going to lift the arm up, so lift up the opposite arm and take it over and roll and take it over and roll. Take it over and roll and over and roll for a challenge. You can place that hand down and lift the opposite arm
I know it's all about balance and control. Now. Oh, you are not done yet. Stay where you were Jake, the other leg back and go to your plank position for balance control, plank position, shoulders and arms. Press out and pull them back underneath you. Keep your plank ribs are in out, and exhale back. [inaudible] out.
Exhale back and press it out and exhale back. Bend the knees and come down onto the carriage and change sides. So the first one is with the arms down into the reverse scooter and the knees in is centered onto the carriage and the leg is behind us onto the foot bar. We have stand out and as we extended we lengthen the spine as we pull back in, we round under ourselves and really roll it through and extend. Take it nice and long, beautiful round and take it in and down.
Two more times, extend back, becomes a long round and pull it in and last time extend and exhale to come back in. Now the thigh moves up, arms are straight, back leg extends, we roll through the foot. Here's a good place to really watch foot centering and to watch how we are working with the alignment from the heel to the ankle, to the knee and to the hip. We do it four times, then we extend the opposite arm, makes it a little easier and back and front and to [inaudible] you breathing back, leg straight, shoulders aligned, shoulders down, neck in line with the spine. Now if you can, we're going to take the opposite arm. And of course your goal and your challenge is to repeat the exercise with both arms along gated and out to the side. And one you've got to Christie and two beautiful and three and four and hands come down for balance control, step it back. It's a very nice whole body sequences and itch and ouch and in and out.
Exhale and long plank position and out pull. And we've learned all of these business things in our math class and in one more out and in. Kneel down on to the reformer and get ready. It's Jack Rabbit time. Okay. Uh, this comes from the Cathy Grant Series of Jack Rabbits and she has tons of them there. Just lots of, of of um, movements in this patterning. Um, she teaches it in her mat class as well as on the reformer and it's just really, it's fun. It's moving. It can even get aerobic. So what we are going to do is very similar to the scooter series that we did on the floor, but we are going to be doing it on the reformer. So you'll want to have um, again, a medium spring. If it's too light, the carriage is very unstable, but if it's too heavy, you won't make it through the whole thing. So, uh, I would say for your red and blue and you try it with the red and the blue and let me know, okay, standing on the center, hands on the bar and now step back and place the heel onto the shoulder rest.
Centering the foot centers onto the metatarsal arch. Make sure that you really are over your foot centers. You're not rolling in or out on the feet. Now round the back and bend the knees. We're going to lift this leg up and peep knee to knee in this position.
So the knee, while the knees are you, all the knees are hip distance apart. They still maintain this alignment as if you have a thick band. Now they're not going to move. You're going to round, but you're going to keep the alignment across the knees as you press back and pull in back and in. Keep knee to knee, back and [inaudible] and back and in and back and in. Now this time the leg is going to lift, but it's going to. The knee is going to stay bent at a right angle and then it's going to come in and it's going to go. This light stays bent to bend and pull it onto you, round your back on and out and round in and out and around you.
And now the back leg straightens, but the front leg stays bent. Straighten it, pull it back in and straighten it. Come back in and straighten it. Come back in and now everything straightens. The leg, the spine and the chest opens and pull back in and take it long. Take it out and pull back in and take it along and take it out. Great. And pull back in and take it long.
Take it out and pull back in and change sides. And again, there can be lots of variations. It can go slow, it can go fast. I like changing the rhythm of it, but I um, I really liked the idea of, of the work on both legs as well as on the design and alignment in the torso. So we round the back and the first one we remember knee stays to knee, so it goes back and in. Beautiful Joseph back and in, I swear Christiann back and in and back. Remember it's a Jack Rabbit. Now on this one, the leg comes up and it stays bent.
Both legs bent and in and up. I know it's a little coordination thing going on here. Then up and in and now this one, this leg straightens as you go and bins. So we're not into the last one yet. Straightened just the extended leg straightened, just the extending leg and in and take it out. All right, everything stretches. Take it long, take it high and bend it to come in. Extended on the back leg.
Does supporting leg and Ben to come in, straighten the back leg as well. Straight in here, straight and straight. And there you go. That's it. And Ben to come in and straighten and bend to come in and come down and kneel on to the carers. That was great. That terrific. A lot of fun as well. Yes. Okay. Let me take the leg onto the foot. Bar. Hands are on the bar as well because we really now I think need that nice hip flexor stretch.
So we're going to now open. So the first part, we'll do it in two ways. The first part is going to be the emphasis on the front legs. So what I want you to do is concentrate on lengthening and stretching the front leg. So we go out and stretch for head to knee and bend in. And now lift the arm into a side stretch up and Dover and center and place the arm down and stretch out.
Now as you come in, lift that arm and keep it by your ear and stretch it over it. Center it. And again, now this time, if you can keep the arm off as you go out and stretch, pull back in, come up and stretch over one more time. Lengthen it out and come in and reach nice and long and stretch over. Now we're going to repeat it, but this time the emphasis is on the back leg. So now I want you to think about drawing the thigh onto the carriage and not worrying about blinking the front leg as much. So let's begin. And again, think about pressing down. Press it down. Yes, but the emphasis here brings yas lovely and pull to come in and again, press it out, push down, beautiful and reached to come in. Now if you can, let's remember, let's go to the side stretch and as you go out, try and keep that arm off if you can and as you can and keep the arm at the ear and stretch to go over one more time. Lengthen and emphasizing that back leg, opening a front leg lengthening and reach it up and stretch and come up other side. Beautiful, nice, long stretches.
So the thigh comes up. And first we're emphasizing reaching from under the front leg. As we go all the way out. Stretch it long. Beautiful and pull in and, and one more time. Stretch it out. Now we're going to come in and up and remember we're going to reach over to the side. Okay.
And as we go out, if you can, you keep the arm by the ear and we pull it back in and we can do a long side stretch. Beautiful. And one more time, reach it nice and long. Emphasizing the stretch under the front leg. Pull back in and it all the way over and come up. Now the emphasis is on the back leg, bringing the thigh down. We'll stretch out and down. So the first one, we really want to just feel that long stretch and pull back to come in and again, press it out and come back and come in. And now let's remember, we're going to all so get a stretch over to the side and if you can now think about both legs lengthening, emphasizing that back light coming down, torso nice and long. Reach to pull back in and long open side stretch and up.
Last time and stretch. Reach it long, stretch it out and pull back in. Come on up and stretch it all the way over and up into the center. Okay, we're going to do a standing twist now, so we're going to stand in the center and [inaudible] the arms again on the front of the bar. Now what I want you to do is to think about taking the leg to the opposite shoulder, wrist, and so we're now crossing the legs one over the other, round your back, pull back into the torso, drop the tailbone, close the ribs, and within you. Inhale as we press back and exhale as we pull from and inhale to go back and exhale front. Inhale, press back, rib, sand. Exhale front one more time and inhale back and exhale. Let's intensify that stretch by bringing the arms oh over so their arms will go and cross so that we really get that long, long stretch.
And so we get more of a twist on the body for us entrusted. So the arms go to where the lay that's crossed in front so that you get a longer stretch on the body. Inhale back. Exhale front. Remember the rib, stay in. All right, uncross the arms. Now this time we're going to extend the leg out in front of you as you press back now bend it and extend it to the back behind you CHRO, crossing to the opposite shoulder. Rest as you pull in out to the front, cross it back and pull in out to the front. Cross it back, pulling in, out and front and back. Across and in.
Let's change sides. So just go ahead and switch to the feet. Crossing one to the back and the other to the front and versus stretch with the background. Tailbone down, head in line with the spine. The inhalation takes you back. The exhalation draw as you all the way in.
Maintaining that same design. On the body, keep the back around, head in line with the spine and ribs closed and intensify this stretch, crossing the arms, oh over and reach it out. And Palladian see that beautiful line on that tour. So, so we in chance advise the length and pull back under and pool back in to to go out, pull it in and out and pull to come in. Now this time the front leg is going to extend across the front arms, uncross. And we as we go back, the leg comes front and as we pull in it goes behind you to the opposite shoulder rest. And we try not to make any clunky noises as we are doing the movement.
Make it smooth and take it around and push it to the front and take it around and push it to the back. Good. And once again, as you come back, we, when you go to the back, it goes front. And when you call him back and it goes back, let's try a couple more of those. We looked a little confused, pull a shit back and there you go. And as you go back, it comes, there you go. Now push it around to the back and pull yourself in and take it around to the front. So we did a few more on this side and around to the back. But now finish in the center and believe it or not, we are at our final stretch. So maintaining the spring and again on here you want probably just either one full or one half and we're going to step around to the front.
Let's place the bar down, align the torso and have the feet just directly under your hips. Round the back and place the hands onto the carriage. Now we start with the background and from here we're going to press out am going to long gate the spine, stretch like a snake coming out and round and pull yourself up and in and stretch it. And I said long to go out and round and pull it in. Two more of these stretch they hips. Do not move. Maintain that alignment, maintain that nice length as we pull back under and round the back.
Let's just do one more. Remember not to lean forward, not to stretch back, and we'll pull to come back. And beautiful. Now I want you to go down onto your elbows and I want you to keep the um, forearm onto the carriage. From here, you're going to just lengthen the arms, stretched them until they're straight almost come up. No, the elbows. Stay on the carriage. There you go. And do you feel that in your upper back? Well, you definitely should, and back and again. Oh beautiful. And come back and press it out and come back. And one more. Go back to your straight arms rounding Novak upward and pull the carriage in.
Now we're going to Relevate up on to the balls of the feet. And now that long stretch, reach it out and stretch the spine long length in all the way through. Round yourself and pull back in and lower your heels down. One more time. Lift the heels up, lengthen out, and pull yourself under an n and lower your heels down. Now without changing the alignment in the tour. So begin to roll the spine up. One Vertebra at a time, a lining from the feet through the knees, through the pelvis, through the ribs, Suzy shoulders and up through the top of your head.
Thank you very much. I hope you enjoyed the class. Thank you. Alright, good job.
Comments


You need to be a subscriber to post a comment.
Please Log In or Create an Account to start your free trial.
