Description
About This Video
Transcript
Read Full Transcript
The real key is to perceive what you are doing. I really can't teach you, but I can help you focus on your awareness so that you can discover what you are doing. Then you have a choice. This is from Bonnie Bainbridge Cohen. Today's class I call little bitchy exercises because what they really are are exercises that help you get a piece to a connection in a larger exercise or a larger movement.
We're gonna use a little band. I have two bands. Sometimes I use a longer lighter one for some of the arm work. And then I use a stronger, shorter one for some of the hip work. If you only have one band, you can of course deal with that.
And then if you have a TheraBand, you can tie it in a nod and then just make that be a loop. And of course, all these exercises can be done without a band. I'll talk you through them. And some of them might be a little bit different than you're used to. I'm gonna put them down for a second here and also give you a chance to grab maybe a towel or a blanket.
And we're gonna use this when we're in our bridge for some other little ideas. So these are just a blanket and a towel. And if you don't have them and they weren't mentioned early on, that's okay, but they'll help you feel stuff just a little bit differently. So starting in standing just on your mat, just take a little second here, kind of catch your breath. Take some inhales (sighs) and take some exhales.
(sighs) Maybe close your eyes, maybe open your eyes, and ask yourself to fill yourself up with the breath and exhale down. Remember from day one or class one, we don't wanna grip ourself up, we wanna fill ourself up. It's a nice metaphor. Fill ourself up front to back, side to side and top to bottom. Separate your legs and now separate your arms.
Inhale, grow wide, like a starfish, (sighs) exhale release, (sighs) inhale, grow wide, fill up your lungs, exhale release. Now to the side, bending and then come up, I feel a little Jane Fonda-ish, just starting a little warm up, but it is important for me to do a warmup that centers around the spine and the breath. There's lots of times to walk up a hill and get your breath going that way as well. But when we start on the mat, I like to just get to the spine and then come back to center. Now arms come forward, knee bend, or a squat, whatever you have available inhale, exhale, breathe.
Just getting ourselves warmed up here. One more time, good. Now standing tall, take your leg into your chest, give it a pull and then bring it down. Take the other leg in. Be wobbly, don't look for perfection and just get some little warming up in the hips.
Maybe I'm pulling my leg like into a standing figure four stretch, just a little dynamic mobility here. One more time on the left. And now we go sideways. You grab your shin behind you and you reach your opposite arm to the CLA. I just wanted to show you that from the side.
So you grab your shin, you reach your opposite arm to the ceiling, and then you come down. One more time each side, this is almost like a little standing bridge and we get stretch, whoa, we hit stretch in the front of the thighs, we reach and then down. Separate your legs one more time. Arms come out to the side, we got a little rotation. So maybe we'll call this a little bit you warm up, because sometimes we don't remember to do these little things.
When we twist it's our thorax, shoulder blades, everything. Now we've been, we do a little punch. Now these exercises are gonna come alive with a band in a little bit. Very good. The rest one roll down, nodding your head, rolling down, stay very active in your legs.
At the bottom, fill up your back body and then unwind your buttocks down as you bring yourself all the way up. I'm gonna take my looser band now for my arms. I'm gonna put my arms through the band, it looks like this, separate my feet up, pelvis distance apart. Take my arms up the CLA and down. Don't overdo it, if your shoulders are tight and remember for the shoulders to have full range of motion, your chest needs to be fully open.
So that's your thorax. Now all these exercises I'm doing in standing, we're going to do in quadruped and in prone. With your arms up over your head, make a fist with your hands to engage your arms. Take your fist toward your pinky finger. Can you see that?
That's called ulnar deviation. And what that does, is that actually feeds external rotation in your humerus. Gonna pull the band out very lightly, very lightly, and you're gonna hold it. My voice is actually quivering, I'm working really hard, ulnar deviation with a fist, gentle external rotation of the shoulders, hold for five more, take your low belly with you for more, feet are planted three and two and one and lower down. Three movements and then a hold, make a fist, inhale, exhale.
Here's two and three. Very good, one more time four, go upstate up, ulnar deviate, grow your chest and go ahead and shrug your shoulder blades up your back in the back. Not shortening your neck. Your neck should be free, but let your blades elevate, your elbow should ideally be straight and you're gently ever so gently pulling a part on the band. It's not a big movement.
It's a big stabilization, really focusing on that, ulnar deviation, whoa, that's enough of that and bring that down. I'll do one more time. Fist, up one, inhale your chest up fills with air, two, and then three. And then last time four, go up, stay up. Fist your hands, ulnar deviate.
You have one arm that's more tired than the other, I know it. And then grow up. And then from here, shrug the shoulders, on shrug, no neck. If you keep moving your head, know that'll make sure you don't extend your neck. And down one more time up and down and bring your arms all the way down, rest.
Now for the tiny little movements in your rotator cuff, it looks like this. My palms are out and you'll notice here that the band is a little tight and it's kind of forcing me to do this. So what I'm gonna do and what you can also do, is I'm gonna use one of my hands, say for the stabilization of the band. And then my other arm is just gonna do this pulling, an extra rotation. Now it doesn't look like much, but it is.
Remember shoulder muscles, small. They need endurance. They need lots of repetitions at a very low load, especially to keep the head of that humorous really happy right in the glenoid fossa, and then rest. Now we're gonna do that again. Next time you do it, I want you to make a fist with your hand, and I want you to make your fist go towards your pinky finger.
Can you see that? That's called ulnar deviation. And when I do that, it's gonna make you not go into extension of your wrist that tightens other things. And we'll talk about that again in other exercises as well. Remember, so today's class little bitchy exercises to make other key connections.
Fist to the hand, ulnar deviation. Now I move my forearm. It's a tiny motion. I feel this behind my shoulder. You keep doing it.
I'm gonna show you where I feel it. Behind the shoulder and in here. If you feel it in your bicep and you're doing it like this, that would not be correct. A couple more, how about five, four and three and two and one, rest. We're gonna do one more it'll be three and then we'll get the other side.
Shake your arms out a little bit. Let your arms hang down by your side just for a second. Just make a notice. If you make a notice of your body after you do one side, you might be pleasantly surprised that it gives you information and you're able to perceive something just a little bit different. Last one, fist, fill your breath up.
Hold the band with one hand and move the other one from the back of the arm. External rotation. You'll see I have a fist and my fist is actually ulnar deviating. I'm not pulling way up into a bicep curl. I'm using my external rotators, how about five more and four and three and two and one, and rest.
With your arm resting down, you may even feel like you have a broader opening in front of this collarbone. Other side. I'm gonna hold the band with this hand. I'm gonna put this here, I'm gonna make a fist. I'm gonna turn my palm ulnar deviated, open my chest, feel my breath and I go out in it.
On the hand that's holding the band, it's probably a good idea if you pull it down, because again, you don't wanna get into some bicep activity that will pull the head of that shoulder forward. And you also don't wanna be doing this with the thumb business. So we're going out and out and out and out again, the back of the shoulder, back of the shoulder, rotating the humorous bone out and out and out and out. How about three more and two more and one more and rest. That's one.
We'll do two more sets. Circle your shoulders a little bit, grab the band. Other arm is down holding it. If you need to have more tension and you can actually just choke up on your band a little bit. And then hold the band, I may actually, I'm gonna make a fist like this.
I'm gonna pull with my forearm so that my wrist can stay in that radial deviation. Filling up your breath, having a little fun, being perceptive, noticing what your body is doing and then rest. If this makes you really tired, that's really, really good, because the little muscles need lots of repetitions at a smaller amount of weight. Now I'm not downplaying an overhead press or any other thing that you might do in your weight training program, that's all well and good. But these set the tone for what's gonna happen here so that you can indeed do those things.
Last one. Fist, elbow flection, ulnar deviation of the wrist, holding the other hand, just propping you up again, making the setup. The setup is everything. Are you gripping your back? I'm gonna recheck my ulnar deviation on this side.
So I really feel it up in my shoulders. How about five more, four more, three more, two more, one more and rest. Circle the shoulders, let your arms be soft. Just feel, for me anyway, I feel kind of an openness in my chest. My arms come down by my side.
I like the arms to hang by the side when I look at clients come in, sometimes they come in front. We're gonna open the chest, arms down by the side. Here's the next exercise. Hold the band out in front of you. We've already done this where we raise the band up over our head.
Now you see my hands are facing each other. Now I'm gonna reach, I'm gonna rotate my palms to face back, that's called supination. And then I'm gonna bring them forward and then down. So palms face each other, go up, supinate my hands, ulnar deviate my hands, release, palms together, come down. Palms up, palms facing each other.
I turn my palms, I ulnar deviate and that forces me to feel something in the top of my shoulder. And then I come down. One more time. Up, supinate, ulnar deviate, make a fist, inform your arms. Take your low belly with you and hold here for five and four and three.
One of my favorite exercises, two, and one. A lot of people when they get shoulder problems, they have to learn how to really reach through their shoulder blade. So that's gonna be our next exercise, it looks like this. Holding the band in your hand, squeeze it, then bend my knees and I'm just gonna reach and reach, punch and punch. Again, it seems like it's a silly exercise, but what I want you to do is reach your blade.
See how I can reach my blade. Elevation with a little bit of protraction. Elevation with a little bit of protraction. Now I do it to the front. Why do I bend my knees?
It keeps me from extending my back. 'Cause a lot of people they get do in these exercises like this. So if I bend my knees and I can think, take my rib package back. That's a different feeling than just tucking your butt. A lot of times you bend your knees, it softened your hips, and you take your rib package back.
So let's punch now. So it's protraction, protraction, protraction. So my blade is coming around my rib. Let's do a couple more right here. My neck is not shortening in the back.
I punch, punch, protract, protract, yes, my legs are loaded. How lucky for me? Two more, last one, come back. So we've reached our blades up. We've reached them forward and we've punched them.
Now, arms are getting a little bit tired. It's gonna come down to the hands and knees. Now in this hands and knees position. We're gonna let the band go for a second, give the arms a rest. And I want to be sure that you understand this next position.
Of course you will, but I'm just gonna give my arms a rest. We're gonna round the torso. And as I round the torso, I'm gonna bring my head down. My arms are reaching forward. And I'm gonna mobilize my hips and my spine.
Just a little bit side to side. And as I'm doing this, I'm telling myself I want my body, my hips, and my spine and my neck to receive this flection connection. So that as I come down and if your head doesn't touch down, you could of course put something like this down, just for a second. Making a perception here. So my head is down the back of my neck as long, my arms reach out.
And as I push this mat forward and I sit my bottom down, of course my lumbar is never gonna be as round as my thoracic, but just stay with me here and kind of find this. And then you can take that away and sit back, just a little bit further. Now this exercise is gonna come alive and it's gonna be the same exercise that we did. I'm gonna show it to you without the band, it's gonna be, watch this hand. Reach, rotate, raise, come down, come back.
Reach, rotate, raise, come down, come back with a fist. Reach, rotate, raise, with ulnar deviation and come back. So we're gonna try it with the band. You can let the band go at any time the band forces the resistance to go way proximal. My head is down receiving flection connection in my trunk and my cervical spine so that I don't extend my neck, looks like this.
Reach, rotate, raise, come down. Reach, rotate, raise. I'm not resting in my hips y'all, I'm pulling my belly in, I'm inflection connection of the front of my body. Reach, make a fist, rotate, raise, ulnar deviation, hold for eight, seven, six, five, four, three, two, one, when we're down, release. Other side, reach, rotate, raise, come down.
Reach, rotate, raise make a fist, come down, come down. One more time. Reach, rotate, make a fist, raise, ulnar deviation, hold for eight and seven and six and five and four and three and two and one, lower down, come back. In the event you couldn't raise your arm up. That would be okay.
I feel like it would have been a good idea to actually do this one first. Because here in your quadruped position, you could curl your bottom and push your hands a little bit to get a little bit of flection connection here. And then I can reach, rotate, raise. And I think that's good if you don't have that full range of motion. I'm gonna show you the other one.
This is as much a tutorial, like a full length tutorial as it is just doing the work. So here my arms have to be able to go over my head, reach, rotate, make a fist, raise, ulnar deviate. So in quadruped let's do about five each arm. Ready? Reach, fist, rotate, ulnar deviate, raise, come down.
And then reach, rotate, fist, ulnar deviate, raise, come down. Again, reach, rotate, raise, come down. Two more. Reach, rotate, still use your belly and then come down. One more time, reach and rotate and raise and hold.
Now you're not gonna get the same load in the back of your shoulder, unless you've come all the way down into this flection. And when you do that, it's all about your lower trapezius and that upper back connection. We've got the other side. We're in quadruped. I'm pulling in the tummy, nodding the head a little bit, making a flection connection.
So I'm not in a hurry to lift my neck or go into extension. Reach, rotate, ulnar deviate, raise, come down. Two. Here's three, reach, rotate, raise, oh, these are so good, come down. Lightweight, lots of repetitions, come down, building integrity to protect that shoulder joint.
One more time, reach, rotate, raise, and then come down and then sit back. You ready to get away from the arms and into the legs a little bit. We're gonna come back to the arms, but now I'm gonna take my heavier band and come to your backside. Some of these are very common, but when I teach them to clients, I always ask myself, why don't I do this on a regular regular basis? Because 30 to 45 seconds is pretty long.
So now in our hips, we're gonna keep a neutral bridge, I mean, a neutral pelvis, arms are down and we're gonna come right up into a low bridge and we're gonna press the band apart. Now at first you go, oh, that's not really very hard, I wanna do 50 repetitions. But what we're gonna do here is connect through the tummy. Keep the legs pushing apart, the balls of the feet and the heels of the feet completely pressing down. And you're gonna hold this for 30 to 45 seconds.
Now I don't have a timer on for us, but I can kind of tell when there's about that much time. And then what happens is you start to feel a little bit of this wobbliness, and then sometimes you really feel like you wanna tuck your bottom. And what I want you to make a notice or perceive, is that the more you just hold the band, the more motor units start to pick up in your bottom without you thinking you have to over squeeze it. So the body and the butt will respond to the time that you press out and then release. And you rest for about a good 10 seconds.
And we'll do it again. So I'm gonna scoop my belly, my pelvis is relatively neutral, so I don't wanna do a tuck. We're gonna do a curl after trust me, but right now we're just working the bridge, reach my shoulders. So I don't have to squeeze these glutes. I have to push my knees apart and my feet down.
And then the longer I stay without messing with my chin, without messing with my jaw, I don't have any good jokes. We're gonna keep holding, 'cause how many of us actually really do this on a regular basis? I actually did it yesterday to be sure I could hold it for 45 seconds and then come down, rest. Again, I don't have a timer on today, but you can time this yourself or just do it along when this class comes on the site and then we're gonna do one more time. You're gonna scoop the belly, lift up, press the band, press the feet down.
You don't want your feet to turn out like that. You wanna keep the balls of your big toes down. And you're gonna hold it. And as you gently hold the band apart, you're not pulsing the band, you're holding, you keep holding and holding and holding and let's get 10 more, nine, eight, heels pressed down, seven, six, five, four, three, two, one, and then rest. Important job for the glutes to help you lift into the bridge.
Coming to the side. Of course, this is an old standby, but again, it's an important one. I'm gonna take my top arm and I'm gonna put it right behind my top butt-cheek. I'm gonna turn my toes apart and my heels together. I'm gonna stay relatively neutral and I'm gonna hold this band up for a significant amount of time.
Now again, you're gonna wanna tuck to get out of it. You're gonna wanna wiggle to get out of it. But all is I want you to do is hold it there. So you're holding the load probably with a heavier band than was the one for your arms because these muscles are bigger, they get jucier. And then I'm gonna lower down, 'cause you have a lot of exercises to get done.
So people ask me, why do I do these? When do I do these? Well, sometimes I can do them keep holding the band. Sometimes I do them in the midst of a mat class, maybe during a side leg series. Sometimes I'll call a whole class fundamental setup.
And then of course my clients who named these exercises, the little bitchy exercises, they are pretty proud of themselves. How about 10 more, nine, eight, try not to arch your back. Try not to tuck your bottom. Six, five, four, three, and two and one and rest. We have one more, but let's make sure that when you do this clamshell hold, that you're not digging into the side of your greater trocanter or have bursitis, because this type of exercise, it doesn't make that bursitis or that lower feeling in your leg any better.
This exercise you should feel in the back of your rump. We got one more. Toes apart, heels together and pull. It makes no difference how high you pull. What matters here is the load that you're creating in the back of your bump.
It's a very deep connection into the back of your hip. Can you fill yourself up with the breath? Are you making a perceptual feeling that it's in the back of your bottom and it's not in the side of your neck or in your jaw or maybe down in your knee, you really wanna feel the load in the back of the hips? How about 10 more? Nine, eight, seven, six, and five, four, three, two and one.
Relax that leg, we're gonna go to the other side. I gotta adjust my little microphone here. So I'm gonna come down, now, when you do it on this side, the thing that's gonna be interesting. So your knees are forward, your toes are apart. I'm gonna leave my head up a little bit, so my microphone doesn't get in the way, I put my head here.
So let's go ahead and do the load, I'll tell you a little story. You're gonna feel it in the bottom leg first, because you already were working that, okay? Now Christopher Powers, he's a physical therapist in University of Southern California. And he actually found out or did a study that hip strength helps with knee injuries. And of course we can kind of guess that.
It's really nice when there's research to kind of back what some of the exercises really help us with and then rest. I don't have my timer. I don't know if these are 30 to 45 seconds, but if you try them again at home, set your timer. So open up the knee, try not to tuck, also try not to roll yourself backwards. You want a little extra challenge for your core?
Put the arm up to the ceiling and just hold that there. You could put a little 10 pound weight in that hand, and that'll kind of perturb your chunk and make you hold that as well. Keep holding. You should be feeling both hips now. How about 10 more?
Nine, eight, I can feel my voice quiver, seven, six, five, four, whoa, I got to hurry, three, two, one, rest. Oh man, these are really good. One more time. Heels together, toes apart, load the back of the bottom and pull the band up. Try not to arch your back.
Keep core connected. Keep the back of the buttocks engaged. I'm gonna take my arm back up to the ceiling. I'm gonna keep holding, keep holding. Boy, the core and the abdominal work after this is gonna seem like a breeze.
Let's get 10 more, nine, eight, seven, six, five, four, three, two, one and rest down. Oh, goodness. Next series. Let's come to the back. Now, let's take the band away for a second because we can, fix my pack.
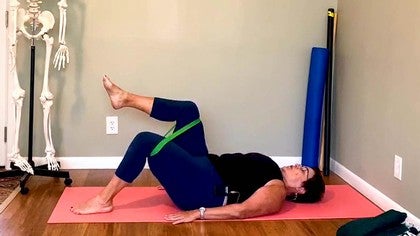
So just do this with your legs. Just do something with your legs to kind of give it a little bit of sensation. After we did all that work in the hips. Now let's take the band, let's put it on your right leg and put that right leg straight to the ceiling. Left leg comes down in long.
Now, if you look right here from the belly and the front of the thigh, this is long. If I squeeze my butt and tighten this leg too much, it looks like this. That's not a holding of the pelvis, that's a gripping. So we don't wanna ripper, we wanna hold her. So you're gonna keep long here.
And then I'm just gonna bend and press this opposite leg away. Just to get some sensation, some mobility in the hip. I'm gonna pull the knee to the chest, I'm gonna pull the need of the other side, frog the knee, knee to chest, knee to other side. Frog, chest, knee to other side. And then we'll just circle this leg.
And then I'm gonna figure four this leg. And then I'm gonna take the band away and put it down. Other leg. This is a little interlude. Frog, chest, across, extra rotation, more neutral, more internal rotation.
External rotation, more neutral, more internal rotation. One more time. Frog, chest, across your shoulder and then lower it down. So now we're gonna go on and do those same actions, hip flection, neutral, and across the body, but we're gonna do them with the band up our thighs, is gonna look like this. So you want the band to be as flat as it can, always should have an extra band in case one breaks.
Now, you know from our other work that we understand neutral. But the first one we're gonna do is a tiny little tip of the pelvis. So we did this using the ball in class one where we learned how to, what we learned, y'all know how to do this. So we're gonna tip the pelvis, we're not gonna grip. We're gonna tip and hold the pelvis in a posterior tilt.
So my pubic bone is higher than my sides of my pelvis. Now I'm gonna pull the thigh into my chest as I maintain the tip of my pelvis. So as I do end range, hip flection, I'm tying in my deep hip flexor with the rounding of my spine, rounding curling of the pelvis. Come down, release. Tip and hold, a tiny little tip.
Take that time to tip it and not grip it. So you're gonna curl. Then I'm gonna keep the left leg down and I'm gonna hold the curl while I bring that other leg in. I'm gonna hold the curl as I pull eight times, seven, six five, four, three, two, one, release on curl. Whenever we do curled, we can do uncurled.
So now with a neutral pelvis and a support of the core, because our core doesn't really move our trunk. The core sets the tone and the stabilization deeply. So now I'm going to just lift this left thigh dorsiflex this foot, or make a flat foot. And now I'm gonna pull my hip kind of deep, but I'm not gonna curl my belly. I'm gonna pull and not curl my belly.
Not arch my back either, but keep my rib connection happy. Keep my hip flexor challenged, don't be afraid of that hip flexor and keep my core maximally engaged. And I got two more, last one and then lower down. So that kind of energizes the whole leg working again end range, hip flection in neutral, other leg. Flex the foot, pull, release, pull, and pull.
And as I do this pulling, there's not really a magic number, but we wanna do enough that we feel a challenge where we want that challenge to feel, which is deep in the front of the hip and at the lowest part of our trunk. How about two more and then last one and then lower down. Let's let the legs go side to side a little bit. So sometimes you can feel this all the way down to your inverters, you can feel your toes, whether they're dorsiflex or plantar flex. Okay, here we go again.
Tipping of the pelvis. This could be like reverse abdominals on the reformer carriage too, when you put your legs in the strap. If you need more tension, you take one of your legs further away and that'll make the tension in the band increase. So I'm gonna keep the tilt of the pelvis, I'm gonna let my shin rest, not gonna dorsiflex this time. And now I'm gonna curl my pelvis as my thigh comes closer.
I'm gonna curl my pelvis, maybe my arms can go up. So I don't over press them down. Or I can just remind myself not to do that, little bitchy exercise, rest to other side. Remember to get a little more challenge, you reach one of the legs away. You get a tip of the pelvis, engage abdominals to posturally tilt down below.
Lift the thigh with the shin resting, hold the tip and now the tip pulls the band. The tip pulls the band. How about three more, two more and then last one. And then everything lowers down legs, side to side. We have one more to do without the tip, dorsiflex the foot, lift the thigh, pubic bone stays heavy, hip flection.
I should be able to hip flex to almost 130 degrees or so without having to tip the pelvis. Let's get five more, four, three, two, and one and rest other side, that one really speaks to my entire leg. I'm gonna lift the other one up and then pull. These principles by the way are really kind of what ultimately help the spine health, help your back feel better to differentiate different actions of the pelvis. Let's get four more and three more and two more and one more and rest.
Take that band away, lie your legs out, straight down, stretch your legs, long flat pelvis, pulling the belly in, don't be gripping your buttocks. Just stay long right here. (sighs) Now, come on up. Switching now to the shoulders. Again, I'm gonna take this blanket, you can use a towel or you don't have to use anything, but I'll tell you why I'm using it.
And it really helps, especially if you tend to have a little rounded shoulders or if you pull too hard in your shoulders or client close to heart. I'm gonna take this blanket and I'm gonna let my head come off it, so that I have about an inch and a half of head off of the blanket. So that's that height. I'm gonna actually raise it a little bit higher. 'Cause really wanna make a point.
So I'm gonna move this back this way a little bit. So in here, I don't wanna rest my head on, I'm gonna come back, stay with me here. Good work, so whoa, here comes my neck into extension. So this doesn't look like super comfortable, but what it's gonna do, is I'm gonna take this band, oh, I should have grabbed my yellow one, but that's okay, I'll grab this one. I'm gonna lift up into a bridge.
Now, I'm gonna reach my arms long and I'm gonna grab that band under my bottom. I'm gonna make a fist and ulnar deviate, and then I'm gonna stick my shoulder blades in. So now when I reach my arms long down my back, and I all ulnar deviate my fingers down, what that does is it allows me to kind of talk to my chest to make my chest get more vertical. And my voice doesn't change because my throat isn't short. Now my triceps are maximally engaged, my buttocks maximally engage.
And then I'm gonna come down. Press my feet, lift up. Now, really reach those arms. So a lot of times people wanna grasp of their arms under their back and then pull them. But I actually like the band a little bit better because then you pull it apart.
And if you ulnar deviate towards the pinky side, you're gonna get more tricep and the more moment, if you will of external rotation in your upper arms. Let's hold this now that you understand this, I'll stay here, if you need to monitor this position and take your head over the edge of the blanket. And then I'm gonna drop down. It's gonna feel like you're arching your back, that's fine. Because when you get up, you're gonna connect in through your front ribs and then you're gonna coil your upper chest up, you now hold, how about five more seconds.
So legs are fully engaged right from the band work, triceps and upper arms fully engaged from the band work and then lower down. And we'll do this one more time. Lift up and stay up and hold ulnar deviate, push those fists down, five and four and three and two and one. Will take the band away or bring yourself down, roll to the side and come back up. I love how the chest and the shoulders feel when we're able to open it all the way up like that.
I think it's really important because people get frustrated when their shoulders kind of don't work or you might get frustrated. And the more we work on the chest and its relationship to the shoulders, I think the better able we are to get that lift. And that incidentally is what becomes thigh stretch with arch becomes back then. So the next exercise, we're gonna put the band at your forearms, and then we're gonna take your forearms down on the mat like this. And I'm gonna face you just for a second, because a lot of times we put something on the arms and it does something like this, one arm out, we try to grasp here.
But what we really want to feel is we want those shoulders to be under the, whoa, that's why. I got to get a longer lighter band for my arms. We're almost done. So now you see here, the position of choice would be something like this. But what I want you to do since we've just been educating the shoulders is we're going to fist, rotate and then pull the band apart, and then turn my palms down.
You see how that holds a different picture than letting everything collapse here. So we'll do that on our side, or I'll do that on my side. Let's see. Okay, that gives us just a little rest. So the band on the arms, comes down.
I'm gonna pull the band apart with my shoulders, with my palms rotated upwards. I'm gonna set my shoulders, then I'm gonna turn my palms downward. Then I'm gonna lift my butt upwards, keep the knees bent. So pay more attention that your arms press away and your chest comes toward your shins. Then if your legs can go straight fine, if they can't fine.
But make this exercise here be about your upper back and your upper shoulders. Not crunching my neck, my voice isn't changing and then bring myself down. Release. Let's do it five times. Press the band apart, turn the palms down.
Hold this relationship. Lift up. Press arms. Chest goes to shin. I mean, chest goes to shins.
My head is not resting. I'm pushing my mat away. Opening up the front of my chest, right where a necklace would fall. And then come down, that's to inhale. Exhale, press.
If you only come here, that's fine. If you can get further, your shoulders can push further forward. If it's hard, that's okay. If it hurts, we don't do it. So you have to get that perception into you as well, the difference between hard and hurt.
Two more times. Re-engage those arms, press. Let's do, this is a good one. I can almost tell when it's getting more connected. Pushing, not shortening the back of the neck, and then bring us down.
One more time. Press, lift, reach, really push. And then bring yourself down and then sit back. Very good. So come back out to quadruped here, and just feel without the band for a second.
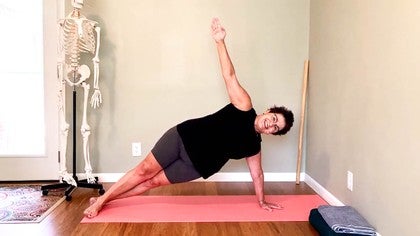
Feel how you can really engage through your whole arm and your chest. And you hold yourself here. Shoulders are set, hips are set, tummy is set. Take one leg out to plank, take the other leg out to plank. We do have a class coming up that's called all the planks.
We'll be doing them all. But today this is just making you have the awareness of how you can be engaged through your shoulders and then bring yourself down. If you like that hand position, keep it. I love my hand position today. It's not always like that.
I mean, sometimes we play around, but I like my hand position today. I think the shoulders and the band work have really helped my upper back come into play. I'm gonna start with my right leg first this time, and then I'm gonna take my second leg. I'm gonna push the floor away. I'm not gonna arch my back.
I'm not gonna tuck my bottom. I'm just gonna push everything I have down. My toes down, arms down and hold for five more, and four, and three, and two, and one. And then everything comes down. Sit back and rest.
We have one last variation with the band in the plank position, but it can also of course be, let's do it in quadruped first. So I hope you've seen by doing some of these exercises how the minuteness of the exercise really brings to life the control that's required proximally, especially since the band has been kind of distal on our knees, forearms and stuff like that. So now I'm in this plank. I'm gonna press my shins down. And then the exercise is like this, up, touch, side, touch, back, touch.
Switch. Up, touch, side, touch, back, touch. Switch. Up, touch, side, touch, back, touch. Switch one more.
Forward, touch, side, touch, back, touch. Switch. How do I make this exercise progress? Well, I'm going to come up to a plank. Forward, touch, side, touch, back, touch.
Hold. Whoa, can't, the side is a little more challenging. Hold, rest, we'll do it one more time. (sighs) So one side is a little happier than the other. Again, nothing hurts just hard.
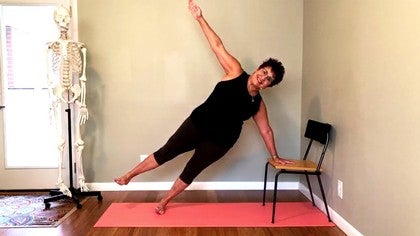
If you quit when it gets hard, you won't get a chance to get better. So stay practicing and then press your arms. Here we come to a plank. And then let's separate my legs. I think that's gonna help me a lot.
Forward, side, back. I'm gonna do it one more time. Forward, side, back. Other side. This one's hard.
Forward, side, back. Forward, side, back. Oh my goodness. (sighs) Those are good. Now we get to do them with our legs.
We are almost done. So band around the feet, shins, quadruped. Here we go. Back to the plank. It's gonna be forward, up.
I mean to the side, up, to the side, up. One more up, rest, down. Or you could do five more sets while I rest in between. It's always okay. You can always do more.
Here we go. Side, up, side, up. Three, up, two, up, last one, up and rest. (sighs) Okay, guess what the last one is? Oh shoot, I got to get all the bands.
I might as well do it, it was on the plan. So here we go, watch. The green band around the feet. I'm tired already. Tired is okay.
Pain is not. Band around the shins. Band around the arms. There's a full throttle. Plank.
It's opposite arm and leg reach. Band around the arms. Don't bend those elbows, but push the elbows, make the triceps engage. Come up to that plank. Ready?
So it's left arm, right leg, and hold. Whoa, and then hold. Whoa. Okay you guys keep doing it. If you make a sound sometimes it helps.
One more time reach. Oh my goodness. Last one, oh my goodness. Take those bands away. (sighs) There's probably millions more little bitchy exercises.
Some of them I've done. One of my clients is going to text me and tell me I forgot some, and that's okay. We'll include them in another class. I'm so glad you made the choice to be here today. I'll see you next time, next week.
Just me and my mat. No props next week. See you then. Bye.
Key Connections: The Power of Props
Mention
 |
Karen Sanzo (Teacher) |
 |
Deborah H |
|
|
Patricia C |
 |
Kelli PHYSIQUE KINETICS |
 |
Jill |
|
|
Karen M |
 |
Marta F |
|
|
Louise D |
 |
Adrian D |
 |
Jill S |
|
|
Milupa |
|
|
Michael Mary S |
 |
Allison O |
|
|
Laurel N |
Comments


You need to be a subscriber to post a comment.
Please Log In or Create an Account to start your free trial.
