Description
About This Video
Transcript
Read Full Transcript
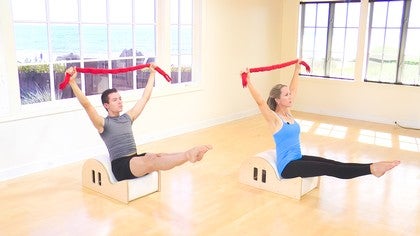
So I'm here with David McMahon. My name is curious. Savan director of Fletcher plotty center national. And um, Dave [inaudible] is going to show a five Fletcher variations on the Cadillac. I'm Ron called the Cadillac the trap table, the trapeze table. And I think he was the one who really coined that phrase. Um, so if you hear a trap table, no, that it comes from Ron flat churn. Um, what we plan to show is how Ron not only taught, um, the work with, with, um, precise precision. So there was a huge attention to detail and the way he taught. Um, and also the, the, the way that the breath and fuses the movement, um, leads to more spinal articulation, um, and maybe more clarity of the intention of the work.
So we'll start with, um, just the simple roll down series. Um, and for each piece of the front we have a mount and that's to prepare the body. So it's not the equipment doing the work to the body, but it's rather the body working with the equipment. Um, so David prepares himself in a standing position. Um, and we'll start with four parallel plays. Inhale, reaching forward. Exhale, lengthening up. And again, inhale, lengthen forward and exhale, pressing up each time, trying to grow a little longer through the spine. Two more times.
And as he presses down, he grows longer through the spine and then maintains that length as he releases. Two more times, press and release. What oftentimes happens with the roll down is that we use the bar instead of working the bar and then a full breath to press the bar down, holding the bar down, and then it's a gentle pulse from here working from the back. So we oftentimes incorporate the pulses and the Fletcher work, and that's just to deepen the awareness of a position. Last one, and then maintaining that engagement from the back. We'll down on four breaths.
The first breath is through the pelvis. Second breath is to roll through the lumbar spine. Third breath is to roll basically to the base of the shoulder blades and the fourth breath, stretching that line all the way out onto the mat and then holding that position again, take a deep breath in and press the bar down to the thighs. Inhale and exhale. Find that connection again. Two more times, working from the bag last one and press down and then lifting the bar halfway up from there.
Again, four breaths to curl up without losing that engagement for the shoulder girdle. So it's the spine and the tour. So doing the work as you can tell, and this is the third breath. The fourth breath takes us into a spine stretch or a full contraction forward. And then again, maintaining this connection, rolling up through the spine all the way a you draws his legs together, pointing the toes, and we'll do the same. Roll down with the legs together.
It's a little more challenging. First breath through the pelvis, opening up the front of the hips. Second breath rolling through the lower back. Third Breath into his upper contraction, and the fourth breath to stretch that line all the way out onto the mat. So we all have a tight spot or two in our bags. And what we want to do is identify where that tight spot is and then work into it deep in that contraction. So take a full breath to curl forward and then take another breath just to deep in that position there. That's his tight spot. You can tell in how back a bit.
So inhale down to the mat. Exhale, fold or, and again, inhale back, shoulders down, and hurl forward two more times. Inhale back deep in that contraction. That's it. Beautiful. One more time. Inhale back and deep and the contraction. And then it's three more breaths to come up. Summing up through here.
Keep working the bar. Curl forward. Keep working the bar and round forward into a spine stretch. Maintaining this connection into the back. Roll up and out of the hips. Lifting all the way up through the crown. One more time.
Full breath to open the hips and roll. Reaching a member's spine. Third Breath. Nice and fourth breath to lengthen all the way out on to the mat. Full breath to find that contraction.
And then just take one more breath to deepen it.
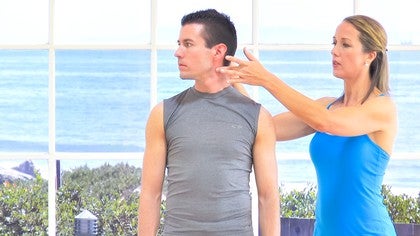
And again, curling forward all the way into his spine. Stretch. And again, engaging the bar to roll up and out of the hips, lifting up, placing the head right on top of the spine. Take a deep breath in and without losing that lift in the body. Release the Bar, lift the arms out, circle the arms behind you, making a contractions. Wiggle off to the side of the Cadillac and come up to a standing position. Lifting the arms laterally, lifting Ah, and then find that length as you press all the way down by your signs. And that is Ron's version of the roll down. This next piece of movement is Ron's version of the short spine stretch on the Cadillac. And I believe that Ron, um, developed this piece. Um, if you see it elsewhere, it's, it's important to know the lineage of where, where pieces of movement come from.
Um, so if you see the short spine stretch, uh, performed this way on the Cadillac, know that it comes from Ron Fletcher. So again, we have a mountain for this piece. David is standing at the end of the Cadillac and again, he'll perform four parallel plays, reaching the arms forward and lengthening up again just to prepare the body, reaching forward and lengthen up two more times and lengthen up. Last time, play and hold the play and contract to place the Sitz bones right at the end of the Mat. And from here he rolls down onto the mat, holding onto the bars, holding on to the role the push through bar, hooking the niece over the bar and placing the arms down by his sides.
So what we want ideally is to gently hold onto the end of the mat to, to establish the opening through the shoulder girdle. Um, this is a deep hip flection, so with, with hip issues or knee issues, probably not inappropriate piece of movement, but it's wonderful for differentiating the spinal movement from the pelvic placement. So in this position, when I'm gonna ask him to do first, just simply place the pelvis, take a deep breath in and as you exhale, think of lengthening your pelvis down onto the mat. Just so he can find that nice deep hip fold or not so nice as the case may be. And again, deep breath in and exhale. Find the fold into the hip. Let's do that two more times. Deep breath in and feel how the breath lengthens the torso down.
One more time. Inhale and exhale my fin it out. Now we'll work a very small pelvic contraction. Take a deep breath in. And as you exhale, curl your hips. Step away from the mat, holding this position again, inhale. And then use your breath to place your pelvis long to the mat. And again, inhale and exhale.
Curl the pelvis away from the Mat. Now there, deep breath in and exhale length in the pelvis out. And try to find the end of the movement. One more time. Inhale and exhale. Curl the pelvis up this time, continuing the movement. Take another breath in. And again, use the breath to heal the spine up away from the mat all the way up. Good. So ideally what we want is to have, um, a straight line from the shoulders all the way up through the knees. So it's a fairly high shoulder stand exactly than keeping the hips open, rolling down, chest through the upper back, sternum to the mat, and then take a second breath to reach the rib case long to the Mat.
And then the third breath again is to place the pelvis all the way out. How does that feel?
Coming all the way up to a high shoulder stand, stretching out the back of the neck, keeping the hips open, rolling down through the sternum and again, rolling down through the ribs. Notice how the breath works, the movement, and then finding that lumbar stretch, reaching the pelvis all the way out onto the mat. Let's do that one more time. Inhale and exhale curl. Ah, so this really emphasizes the whole idea of the spine stretch, working the front of the body to open the back of the body and then from this position, extending the right leg up. Inhale, lengthen and exhale, breath lengthening of working the best is meaty Allis. And then working through the hamstring. And again, extending the right leg up and wrapping a bike around the barn. Last time, lengthening up and then hole from the back of the leg. Notice the pelvic placement rolling down again.
First rolling the sternum away from the chin. Ron, emphasize that length and opening of the throat and it rolling through the ribs. Feel that active stretch. And then a full breath to lengthen the tailbone all the way out onto the mat and plays wonderful stretch. Placed the hands outside the knees. And as you push the bar up, thread the legs under the bar. That's it. And then holding on to the bar. Use the spring to help roll you at placing the fee. [inaudible] and roll all the way up through this. Fine.
And then just roll the shoulders forward and place. And one more time forward. Ah, and like, and that is the short spine stretch on the Cadillac. So the next two pieces are two variations of the Kat. Um, some of it will seem very familiar. Some of it. Um, I think different. Um, the first is Ron's cat and the second is Diane's cat after Diane Severino. Um, so I'll talk through each part of the movement and um, and enjoying. So again, there's a mountain for this piece. Uh, David circles his arms out to the side, places the hands on the mat and then places one needed time on the mat and then he rolls up through the spine, setting the body first, circling the arms from his back and placing the hands on the barn. So we wanna think of there being a connection between the shoulder joint and the joint of the Cadillac. And so let's first just find that connection. Inhale, lift the bar up and exhale, connecting into the back two more times. Again, exaggerating that, lift through the body last time. Inhale, lift and exhale, contract back.
And then from here, maintaining that connection, it's a full breath to contract back away from the bar and a full breast depress pack up to find that beginning position, opening up the hips, lengthening through the spine. Take a deep breath in and a little more emphasis on the connection on the contraction that and a full breath to work the hamstrings, opening the hips and then lightening up to find that beginning position. One more time. Deep breath in and a deep fish in the ballet. That's it. Good. And pressing the hips open to lift all the way up and then finding that deep contraction and then just take a breath too deep in this position.
So the, the cat bronze cat has a real swing quality to it, um, which is what David will show. It's a full breath depress out, hips up and back and again hips up, finding the fold in the hips a little too far forward and contract that and again sits bones up outset and contract back last time and owl and contract back pressing the hips open, lengthening up through the spine. And this transition is a Ron transition. It's a full breath forward to a hinge. Taking that line that you just found, take the pelvis with you, stretch beautiful and find center and then engaging the bar. Find a high release or thoracic extension. Opening the chest to the ceiling and again, lengthen and find center and lengthening forward to the hinge. Take the pelvis with you, dredge that whole sideline of the body and come center and then finding that high release. So lift the sternum up to the ceiling, stretching, working the back, that's it. And come center and then block the knees forward for Diane's cat.
So this piece starts with the elbows wide. The bar is just at the base of the sternum and from here he presses the bar down and he follows the bar with his spine and the body from that extent, from that contraction that flection, he goes into extension, he places the pelvis right over the knees and rolls up and out of the hips. And again, it's full breath to press the bar down, likening all the way out. Just a wonderful stretch for the sides of the body and lifting up out of the hip. And let's do that one more time. No shifting of the pelvis. I know, fold.
Find that length all the way out and curling up.
So this next piece is um, bronze swing series. It was developed for one of his teachers in Tucson, um, Sean White. And it's a wonderful piece for stabilizing the shoulder girdle while contracting and flexing the spine and adding rotation to the movement. Um, and it's just, it's a very difficult piece of the fun. Um, so I would just take it in pieces. If you practice this at home, starting just with this, uh, the, the stabilization piece of it, then add the contractions in the flection and then maybe eventually add the rotation to it. Um, be sure that the shoulders are open, the chest is open, um, and, and take it one piece at a time. So David, we'll start by reaching to the underside of this, of the swing. The hands are together and notice how the swing is facing towards him. And what he'll do is first engage again through the shoulders, pulling the bar down and up and again, pulling the bar down.
And we want to see that opposition through this fine. Two more times. Drawing the bar down and uh, last time, draw the bar down and up and then pulling the bar down, holding it there. That's it. Find a little more lift up through the upper back and then pulse the bar down again, emphasizing that position to set three or more. Lift here and four and release the bar, placing the arms laterally down by the size of the Cadillac. And then just lifting up, pressing down a little higher. V Two more times. Lift and play. Last time, lift and place. And a place the right hand to the underside of the bar that says, turn the bar the other way right there. Good.
And then place the left hand in front. Does that feel okay with the strap there? Good. So from here, we'll engage the shoulders first and then begin rolling down through the lower back and rolling down just to the lumbar spine. Let me back a little bit further. And then holding this position, he releases the left hand of rotates towards the room and then comes back to that starting position. And again, open the chest. Notice how the movement comes from this fine, not the arm and pulls back. Last one, he's trying to stabilize the lower back as he rotates through the thoracic spine. And from here, curling forward, rounding up and over the pelvis and then rolling up to a seated position, releasing the bar, placing the hands laterally and just two lips and lower and uh, and Lauer. And then place the left hand to the underside, placing the right hand in front and then from here, contract and engage the bar rolling down. So we'll show the second version on this side. We won't repeat the first.
Taking a full breath to rotate towards the window. And then from here, take that rotation over to the other side. It's very difficult to make this about the spine and not the shoulder. Often think of wrapping the rib cage around the spine and rotate and again, open to the window, maintaining that connection and to the back and rotate into the room and open to the side one more time. And then coming back to center, placing the hand, curling forward, rounding the spine a little more round through here. Round, round, round, round, round. That's it. And then rolling up out of the hips, release the hands and two lifts up and lower and lift and lower the lifting the arm circle to arms behind you. Make a contraction, drawing the knees together and extend the legs off the side of the machine and come to a standing position. Beautiful. Thank you David.
So the next piece of movement that we will cover today on the Cadillac is called hanging up with twist. It's a version of hanging up. And what's interesting is that the last piece that we covered, um, the Ron swing series was very much about stabilizing the lower back and introducing movement through the thoracic spine. This is more about stabilizing the upper back and introducing more movement through the, through the lumbar spine. So it's a wonderful way to make, um, pilates and this piece of movement more three dimensional, which is something that I think Ron felt, um, was, was lacking in some of the Palati Smith that he felt that it tended to be too linear. Um, this is not a linear piece of movement. So David will take an underhand grip and he draws one leg up and extends out like through to this swing. We're placing the feet right in the center of this swing as opposed to the sides. He draws the other leg up and extends that like through.
And then from here he folds at the hips. So he sent a deep v position. We'll start with the shoulder shrugs, take a deep breath in and exhale, draw the shoulders down your back and again, inhale, relieves and draw the shoulders down your back. And let's do that one more time. Inhale, release. And as you draw the shoulders down, try to pull the ribs in as well as you find everything pulling into center from here. Maintaining this stabilization here. Take a deep breath in and pull your hips back behind. Shoe reaching back.
And again, inhale. So working the hip flexors, lengthening the so as one more time and pull back. And then from here, using the abdominals to curl the lower back and pulling all the way up and find that long plank position. Nice. He draws the right leg in, extends that like up to the ceiling, bends the like and maintaining the stabilization through here and twist the lumbar spine. Oh over to the side, bringing that leg. So it's parallel to the floor. Exactly. Then he increases that twist with the poles in hale acts.
Now that's it. Beautiful. And then full breath to bring the leg back, the hips, back to center. Full breath to extend the leg up to the ceiling. Bend and extend out. Maintaining the work through here. Folding at the hips. I'm sorry.
So let's do the transition. Fold the hips and again, pull back and for liens and pull back and release one more time and pull the hips back. And then from here, use your abdominals to bend your spine. Coming up. You're doing okay. Okay. Draw the left leg and an extended up bend and twist the hips over to the side. Two sets of pulses. Show as set as a full breath, and then pulling the hips back to center.
Extend to like up to the ceiling. Shand and extended like through the swing and again, folding at the hips, coming down and take one leg out and the other and come to a standing position. Nice work. Good. Thank you. And that's that piece of movement.
Pilates Legacy Project: Ron Fletcher Methods

Mention
 |
Kyria Sabin (Teacher) |
 |
Sintha K |
 |
Susan H |
|
|
Vicki R |
|
|
Gena F |
|
|
Julia T |
 |
Donna S |
 |
Corinne M |
Comments


You need to be a subscriber to post a comment.
Please Log In or Create an Account to start your free trial.
