Description
About This Video
Transcript
Read Full Transcript
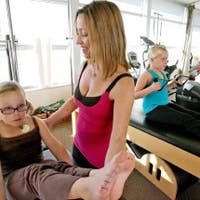
My name is dawn Marie Ikes and this tutorial is designed to give you some modifications for some very traditional PyLadies exercises if you have had or are going to have a total hip or total knee replacement, a k a now they're calling them hip and knee arthroplasties. So what we've done is we've taken the traditional exercises, modified them for some of the challenges you might have postoperatively, but I mentioned practicing these. If you do know that you are having one in the future because preoperative training is really, really important for your neuromuscular system in terms of setting you up for a really speedy recovery. What's happening more and more now in healthcare, and I'm seeing it in my physical therapy practice as well, is there's a huge push towards early discharge. The hospital stays are getting shorter, insurance companies are covering less and less therapy and there's a challenge when we've got these protocols that we want to cover to get our patients back in functional, uh, as quickly as possible, but to also do it within a framework that's appropriate for what they need. So a really great resource is working side by side with apply these instructors.
So for myself as a PT, I don't know what I would do without PyLadies instructors to refer my patients out to and to get people kind of up and running, especially when they don't have good insurance coverage or maybe they're in a plan that doesn't really cover more than one or two postoperative visits. It's also a way to really look at the value that we see in what PyLadies instructors can offer. People that are recovering from surgeries and injuries, and there's a couple, not a whole lot, but it's a growing area of research. There's a couple of really good studies out there looking at utilizing a polities instructor and Polonius instruction as part of the preoperative training and postoperative rehabilitative care. So we're going to show you those exercises and hopefully you're going to be using them preoperatively and postoperative least you can kind of maximize your recovery period. But in any case it just be fun to try them.
If you've had issues with your hips or knees to see if it maybe gives you some different input into your body and into practicing some of these exercises at home. Let's begin. I'll go ahead and move this over here. Thank you. I'm sorry. Did I catch you there? Good. Keep that here. Excellent. Stand here and go ahead and lie all the way back. Damn good. And I'm going to set you up.
Sell that her affect. We're right there. So what I'm doing is I'm giving her a little bit of support with her leg and hip position so that she won't be too pulled forward in a traditional long sitting position. But we can give her some and you'll see as I continue to progress and teach the exercise how it just ever so slightly changes the angle of where her hip is. But also if she were to have had a knee surgery, et Cetera, we could take the baby arc and maybe put a long box up or something else. Um, considering that this is really designed for modifying at home, it's much easier to think in terms of maybe having a couple of phone books stacked on top of each other or something that's really about six to eight inches high. I love the baby arc. Um, and this is not employee for selling equipment.
They do make foam versions of them, but I think are great for at home and I often encourage clients to buy those as well as little props and different things that you can do because the more we're able to do at home, the more it's just going to upgrade or reinforce what you're doing, um, in the studio. So from here you're just going to float your arms up to the ceiling and relax. They're just holding. So this is going to be a very, very standard hundreds that she's going to do, but just in a slightly different position and with the support of the arch. So you're going to inhale to prepare, you're going to exhale and you're going to Tuck the chin slightly, lift the head, neck and shoulders reaching towards there. I want you to press into your feet to activate your hamstrings and go ahead and pump their arms. Breathing. Two, three and out. Two, three, four, five, two, two and out. Two, three, four, five and three, two, three, four, five and out. Four, two, three, four, five and out. Two, three, four, five.
Last one out too. Three, four. Inhale, hold it. Connect in there and exhale, float all the way down and bring the arms. Good. And bring the arms down by your side. There you go. So with the hundreds, traditionally we do 10 repetitions of five breasts in and five breaths out. But you want to get into the habit of practicing a gradual build because postoperatively your endurance might not be as high. It's not going to feel as good.
A couple of other things I want to point out about the positioning for that. So we have the ball between her knees so that she's able to stabilize her position because whether or not it's a hip or a knee replacement, one of the things that we know initially, um, within the first two to four postop weeks is that you don't want a lot of excessive active hip motion in the abduction or abduction plane. This can make it a little bit challenging, but bed mobility, things that you learn in the hospital will help you with getting in and out of this particular position. I am going to guide you through a log roll to come out of the position so that you can see the safest way to be getting up and down from this position. Another thing I'd like to add is if you're doing this at home, it's certainly safer depending on where you are in your postoperative care to be doing this on a versus getting down to the floor and anybody who's had a hip surgery and I have had a hip surgery, so I can speak to this.
We'll tell you the last thing on the planet. They're going to consider doing the first two to three weeks postop is getting down on the floor to do their exercises. So keep in mind that these are modifications, but that you would want to be in that safe environment. So what I'm going to have you do, you're actually going to keep the ball between the knees and I'm going to move this out of the way so your feet are going to come down to the table. Okay? And I'm just going to have you roll like a log onto your right shoulder and your right hip. Good and not off the table. There you go.
And then you're going to actually press yourself up with this arm and bring your feet down as you come up in to that position. And notice she kept the ball between her knees the whole time, so there wouldn't be any excessive motion one way or the other. And that is the modified hundreds for knee and hip arthroplasty. So now we're going to go onto the next exercise, which is single leg circles. This is one that traditionally individuals I've worked with after they've had hip or knee surgeries have been really reluctant to reinitiate.
And in fact it's a really important exercise for trying to restore that hip mobility and that muscle memory that sometimes gets lost or just disconnected after surgery. Uh, doing some of the preoperative training reduces a little bit of that fear about how it's gonna feel and, and how it's gonna translate to the body. But your best case scenario is just to try it, to go through it safely and with caution, but really checking in to see how it feels cause this is a really, really great way to get the wd 40 kind of back and moving in, um, those joints and get circulation, blood flow, lymphatic return, and a lot of other essential pieces when you're dealing with a recovery from any sort of lower extremity surgery. So I'm actually gonna have you log roll to come down so we can do it carefully. Um, keep in mind that your Dr. May have his own set of protocols, precautions, indications, and contraindications and you would certainly want to have a conversation with him about some of these exercises as well as really enlisting a pilates instructor or a physical therapists to be working with you in the initial stages of learning these exercises because you just want to be really, really careful and really safe. And um, what I'm going to have her do is a proper position to transition onto her back if she had had a knee or a hip surgery. So you're going to come down slowly onto your right shoulder and your right hip.
We would assume that the surgery was on her left. You're going to roll onto your back with your knees coming together. And then I'm going to position the baby arc so that if she extends her legs, extend one leg out and the other leg out and let them fall. And I'm just going to remember to bring it up. Oops. The over ball is in their hiding. There we go.
Does that feel pretty good? Okay, good. So I want her to be in a very relaxed position and I want her to have the support of the arc, not overextending that hip, which might prefer to be a little bit more flexed or putting it into too much extension. If she has, say had an approach to her surgery that too much extension would not be good for. So what I'm going to have you do, we're going to pretend this is her surgical hip. I'm gonna have you take your nonsurgical hip and lift your leg up into your chest and you're going to place the theraband on all five toes of this leg. Okay? Yeah. Now what I'm going to have you do is straighten that leg out right next to the other leg, which is going to come up and creep its cute little toes into the theraband and then we're going to take that foot out.
Now she can use the theraband without having to go into too much hip or knee flection. She's now been able to put the theraband on this leg without having to sit forward and flex in a position that she's not supposed to. And now she can gently let the theraband guide her to bring this leg up for single leg circles. One of the nice things with the theraband four single leg circles is you get some really good proprioceptive input of the femur into the Acetabulum in regardless of what the exact nature of the procedure is, you do need that input and you need that reinforcement for the rest of the pelvis and the rest of the body. So this is a really nice way to do that. The other thing that the theraband does, it's really, really nice is as we're doing these single leg circles, she's going to be relying on the theraband to guide the movement instead of actively over-utilizing the inner thigh or the outer thigh muscles.
That's a very important piece in the early stages of recovery. Uh, as I said, there are a handful of protocols out there that you can follow in one, in fact, that was published in 2007 by, I believe it's The New York City hospital bulletin. I think I got that right. Um, that actually looked at using PyLadies protocols that they use. This one in the early stages, mid stages, and through all of it to just retrain and reguide that movement. So what I'm going to have you do is relax your shoulders down. Good. She's going to hold her hand here and she's going to gently allow the allowing that there vantage control.
She's going to inhale as her leg just comes to midline, not across. She's going to exhale as it comes down around and up, one down around in, up too. Good down around. And please note that she is not crossing midline and hold and now we're going to reverse it. So you want to create more of a half moon than a big circle, which you're doing beautifully. So we're going to inhale out ever so slightly. We're going to exhale down and through the center.
One down in through the center too and down and through the center. Three and one more time and four. And now unlike what I would have her do if she hadn't had a hip or a knee surgery, I'd have her bender knee in and take a nice stretch. I just want her to press into the theraband to slowly bring the leg back down and now she can take the on operated leg in and bring it back up. Good. And then take the theraband off. And that is how we would do single leg circles.
Obviously you would want to do it on both sides, but again, following precautions and protocols set by your doctor. But appreciating that mobility and returning that passive range of motion and mobility and then active range of motion and mobility is really, really important. Now that we've done modifications for the hundreds and the single leg circles, we're now going to move on to the side leg series, which becomes a really important component for normalizing gait, improving hip strength, all of those important aspects in issues related to either a knee or a hip procedure of any kind. So what I'm going to have you do is go ahead and ally onto your right side and get, and typically we would have her in the side leg series with um, and why don't I put a ball under your head like there is that kind of Nice, that kind of Nice. Um, typically we would have her in a banana position relative to the Mat, but I'm going to initially just start her in the modified position for this. So with this position, I'm going to have her have the bottom leg bent.
And what's very important with this piece is that she's not bent where her heels are lined up with her Tush, but she's actually bent at a 45 degree angle with her heels angled out this way. The difference if you watch her pelvis would be if we line her up here and then she starts doing this sideline leg series, it changes the position of the bottom hip or the stabilizing hip, which we don't want. So we're actually going to keep the legs a little more extended and it requires more knee flection range. Then we need to be worrying about right now. Is that comfortable on your head? Okay. And I'm going to look here, here, and here. You're gonna go ahead and straighten this leg all the way out there. Welcome right there. Good. So now with this, what we can do is she's got a more stable base down here.
She can work very carefully through inhaling going, go ahead and bring the leg forward just in a small range. Good. And exhale, come straight back towards me and in helping the leg forward and exhale, come back one more time. Inhale, bring the leg forward and exhale, bringing it back. She can hold it there. We're now going to do small circles. So you're going to inhale and exhale and inhale and exhale and inhale and exhale. And one more n hold. And now other direction. You're going to come forward and exhale and exhale and exhale and hold and then bend the knee and bring it back down. So the importance of this modification for either a hip or a knee procedure is creating a more stable base on the underside, but also encouraging the abductor and adductor strength piece for these patients. Again, keeping in mind the protocols and the safety precautions, but the importance of building that strength and endurance over time.
The last piece of this exercise is straight hip, AB and abduction. So I'm going to have you straighten this leg out. Good. And we're just going to lift up just to there towards the ceiling. Nope, there you go. And come down slowly. Okay. And then just come up half that distance. So if the first one was what you would normally do after surgery, the second one, once you're cleared for this amount of range of motion is how you're going to go. You're gonna start at just splitting that distance.
It's about 30 degrees. So if this is 90 degrees and this is 45 this is about 30 that she's coming up to and bring it back down and inhale up and exhale down and last one and down, get bend the knee and rest right on in. So that helped coordinate not only actively the abductors working, but the concentric and east centric coordination between the abductors and the adductors for that motion, which is also very important for patients recovering for any lower extremity surgery. So the last exercise we're going to do is a very simple, very traditional preparatory exercise for PyLadies. I just want to emphasize it for knee and hip postsurgical and issue related stabilization programs. So I'm going to have you go ahead and lie down on your back and all we're going to do that's a little different than this is we're going to place the ball between her knees. Good.
I'm going to take arc up so that she's got a slightly elevated hip position. Go ahead and lift your feet up, placed them back down on here. Good. And then I'm going to take the theraband and I'm going to tie it around her outer thighs.
So if you need to place your hands on the sides of your thighs, squeeze the ball, but then activate the sides of your thighs like you want to press your hands away from them and then all you do is a typical grounding. You're going to inhale to prepare. You're going to exhale and just press into the feet and nothing's going to move. Gently reconnect to the ball as you reconnect to the band. As you narrow the sitz bones ever so slightly, lift the pelvic floor, but don't let your spine move. Draw the navel in, close the ribs, lift the sternum, spread the shoulders apart, reach out of the top of the head and hold it and release.
As you see our body kind of hovered up a little and came down. We'll do one more of these and these are great to practice at home. You can practice them and sitting on your back, any position that you are in that you're comfortable and you can practice these grounding exercises with a ball between your knees and a theraband. On the outsides of your thighs. So inhale to prepare. You're going to exhale PRRS through the feet to activate the hamstrings.
Squeeze the ball, but connect to the theraband. Pelvic floor lifts up navel draws in, ribs connect, lifting the sternum, shoulders wide, reaching out of the top of the head, hold it for five, four, three, two one and release and rest. Good. And that is grounding with co activation of the abductors and adductors. In conclusion of what we've talked about, we've looked at a couple of key exercises in the [inaudible] repertoire with modifications for people that have had a procedure on either their hip or their knees. We've looked at the hundreds, we've looked at single leg circles and the options for that. We've looked at grounding and we've looked at the side leg series.
The biggest and most important thing is to keep in mind that mobility is essential and staying connected to your body regardless of what functional status it has is the most important gift you can give to yourself as you're recovering or dealing with something related to a surgical procedure. Thank you for your time. And again, if you have any questions, please feel free to send them in on the forum and we'll be happy to answer them or address them and we'd love your feedback if these exercises work for you. Great. Thank you.
Comments


You need to be a subscriber to post a comment.
Please Log In or Create an Account to start your free trial.
