Description
About This Video
Transcript
Read Full Transcript
Hi, I'm Daniel Bla debtor. And we're going to take you through how to position yourself on the oof in all of the positions that work, all the planes of the movement of the body. So we're going to first of all start with supine or lying on the move on your back. So the best way to position yourself to get started is your tailbone right on the very end of the UHF. So coming down, almost sitting on the floor, sitting down for me, how to Yep. And the UHF comes up when you're sitting in the right position and slowly coming back, supporting itself a head under your towel.
And we're pretty close to the right position. Now the best way to gauge whether you're in the right position, first of all, is are you comfortable? That's number one. You have to be comfortable. If you're going to do some balance work, put your hands on your lower ribs, elbows on the ground. You're going to take one leg into tabletop and the other leg into table top. Now did you say how high these head lifted up and she's having to work really hard? On the neck. So we're going to move her up.
The move towards a small end and until she finds a place that she doesn't strain her neck and she's really nice and comfortable in tabletop, that's the best way to find the right position for you when you're lying on your back with the [inaudible], taking one leg down and the other leg down. Now when you're doing seated work, the way to position yourself is the lower you go, the easier it is, the higher you go, the harder it is. So to do some role at work, we're going to slide down. So our tailbone is really right on the end of the oomph and that's the position that you would come into a role up. Perfect. You want to be in a position when you're actually sitting up that you're actually not on the ground.
You're still sitting right on the very end of the roof, but you can see how that moves underneath. Heidi, as she's doing that, she's not, she's still off the ground. She's not sitting on the ground. Um, but uh, she's moved definitely down from her normal position lying on her back. Now we're going to do an other seated position, but first of all to get off the roof, we're going to get Heidi to roll onto her side. When you're coming up, take your time coming up. Your head is lower than your hips and so don't rush up. Take your time. For those who have low blood pressure, really take your time coming up. Okay.
From here we're going to move the move back to front. So we're going to do a seated position, which we do in, in roll-ups where Heidi will sit in the saddle. Now again, this works exactly the same way. The lower you, the easier this becomes the high you go, the harder this is. And this is for, um, anyone who wants to actually create more flection in their lumbar spine of Latin, yellow or back. Most are, we're going to get more movement this way and you get more extension through the middle or your thoracic spine and coming back up. So again, sitting in the saddle, you're sitting burns on a the side of the saddle and the lower you go, the easier this is, the higher you go, the harder it is. Okay. We're going to do some sideline now.
So the large end of the youth goes into the small of your side, your hip goes into the saddle and you really want to get yourself nice and comfortable. So when you're lying on your side that you feel really supported with you there. And it's actually not putting any pressure when you're actually having your Oba on the ground. So your shoulder is nice and comfortable and relaxed. Making sure that your really square on to the earth is really important. So you don't want to be leaning back. Now when you're doing some sideline work, especially when you're bringing your upper body up, if you feel anything in your back, it means that you're arching too much.
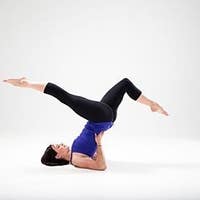
So you bring the bottom hand forward and that's going to help with that. So if you feeling anything in your lower back when you're coming up into these positions, you would bring your lower uhm, around a little bit more and that's going to work you more into your legs. Okay. That's your sideline position, the hip in the saddle, the large end of the year with supporting your, your um, you in through the side. One of the other positions that we do as you become more advanced with the IRV is a nailing or a quarter ped position. We also use the standing, we use it on reformers and Cadillacs, but this is also a great position that we also do in a group class. Now to do this position, you have the Irv Cross ways on your mat.
You place your knee in the saddle or in the middle of the small part of the earth and you place your other knee at the top of the roof. I really like a position where the hands underneath the shoulders, this really lines the body out nicely. You can, you will find that when you're using the, this way you're having to use this hip. That's actually only a lot more to stabilize. So it'll actually up-regulate a lot more of those muscles. And this is very much a great exercise to activate that posterior chain.
So when you're using the move in a kneeling position, the knee goes into the saddle, the other natures goes to the top of the small end of the roof. Now the last position that we do in all the classes is the prone position. And this position is fantastic to actually create some space for your diaphragm and get some really good extension through the middle of the back, not down into the lower back. Now we're just sitting up for me. How do we going to take that over? We turn it upside down. So the base of the move is, this means that when you lie on you, if you're going to compress through there and you can see that the large end comes up, which is going to encourage more extension through the middle of your back.
But it flattens down here, which means it's going to actually relax your lower back. So you again move more through your lower thoracic spine. So lying down onto the earth for me and as you can see, the [inaudible] is shaped that it can sit right underneath your rib cage. You don't want it up here. You're going to sit it down. So this part, the torpedo part of the roof sits underneath your ribs.
So if you're coming down for me, they are hiding and she's going to position herself that that just sits underneath her ribs. Now if you feel anything in your lower back, when you're doing prone extension work, what you need to do is you need to move further up. As you go higher, you'll start to see how these lower back settle down. If you come even a little bit higher for me. Okay, you'll see her hello back settled down. The other position that I really like and I mentioned in the class when we're doing this position is I want everyone's Hales to be hit with the pot and they fade, turned out. This will actually activate more of their glute maids, which is going to stabilize your sacral Iliac joint, which means that you're moving less from your lower back.
And it's all about getting that movement through here, not from down here. So I hope that really helps. Just clarify a little bit of how to position yourself on the earth. Um, there's lots of information also with our movement app if you want any more information. Um, but that really sums up what you need to do. The most important thing is you need to be comfortable. If you're comfortable, you're in the right position, trust what you feel, and that's a really great place to stop.

Comments


We have been using it Australia for 8 years but just launched it in the US last October.


You need to be a subscriber to post a comment.
Please Log In or Create an Account to start your free trial.
