Description
About This Video
Transcript
Read Full Transcript
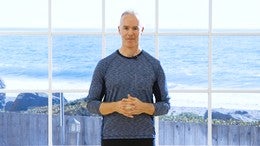
Hi everybody. I'm Tom McCook back here at Pilates Anytime with Veruse and Candace. And our lesson today is on things you can do to affect your gait pattern and understand better how your body relates to gravity. I've been teaching The Franklin Method for the last 15 years. It's one of my greatest influences in how I teach.
And along with Pilates. But also recently I took a course called Anatomy in Motion with the creator a guy named Gary Ward. Who also, he wrote a book called What The Foot? Question mark. That goes into deep detail about what happens in gait and how the brain and the body manage our center of mass inside of our base of support if you think of a circle around your feet.
So we want our brain and our muscles are always working together to keep our center of mass inside of our base of support and our muscles are responding to that. So what we're going to do is we're going to go through some movements of all the joints as a way to give the brain more feedback to what it's designed to do when we're walking. Which is probably the thing we do the most. And how we can enhance our Pilates practice by including some of those ideas and then some ways of stretching that are related to muscles lengthening in relationship to where they would be lengthening in the gait cycle. Super helpful.
And you can think a little differently about stretching. I think you'll find it really useful. So big thanks to Gary Ward and Eric Franklin for their influence on me. And for you, if you ever want to take workshops with them, I highly recommend it. So what we're going to do is first start with just a self-assessment.
So self-assessment we'll stand and have our feet directly under the hip joints or under the sit bone. And just the beginning part would be just to close your eyes and notice how the weight is and let your arms just hang. And just close your eyes and just sense weight on your feet without trying to correct anything. Just notice front to back, left to right, just noticing that. So that's, we're just taking an inventory of how we are weight bearing front to back, left to right.
And what I recommend is just sense that and notice front to back and also notice if you're on one side more or the other. Could be more forward front on one, more back on the other and outside. All those are possibilities. And then when you get a picture looking down at the ceiling at your feet take that snapshot of how your feet are imprinting on the mat and then open your eyes. And then you've got an idea, okay there's what I'm currently doing.
So will that change anything? Yes. That will start to change something but then you want to add in, okay, now I want to start to move all my bones and my muscles so they can start to feel, oh, they've got choices that maybe I haven't explored before. So we're gonna mobilize first in three planes. In the sagittal plane, which is flexion.
This. Head. That's all sagittal. We're gonna do first with the pelvis we're gonna take our hands and visualize here's your pelvis and we're just going to tip the pelvis anterior let it tip forward which means the pubic bone drops down the front. And then tip it back and just sense that when you're doing that, that you're just letting it happen opposed to overmuscling it.
And the tendency will be when you tip it forward is to pull up a little too much on the lower back. So see if you can release that and just notice how you're doing what you're doing. You might notice it's harder to go forward or easier or a little stiffer going back. Now when you go forward notice if you let the weight roll a little more to the inner front of your foot you let the foot do what's called pronation. The two go together.
The anterior tip and the pronation of the feet. And then when you go back, the pelvis tips back. If you go more to your lateral heel, that's more supination, you'll feel the arch lift and you start to feel, oh, there's a relationship between my pelvis tipping anterior, my thighs rolling in, and my feet pronating. And then when I tip back, the feet supinate the thighs roll out a little bit and the sit bone becomes a little narrower. So you start to feel there's a relationship between posterior tipping, supination, anteriorly tipping, and pronation.
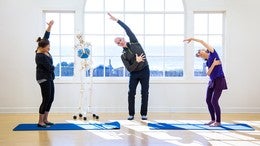
So that's just, now we're gonna work our way up the chain. We'll include the whole rest of the spine. So let the pelvis tip anterior again. Now imagine your pubic bone dropping down as your breastbone lengthens up. All the way up to the top of the breastbone then up the back of the neck because the general rule is the lumbar spine and the thoraxes are doing the same thing at the same time and the neck is doing the opposite.
So from the side it would look like that. Like these guys are doing. And now the reverse would be posteriorly tipping. And the ribs come in so the lumbar can flex. And then the eyes stay on the horizon 'cause the neck is extending.
So when you're walking, your head is countering what you're spine is, what your lumbar and thoraxes are doing to keep your eyes level with the horizon. So then again tip forward and go up. Up the back of the neck. And then posterior, ribs come in. And even touch your front ribs for a moment and notice that you might have room for the lumbar to flex a little bit more.
That's it. And now anteriorly tip go up the front. Now let's add the shoulder grow. Let the shoulders go back and let the arms externally rotate. And now posteriorly tip.
Let the shoulders protract and leave the eyes right up on the horizon. That's it. And do a couple more. Anteriorly tip and I'm gonna give you that feedback. The shoulders come back.
The back of the neck lengthens. And then posteriorly tip. The lumber lengthens. You might notice that might feel a little hard for you. That can be more difficult.
And again in the beginning when you're learning this when you're practicing, you don't want to force it. Just feel what's happening. This will change over time. One more time. Posteriorly tip shoulders come in.
Eyes on the horizon. Then just come back and take a moment to notice that in itself might feel different in your standing. You might feel a little lighter. The weight on the feet might feel a little different just from that. Now we're gonna go into the frontal plane.
Which is this plane. Frontal plane, the first option is to do what's called off-axis 'cause when you walk there's a moment in walking where you shift a part of the gait cycle where you do what's called an off-axis movement. So if I imagine a straight line through my belly button like a skewer and I shifted my hip I've taken the axis with me so that's called off-axis. So what we're gonna do is just laterally glide your hip out to the side. But leave your eyes on the horizon.
And just put your hands on the front of your hips. Your hips stay square to the front so they don't twist, they just glide laterally. So you start to feel how your loading the outer hip muscles and the outer waistline. And then come back and just do that on your other side. Staying level in the front plane or in this plane and feel you're opening the side and you're feeling the waistline muscle might feel more loaded on one side than the other 'cause our bodies are different left to right.
Now shift out there, level the eyes. Now take the same side arm up overhead. Now pull up like you're lengthening this lat tissue. You're reaching. Eyes are still level.
And pull the other arm forward with the palm up. Now keep loading out, up, and forward then take a breath. And then slowly come back and let's do that on the other side. Shift. Open the ribs out.
Eyes are level. Pull the arm up. That's it, feel how you're lengthening and reaching. Eyes are level. Take the downside arm with the palm up and pull it forward.
So now your spine is rotating toward the upside arm it's side bending towards the downside arm. And then slowly come back. So now we're challenging our base of support to feel that the body can go out there. So now the brain can say, oh, I'm not used to going there, that's an option that I can add in to when I walk. Or at least let it happen 'cause when you're walking, it happens relatively quickly.
The whole gait cycle happens in point six to point eight five seconds. So you can't really correct your walking in real time. You can dissect it, then build back into it what's not happening that you want to be happening through understanding it a little bit better. So now let's do what's called on-axis. So now the belly button stays in the middle.
Now as you bend one knee, let the hip lift on the straight leg side. Let the hip still stay, they're not rotating, they're just hiking. And then do that on the second side. Feel that hike. Now let notice as I mentioned before that the lumbar and thoraxes are doing the same thing at the same time.
So right now on the high side, my lumbar spine is side-bending to that side. So is my thoraxes. So let the ribcage come closer to the hip but let the neck do the opposite so the eyes stay level. And then again feel that your own little personal samba. There we go.
And this might feel weird for you or some of your clients when you do this if you're a teacher because this plane can be left out in our movement pattern. Now when you're there, fully straighten the leg on the high side, feel the lateral heel on the big toe. On the other side let the arch come down a little bit. So whenever you're bending your knee your foot is moving towards pronation. And then come back and feel it on the other side.
That's it. And then come back and we'll let that go. So that's plane number two. These are great things to do especially if you've been sitting or right before you do any exercise. Now we're going to add the rotational plane, which is transverse plane.
Typically we don't let our ankles move that much. So I want you to imagine you're going to keep your big toe on the floor, the ball, the little toe, but you're gonna let the ankles move. So, you guys, just roll your ankles in and out for a moment and just notice, oh, my ankles are designed to move. So we're gonna let that happen, but we're gonna keep the two front foot points on the floor. So when you initiate your rotation to your right leave your shoulders relaxed and let the right ankle and left ankle turn to the right.
And let your left knee bend. Now notice that your big toe is staying on the floor but the arch is coming away from the floor and you're opening your right hip to the front and the pelvis is pulling back to the right as a whole. That's it. And then come back. Now take it to your second side.
Let the ankle move. And feel like your big toe is being sucked into the floor, but the ankle is moving. That's it. That feels kinda nice. Now come back to the center.
And what you'll notice the tendency might be when you start is you might tend to do this. Stick your butt out. So you don't want that, you want to feel like you're rotating but you're not tipping your pelvis over the leg, which would be flexing the hip. You're extending the hip. You're opening the front and you're turning and you're fully straightening the leg.
And this is a real key thing that we want to add in that prevents hyperextension of the knee. Really get the hip to pull back. The hip to fully extend. And the foot to supinate. And just do that one more time.
You're just building this back into the body. Or letting it be enhanced. And then come back. And take a moment. Now let's include when you lift your arms overhead.
The first movement we did which was first just lift your arms overhead and just notice how that feels for you. Just notice range, ease, how it is for you, right now. Now let's add in the first movement we did where we let the pelvis tip anterior. Let the pubic drop down. Let the breastbone lengthen up away from the pubic bone up the back of your neck.
Now lift the arms. Notice if it feels any easier. So what we just did is we included what the rest of the body can do to assist shoulder flexion to make shoulder flexion easier. The whole body's moving. So you can include that in your practice.
So if I'm doing a Pilates exercise and my arms go overhead, I can add in that awareness of the spinal change. Which will assist my shoulder mechanics and make it a little easier. And you're eccentrically loading your abdominal wall instead of holding it still with the same length. Something to play with. So let's do a couple things for our hips just to get an experience of how to load the muscles.
So the first thing we're going to start with is the glute. So your glute attaches, so we'll just touch our sit bones everybody. Imagine it goes down to your sit bone but also goes lateral and lower on the thigh and attaches to the IT band and to the lateral thigh bone. Now come all the way back up and touch all the way up to the top back of your pelvis. And imagine it ties into the top back avilia and it's also connected to your lumbar dorsal fascia.
So it ties all the way into the back and to your other thigh and the bottom of your butt. So it's a big muscle. It's a glute? It's a glute. Glute max.
So, it's primary function is hip extension. External rotation. And adduction. But when you walk, you don't walk like this. That be a little weird.
So how do I load it when my foot's on the ground? So we need to load it in a few different planes. So what we're gonna do is start with the first plane by taking your left foot forward just a little bit about six inches or a foot. Now just imagine when you shift forward keep your head over your pelvis. So you're nice and upright.
Bend the front knee a little bit. Now imagine right now you're beginning to load your butt because your hip is flexing. And your glute is starting to lengthen. Now to lengthen it more, we're gonna let the pelvis tip anterior. Let the pubic bone drop down the front.
So you start to feel like you're loading it more. Now keeping as much weight as you can on the front leg, tip the pelvis more over the leg to lengthen that muscle. So it's it's decelerating you. Protecting you. Now it's bringing you back up.
And again shift forward. Anteriorly tip. And then tip over the leg. And now let it bring you all the way back up. That feels kinda nice, huh?
So that's the first plane. That's in this plane. Now we're gonna add, remember I said it's an adductor? And an external rotator. So if it's an adductor we need to adduct and let the hip come up a little bit to lengthen those muscles in this plane.
So what you're going to do is first you'll shift your hips a little forward. Let the pubic bone drop down slightly. Now let the hip hike slightly. Which happens in the gait cycle. And let the knee come a little bit towards the mid-line to adduct.
Now you'll feel a little more of a load on that outer glute. Now tip more over it. Now see that muscle sliding together to level your pelvis and bring you back up. That's kinda nice. And again shift forward.
Let the hip hike slightly. Let the knee come in. Tip over the leg. And come back up. Another key point is, even though your knee is coming in, you're still maintaining your three foot points, ball to big toe, the little toe, and the center of the heel or the heel itself because the foot is changing shape but you're not grabbing with the toes as possible.
Now again we'll shift. Tip. Hike. Now this time we'll add the rotational plane. So as you hinge, reach across with the back arm to add a rotation which puts more of a load on the glute.
Then bring yourself back up. And again, first it's a shift to feel the initial load. Let the hip come up a little bit. We're adding in that frontal plane. Let the knee come in.
Now tip more over the leg and reach across. And come right back up. So that's what I recommend you do for your glutes. You could do, you know anywhere from three, four, to eight on each side just to get a sense, okay I feel that's working. Great thing to do before you come down onto the mat.
Great for peoples lower backs. Now let's do the hamstrings. So for the hamstring, let's just touch the back of our knee and visualize that the hamstring's attached on the outside and the inside of the back of the knee. Come all the way up to the sit bone. So you have attachments in three main muscles.
Semimembranosus, tendinosus, and the bicep femoris. And those three, just run your fingers back up and forth like that for a moment. Primary function is to decelerate you when you hinge but also they bend your leg and they're a hip extensor. So we're gonna use it in a way that we're, what happens when you walk? So when you walk just take your left foot forward.
And have it just a little bit in front of you. And I want you to lift your forefoot off the floor. And do what's called inversion where you lift the arch up more so you start to feel your lateral heel. So that's what we're looking for when we walk in heel strike. That's the shape, that's the optimal way the body should hit the ground when you're walking.
So now when you're there, posteriorly tip your pelvis. Touch your ribs and take your ribs back so you're going into what's called a posterior tip and spinal flexion. Now as you bend your back knee, reach for your foot. And come back up and let the foot come down each time. And again lift the foot.
Posteriorly tip. Flex the lumbar spine and go down. And imagine as you're doing it, the first thing is you're just getting the basic mechanics. But you'll notice the tendency to put a lot of weight on the back leg. So we wanna load this muscle.
We wanna load the hamstring. So again lift the foot. Posteriorly tip. Ribs are now as you go back, try to put as much weight as you can into the front foot. Then you'll feel that muscle being loaded.
That's workin'. And again, foot. Pelvis, ribs. Now exhale into it. Little different than we're used to, we're used to doing it all flat back, but when you walk, your spine flexes in heel strike.
Now we're gonna add because of the where the hamstrings attach and what they do. We're gonna add a rotation of the upper body to hit all of the attachments in the fiber. So first lift the foot. Posteriorly tip. And as you hinge reach for the inside of the foot.
You'll feel that more, maybe a little lateral on the hamstring. And again. Foot, pelvis, ribs. That's it. Do one more.
Foot, pelvis, ribs. Now let's do the outside of the foot. Foot, pelvis, ribs. That's it. And just two more.
Foot, pelvis, ribs. And one more. Foot, pelvis, ribs, shift. And come all the way back up. So we do that on each side.
I tend to teach this before I have people lie down. Now you can do this in your life if you spend a lot of time sitting I recommend do the glute loading first then the hamstring stretch. It be a great idea to add this into your life as a way to just sense, oh, loading muscles. Mobilizing everything first in the way it's designed to happen when I'm relating to gravity and walking. Be super helpful for my life and for my understanding function and adding that into my exercise system.
But also just into your daily life. And if you want more information look up Anatomy in Motion and thank you for being with us today. And you'll see more of this in the classes also. And thank you, guys. Great to be with you.
Thank you.
Comments


Great question.
I think these are a much better option than static stretching prior to exercise. There more in line with how the body decelerates and transfers force. Static stretches can be beneficial for areas of the body that have become very tight and compressed. I would always consider each static stretch a full body exercise to connect the stretch to the entire body and posture to get the most benefit. All the best!
You need to be a subscriber to post a comment.
Please Log In or Create an Account to start your free trial.
