Description
About This Video
Transcript
Read Full Transcript
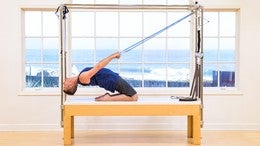
Hi, I'm Benjamin and I'm here with Mary Rogers to take a closer look at the work we do with the legs. Brings on the Cadillac, who doesn't love legs springs, right? Um, I specifically want to take a closer look at options and how to set your body up. One of the things about legs springs is of course that we have to open these springs and push them apart, which means that it pulls us potentially off the Cadillac. So more often than not we use our arms over head for example to hold onto that. And there are often many questions around where the wrist should be, where the thumb should be, how far away from the polls you should be and whatnot. So I just want to start by giving you some options before looking at two different sets of exercises that we often do with our legs springs. Um, so go ahead and lay down on your back with your head towards the lake springs.
The more common option. And I would say maybe the ideal option would be to get your arms all the way overhead against the Poles and distance yourself from the polls, a full arm length away, having your hands as close to the bottom of the pole as possible with all 10 fingers on the outside of the Poles so that your thumbs actually wrap onto the other side as well. And the idea is that you pull the pulse towards one another as well as press your wrists up into them slightly. However, for a lot of people, this shoulder position is not really sustainable and it brings your back into an arch, um, which it almost automatically happens a little bit, right? Um, so I wanna show you some of the other options that we have here. Most obvious one would be to slide the hands up higher and move the body back closer to the Cadillac accordingly. You can go even higher than that just to show that position.
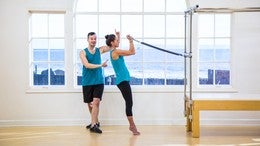
You could move yourself closer to the pose, bend your elbows at this point, what you're going to lose a little bit in sacrifice to a degree is the full arm activation. You will have to also organize your elbows as you move and as spring tension goes in and out. Another variation that is I think not as common that I want to demonstrate actually with the leg springs on is to use the wrap around strap that we often have on the Cadillac, which is often just used to slide the feet under. It can be used as a replacement for what on the original Cadillac was actually a set of straps that was attached to the side of the Cadillac. They're not made that much anymore, so we're just gonna use the strap here.
So Mary, go ahead and hold on to the strap. We want to make sure that it's really nice and tight and that you can actually pull on it. We're going to place the grafts legs springs that we're using today around her feet, one at a time
She has that opposition of the strap to hold it in place and she doesn't have to put her shoulders at risk. Let's take just one more here, pressing out, coming back in and let's go ahead and take the springs off for just a second. So for all the exercises we're about to explore, just know that you have all of these options. Since she has no problem to get her arms all the way overhead, that is the position we will be working in. So go ahead and grab onto the polls, distance yourself. Again, an arm length away. We're going to get the strap out of your way in a second. Go ahead and bend your knees in. Let's place the strap around the feet again.
Now as far as placement goes, I prefer to get the strap as close to the heel as possible to the base of the arch, if you will, so that we don't have to point our feet all that hard to hold onto the strap and your toes can be somewhat relaxed right now before we go into the actual movement that comes with the leg spring series, I want to talk about the purpose of this, which is really to mobilize the hips and to give varied movement to our legs against the tension of the springs. In order for that to be effective, we have to put the whole rest of the body into action. That happens by way of finding the proper arm placement for you first as we just discussed, and if in this position here you have your arm straight, I want you to actually use them to press back and get the base of your rib cage down onto the mat. So think of that as your first order of business arms pushing back for your ribs to deepen down and for your hips to maybe settle into the mat a little bit farther away from the head. It should feel as if your arms are already pushing the top of the spring, this direction against that. Once you have that arms pushing back ribs deepening down hip creases, folding into the mat, you go ahead and press into the spring pass and therefore a second.
So the feeling really is not just pushing your feet into the spring, but pushing the opposite end of the spring with the arms and with the length of the torso as if the spine itself is actually a length thing. The spring out just a little bit more. Now keep pushing with your arms as you slowly bend your knees back in. So it's called legs springs, but it's by far not just leg work. You're using your torso and your center just as much, if not more, especially if you continue doing this, pushing out, coming back in.
So this is our frogs. You press the legs out straight, you bend your knees back in. Really folding in at the hip. Fold at the hip, crease against the arms, pushing back this powerful relationship between the arms pressing back for the hip creases to settle down remains. No matter what leg movement you choose from here, we'll go through a few to bring more varied movement through the hips. Take your legs out straight and hold them there. This time. Go ahead and extend your legs up to vertical without losing that connection of your torso into the mat or the push into your arms. And then go ahead and press your legs away from you and down along the biggest radius possible arms that still push and go down another millimeter more than you think to feel your center.
Begin to turn on and take that range one more time. All the way up and away from the body and down. This is the range for your circles later. Take the legs up one more time as far as you can. Keep your seat on the mat and then down as far as you can.
Keep your ribs on the mat and go ahead and open your legs nice and wide. Circle them up and back together and go through that range a couple of more times. So start to finish from the hips up. The requirement of efforts stays the same as the leg choreography changes. Open and close. Go the other way. Lift them back up open. Circle them away from you and lift. Take one more open, circle it around and lift. Bend your knees and for a moment of rest.
So as I said before, the effort, the energetic effort through the arms, down to the hips remains the same. And what I want you to think of as we go through these basic variations on legs, spring work is that it's not so much about training anyone specific muscle in the legs as much as really mobilizing the hips, keeping the body nice and steady against the dynamically changing spring tension. Pretty much all your leg musculature is working the entire time with a different emphasis. However, our next one goes a little bit deeper into our hamstrings. Go ahead and extend your leg straight up to the ceiling. It's a walking steps we're going to begin than with scissors. However, press one leg down as far as you can possibly get it without your ribs.
Starting to pop off the map and just take a moment here and recalibrate your centeredness by pushing both arms evenly into the Poles because very easily you'll push harder through one arm than the other. At this point, go ahead and extend that leg up. Switch to the other side. Again, take a moment here to make sure you're not rolling onto one side. This way you can clean up you're walking steps which are going to happen next. Go ahead and bring both legs up for a minute and then take both legs into your walking steps. There are tiny scissoring actions. Your goal is to try and keep your hips as steady as possible, meaning there's not a lot of rolling side to side and what you're going to use for that is again your arms pushing back. Let's take one more set down and lifted up.
I'm going to take two more sets with a leg slightly turned out just so that your hips again move in yet a different direction. Take it down. Two, three, four, five, six, seven, eight, nine, 10 and up to three, four, five, six. One more time. Take it down, reaching longer into those springs as the legs lift up and then go ahead and bend your knees all the way in. There's just a couple more variations that we will explore today before adding another little surprise in here. Our next one is the bicycle. Go ahead and extend both legs straight up to the ceiling. Press one leg away from your keeping the legs turned out on this one, bend that knee in and follow through with the other.
We work in a turnout stance here so that the spring can travel along the inside of your leg rather than pushing on top of your knees. So it's just a better choice. Let's take one more round. Really get those hips into the mat still by way of using the arms and the center, go ahead and reverse it. Bending in Prasad, long and low as the other leg is pulled up by the spring three and two and one extend both legs out to about a 45 degree angle and just find your strength and two positions. Again, we're in two directions rather the arms pushing out the legs, pressing the opposite way. Go ahead and into your beats. Open. Close your leg side by side. [inaudible] breathing and pots. After you've done a few, see if you can really freeze your body for a second. Press the legs down a little farther against the arms, dialing up their effort too. And go one more time. Open, close, ten nine, eight, seven, six, five, four, three, two fruits.
Take the legs down and nother notch. Keep pushing those arms back. The springs might be shaking and so do your legs yet. Do another one. Open gloves, 10, nine, eight, seven, six, five, four, three, two and one and done. Bend your knees in towards your chest. Those are pretty much our basic variations on leg spring work. How are you? It's feeling mobilized, warmed up.
Now we'll take this up a notch by bringing the hips up into a hovering position. This is often called the magician, um, where we actually repeat the same exact movements. What we're adding in is this idea that our spine is extending so deeply into the springs by way of arms pushing back by way of our legs, pressing out that the hips can actually stay stable in the air rather than on the mat or the little something like this. Go ahead and bring your knees back in. Push the arms back. Your first step of the ribs deepened down the hips, lengthen down your legs, extend away from the body. At this point it feels like you can't go any farther, but I want you to think that your spine, your tail is lengthening so far towards the heels that the spine and never, we begins to lift up. The feet shouldn't really rise all that much.
Keep the feet opposite of the attachment hole. This position, keep the arms working so that your body isn't nice and long and like magic. She's floating. Begin to roll your spine down first and once you have to land, you bend your knees back in. So think of it as a natural consequence of your extending out in opposite directions so much that your hips just lift up. It feels like a shoulder bridge almost. All right. Arms press back, ribs down, hips down, legs out. So much the hips begin to float up and yeah, once you feel steady in this position, you understand that your hips are now just as supported like they were on the mat. You begin to add your frogs, you press back out. Let's do one more.
Press it out, circle the legs right down, around and up. You can do all the same variations in here while maintaining that strong connection. Your Center. After you reversed it [inaudible] let's do one more. We go into our walking steps. Keep them super small, down two, three, four, five, six up to three, four, five, six or any number of repetitions that you like. Take it up to four, five, six. Hold the legs out and we'll finish up with beats opening, closing the legs, still maintaining that strong center, the arms pushing back, the breath just flowing, right. Take three, two, one and slowly lower the hips back down. Bend your knees back in. And if you have a favorite stretch that you like to do with the straps around your feet, who can maybe hold on to these guys and pull them towards you?
We are done with our legs. Spring two ways. Again, know that for all of these you have the option to position your arms as differently. And these are the two ways that we do them. Support it on the Mat as well as support it up in the air. Like magic.
Comments


You need to be a subscriber to post a comment.
Please Log In or Create an Account to start your free trial.
