Description
About This Video
Transcript
Read Full Transcript
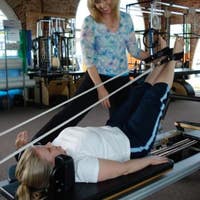
I'm Karen Sanzo and I'm happy to be here at plot is any time offering a tutorial today on light versus heavy Springs. So I'll describe to you when I would use a heavy spring and why or a light spring and why sometimes the Springs challenges in [inaudible]. Sometimes they assist us. I'm first going to use a spring to help assist us and this exercise will happen first with a long box. And I'm going to put the long box on the carriage and I'm going to take this sling here. Have the client sitting on the box.
I have this on one red and one blue spring. My focus in this exercise is to teach the client how to roll back, uh, from their post your or your ribs through their lumbar spine as they curl their sacred mud underneath them. And I'll show you what this looks like here. So please hold this spring right here. I'm going to take the strap here and I'm going to give it a little pull. And then the other one on here. So in this position here with the hips flexed and the knees flex kind of takes the hips out of the equation a little bit so the client isn't tempted to say clench their bottom and kind of grip into the posture. A chill.
I'm a big fan of the breath. I'm a big fan of inhaling and filling yourself up with breath. We say it a lot. The posterior lateral ribs, we say it, but do we often feel it? And so sometimes having this sling here or even a band, the client can feel this so that as you breathe in, fill up these lungs into that belt and then exhale. I may even put my hands on the shoulders so the shoulders don't rise as much, but the ribs expand. It's a feeling. Sometimes we can't always see it, but can you feel the strap giving you some assistance there? Now I'm going to have the client start to tip that pelvis underneath them, but now you'll see she's trying to lean back from here.
I don't want her to lean back from here. I want her to lean back from this belt. So she's going to curl the buttocks. That's it. Almost as if her lowest ribs are pushing the belt back. You're going to hold that right there. Go ahead and take your arms in front of you. Juice up your arms, squeeze your hands together. Good. Now, right here in the free. Here you go.
So feel these front ribs. Almost join these back ribs. So go backwards a smidge. You got it. Hold yourself right there. Relax your shoulders. Good. So again, what we're doing here, there's a red and a blue and I want her to feel like her buttocks is scooping underneath. Not by leaning this part of her back back, but the lower back you can get back. The lower ribs you can get back. The more work you're going to feel. East centric Lee in your abdomen. Take a big inhale there and then exhale.
Bring yourself all the way up. Now the hands come behind the head. The next exercise is spine stretch forward. So in this exercise, we're going to grow up through the crown of the head, right? The bridge of the nose is right here where the hands are on the occiput. That's the the head going back. Not always the chin coming up and down.
So breathe into this inhale and as you exhale spine, stretch your body forward. So I want you to round your spoke. Be careful. Come back up. That was the hip flection. So I don't want her to flex her hip here. I want her to almost push your ribs back to go forward. But she's not pushing so far back like she's leaning back.
There you go. Can you stay there and take a big inhale and as you exhale, can you pull the abdomen in any more to guide the ribs back? Sometimes it's not more core. It's actually more core awareness or more relationship building between this flection connection here and what's happening to the position of the sacrum and the spine. Good. Take one more. Inhale there and then as you exhale, bring this back. First I'm guiding your head because she really wants to lift her head up. There you go. Now you stack, now you stack, and now you stack a very good, nice job.
Take one more big inhale and exhale front ribs to back spine. Stretch forward. Some people can actually do the spine stretch exercise in spinal extension, especially if they get really sheared forward. And an anterior tilt client is pressing down her feet. The feet and the knees are pressing this way, pressing away from you this way.
Belling pulled back that way. Crown of the head, reaching this way. One big oppositional oppositional movement here. One more big inhale. Exhale, unwind yourself. Bringing yourself all the way back up. Nice job.
Take the arms out in front and hold your hands like this as if you are holding the straps. But right now we're going to give the feeling of the flat back with support. So you're going to press your feet. Lean your torso back. So net don't round this time. Lift the chest bone. There you go. Lean back, lean back till you get that quiver.
Hold yourself right there. There you gonna bring your ribs back a little bit. There you go. Now sit right back up in your hips. You got it. And then do that again. That's it. Pull these ribs back. Pull the rows back. There you go. Hold yourself right there and then bring yourself back up. One more time. Tighten your arms, squeeze your fingers, go back, go, go, go, go.
Let's stop. Stay right there. Feel the quiver all the way up through your teeth. Your molars are quivering. Good. And then bring yourself all the way back up. Nice job. You hang on over there. I'm gonna take this off on this side. [inaudible] and then go ahead and step on off.
Take your box off and we'll do it. Similar sitting on the carriage with the legs straight. You'll notice it's going to be a little more challenging. But I think it's important to see that it can be done. Sometimes we'll just say it. Sometimes people, um, who are heavier sometimes feel self conscious about not being able to roll back or roll up. But some of it's not about size, it's about, uh, the awareness that you have in your trunk.
It's the awareness you have where your ribs are. And so we really want to teach that in Palladio who really want to teach an experience. Okay? So we're going to continue with this experience and she's going to give that a pull from her arms. She knows how to use her arms and then come all the way around this way. So now she's not on the box anymore, right? But so yeah. So right here.
So kind of lift up your chest in the front of your body a little bit. Good. Yeah. Actually press down on your hands. That's actually a good idea. It's actually a natural kind of feeling to feel. Press that down a little bit. So now act like your legs are going to go that way and you're gonna pull your abdominals back and roll backwards, whatever you think that is. And then I'll kinda cue yourself around it. Good. Now hold yourself right there.
Now feel how you're kind of hoping you don't fall. Right. Okay. And then sit yourself back up. So I think I'm going to add a red spring on here. So I'm going to pull this back. I'm going to take the blue one off. So now there's two red Springs on and I think lowering you down gave you a different challenge. So again, curl your buttocks underneath you. Good.
Pause right there. The only thing I want you to move back is this band. Okay? It's the only thing I want you to move back. Yes. Yes. Can you feel your belly pulling into help that good focus right here. Tactile input. So important. Yes, we use our hands a lot, but this is really good band. Yes, very good. Now when you curl forward, keep this back, but curl forward from your upper ribs all the way forward.
All the way forward. Reach your hands in front of you towards your toes. There you go. Now can you pull this backwards with your belly? There you go. And then roll back again. Stop. Stop. It's not a sit up tall exercise, right? It's a rolling back exercise.
Roll your pelvis. Nice. Can you hold that right there? Okay. Keep your legs squeezing together. Keep your belly button pulled back and move your arms side to side. Two arms. Go to the right. Two arms. Go to the left. Good. Two arms. Go to the right, two arms, go to the left, center your arms, pause. Give one more curl of your buttocks underneath you yet.
Hold yourself right there, and then sit yourself all the way up. Stretch yourself spine, stretch all the way forward, pulling your ribs back into the loop here, back into this, and then stack yourself all the way up. Very good. Okay, so you grab this side, hang onto that. I'm going to unhook this and bring it around and then come on off of there. Adding the leg loops on. So again, there's two red Springs on, and this is, I'm kind of an interlude. The next exercise having lighter heavy Springs. But what I want you to notice here is pull the straps, making your arm connection. Much like you do, pull your belly in, legs come in last, Sue the feet, arms come down, press the legs out. Let the feet come in, grab your straps, take your feet off, release the straps, pull the straps, put your feet in, press the legs away, bring them back in.
One more time. Feet come out. Why do this? It's important for people to understand that this is actually an exercise and they actually feel this. I mean this is, and again, some people that have different sized bellies and chasse and everything, they feel like everything gets in the way. But go ahead and bend in. Do that one more time. And then last time come on in for us the feet and then arms come down by your side. Press away. So this is a typical spring edge to red Springs. Legs are long. Drop your bottom down, scoop your belly in. Okay, so typical exercise here is legs up from the thighs.
Press down. If the spring in this position were to be really heavy, a client might tend to push from their knees. So one thing you want to be sure of here is you want the client, take your left hand, touch your own thigh here and charge up that thought. There you go. You feel that's different than just resting in your knees. So you might've been resting a little bit. Okay?
If you feel like there's a little hyperextension, you can ask them to bend their knees as smidge. Go ahead and Bago that hole right there and then juice up that leg. Use this hand to so do you set the leg there? You feel that difference? Now keep that juice of that leg. Bring your legs closer. Stop read juice. Press down, stop read juice. Press up.
Make the pressing of your legs smaller but more juicy. Okay, I've never said that before, but that's really what I mean. So I don't want you to just get in a hurry to push the legs down. Relax these toes here. There you go. Really reach your feet long. Good. You got the juice in the legs. Good. Go down and then come up and then one more time down and then one more time up.
Bend the knees into your chest. Let the carriage come in and rest there. Now I'm going to take one of these red Springs off. She's going to press her legs out. It's going to feel like there isn't a spring on it at all. Go ahead and press the legs out.
Do you see how all of a sudden that's a lot lighter, right? So now you're going to hold this ball. Relax your toes. There you go. [inaudible] squeeze the ball. You're going to feel your inner thighs. Okay. But guess what? You need juice every they on fire. She said, just so you know, they're on fire. Hold that quiver. And now press the legs down. Lights, spring, pause. Get long in your torso, please. Get longer. Longer, yes. And then come up five times down with the legs and then up.
It's a very light spring down. And then up. Now I want her to do corkscrew legs. So take your legs to one side, down around. Give a little squeeze to meet up. They stop. Come to me broad shoulders please. Arms long by your side. That's it. Down around. Come up and stop. Now bend your knees into your chest and then press the legs away.
Press and bend. So feels like it's light, but just holding the ball with a really light spring. Makes for juicing up the legs. This is harder. Good. Two more times like this. Good. And then last time, very good. And then I'll take the ball. You take your legs out. I'm sorry. Take your legs out of the straps. That's okay. But let the carriage come in. Leave your knees into your chest.
Leave your knees into your chest. I am now going to put on three red Springs total. She's going to struggle. Pull the arms. Hmm, but she's strong enough to do it. Put the legs in there yet. Go press the legs away. Hold right there. Now hold the ball. Juice the legs.
Get those arms long. Reais you go reach those arms long by your side. Scoop in your belly here. Drop your pelvis down South a little bit. There you go. Now tighten the legs. Press your legs all the way down. [inaudible] keep going. Now pause right there. Relax your toes. Relax your toes. Good. Now squeeze the ball.
Now do you feel more behind your knees or more in your whole thigh? Oh, that whole five. She said whole thigh. Good. And then come straight up and then go down. Now lifted up slowly for three, for two for one. Go down quick. So it's quick down and slow. One, two, three, slow on the East. Centric fast on the con. Centric, heavy spring one, two, three. Last one. Press down, come up slow. One, two, three. Bend the knees all the way into the chest. I'll take the ball. You'd take your legs out of the straps.
Light and heavy Springs. Really important to play with and footwork a little bit. I mean feed and straps a little bit. Okay, so come on up from there. I'm going to raise the head rest. We're going to get ready for our long stretch or a plank position.
This is another area that um, I feel we need to pay attention to because sometimes in group classes, um, you know, there'll be a, a poster up or something that says to red Springs for long stretch or something like that. But we do have to look at the size of the person and how much support they need so they don't have pain or slippage and then work from there. So I'm making a choice. Um, in this instance I have three red Springs on and a, I'm going to have the client come to kneeling on the carriage and as one foot comes in the head rest and she gets ready to take one of your feet to the headrest and bring yourself up to a plank position, trying not to move the carriage and then put your other foot right in there. There you go. Don't move the carriage. Good. So right here it's important legs or juice stuff. Arms are juiced up.
She's chuckling. Spine is happy. And then come down on your knees and restaurant there. Three Springs, not moving the carriage, but creating a successful plank experience. So it doesn't have to be about a sagging back or my arms are weak or my shoulders. A weak plank is a relationship to the front of your body. You got that right? Yes. Okay, so now step off and I really like to teach people early on how to get into that plank position so that you go hand, foot, hand, foot, you know the foot goes here. So you can show me how you can do that. So right hand here. That's it.
Then your right foot chest comes all the way over the bar. Good. And you're not going to move the carriage at all. You're going to hold that. Now from here, I'd like you to take your belly upward and take your butt higher. Good. And then hold that and then take your butt downward. Hold that, take your butt upward, hold that, take your butt downward to hold that, take one leg to the floor and then step off. Nice full quiver, juiced arms and juice legs. So it's important, especially on the long stretch, especially in building a plank that the client feels successful. Uh, sometimes if you get going kind of quickly and you know, clients look around the studio and they kind of see what other people are on and their spring edge or whatever, it may not be the best spring for them, especially in a plank situation. So I always try, uh, before clients enter a class that they understand their spring edge, especially in things like this plank exercise especially they have it for support or for challenge cause we don't want back pain to uh, make them stop their session. Okay. So we need that friend support.
Did you feel support in those? Yeah. Okay, great. Uh, the next one, uh, that we'll do will be the side splits. Okay. So come on around. So before we get on here for the side splits, I'm going to take this gear bar, I'm going to move it back so that I have enough room to take this whole foot bar down because I didn't want anything to be in the way here. When I teach side splits in the very beginning, I load the exercise on purpose with heavy Springs. So I'm going to put one green on here and two reds always have the client stand on the stable. Nope. Nope, Nope. Come over here. Stand on the stable first.
The stable part. First step, all the way up. There you go. Have the feet be relatively close together. Okay. I want the carriage to be tight. I want the client even possibly to not be able to move it so that we can get posturally set up right shoulders or back, bellies in et cetera. We're not looking for perfect posture here.
We're creating a relationship between how the legs are basically gonna abduct and add duct with relationship to the center line of the body. First, put your hands on the back of your bottom right here. Spread your toes to the best of your ability, which means they don't grip. Okay, and then look straight ahead. Pull the bridge of your nose back. There you go. And hold that right there. Attempt to push your carriage apart. It may or may not move. It does move a little bit. Good. Now take your torso back a little bit.
So your your back over the heads of your femur. Her body is right now a little like this because the spring is kinda heavy. I'm going to cue her to take her hips back like there you go. Just like that. So now juice the legs. Put your hands down here. Can you feel the juicing of your legs?
I call it juicing because I want you to feel like the muscles are squeezing. Can you feel that they're squeezing? Do you feel how one leg is doing the push off? That's the right leg and the other one is doing the moving. That's the left. Okay, very good. Okay, so I'm going to keep it on here.
Just to repeat, there's two reds in one green on here. We're gonna change the exercise a little bit. The spring is heavy. I want to create a connection. I want her to con centric. Lee. Press the spring out very quickly. So push out, hold. Close it as slow as you can. One, two, three, quickly out. And one, two, three.
Quickly out. Push. Feel me. Hold your pelvis. Push. Do you see how that's different in the hips? Yeah. And again, push. Good. Now I'm going to take my hands away and you try to do that. Push. You're starting to tilt your pelvis, get weight back, and your heels. Get it back there. Get it back there. Key. There you go.
One more time for success. Come all the way in. Rests right there. Alright, step off of the carriage with your left foot. Step to the floor with your left foot and then step down. I take the time to get the client off to change the Springs. I know for a fact that many of you lean over, change your Springs, do everything like that. Lean down in front of your client.
Tell them to be careful and things like that. Safety first at all costs. We do not need anybody to fall ever. Next exercise is going to take away the green spring. Now there are just two red Springs on there. Okay, stepping on the stable platform first. The spring is lighter. Can you feel how that's lighter? Okay, so now what I'd like you to do is I'm going to spot the carriage and I want you to move your foot out a little bit. [inaudible] little bit further, little bit further, little bit further.
Very good. Now arms out to the side like a tee. You look straight ahead. Pay no attention to the person down here. Okay, now scoop up the belly. Juice up your thighs. Carriage comes out, you hold right there. I'm spotting the carriage. You're going to pull the carriage in from your inner thighs all the way up to your groin. Good. Inhale, go out, relax those toes a little bit. Relax. There you go. Now pull from your thighs and do a Kigo for me. Way up and inside. That's the bottom of your core. Good. We've got three more. Inhale and exhale. You got it. You're doing it. You're on your own now. But I'm here.
All you have to do is say help and I'll help you. We use in clothes and then do that one more time. Press and then squeeze and close. I'll hold the carriage in. You got the carriage. Hold it in there. Fold it in there. Don't move. Hmm. I'll take your hand.
You stepped back with his left leg. Step to the ground and step off. So when you teach somebody for the first time, I mean this client is actually done a, some of these exercises before, but when clients don't know what to anticipate, it's important maybe to give them, you know, gone a little pole, feel the connection, but you want to minimize any hanging on anything. You want to create lateral line connection, especially on the heavier spring for abduction with control coming in. And then the lighter spring is a control con centric. Lee of course, coming in to mid line.
So these are just a few of the, uh, spring edges that I challenge somebody with or facilitate them with a to help them get the feeling, especially when, um, a client might feel self conscious about moving through a class.
Comments


You need to be a subscriber to post a comment.
Please Log In or Create an Account to start your free trial.
